> ## Documentation Index
> Fetch the complete documentation index at: https://docs.blinkops.com/llms.txt
> Use this file to discover all available pages before exploring further.
# Running Workflows
> Monitor your workflows activity using tools in the Blink platform
When creating a Workflow, a *Workflow type* must be selected (On-Demand, Event-Based or Scheduled). Depending on which *Workflows type* is selected, the Workflow has different run methods available. We provide these run methods to enable users to easily integrate with Blink from external systems.
## On-Demand and Scheduled Workflows
Run methods for [On-Demand](/docs/workflows/building-workflows/triggers/on-demand-triggers) and [Scheduled](/docs/workflows/building-workflows/triggers/scheduled-triggers) Workflows include:
Using the User Interface.
The Workflow URL can be copied and used in Postman or another tool. For authentication one needs to add a header (BLINK-API-KEY).
Invoking an HTTP request.
**Note**: The default run method for a [Scheduled Workflows](/docs/workflows/building-workflows/triggers/scheduled-triggers) is the frequency set when creating the workflow.
***
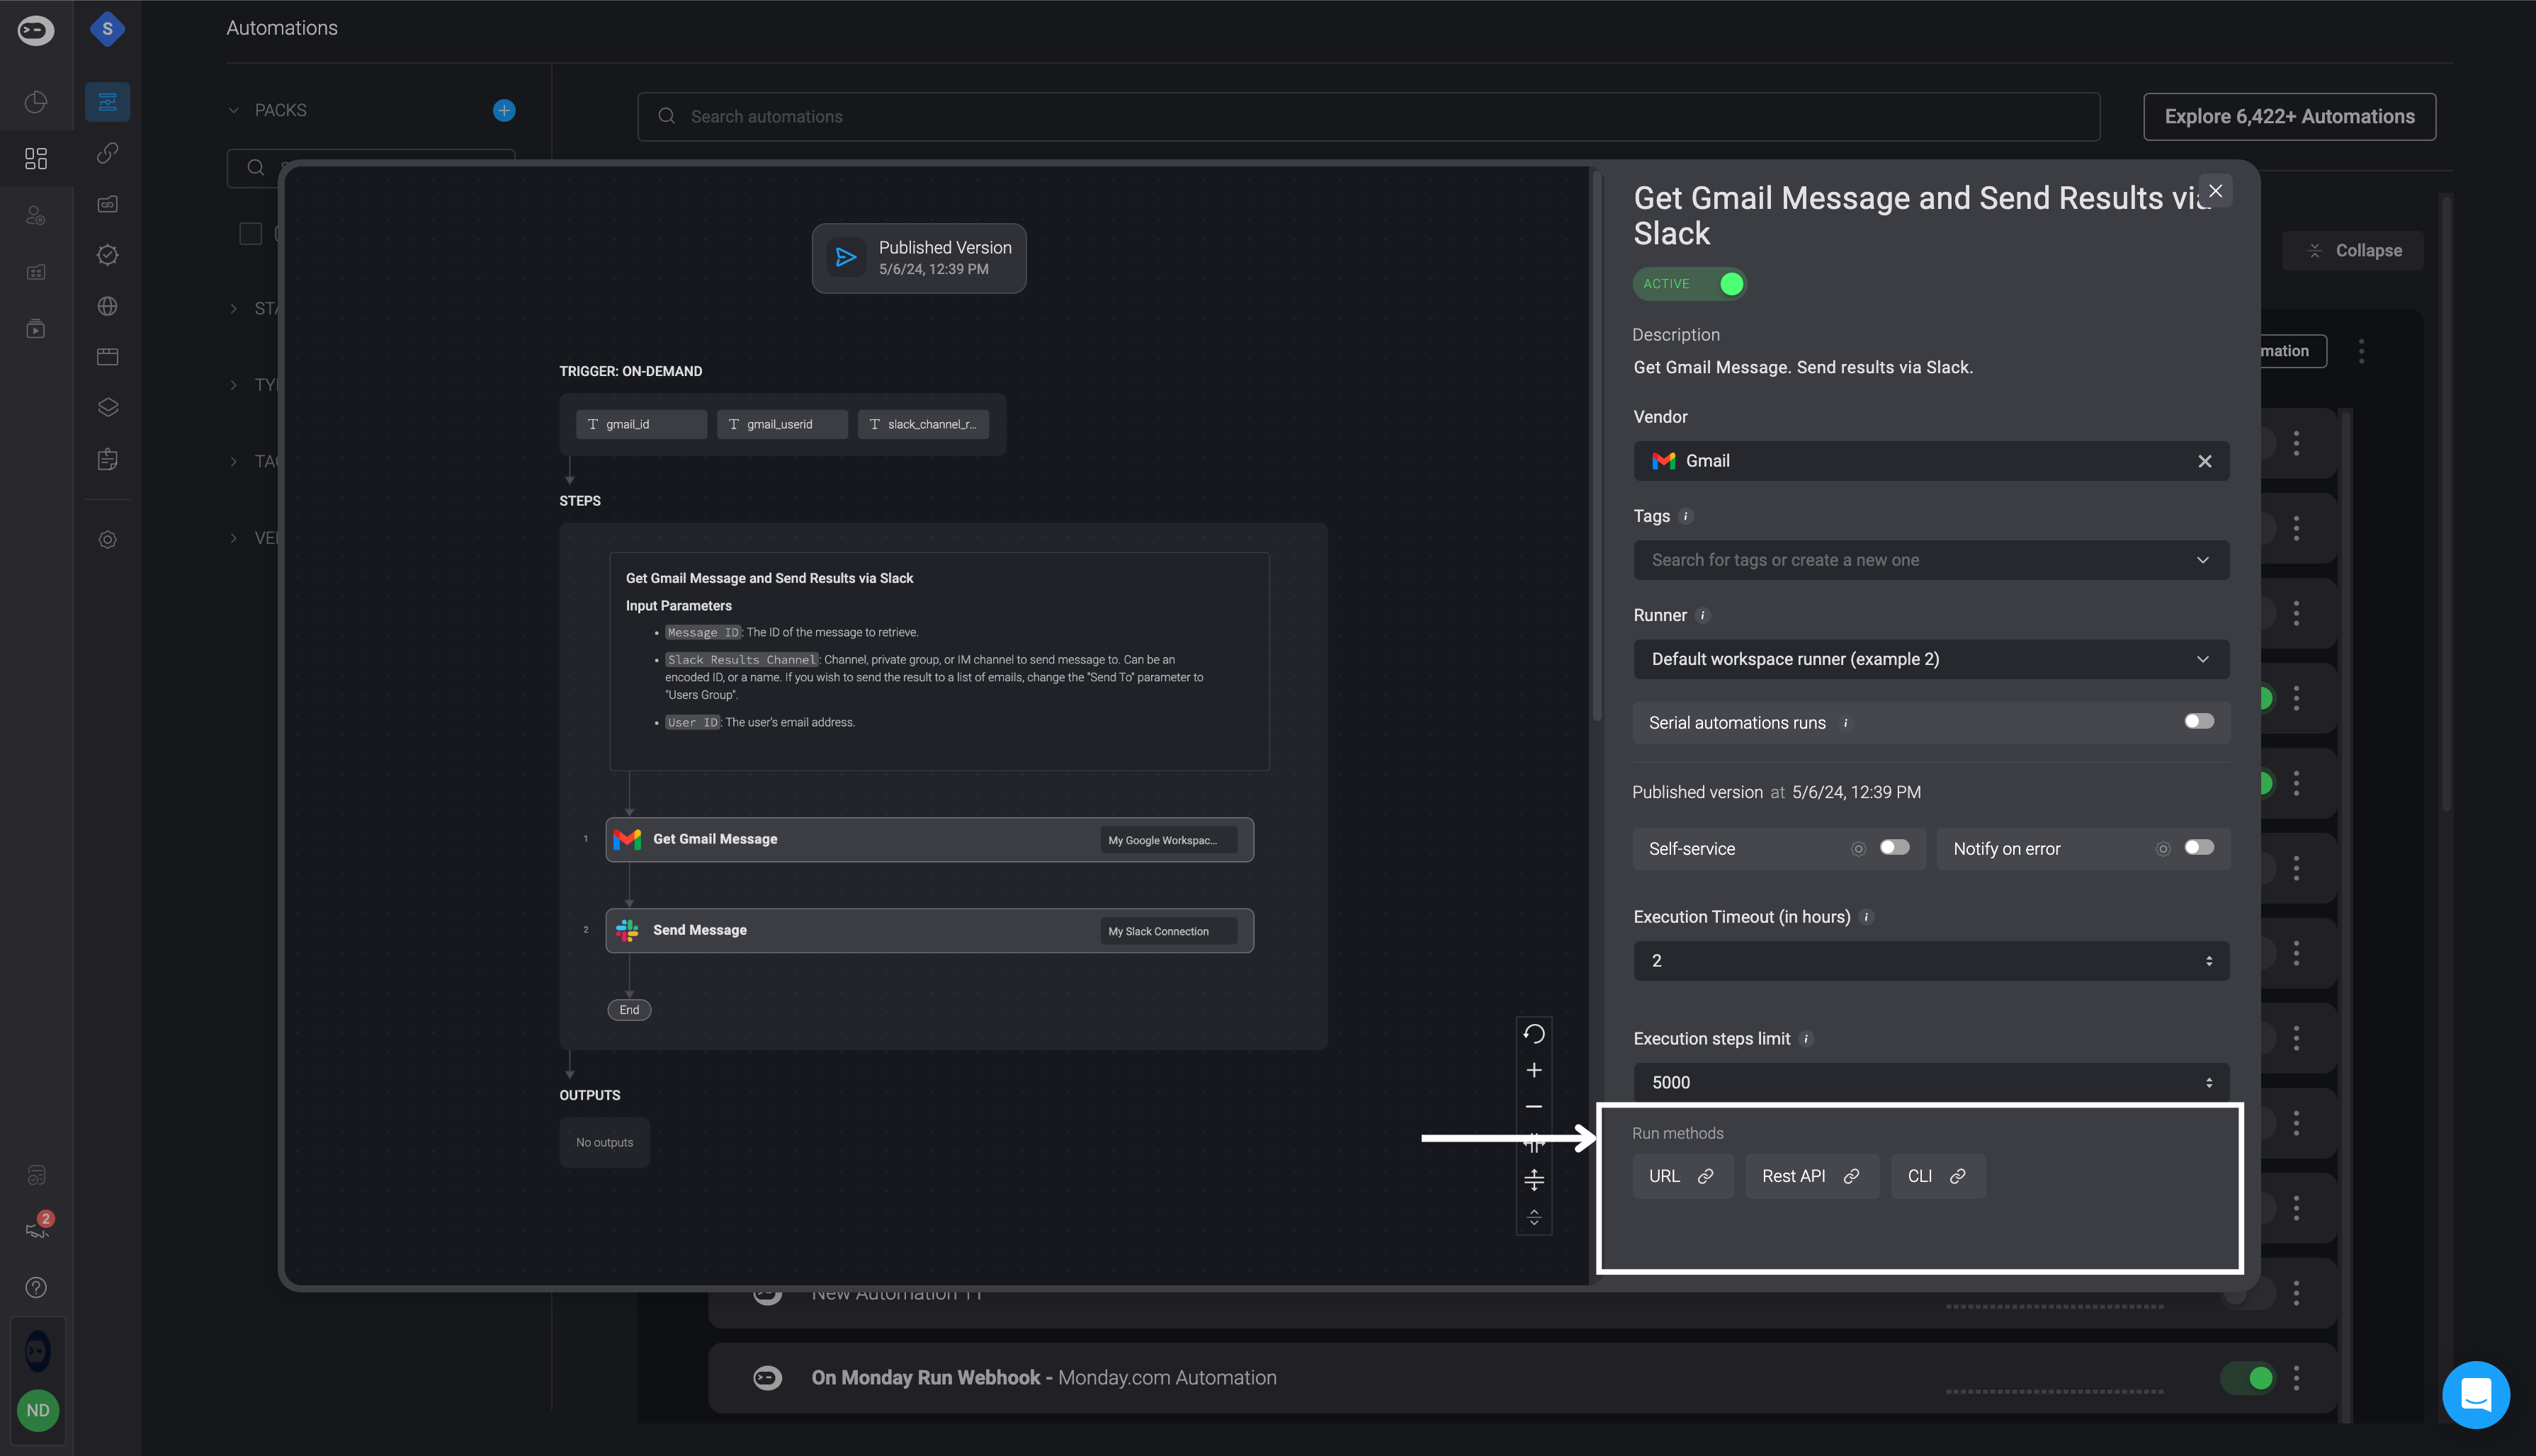
In the [Workflow Overview](/docs/workflows/managing-workflows/workflow-overview-page) page, you can see all the **Run Method** options displayed.
 ***
### Manually Running a Workflow
Hover over the Workflow you want to run.
A blue 'Run' button and a grey 'Overview' button will appear.
If required, you will be prompted to enter input parameters.
Click the "Run" button.
***
### Manually Running a Workflow
Hover over the Workflow you want to run.
A blue 'Run' button and a grey 'Overview' button will appear.
If required, you will be prompted to enter input parameters.
Click the "Run" button.
 ***
### URL
Hover over the Workflow you want to run.
A blue 'Run' button and a grey 'Overview' button will appear. Select the 'Overview' button and navigate to the run methods section of the overview.
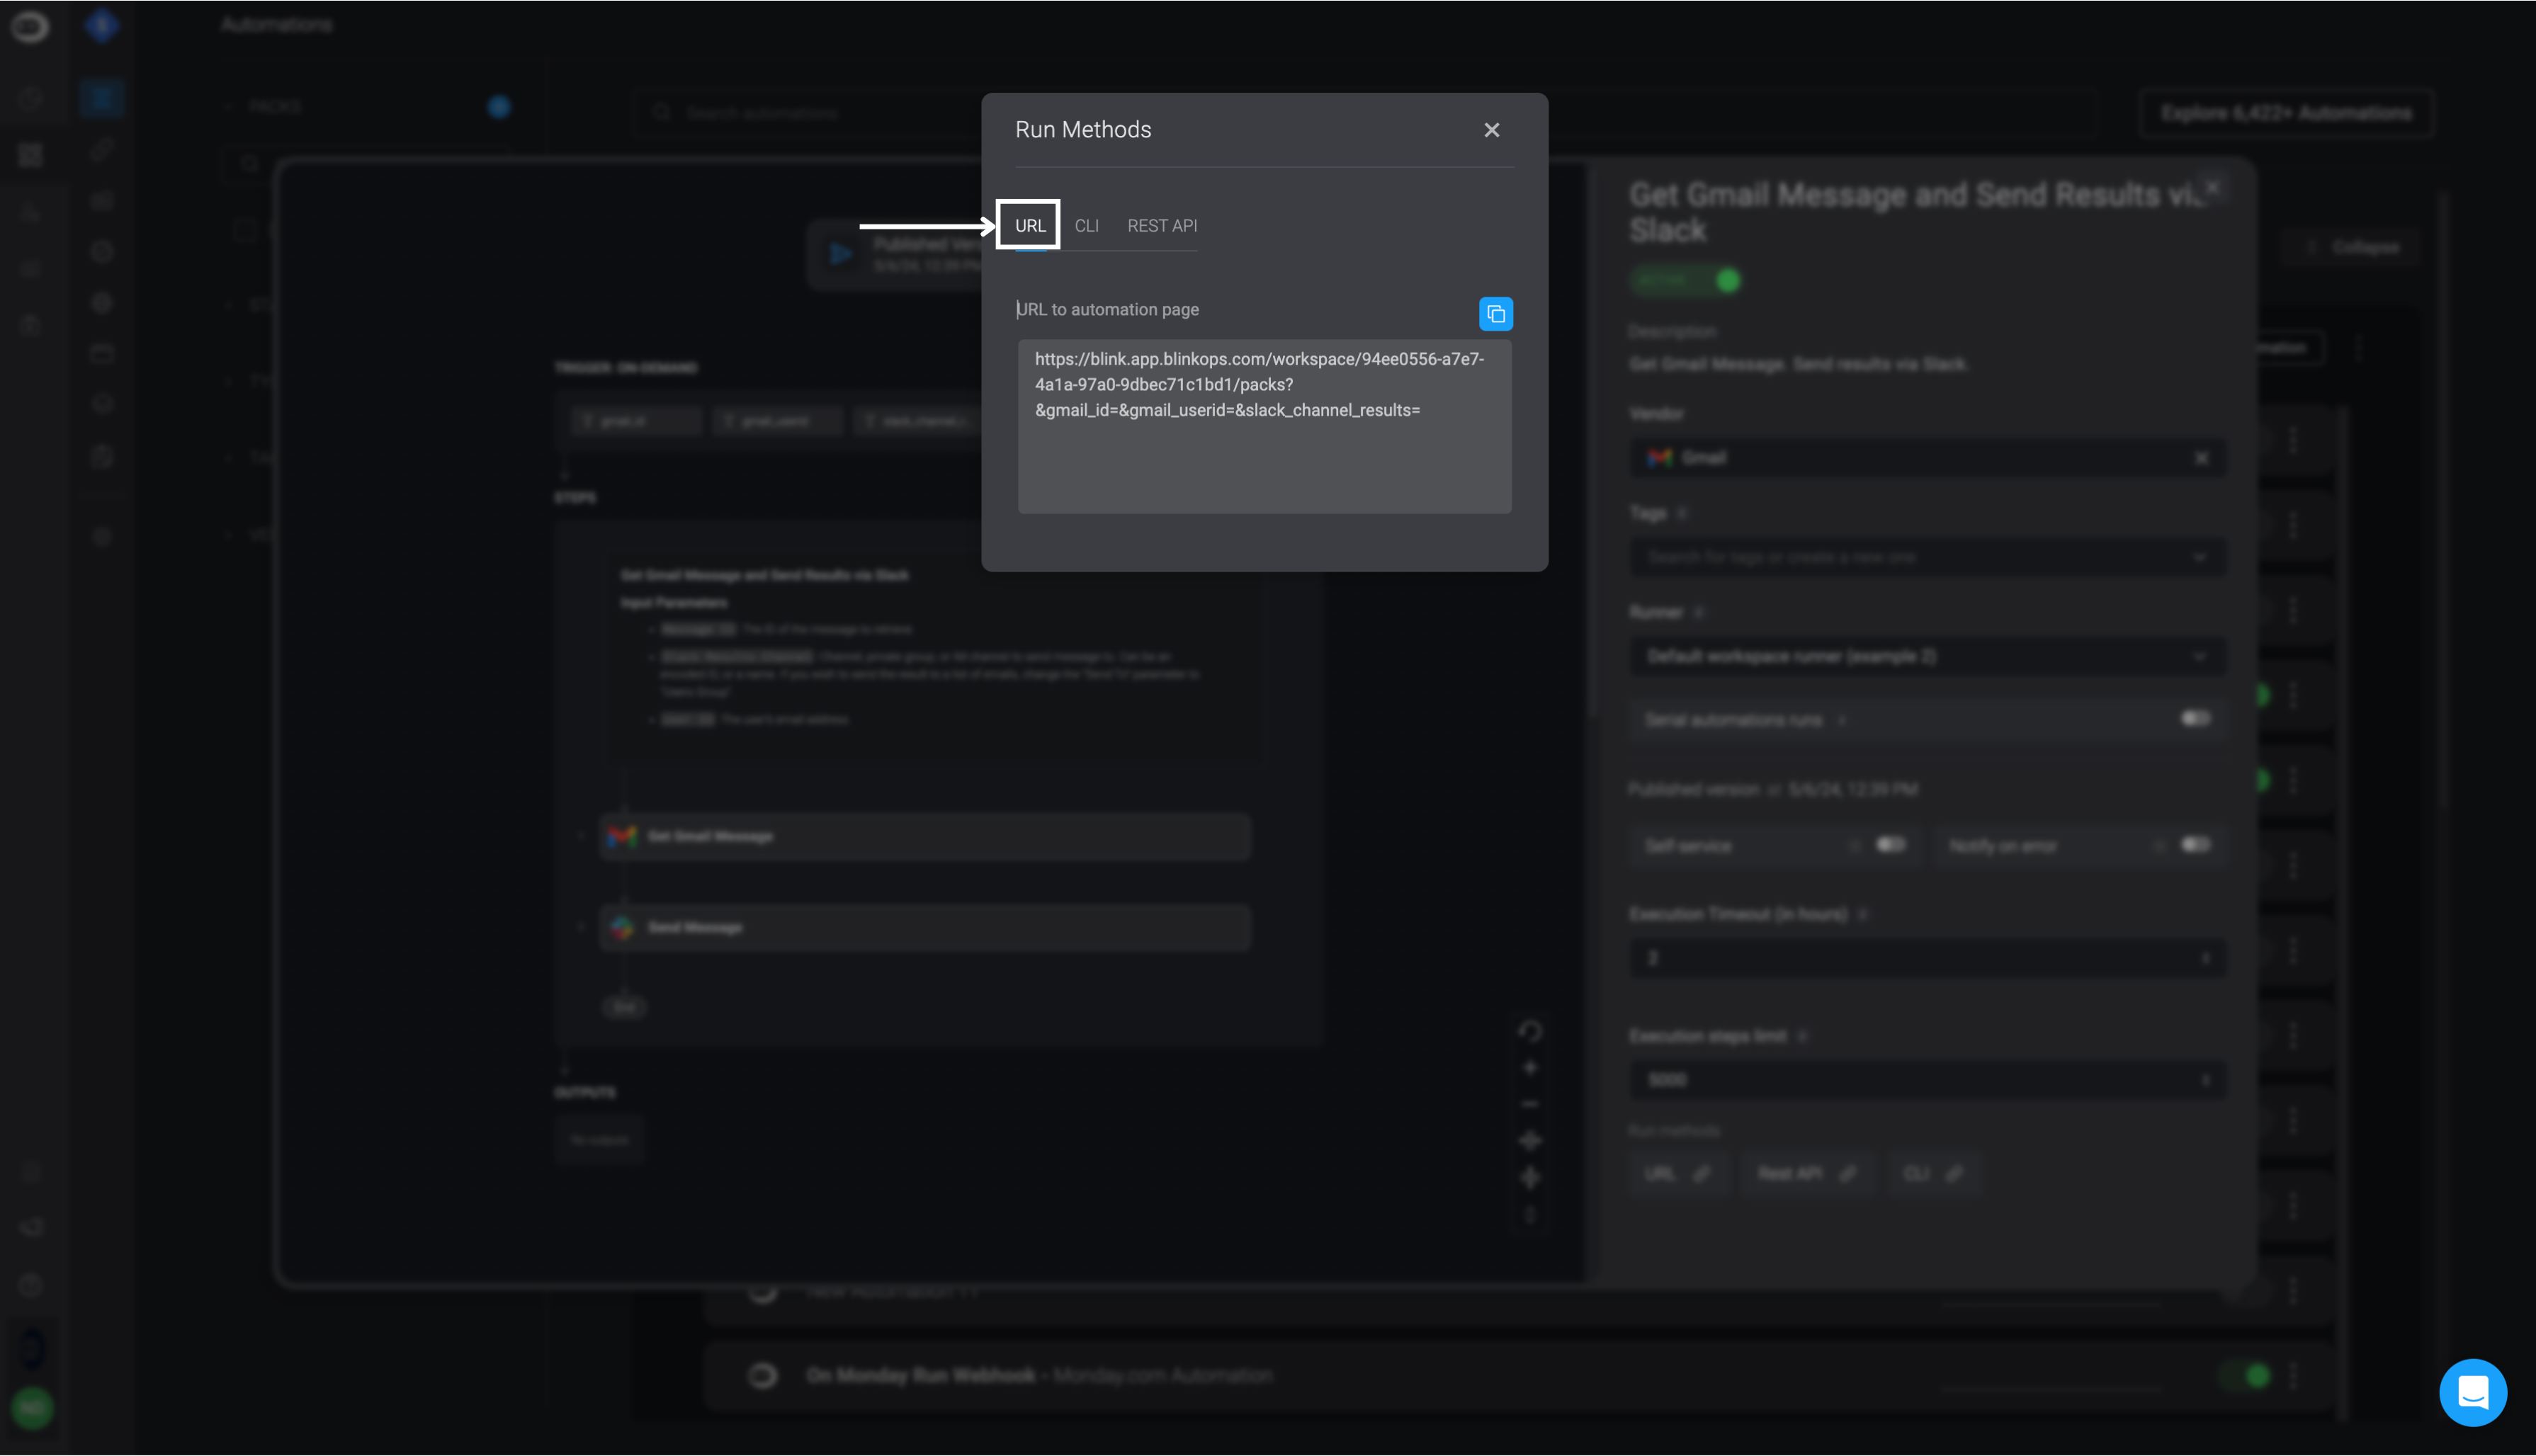
Navigate to the `URL` tab.
Copy and paste the `URL` into the browser address bar. A dialog box will open.
Enter the Workflow's input parameters.
Click 'Run Workflow' to start the workflow's execution.
***
### URL
Hover over the Workflow you want to run.
A blue 'Run' button and a grey 'Overview' button will appear. Select the 'Overview' button and navigate to the run methods section of the overview.
Navigate to the `URL` tab.
Copy and paste the `URL` into the browser address bar. A dialog box will open.
Enter the Workflow's input parameters.
Click 'Run Workflow' to start the workflow's execution.
 ***
### REST API
Running a Workflow using a rest HTTP call. This method can be used to run Workflows from other tools or from the command line using the **cURL utility** like in the following example. The example is using `cURL`, but any utility that can run an HTTP call can be used.
Hover over the Workflow you want to run.
A blue 'Run' button and a grey 'Overview' button will appear. Select the 'Overview' button and navigate to the run methods section of the overview.
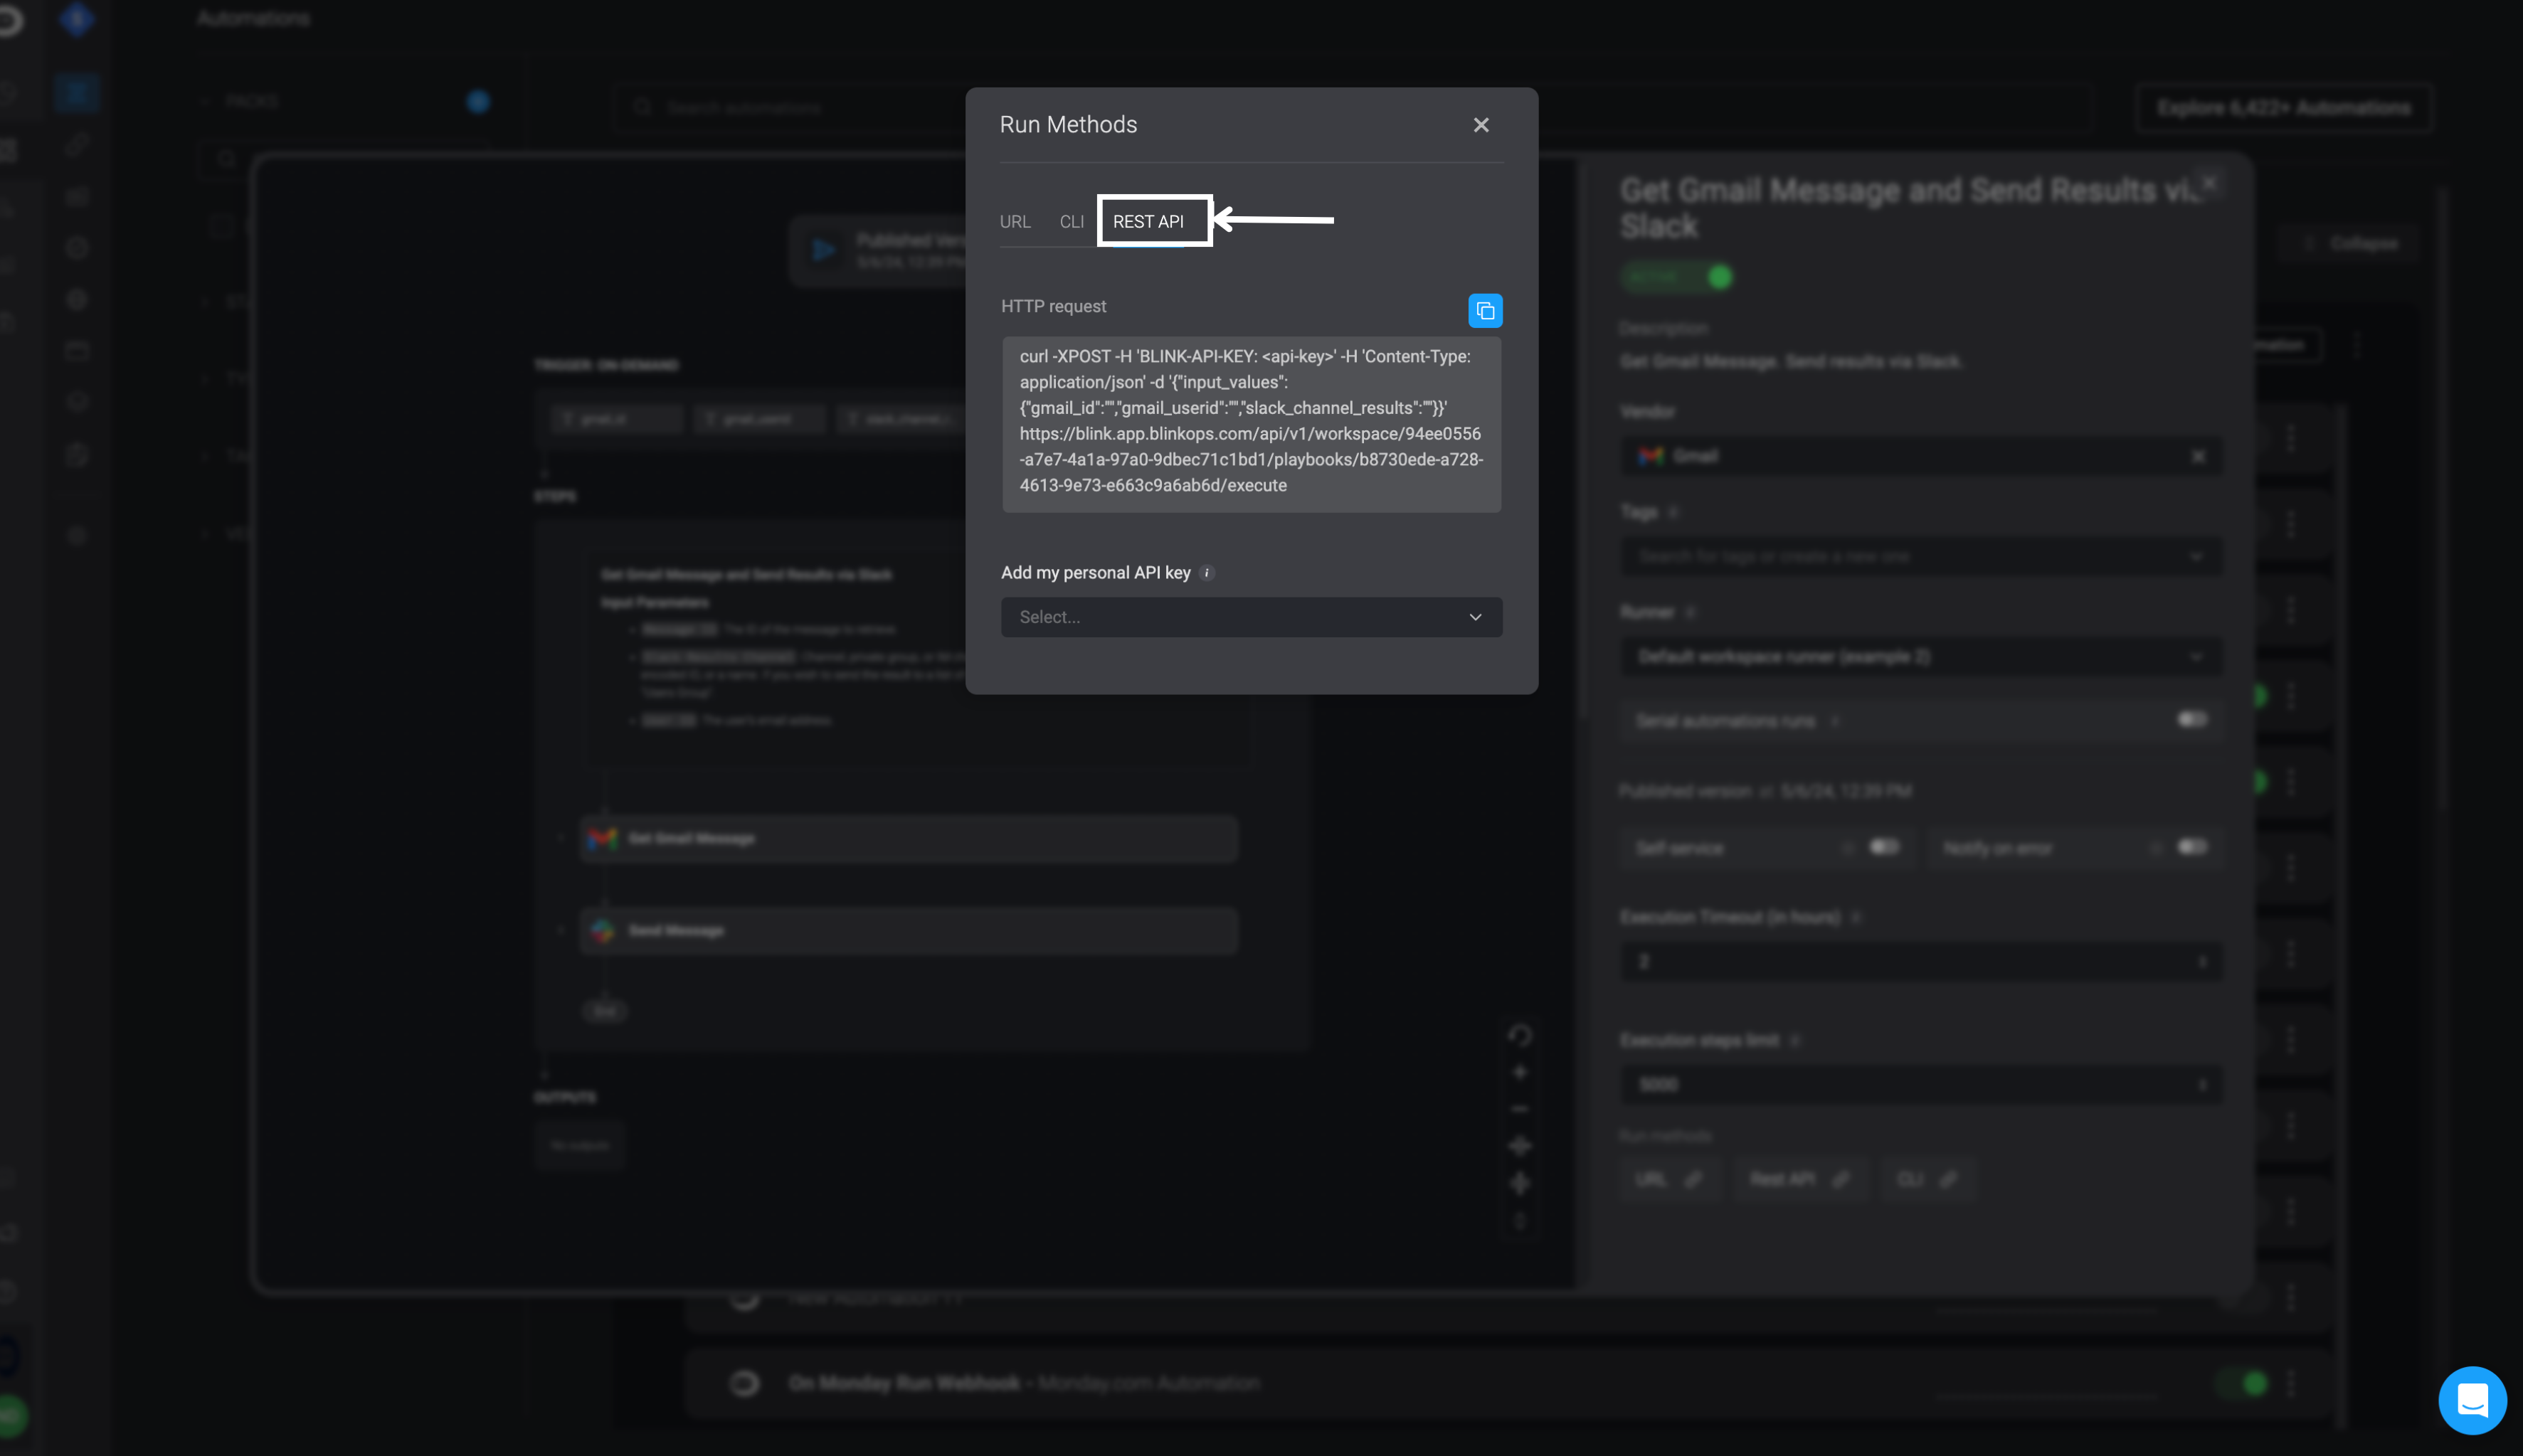
Navigate to the `REST API` tab.
Under the *Add my personal API key* section, choose a personal API Key from the dropdown menu. Your personal API key will automatically be added to the command.
Copy the command and paste it into your CLI and your workflow will run.
```sh theme={"dark"}
curl -XPOST -H 'BLINK-API-KEY: ' -H 'Content-Type: application/json' https://app.blinkops.com/api/v1/workspace/aeb40442-ff12-4071-be15-b0709e59030e/playbooks/f6a68c7f-e585-4f8c-b8b2-f8a82192f4e/execute
```
To supply parameters called x and y to the Workflows execution add the following parameters:
```sh theme={"dark"}
-d '{"x":"y", "a":"b"}'
```
It is possible to execute the Workflows synchronously, and to wait for it to finish by adding `run_sync` parameter and optionally `timeout` parameter. For example:
```sh theme={"dark"}
-d '{"x":"y", "a":"b"}'
```
If the Workflow succeeds, the response will be the output parameters' JSON. If not, it will result in an error.
***
### REST API
Running a Workflow using a rest HTTP call. This method can be used to run Workflows from other tools or from the command line using the **cURL utility** like in the following example. The example is using `cURL`, but any utility that can run an HTTP call can be used.
Hover over the Workflow you want to run.
A blue 'Run' button and a grey 'Overview' button will appear. Select the 'Overview' button and navigate to the run methods section of the overview.
Navigate to the `REST API` tab.
Under the *Add my personal API key* section, choose a personal API Key from the dropdown menu. Your personal API key will automatically be added to the command.
Copy the command and paste it into your CLI and your workflow will run.
```sh theme={"dark"}
curl -XPOST -H 'BLINK-API-KEY: ' -H 'Content-Type: application/json' https://app.blinkops.com/api/v1/workspace/aeb40442-ff12-4071-be15-b0709e59030e/playbooks/f6a68c7f-e585-4f8c-b8b2-f8a82192f4e/execute
```
To supply parameters called x and y to the Workflows execution add the following parameters:
```sh theme={"dark"}
-d '{"x":"y", "a":"b"}'
```
It is possible to execute the Workflows synchronously, and to wait for it to finish by adding `run_sync` parameter and optionally `timeout` parameter. For example:
```sh theme={"dark"}
-d '{"x":"y", "a":"b"}'
```
If the Workflow succeeds, the response will be the output parameters' JSON. If not, it will result in an error.
 ***
## Activity Status
For more information about the execution queue, please navigate [here](/docs/blink-platform/workspaces/monitoring-workspaces#execution-queue)
***
## Running Workflows Steps Asynchronously
When using one workflow within another, known as a [subflow](/docs/workflows/building-workflows/actions/basic-actions/subflow-actions), you have the option to run it asynchronously. Running a subflow asynchronously can improve overall execution speed, as it allows the subflow to run independently of other steps in the main workflow.
For more information, refer to the [Subflow](/docs/workflows/building-workflows/actions/basic-actions/subflow-actions) section of the documentation.
***
## Running Event-based Workflows
Event-based Workflows provide an easy way to execute a workflow when an event happens on an external system. To achieve this, the external system must perform an HTTP POST to the [custom webhook's](/docs/workflows/building-workflows/triggers/event-based-triggers/webhooks) URL. Meanwhile, other Event-Based Workflows function by periodically polling the external system to check for new events.
***
### Custom Syslog
Custom Syslog offers real-time event triggering in the Blink system when a Syslog event occurs, by receiving events from an external Syslog client provider.
Custom Syslog is a service which converts Syslog messages into webhooks and activates the webhook with the content of the Syslog message as the payload.
Custom Syslog performs the conversion of Syslog messages to webhooks in the following way:
* Standard Syslog Message (before conversion):
```
<30>Jul 20 10:00:00 app-server-01 kernel: Out of memory: Kill process 12345 (app) score 678 and restart
```
* Converted Syslog Message (after being processed by the Custom Syslog service):
```json theme={"dark"}
{
"timestamp": "Jul 20 10:00:00",
"hostname": "app-server-01",
"source": "kernel",
"message": "Out of memory: Kill process 12345 (app) score 678 and restart"
}
```
When creating a new Workflow, choose **Event-based** > **Custom Webhook**. You will see the **Webhook URL**, which you will use in the **docker run** command later on.
Copy the Webhook URL from the Event-Based Workflow you created and paste it in the following **docker run** command:
```jsx theme={"dark"}
docker run -d --name blink-syslog -p 514:514/udp -p 514:514/tcp -e WEBHOOK_URL= --restart unless-stopped blinkops/blink-syslog:1.0.224
```
Deploy the Syslog Docker container on any infrastructure of your choice and run the docker command specified above. This could be on-premises hardware, cloud-based virtual machines, or managed services like Amazon ECS or Google Kubernetes Engine.
Ensure that the Syslog Docker container is exposed to the Syslog client. Make sure the necessary ports (UDP and TCP 514) are open to receive messages.
Configure your Syslog client to send messages to the IP address of the machine where the Syslog Docker container is deployed.
Once the Docker container is running and the Syslog client is configured, the Docker container will start receiving Syslog events. Each received Syslog event will trigger the associated workflow.
***
### Azure EventHub
Blink Azure EventHub offers real-time event triggering in the Blink system when an Azure EventHub event is ingested.
Blink Azure EventHub is a service which converts Azure EventHub events into webhooks and activates the webhook with the content of the event data as the payload.
To enable real-time event triggering in the Blink system using **Azure EventHub**, follow these steps:
When creating a new workflow, choose **Event-based** > **Custom Webhook**. You will see the **Webhook URL** and **API Key**, which you will use in the **docker run** command later on.
Copy the **Webhook URL** and the **API Key** from the event-based automation you created. To create your full webhook URL, combine them as follows:\
`your_webhook_url = ?apikey=`
To acquire your 'EventHub Connection String':
* Log in to the Azure portal.
* In the EventHub menu, select the EventHub you want to use.
* Under 'Settings', click on 'Shared access policies'.
* Create a new SAS policy and select the 'Listen' permission.
* Copy the 'Connection string–primary key' from the new SAS policy.
To acquire your 'Blob Connection String' and 'Blob Name':
* Log in to the Azure portal.
* In the Storage Accounts menu, select the account you want to use.
* Under 'Security + Networking', click on Access Keys' and copy one of the 'Connection Strings'.
* Under 'Data Storage', click on 'Containers' and create a new container with the 'Blob Name' you want to use.
Paste your credentials into the following **docker run** command:
```jsx theme={"dark"}
docker run -d --name blink-azure-eventhub -e "WEBHOOK_URL=" -e "EVENTHUB_CONNECTION_STRING=" -e "BLOB_CONNECTION_STRING=" -e "BLOB_NAME=" blinkops/blink-azure-eventhub:1.241205-15
```
Deploy the Azure EventHub Docker container on any infrastructure of your choice and run the docker command above. This could be on-premises hardware, cloud-based virtual machines, or managed container services like Amazon ECS or Google Kubernetes Engine.
Ensure that your Azure EventHub container has access to make and receive `HTTPS` requests.
Once the Docker container is running, the Docker container will start listening for Azure EventHub events. Each received event will trigger the associated automation.
An example of the data that the automation will trigger on:
```json theme={"dark"}
{
"Body": "eyJEYXRhIjogIk15IERhdGEifQ==",
"ContentType": "application/json",
"CorrelationID": "23:16:08",
"MessageID": "b43d80eb-deea-4cab-bcd5-e78e62fe4fef",
"Properties": {
"MyNumber": 123,
"MyProperty": "MyValue"
}
}
```
***
### Polling: Events Occurring on an External Service Provider
There are no manual run methods available from the Blink platform for this type of Workflow. Instead, the Workflow is automatically triggered when the [polling mechanism](/docs/workflows/building-workflows/triggers/event-based-triggers/event-based-triggers#about-polling) detects new events from the external system.
When creating a new Workflow, select 'Event-based' and then choose a relevant event from the list.
The **run methods** section will display the polling frequency or condition defined by the event trigger.
***
***
## Activity Status
For more information about the execution queue, please navigate [here](/docs/blink-platform/workspaces/monitoring-workspaces#execution-queue)
***
## Running Workflows Steps Asynchronously
When using one workflow within another, known as a [subflow](/docs/workflows/building-workflows/actions/basic-actions/subflow-actions), you have the option to run it asynchronously. Running a subflow asynchronously can improve overall execution speed, as it allows the subflow to run independently of other steps in the main workflow.
For more information, refer to the [Subflow](/docs/workflows/building-workflows/actions/basic-actions/subflow-actions) section of the documentation.
***
## Running Event-based Workflows
Event-based Workflows provide an easy way to execute a workflow when an event happens on an external system. To achieve this, the external system must perform an HTTP POST to the [custom webhook's](/docs/workflows/building-workflows/triggers/event-based-triggers/webhooks) URL. Meanwhile, other Event-Based Workflows function by periodically polling the external system to check for new events.
***
### Custom Syslog
Custom Syslog offers real-time event triggering in the Blink system when a Syslog event occurs, by receiving events from an external Syslog client provider.
Custom Syslog is a service which converts Syslog messages into webhooks and activates the webhook with the content of the Syslog message as the payload.
Custom Syslog performs the conversion of Syslog messages to webhooks in the following way:
* Standard Syslog Message (before conversion):
```
<30>Jul 20 10:00:00 app-server-01 kernel: Out of memory: Kill process 12345 (app) score 678 and restart
```
* Converted Syslog Message (after being processed by the Custom Syslog service):
```json theme={"dark"}
{
"timestamp": "Jul 20 10:00:00",
"hostname": "app-server-01",
"source": "kernel",
"message": "Out of memory: Kill process 12345 (app) score 678 and restart"
}
```
When creating a new Workflow, choose **Event-based** > **Custom Webhook**. You will see the **Webhook URL**, which you will use in the **docker run** command later on.
Copy the Webhook URL from the Event-Based Workflow you created and paste it in the following **docker run** command:
```jsx theme={"dark"}
docker run -d --name blink-syslog -p 514:514/udp -p 514:514/tcp -e WEBHOOK_URL= --restart unless-stopped blinkops/blink-syslog:1.0.224
```
Deploy the Syslog Docker container on any infrastructure of your choice and run the docker command specified above. This could be on-premises hardware, cloud-based virtual machines, or managed services like Amazon ECS or Google Kubernetes Engine.
Ensure that the Syslog Docker container is exposed to the Syslog client. Make sure the necessary ports (UDP and TCP 514) are open to receive messages.
Configure your Syslog client to send messages to the IP address of the machine where the Syslog Docker container is deployed.
Once the Docker container is running and the Syslog client is configured, the Docker container will start receiving Syslog events. Each received Syslog event will trigger the associated workflow.
***
### Azure EventHub
Blink Azure EventHub offers real-time event triggering in the Blink system when an Azure EventHub event is ingested.
Blink Azure EventHub is a service which converts Azure EventHub events into webhooks and activates the webhook with the content of the event data as the payload.
To enable real-time event triggering in the Blink system using **Azure EventHub**, follow these steps:
When creating a new workflow, choose **Event-based** > **Custom Webhook**. You will see the **Webhook URL** and **API Key**, which you will use in the **docker run** command later on.
Copy the **Webhook URL** and the **API Key** from the event-based automation you created. To create your full webhook URL, combine them as follows:\
`your_webhook_url = ?apikey=`
To acquire your 'EventHub Connection String':
* Log in to the Azure portal.
* In the EventHub menu, select the EventHub you want to use.
* Under 'Settings', click on 'Shared access policies'.
* Create a new SAS policy and select the 'Listen' permission.
* Copy the 'Connection string–primary key' from the new SAS policy.
To acquire your 'Blob Connection String' and 'Blob Name':
* Log in to the Azure portal.
* In the Storage Accounts menu, select the account you want to use.
* Under 'Security + Networking', click on Access Keys' and copy one of the 'Connection Strings'.
* Under 'Data Storage', click on 'Containers' and create a new container with the 'Blob Name' you want to use.
Paste your credentials into the following **docker run** command:
```jsx theme={"dark"}
docker run -d --name blink-azure-eventhub -e "WEBHOOK_URL=" -e "EVENTHUB_CONNECTION_STRING=" -e "BLOB_CONNECTION_STRING=" -e "BLOB_NAME=" blinkops/blink-azure-eventhub:1.241205-15
```
Deploy the Azure EventHub Docker container on any infrastructure of your choice and run the docker command above. This could be on-premises hardware, cloud-based virtual machines, or managed container services like Amazon ECS or Google Kubernetes Engine.
Ensure that your Azure EventHub container has access to make and receive `HTTPS` requests.
Once the Docker container is running, the Docker container will start listening for Azure EventHub events. Each received event will trigger the associated automation.
An example of the data that the automation will trigger on:
```json theme={"dark"}
{
"Body": "eyJEYXRhIjogIk15IERhdGEifQ==",
"ContentType": "application/json",
"CorrelationID": "23:16:08",
"MessageID": "b43d80eb-deea-4cab-bcd5-e78e62fe4fef",
"Properties": {
"MyNumber": 123,
"MyProperty": "MyValue"
}
}
```
***
### Polling: Events Occurring on an External Service Provider
There are no manual run methods available from the Blink platform for this type of Workflow. Instead, the Workflow is automatically triggered when the [polling mechanism](/docs/workflows/building-workflows/triggers/event-based-triggers/event-based-triggers#about-polling) detects new events from the external system.
When creating a new Workflow, select 'Event-based' and then choose a relevant event from the list.
The **run methods** section will display the polling frequency or condition defined by the event trigger.
***