> ## Documentation Index
> Fetch the complete documentation index at: https://docs.blinkops.com/llms.txt
> Use this file to discover all available pages before exploring further.
# Input Parameters
> Define input parameters that users provide when manually triggering a Blink workflow.
On-demand workflows can use **user-input parameters** to allow dynamic use of relevant values during execution. By defining these parameters, users can tailor workflows to specific needs without altering the workflow logic. Input parameters in on-demand workflows are always provided at runtime, enabling flexible and adaptable execution for various scenarios.
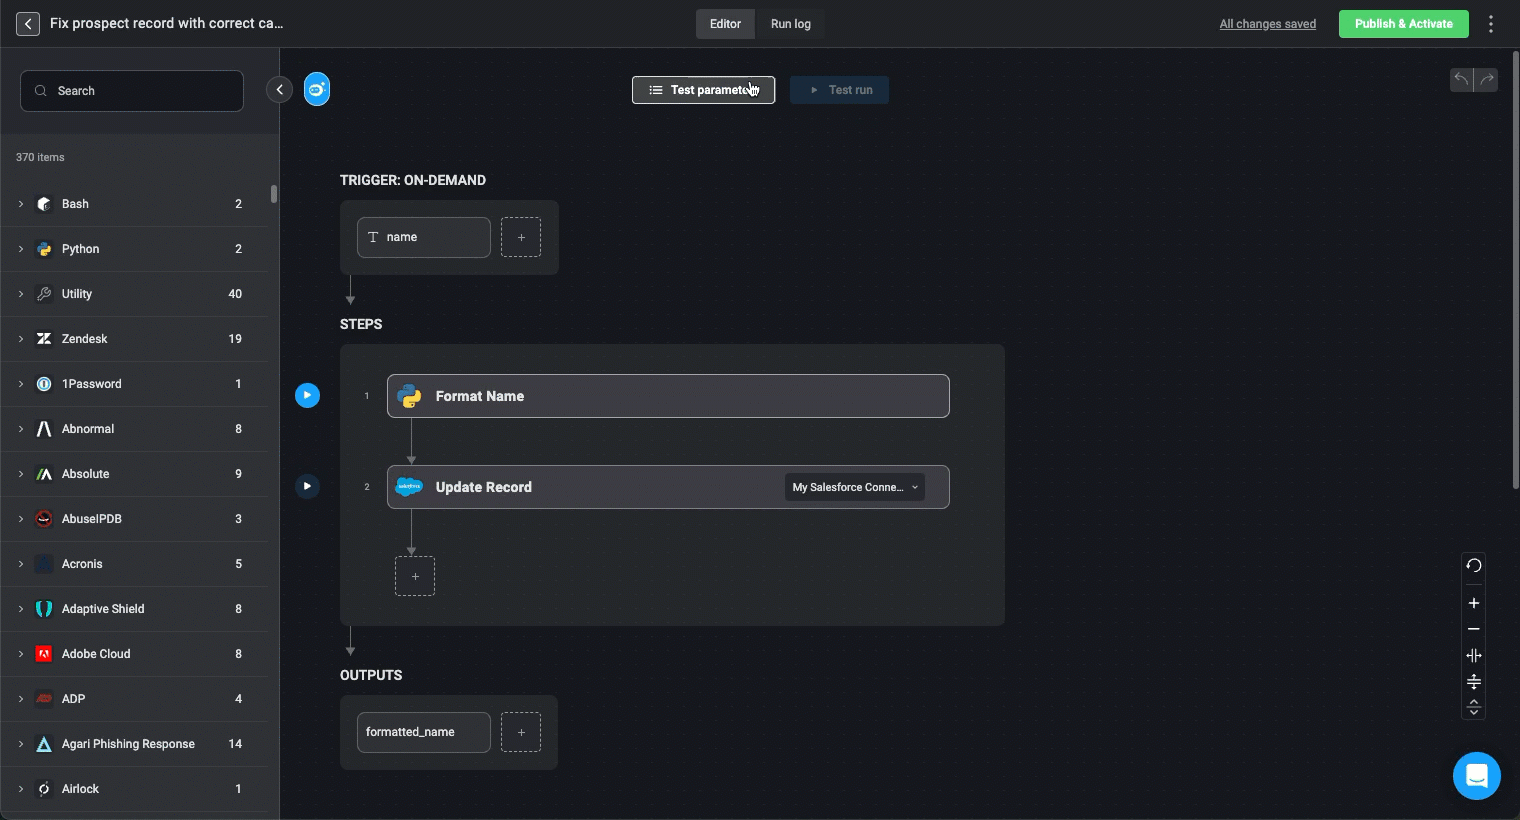
**Business Use Case:**\
In customer relationship management (CRM) systems, user-entered data can be inconsistent (e.g., lowercase names, extra spaces). Standardizing names ensures consistency across reports, email communications, and customer records. To do this, the builder defines the customer name as a free text field for the input parameter when building the workflow.
**When Input is Entered:**
* The user provides a **customer's full name** at runtime when adding or updating a record.
**Workflow Action:**
* The workflow trims extra spaces and formats the name into **Title Case** (`John Doe` instead of `JOHN DOE` or `john doe`).
* The formatted name is then stored or used in customer communications.
**See It In Action**
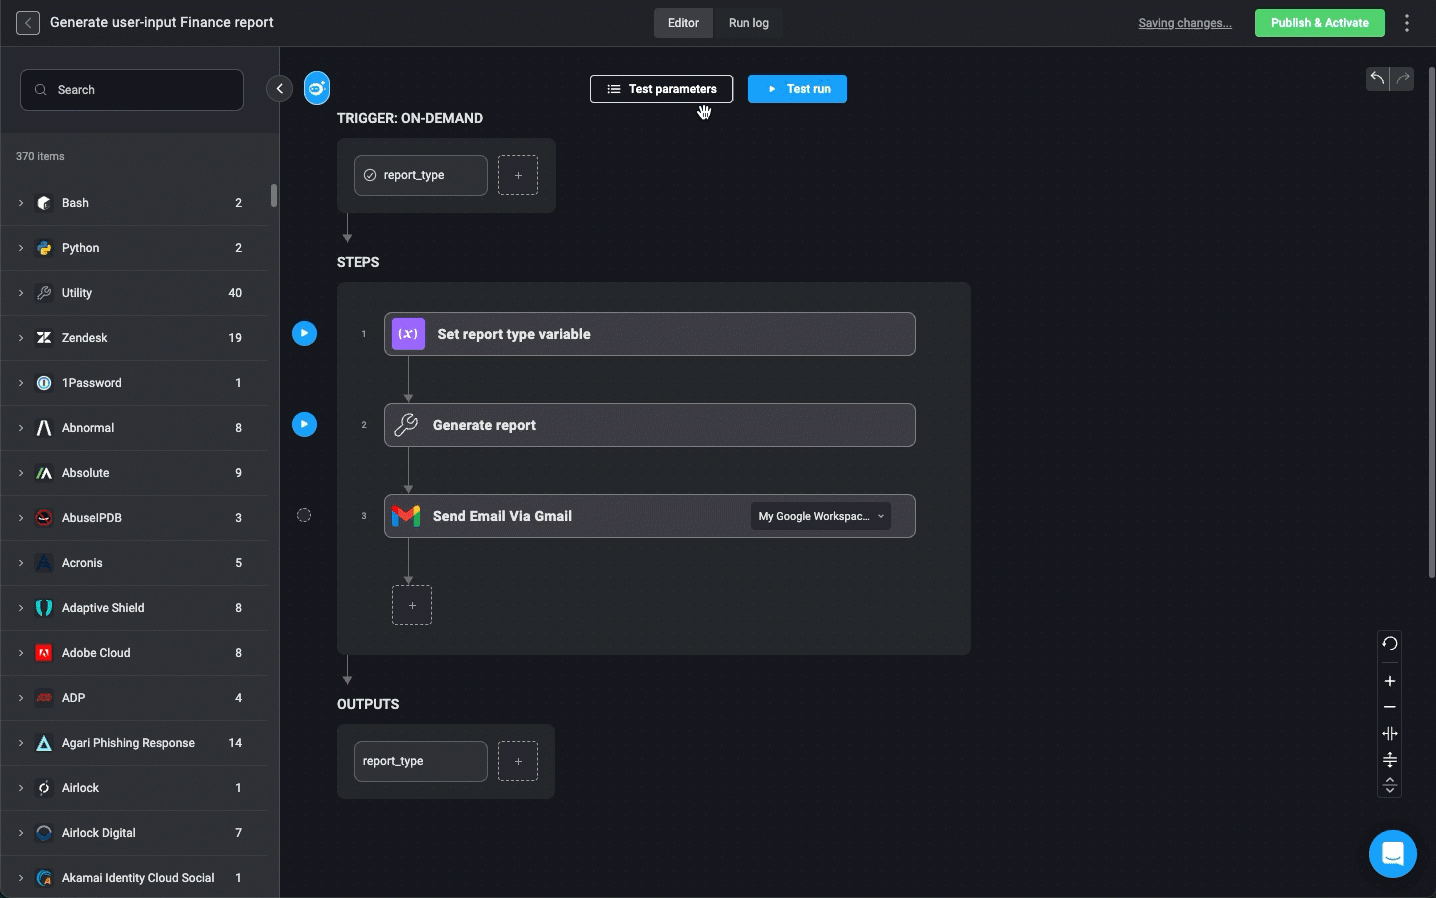
 **Business Use Case:**\
Organizations often generate reports based on predefined categories such as Sales, Marketing, or Finance. This input allows users to dynamically select the type of report to generate. To do this, the builder defines the available report types for the input parameter Single Select list when building the workflow.
**Business Use Case:**\
Organizations often generate reports based on predefined categories such as Sales, Marketing, or Finance. This input allows users to dynamically select the type of report to generate. To do this, the builder defines the available report types for the input parameter Single Select list when building the workflow.
**When Input is Entered:**
* At the start of the workflow, the user selects a report type from the list that you configured.
**Workflow Action:**
* The workflow references `{{ inputs.report_type }}` to determine the type of report.
* The corresponding report is generated and stored.
**See It In Action**
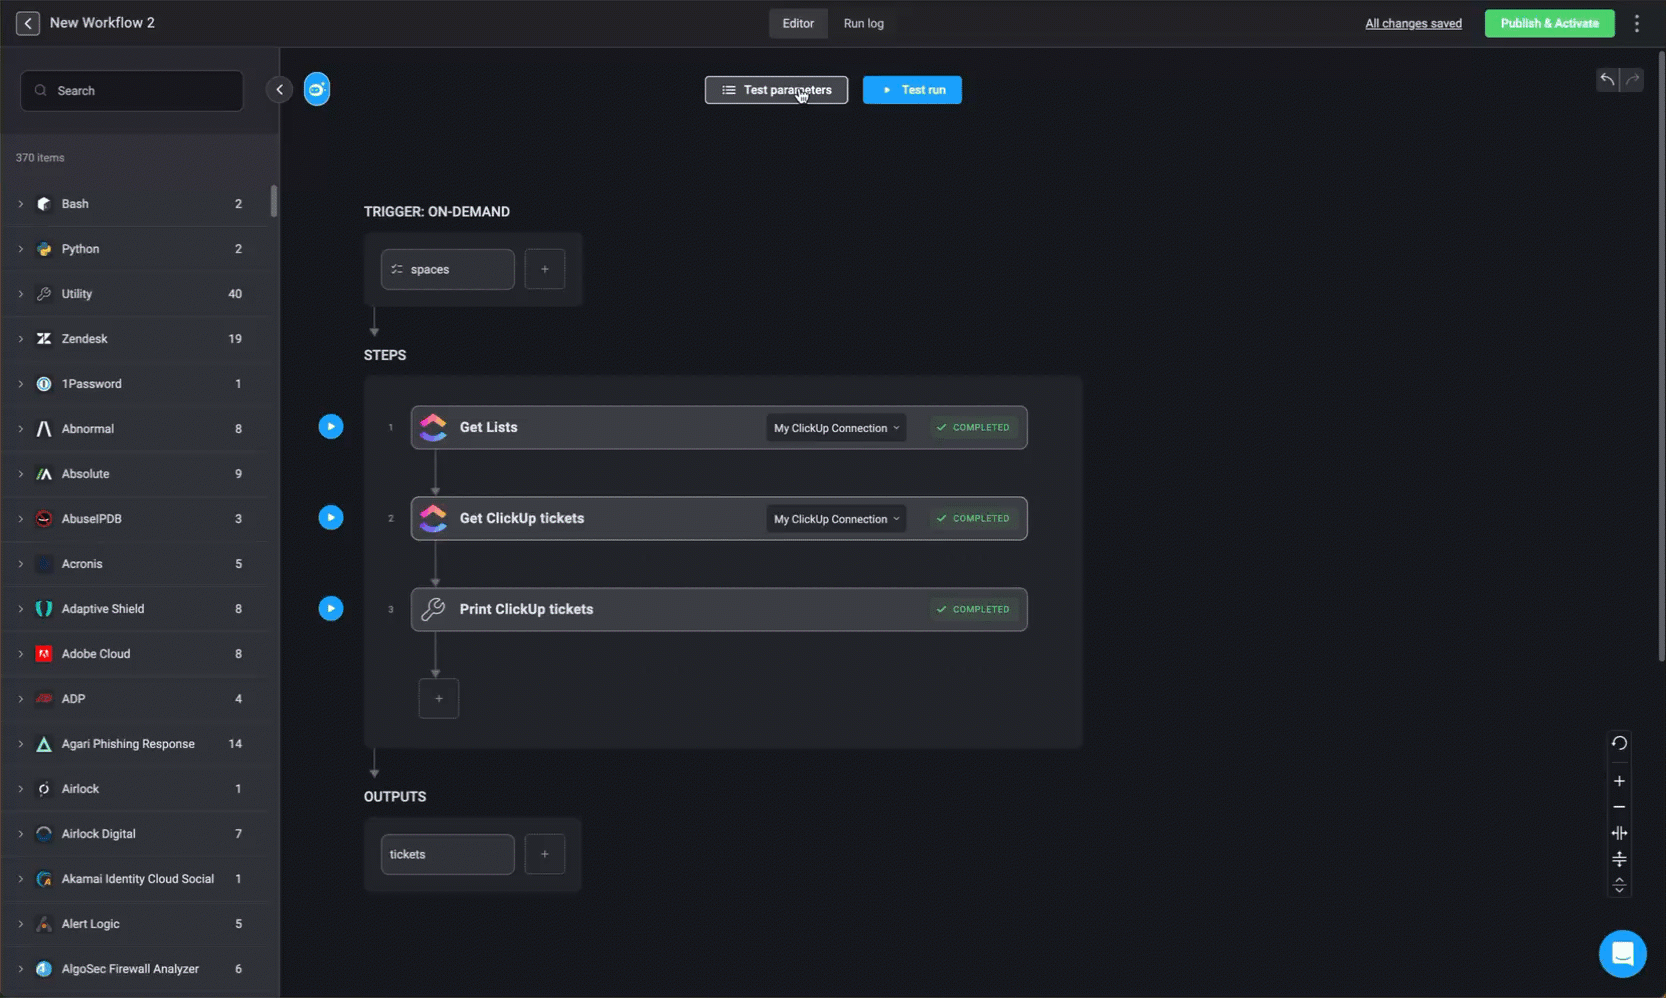
 **Business Use Case:**\
Technical teams often track tickets they’ve opened for customers, but dev teams prefer to limit direct access for efficiency and security reasons.
With Blink, collaborating teams can trigger a Self-Service Portal flow to retrieve ticket statuses without disrupting dev team workflows.
In this example, ClickUp is used to manage sprints. The builder sets up a multi-select input for ClickUp spaces, allowing users to choose one or more spaces and receive task statuses via email.
**Business Use Case:**\
Technical teams often track tickets they’ve opened for customers, but dev teams prefer to limit direct access for efficiency and security reasons.
With Blink, collaborating teams can trigger a Self-Service Portal flow to retrieve ticket statuses without disrupting dev team workflows.
In this example, ClickUp is used to manage sprints. The builder sets up a multi-select input for ClickUp spaces, allowing users to choose one or more spaces and receive task statuses via email.
**When Input is Entered:**\
The users choose one or more spaces within ClickUp from which to receive ticket statuses via email.
**Parameters:**
`spaces` (Multi-Select, required) → One or more ClickUp spaces to retrieve tasks from.
**Workflow Action:**
Query ClickUp for tasks in the selected spaces, format the results, and send an email with the list.
**See It In Action:**
 ***
## Input Parameter Configuration Options
By using input parameters, workflows can be more flexible and adaptable to different scenarios without requiring changes to the workflow logic itself.
Input parameters can be configured to provide flexibility in workflow execution. They can be:
***
## Input Parameter Configuration Options
By using input parameters, workflows can be more flexible and adaptable to different scenarios without requiring changes to the workflow logic itself.
Input parameters can be configured to provide flexibility in workflow execution. They can be:
| Input Control Type | Description |
| ------------------------- | ----------------------------------------------------------------------------------------------------------------------------------------------------------------------------------------------------------------------------- |
| **Mandatory or optional** | Some parameters require input before execution, while others can be left empty. |
| **Flexible Input Fields** | Builders can configure different kinds of lists including a controlled set of options from which the users can choose when triggering the workflow, enable free text, use checkboxes and configure other input types as well. |
| **Static or dynamic** | Static inputs remain fixed, whereas dynamic inputs retrieve values from [global variables](/docs/workflows/building-workflows/dynamic-variables/global-variables). |
## Input Parameter Types
The *file* [input parameter](/docs/workflows/building-workflows/triggers/on-demand-triggers/input-parameters) is not supported in triggered [subflows](/docs/workflows/building-workflows/actions/basic-actions/subflow-actions).
When defining an on-demand workflow, you can choose from the following input parameter types:
| Parameter Type | Description | Example |
| ----------------- | ------------------------------------------------------------------------------------------------------------------------------------------------------------------------------ | ----------------------------------------------------------------------- |
| **Text** | Single-line text input for short entries | A user name |
| **Long Text** | Multi-line text field for detailed input | A description or detailed explanation |
| **Rich Text** | Allows you to format long text with enhanced styling options beyond plain text. You can apply formatting such as bold, italics, headings, lists, links, code blocks, and more. | **bold**, *italics*, `code blocks`, [links](#) |
| **Number** | Numeric value input | `100` |
| **Single-Select** | Choose one value from the list; if enabled, users can alternatively add free text. | Choose one from the following: - Apple - Orange - Banana |
| **Multi-Select** | Choose multiple values from the list; if enabled, users can alternatively add free text. | Choose all that apply: - Apple - Orange - Banana |
| **Checkbox** | True/False input | |
| **Date and Time** | Pick a specific date/time or relative value | |
| **Connection** | Select a configured connection | From the list of available connections. |
| **File** | Upload a file (Max: **500MB**) | For example, a `PDF ` |
| **List** | Provide multiple string values | A list of values. For example, a list of names: Biff, Martin, Lorraine |
***
## Configure Input Parameters
[Navigate to the on-demand workflow](/docs/workflows/building-workflows/workflow-editor) that you would like to update with input parameters.
From **TRIGGER: ON-DEMAND**, click **+**.
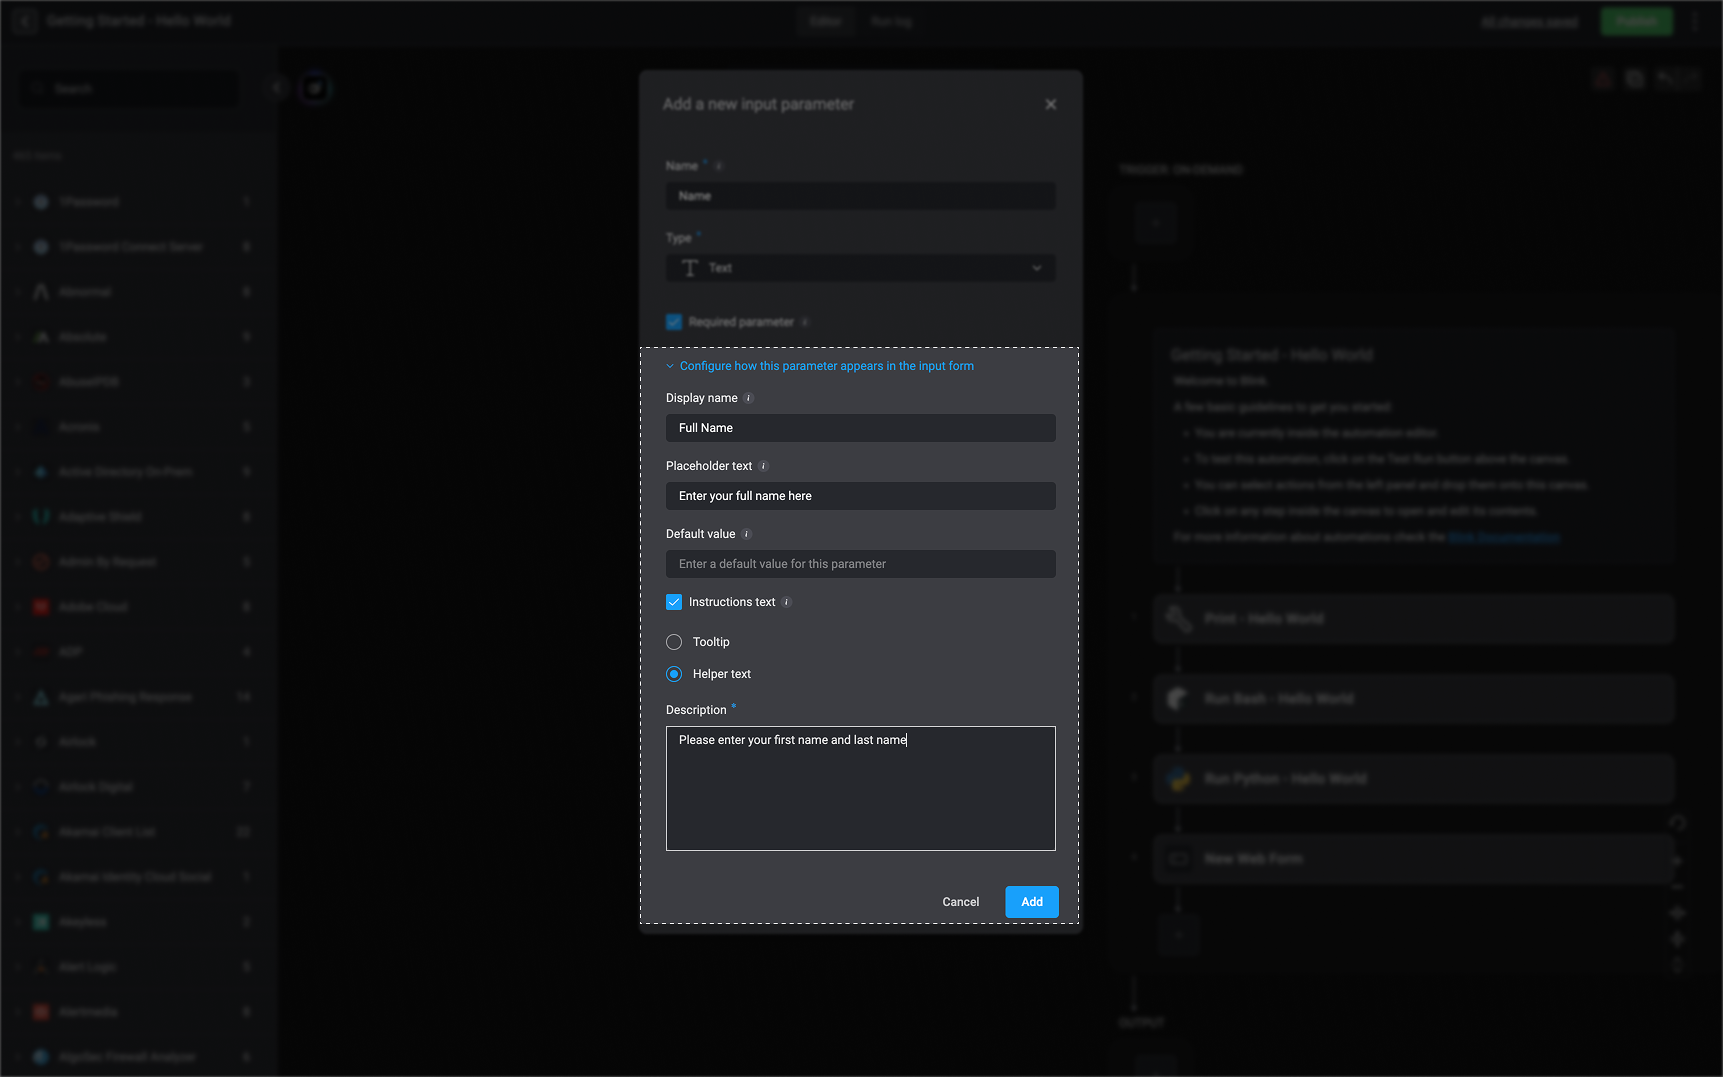
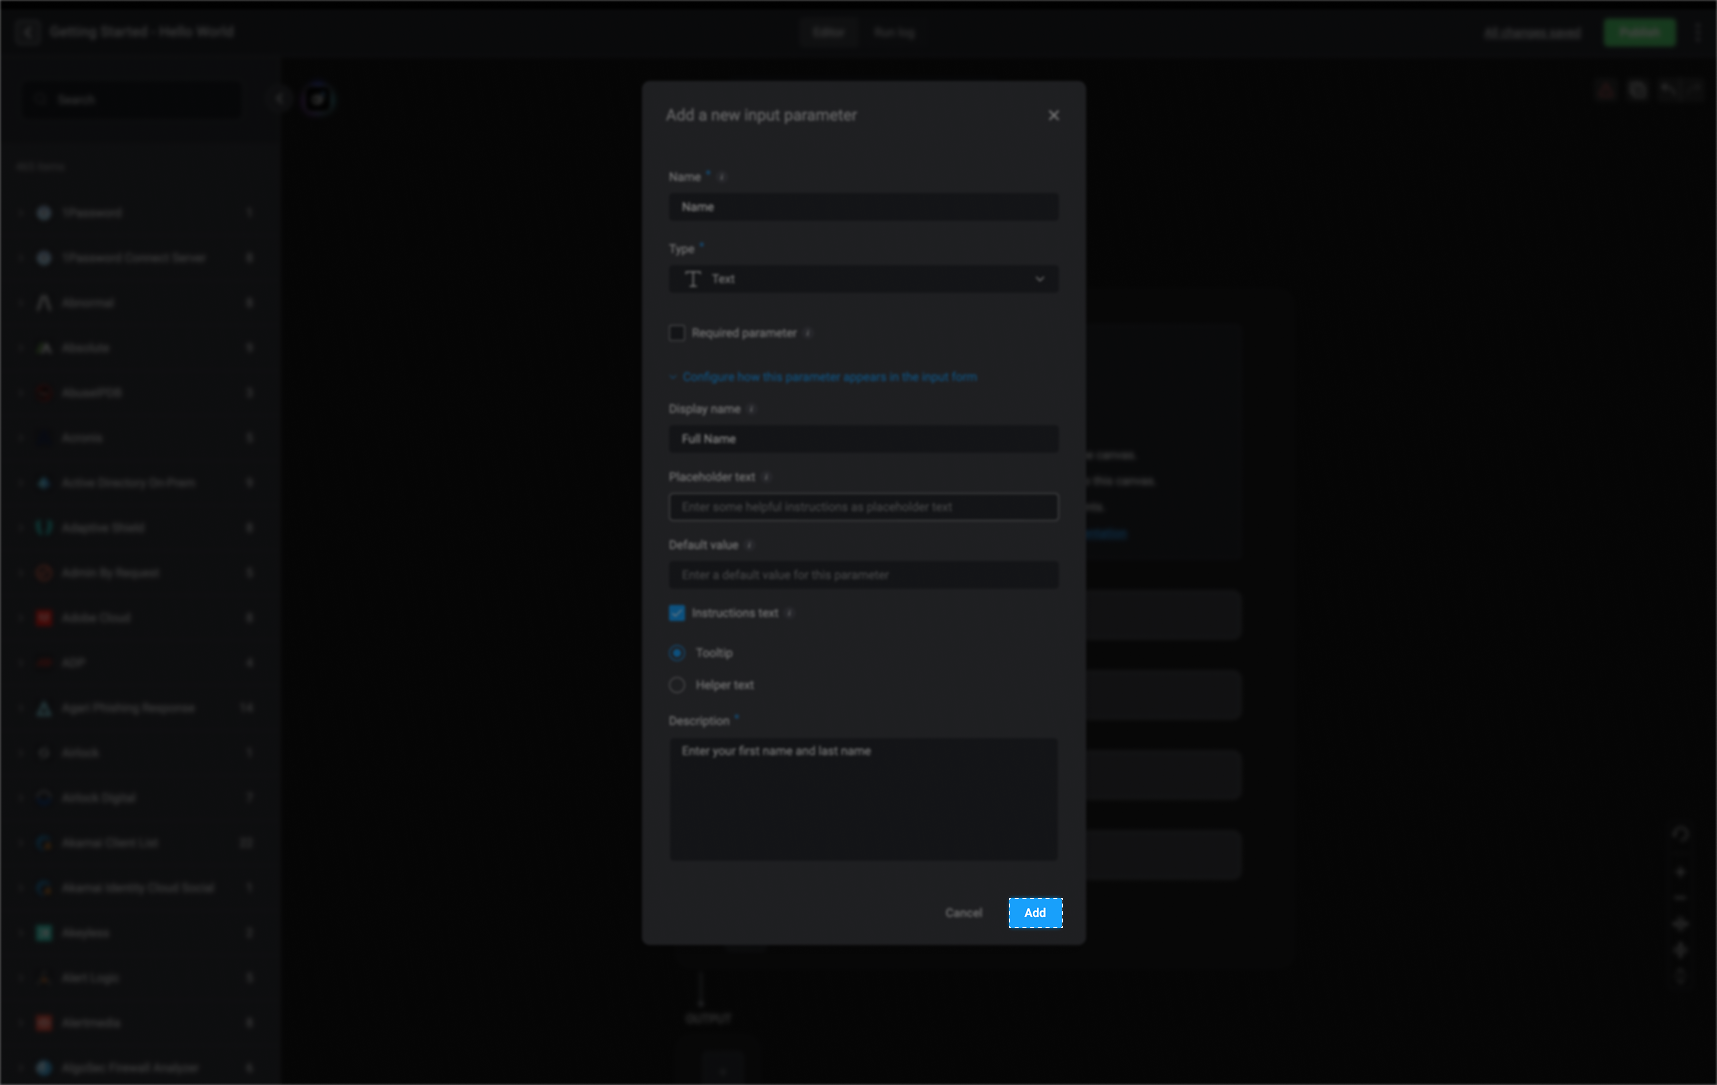
 Configure the input parameter:
| Field | Description |
| ------------------------------------------------------- | ------------------------------------------------------------------------------------------------------------------------------------------------------------------------------------------------------------------- |
| Parameter Name | Unique identifier for the parameter |
| Parameter Type | Choose the [relevant type](#input-parameter-types) |
| Display Name | User-friendly name (optional) - this is the way the field will appear in the form for the user. |
| Required | Toggle on/off to enforce input or leave it as optional. |
| Placeholder (Available for relevant types) | Sample text shown in the input field (optional). For example, if a User Name is the required input, you can enter an example of the expected format in the placeholder. |
| Valid and Default Values (Available for relevant types) | Configure the values that are allowed for the parameter. The default value is the pre-populated value (optional). For example, if the input is a date, you can configure the date in advance for the default value. |
| Options List Mode (Available for relevant types) | Static (values that you manually add when building the workflow) or Dynamic (fetched from a source) |
| Instructional Text | When enabled, this text is displayed as the tooltip or helper text for this input parameter field |
| Description | The text shown to the user, either as a tooltip or as helper text, depending on the selected option. |
 You can configure input parameters to be referenced in any subsequent workflow steps using either the **Variable Picker** or **Expression Language**, depending on how you want to apply them.
The following demonstrates the connection between the input and the subsequent steps, where the user enters a prospect name when prompted, and then the next step formats that name:
You can configure input parameters to be referenced in any subsequent workflow steps using either the **Variable Picker** or **Expression Language**, depending on how you want to apply them.
The following demonstrates the connection between the input and the subsequent steps, where the user enters a prospect name when prompted, and then the next step formats that name:
| Method | Description |
| ----------------------- | -------------------------------------------------------------------------------------------------------------------------------------------------------------------------------------------------------------------------------------- |
| **Variable Picker** | Easily insert input parameters into workflow actions via the [Variable Picker](/docs/workflows/building-workflows/dynamic-variables/variable-picker), which provides a UI-based selection tool. |
| **Expression Language** | Manually reference input parameters within expressions using [Expression Language](/docs/workflows/building-workflows/dynamic-variables/expression-language/workflow-engine-functions) for more advanced logic and dynamic processing. |
Click **Add** to save the parameter.
 The parameter appears in the **TRIGGER** section. When the workflow runs, the value will be retrieved in real time.
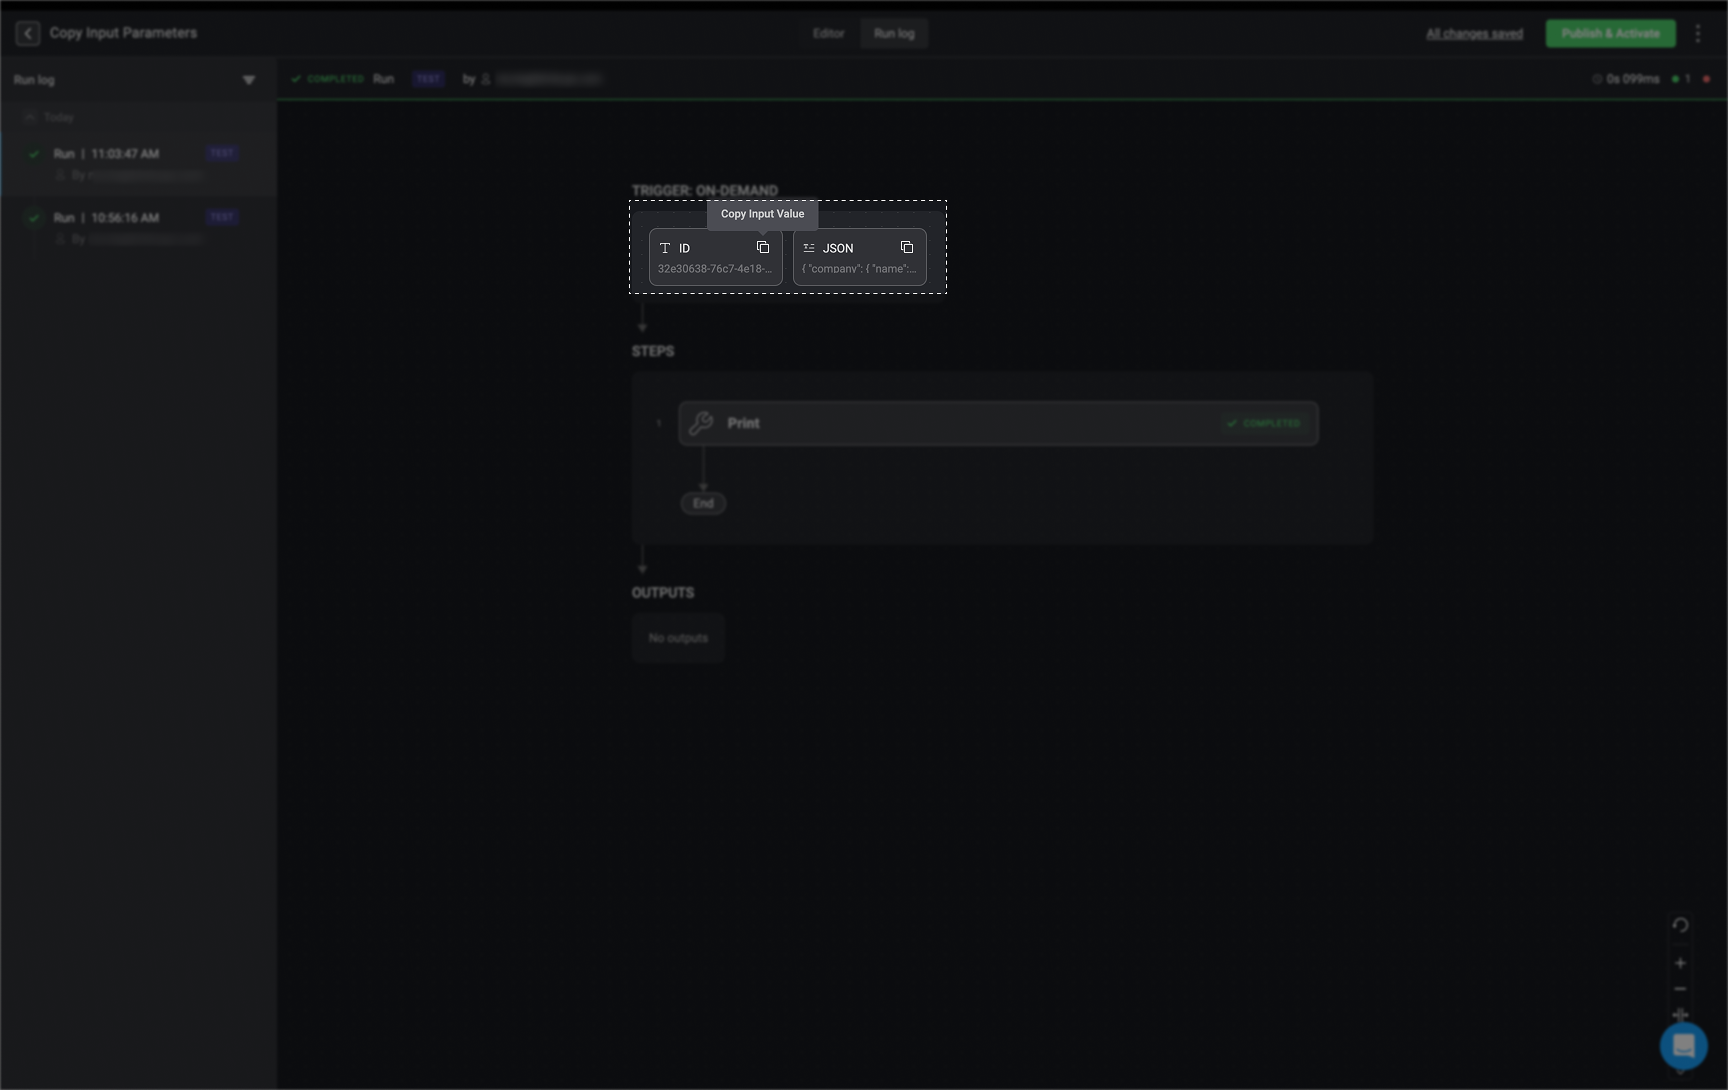
 If you go to the [Run Logs](/docs/workflows/debugging-workflows/workflow-run-logs#run-logs-settings) tab, you can easily copy input parameter values, by selecting the button for quick access. Additionally, you can hover over an input parameter and scroll through long text for better visibility.
 ***
## Related Articles
Learn how to manually trigger workflows in BlinkOps.
Explore methods for testing your workflows to ensure accuracy.
Control access and permissions for workflow execution.
***
## Related Articles
Learn how to manually trigger workflows in BlinkOps.
Explore methods for testing your workflows to ensure accuracy.
Control access and permissions for workflow execution.