> ## Documentation Index
> Fetch the complete documentation index at: https://docs.blinkops.com/llms.txt
> Use this file to discover all available pages before exploring further.
# Tableau
> Tableau is a software program used for data visualization and business intelligence. It allows users to connect to various data sources, create interactive visualizations, and analyze trends and patterns.
## Creating a Tableau connection
Create the connection by using one of the following methods:
* [Username & Password](#using-username-and-password)
* [Personal Access Token](#using-personal-access-token)
### Using Username and Password
**Username and Password sign-in**:
The REST API does not support single-sign (SSO). To sign in, you must specify the name and password of a user who has been created on Tableau Server or Tableau Cloud. Tableau strongly recommends PAT sign-in because it is more secure.
For more information, see [Tableau's documentation](https://help.tableau.com/current/api/rest_api/en-us/REST/rest_api_concepts_auth.htm).
To create the connection you need:
* An API Address
* A Username
* A Password
* A Site
#### Creating your connection
1. In the Blink platform, navigate to the **Connections** page > **Add connection**. A New Connection dialog box opens displaying icons of external service providers available.
2. Select the **Tableau** icon. A dialog box with name of the connection and connection methods appear.
3. (Optional) Edit the name of the connection. At a later stage you cannot edit the name.
4. Select **Username & Password** as the method to create the connection.
5. Fill in the parameters:
* The API Address
* The Username
* The Password
* The Site
6. (Optional) Click **Test Connection** to test it.
7. Click **Create connection**. The new connection appears on the **Connections** page.
### Using Personal Access Token
To create the connection you need:
* An API Address
* A Personal Access Token Name
* A Personal Access Token Secret
* A Site
#### Obtaining the credentials
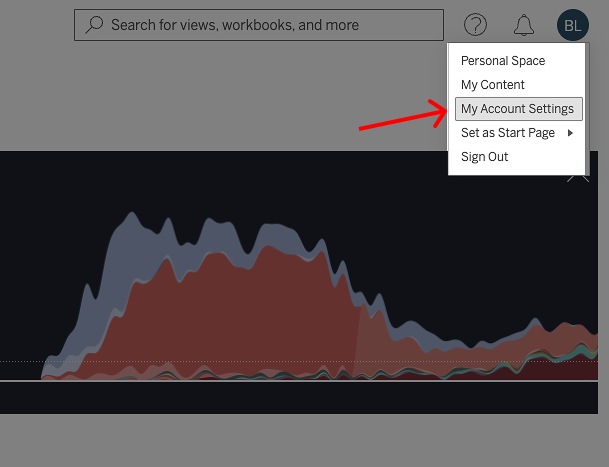
1. In the top right corner, click on your profile picture.
2. Click on **My Account Settings**.
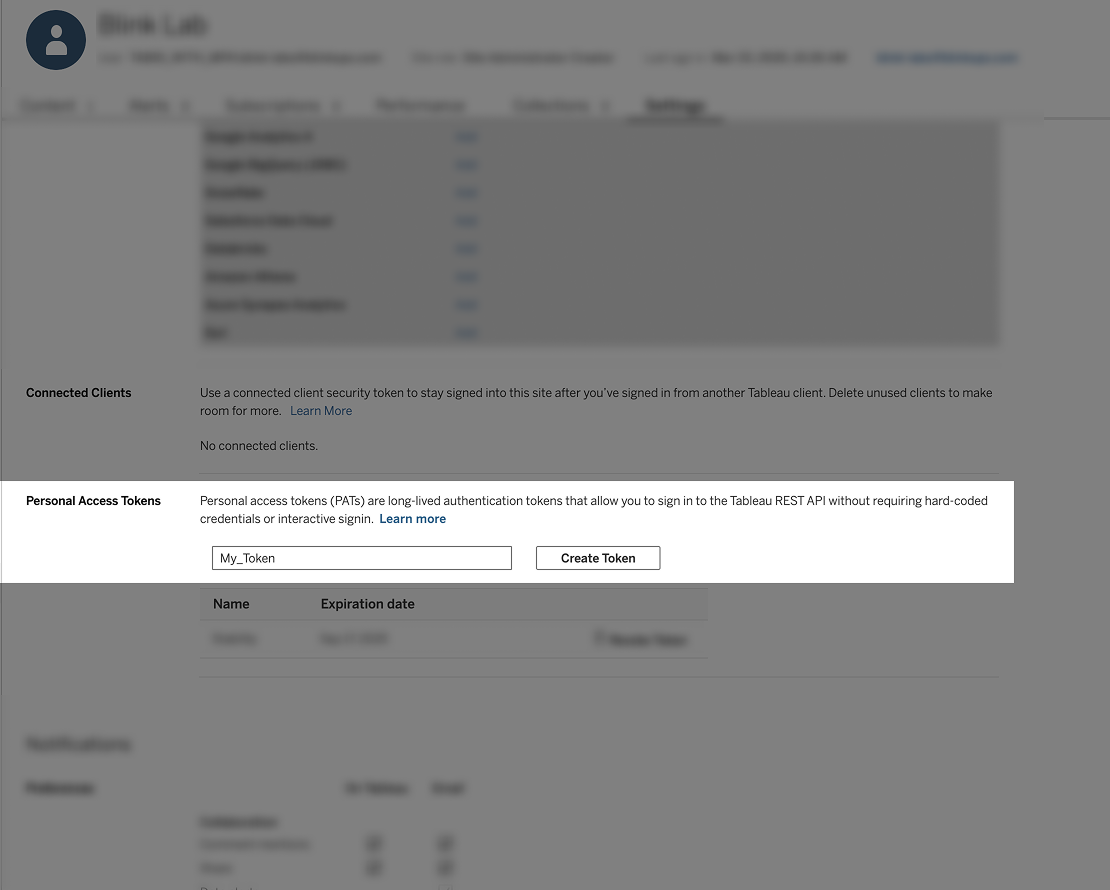
 3. Scroll down until you reach the **Personal Access Token** section. Name your token and click **Create Token**.
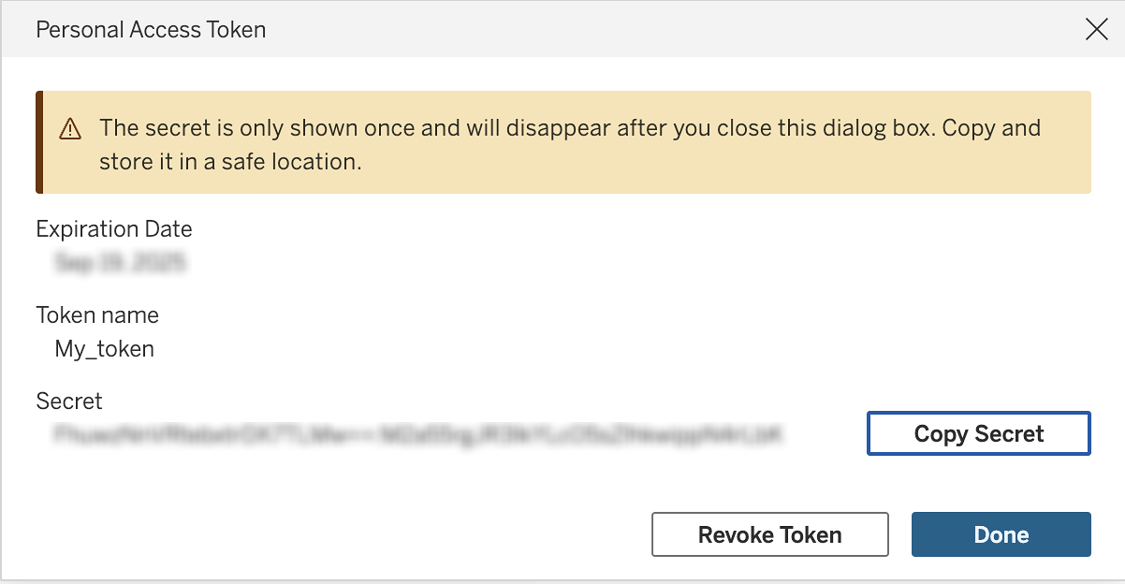
 4. Copy and securely save your **token** it's **name**.
 #### Creating your connection
1. In the Blink platform, navigate to the **Connections** page > **Add connection**. A New Connection dialog box opens displaying icons of external service providers available.
2. Select the **Tableau** icon. A dialog box with name of the connection and connection methods appear.
3. (Optional) Edit the name of the connection. At a later stage you cannot edit the name.
4. Select **Personal Access Token** as the method to create the connection.
5. Fill in the parameters:
* The API Address
* The Personal Access Token Name
* The Personal Access Token Secret
* The Site
6. (Optional) Click **Test Connection** to test it.
7. Click **Create connection**. The new connection appears on the **Connections** page.
#### Creating your connection
1. In the Blink platform, navigate to the **Connections** page > **Add connection**. A New Connection dialog box opens displaying icons of external service providers available.
2. Select the **Tableau** icon. A dialog box with name of the connection and connection methods appear.
3. (Optional) Edit the name of the connection. At a later stage you cannot edit the name.
4. Select **Personal Access Token** as the method to create the connection.
5. Fill in the parameters:
* The API Address
* The Personal Access Token Name
* The Personal Access Token Secret
* The Site
6. (Optional) Click **Test Connection** to test it.
7. Click **Create connection**. The new connection appears on the **Connections** page.