> ## Documentation Index
> Fetch the complete documentation index at: https://docs.blinkops.com/llms.txt
> Use this file to discover all available pages before exploring further.
# ServiceNow
> The ServiceNow business model is based on providing products using SaaS cloud computing software. It involves setting up systems to define, manage, automate and structure services for companies.
## Creating a ServiceNow connection
Create the connection by using one of the following methods:
* [Username & Password](#using-username-and-password)
* [Client ID & Secret](#using-client-id-and-secret)
* [Client & User Credentials](#using-client-and-user-credentials)
### Using Username and Password
To create the connection you need:
* An Instance Name
* A Username
* A Password
* A MFA Secret Key
### Obtaining the credentials
1. **ServiceNow instance name**: If your company’s ServiceNow address is `https://instance-name.service-now.com`, copy "instance-name".
2. **Username and password**: The username and password are the same as used to log in to your ServiceNow instance.
3. **MFA secret key** (optional): The paired MFA secret key used to enable MFA for the given user.
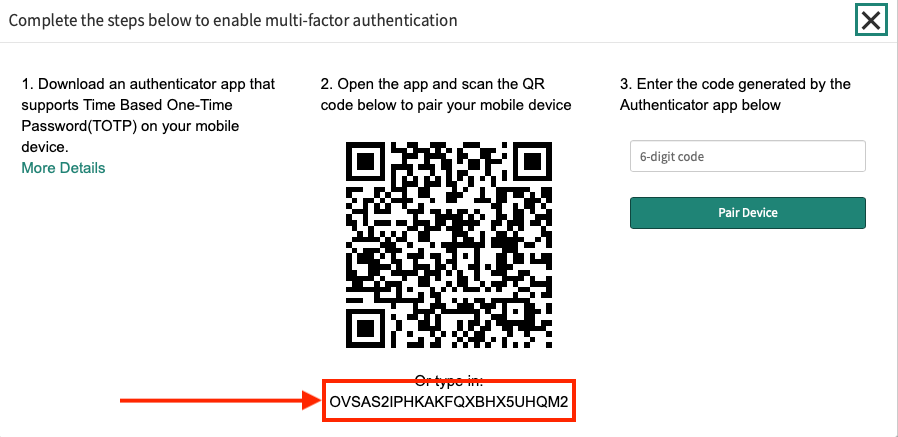 **If the user executing the actions does not have Admin privileges, an Admin must follow the steps below to assign them the appropriate permissions.**
### Create a New Role
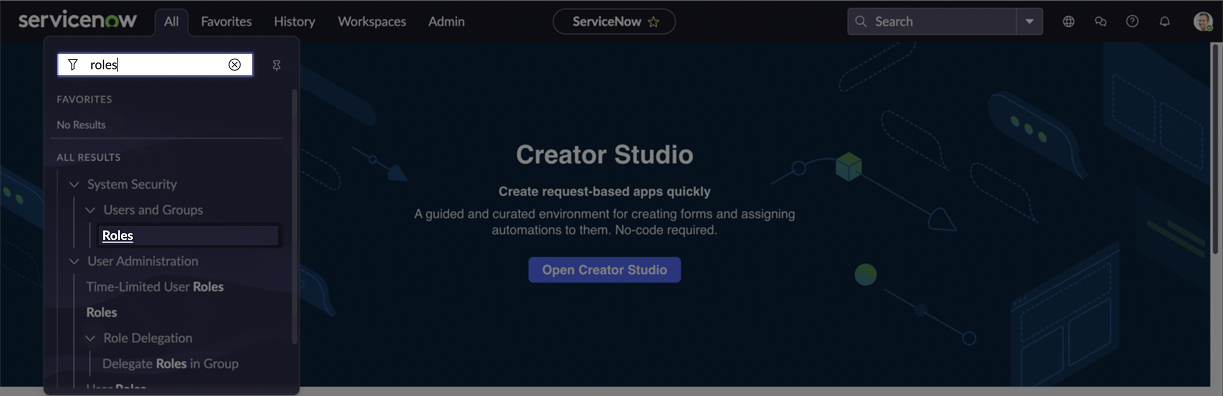
1. In the navigation filter (under the `All` tab), search for **roles** and click **Roles** under **Users and Groups**.
**If the user executing the actions does not have Admin privileges, an Admin must follow the steps below to assign them the appropriate permissions.**
### Create a New Role
1. In the navigation filter (under the `All` tab), search for **roles** and click **Roles** under **Users and Groups**.
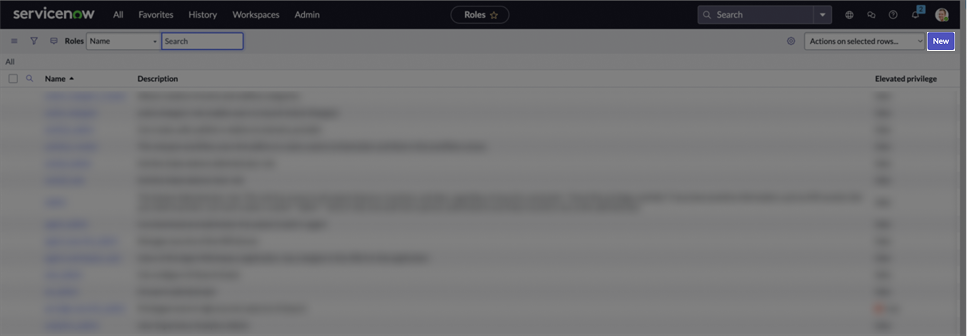
 2. On the **Roles** page, click **New**.
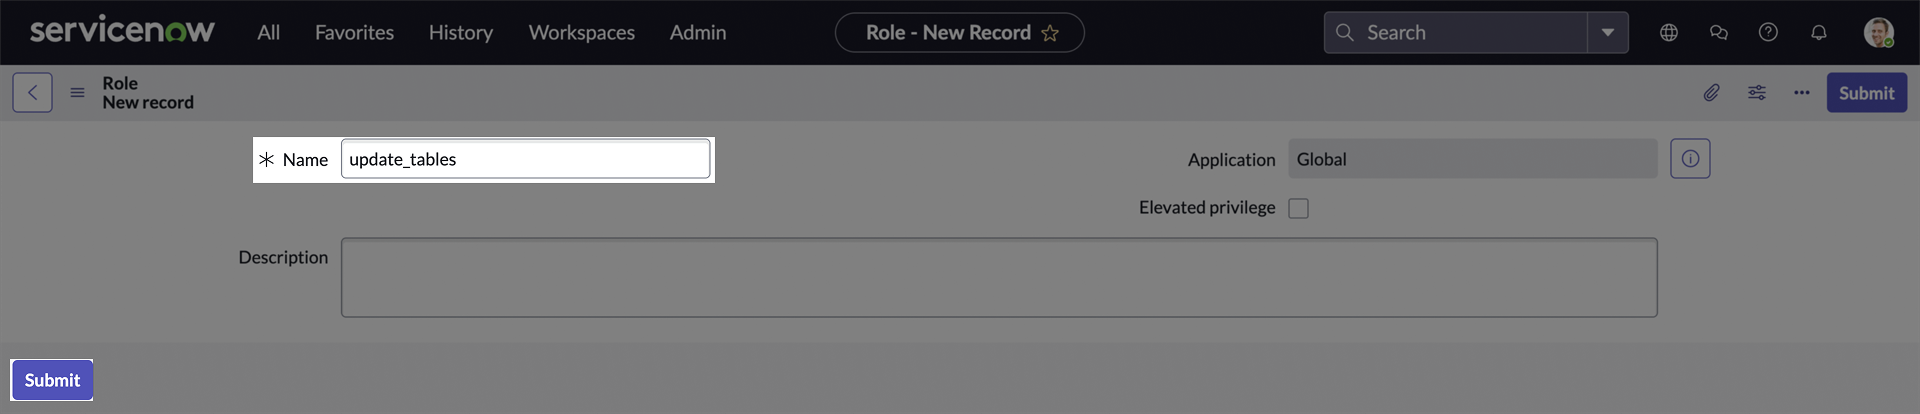
 3. Enter a name for your new role. Click **Submit** to create it.
 #### Assign Role to a Custom Table's ACL
1. In the navigation filter (under the `All` tab), search for **tables** and click **Tables** under **System Definition**.
#### Assign Role to a Custom Table's ACL
1. In the navigation filter (under the `All` tab), search for **tables** and click **Tables** under **System Definition**.
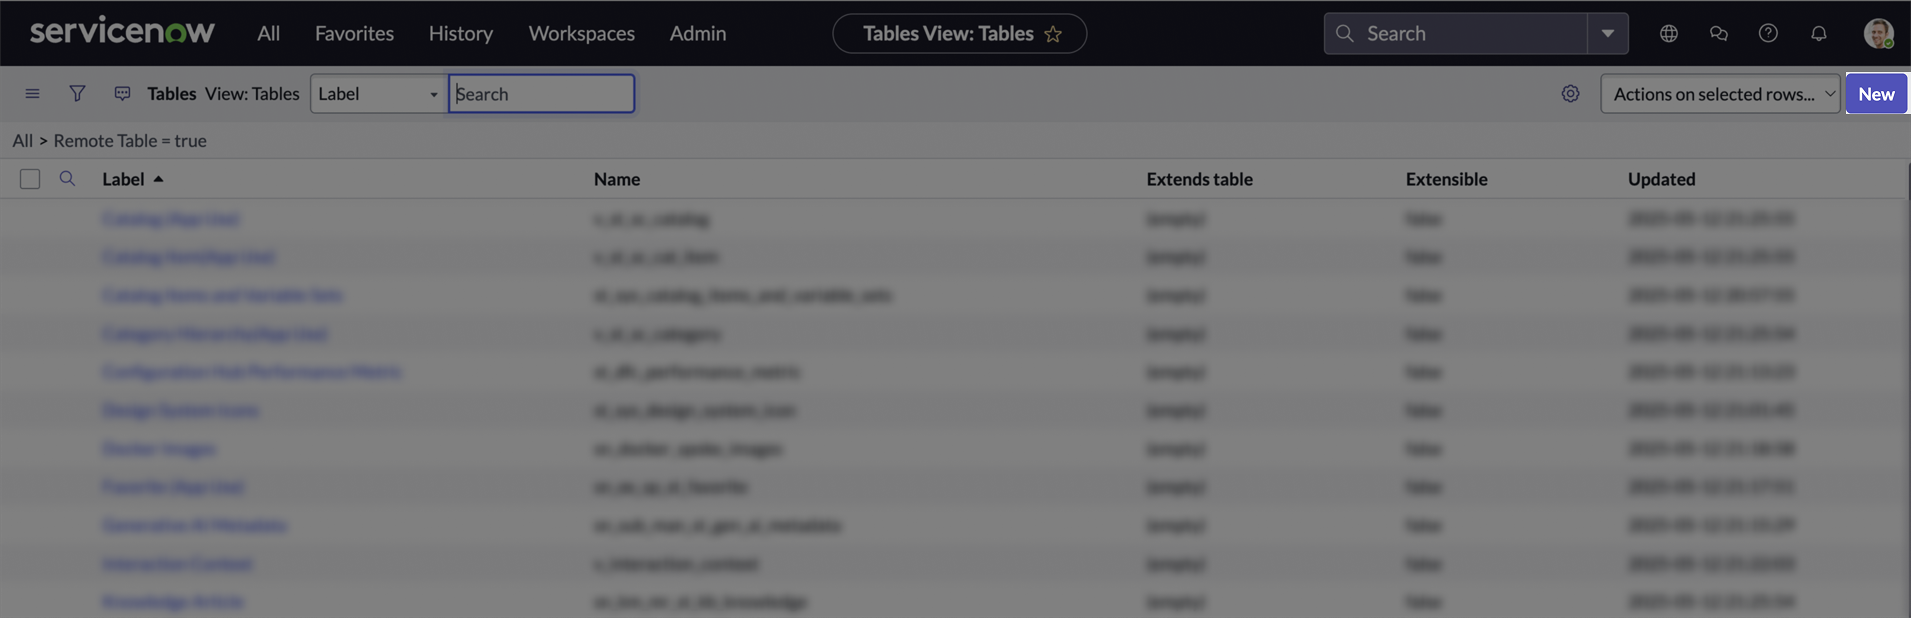
 2. On the **Tables** page, click **New**.
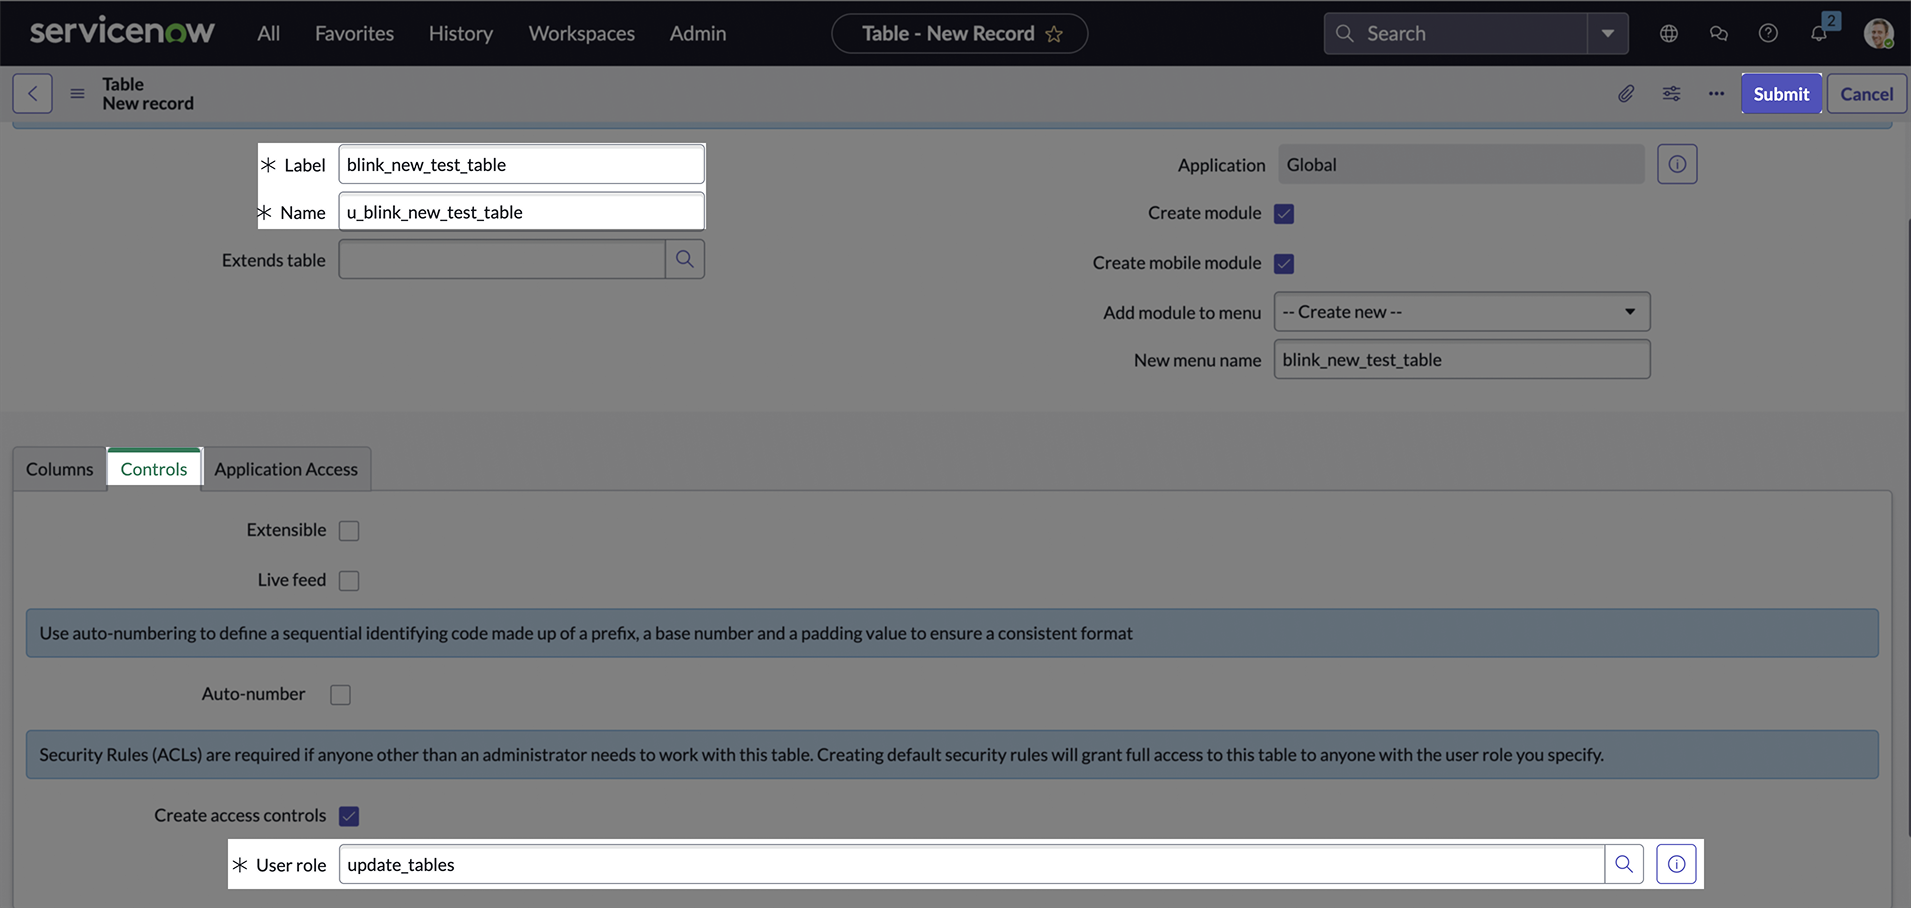
 3. Enter a **Label** for the table, the **Name** will be generated automatically.
Scroll down to the **Controls** section, and in the **User role** field, select the custom role you created.
3. Enter a **Label** for the table, the **Name** will be generated automatically.
Scroll down to the **Controls** section, and in the **User role** field, select the custom role you created.
 #### Assign Roles To User
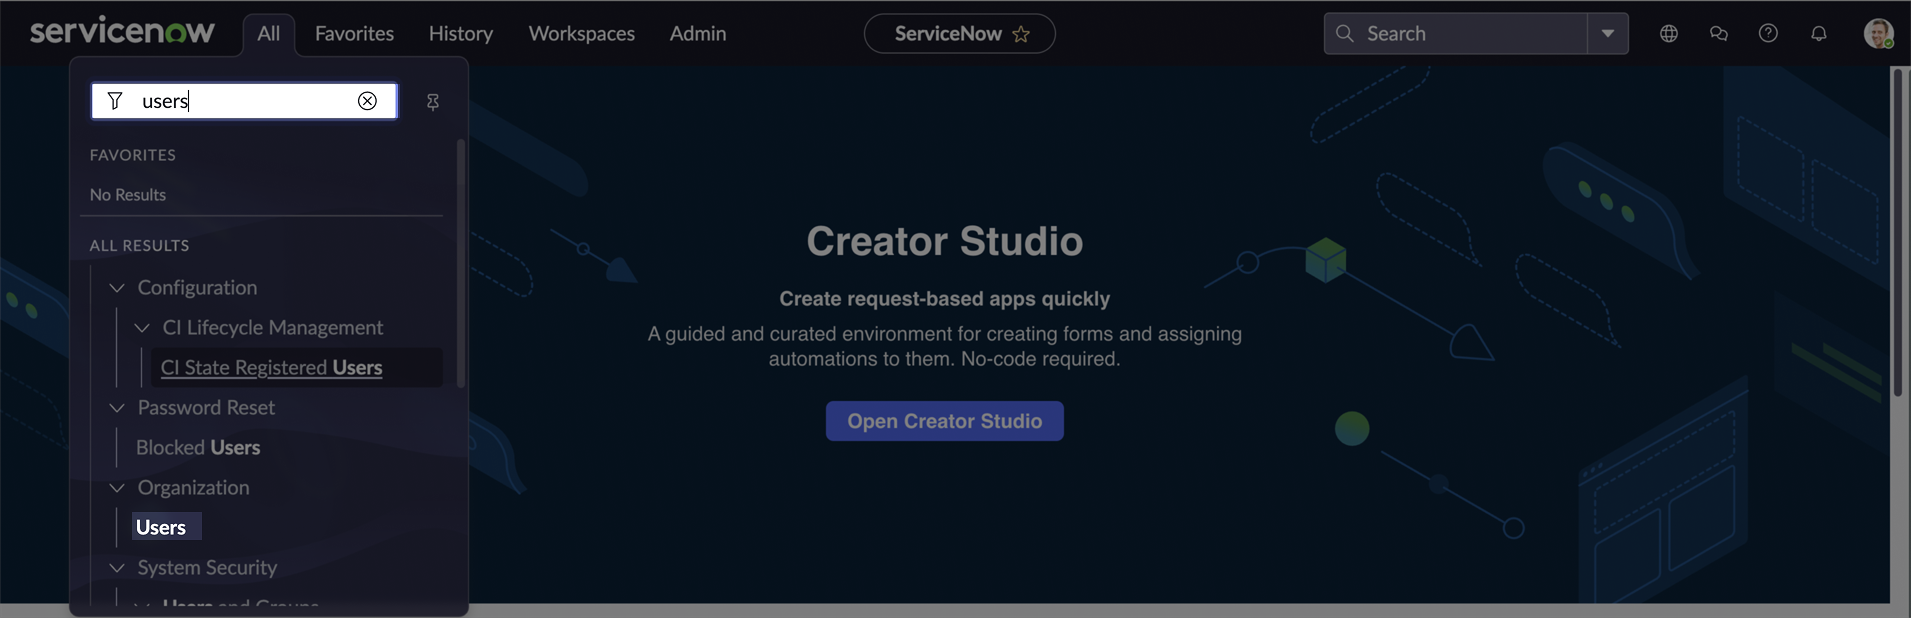
1. In the navigation filter (under the `All` tab), search for **users** and click **Users** under **Organization**.
#### Assign Roles To User
1. In the navigation filter (under the `All` tab), search for **users** and click **Users** under **Organization**.
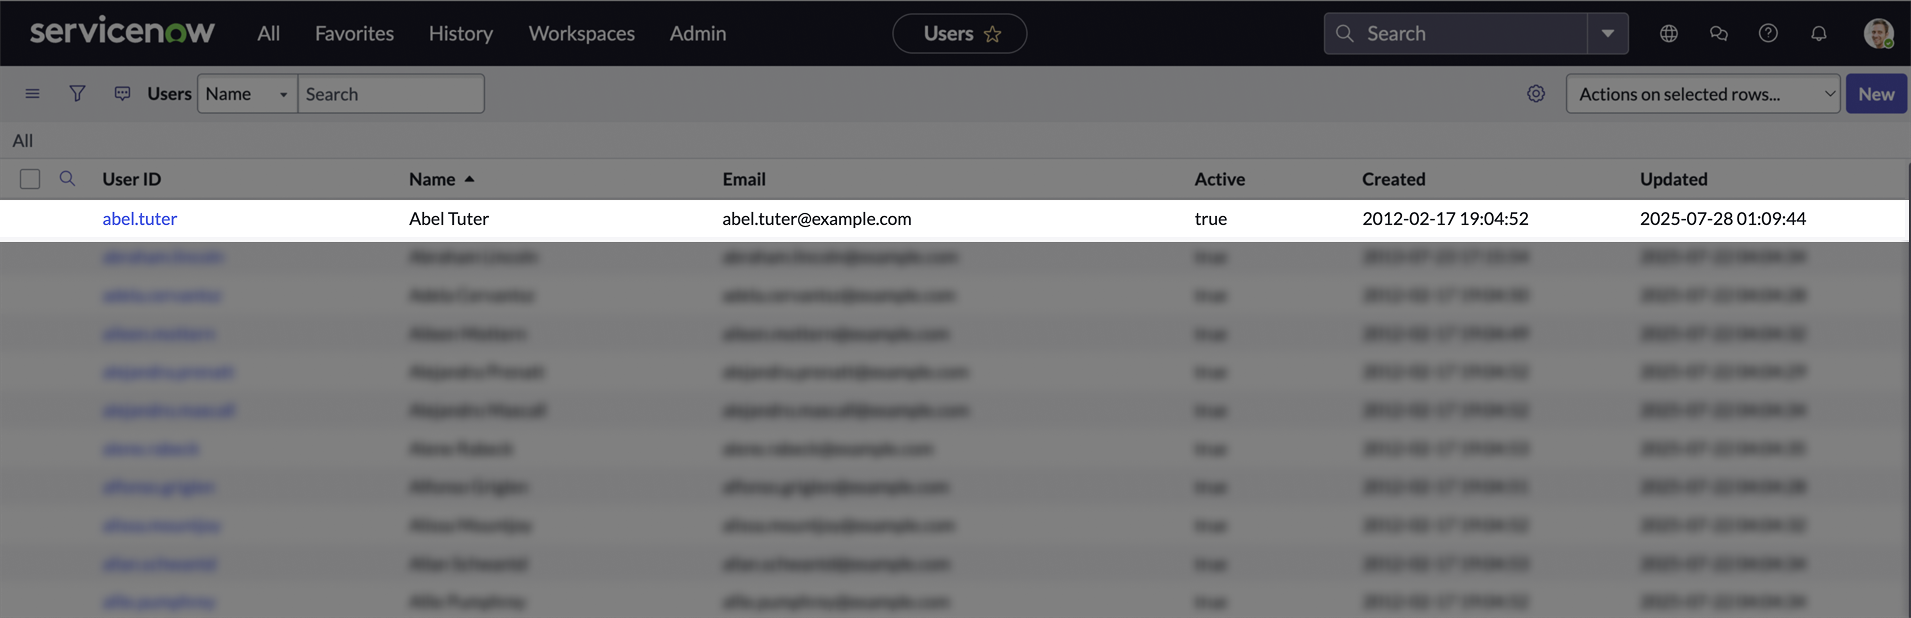
 2. On the **Users** page, click the user you want to assign the roles to.
 3. On the user's page, Scroll down to the **Roles** section, and click **Edit**.
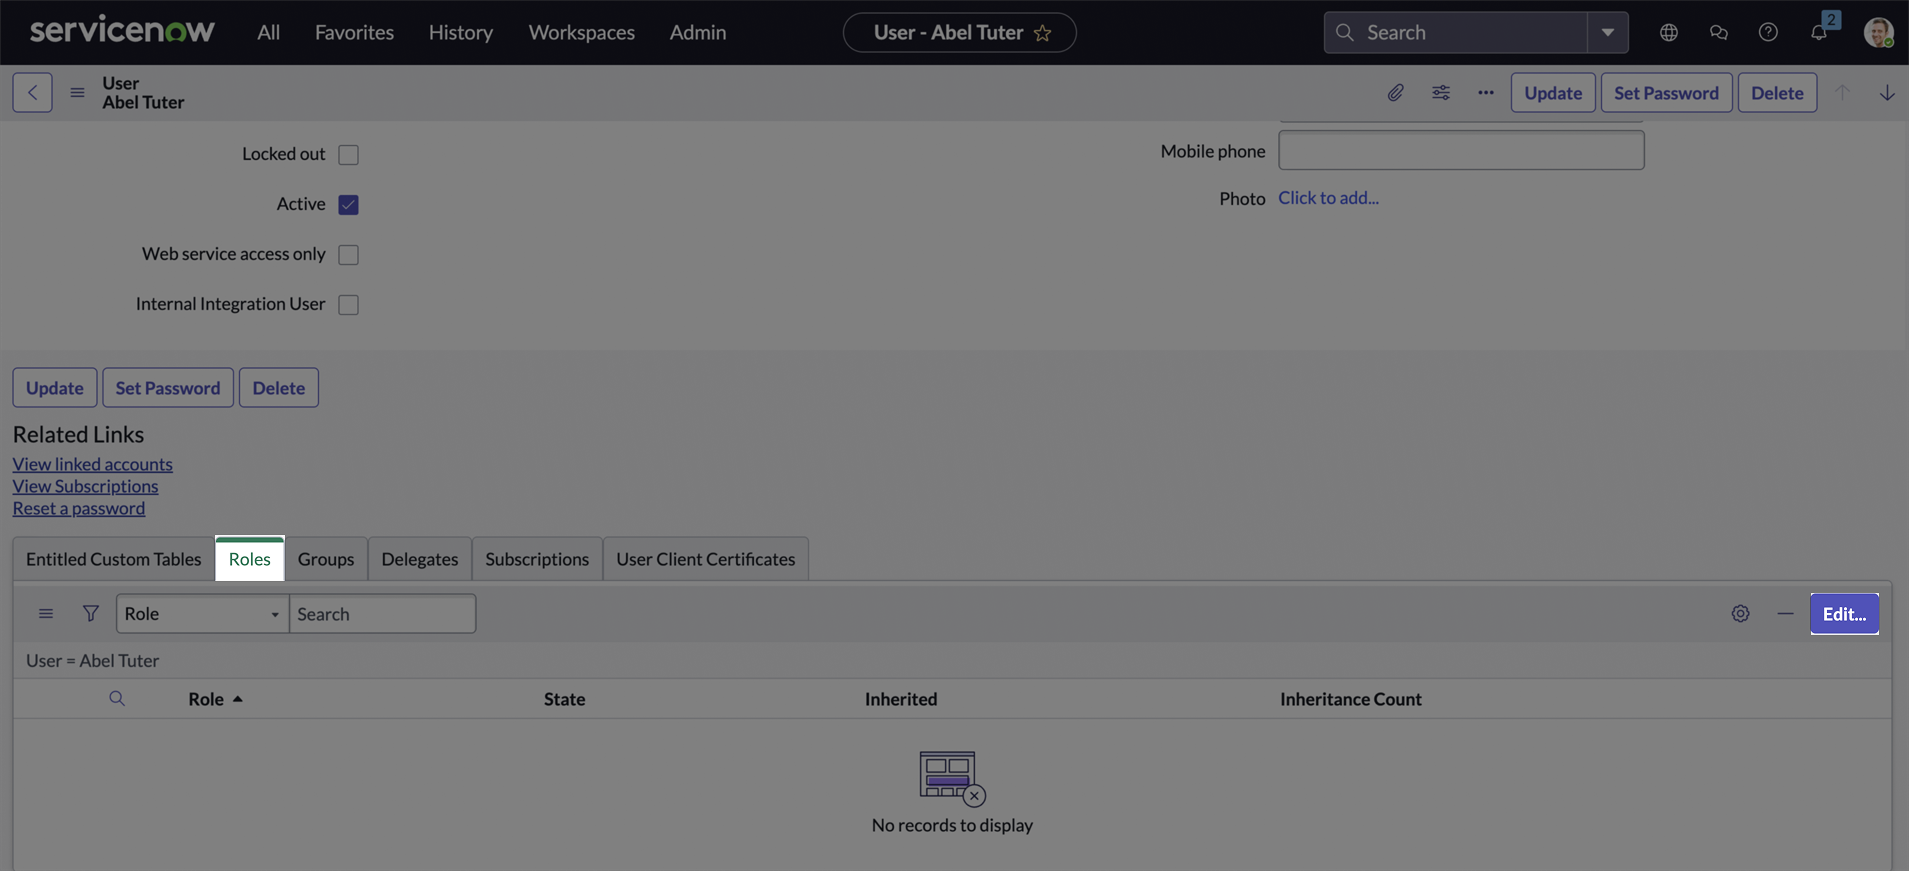 4. Search for the new custom role and add it to the user. Also, assign the `itil` role to ensure access to standard tables like **Incident**. Click **Save**.
 The **itil** role grants permissions for core ITIL-aligned tasks such as creating, reading, updating, and closing records in Incident, Problem, Change, and Configuration Management (CMDB) modules.
After completing all the steps, a new table will be associated with your custom role, and the user will have that role assigned. As the admin, you’ve granted the necessary permissions, allowing the user to authenticate using their own (non-admin) username and password. This enables them to perform actions on both standard and custom tables.
#### Creating your connection
1. In the Blink platform, navigate to the **Connections** page > **Add connection**. A New Connection dialog box opens displaying icons of external service providers available.
2. Select the **ServiceNow** icon. A dialog box with name of the connection and connection methods appear.
3. (Optional) Edit the name of the connection. At a later stage you cannot edit the name.
4. Select **Username & Password** as the method to create the connection.
5. Fill in the parameters:
* The Instance Name
* The Username
* The Password
* The MFA Secret Key
6. (Optional) Click **Test Connection** to test it.
7. Click **Create connection**. The new connection appears on the **Connections** page.
### Using Client ID and Secret
To create the connection you need:
* An Instance Name
* A Client ID
* A Client Secret
### Obtaining the credentials
1. **ServiceNow instance name**: If your company’s ServiceNow address is `https://instance-name.service-now.com`, copy "instance-name".
2. Follow the next steps carefully to enable Client Credentials authentication method and obtain the **Client ID & Secret**.
Only ServiceNow **Admins** can create OAuth applications and obtain the Client ID and Secret.
### Obtaining the client ID and Secret
To use the **Client ID & Secret** authentication method, you'll need to create both a new **system property** and a new **OAuth application**.
The following steps will guide you through the process.
If you want to allow **non-admin users** to access APIs or modify tables using this method, you'll need to assign appropriate roles to the **OAuth application user** associated with the Client ID and Secret.
This includes:
* Creating a new role
* Assigning the role to the relevant table
* Assigning the role to the application user
**Instructions for each step are provided below.**
#### Create a System Property
1. Sign in to your ServiceNow instance.
2. In the navigation filter (under the `All` tab) search for `/sys_properties_list.do`, hit enter.
The **itil** role grants permissions for core ITIL-aligned tasks such as creating, reading, updating, and closing records in Incident, Problem, Change, and Configuration Management (CMDB) modules.
After completing all the steps, a new table will be associated with your custom role, and the user will have that role assigned. As the admin, you’ve granted the necessary permissions, allowing the user to authenticate using their own (non-admin) username and password. This enables them to perform actions on both standard and custom tables.
#### Creating your connection
1. In the Blink platform, navigate to the **Connections** page > **Add connection**. A New Connection dialog box opens displaying icons of external service providers available.
2. Select the **ServiceNow** icon. A dialog box with name of the connection and connection methods appear.
3. (Optional) Edit the name of the connection. At a later stage you cannot edit the name.
4. Select **Username & Password** as the method to create the connection.
5. Fill in the parameters:
* The Instance Name
* The Username
* The Password
* The MFA Secret Key
6. (Optional) Click **Test Connection** to test it.
7. Click **Create connection**. The new connection appears on the **Connections** page.
### Using Client ID and Secret
To create the connection you need:
* An Instance Name
* A Client ID
* A Client Secret
### Obtaining the credentials
1. **ServiceNow instance name**: If your company’s ServiceNow address is `https://instance-name.service-now.com`, copy "instance-name".
2. Follow the next steps carefully to enable Client Credentials authentication method and obtain the **Client ID & Secret**.
Only ServiceNow **Admins** can create OAuth applications and obtain the Client ID and Secret.
### Obtaining the client ID and Secret
To use the **Client ID & Secret** authentication method, you'll need to create both a new **system property** and a new **OAuth application**.
The following steps will guide you through the process.
If you want to allow **non-admin users** to access APIs or modify tables using this method, you'll need to assign appropriate roles to the **OAuth application user** associated with the Client ID and Secret.
This includes:
* Creating a new role
* Assigning the role to the relevant table
* Assigning the role to the application user
**Instructions for each step are provided below.**
#### Create a System Property
1. Sign in to your ServiceNow instance.
2. In the navigation filter (under the `All` tab) search for `/sys_properties_list.do`, hit enter.
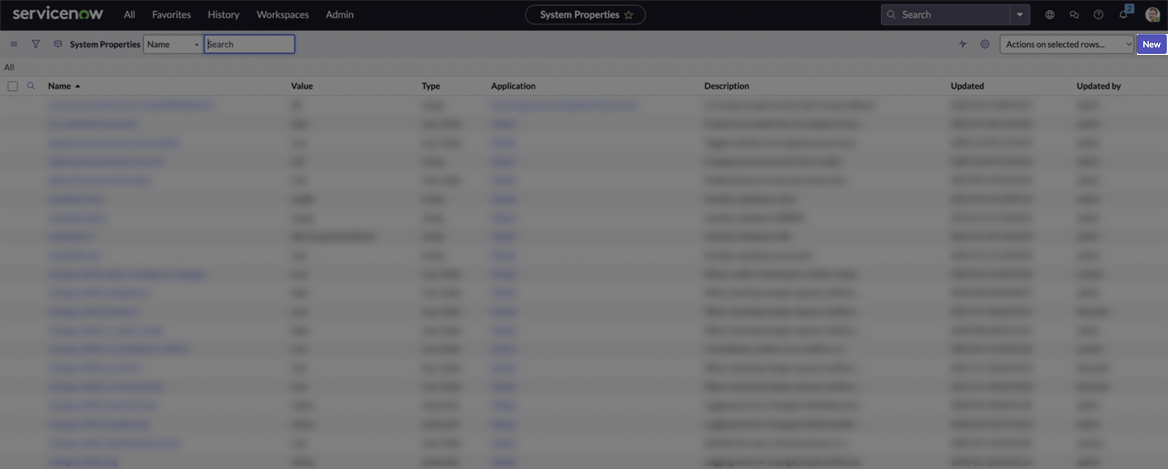
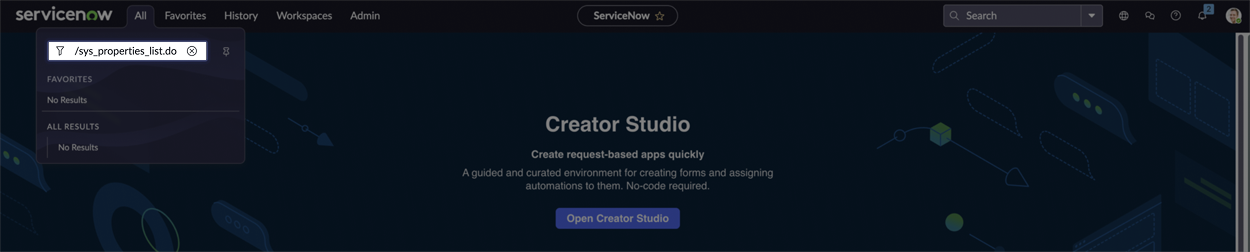 3. The list of system properties will appear. Click **New** to add a new property.
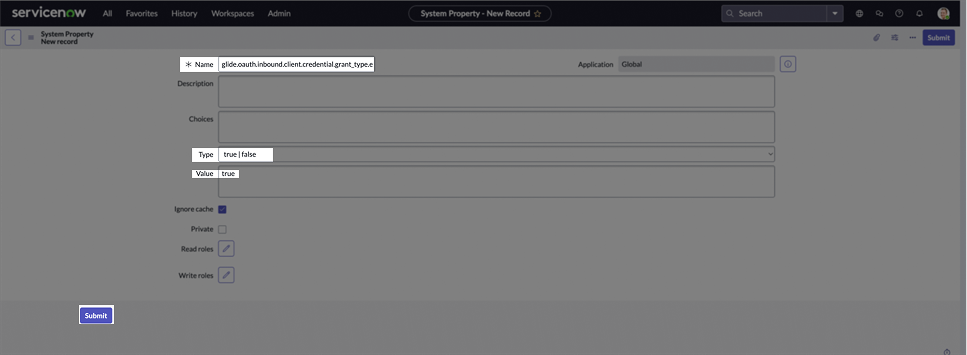
 4. In the **Name** field, enter `glide.oauth.inbound.client.credential.grant_type.enabled`. Set the **Type** to **Boolean**, and in the **Value** field enter **true**. Click **Submit**.
 #### Create a new App and obtain Client ID & Secret
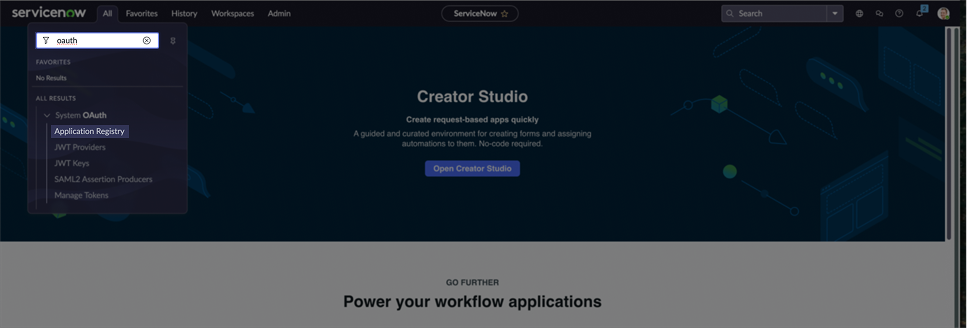
1. In the navigation filter (under the `All` tab), search for **oauth** and click **Application Registry** under **System OAuth**.
#### Create a new App and obtain Client ID & Secret
1. In the navigation filter (under the `All` tab), search for **oauth** and click **Application Registry** under **System OAuth**.
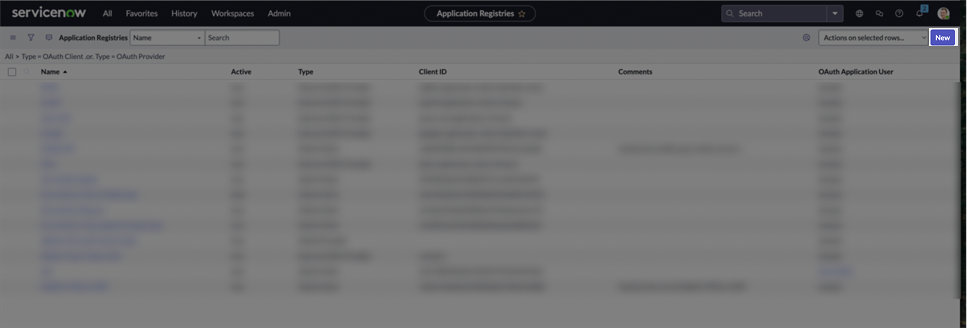
 2. On the **Application Registry** page, click **New**.
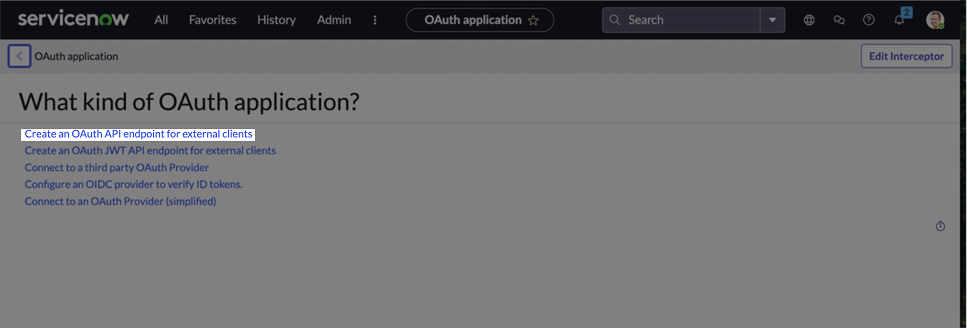
 3. Select **Create an OAuth API endpoint for external clients**.
 4. Insert a **name** to the new app, and add a user to the **Oauth Application User** field. Click **Submit** to create the app.
 In this authentication method, a user **must** be assigned to the **client credentials**. If the **OAuth Application User** field is **not** visible in your application form, you can add it manually:
Right-click on the top boundary of the application form, select **Configure** > **Form Builder**, then drag and drop the **OAuth Application User** field into the form layout. Save your changes.
5. In the **Application Registry** page, search your new app and click on it.
In this authentication method, a user **must** be assigned to the **client credentials**. If the **OAuth Application User** field is **not** visible in your application form, you can add it manually:
Right-click on the top boundary of the application form, select **Configure** > **Form Builder**, then drag and drop the **OAuth Application User** field into the form layout. Save your changes.
5. In the **Application Registry** page, search your new app and click on it.
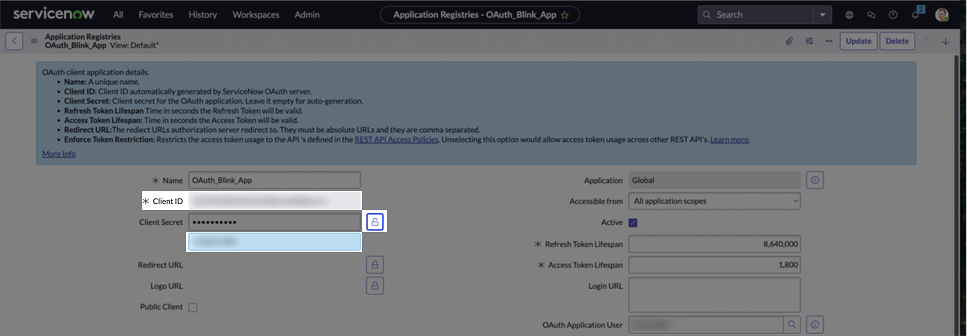
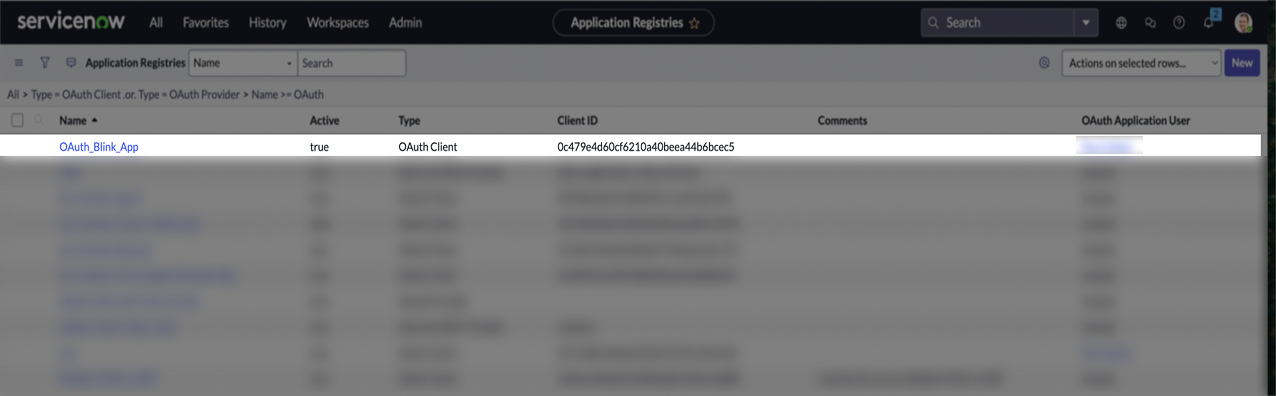 6. Copy the displayed **Client ID**, then click the **lock icon** to reveal the **Client Secret**, and copy that as well.
 As mentioned earlier, to grant non-admin users permission to access tables through the API, you must assign the appropriate roles to the user.
ServiceNow provides built-in roles that grant access to standard tables (e.g., the `itil` role for **incidents**). However, for custom tables, you’ll need to create a custom role, then assign it to both:
* The OAuth application user
* The table’s Access Control List (ACL)
**The next steps will walk you through how to do this.**
#### Create a New Role
1. In the navigation filter (under the `All` tab), search for **roles** and click **Roles** under **Users and Groups**.
2. On the **Roles** page, click **New**.
3. Enter a name for your new role. Click **Submit** to create it.
#### Assign Role to a Custom Table's ACL
1. In the navigation filter (under the `All` tab), search for **tables** and click **Tables** under **System Definition**.
2. On the **Tables** page, click **New**.
3. Enter a **Label** for the table, the **Name** will be generated automatically.
Scroll down to the **Controls** section, and in the **User role** field, select the custom role you created.
#### Assign Roles To User
1. In the navigation filter (under the `All` tab), search for **users** and click **Users** under **Organization**.
2. On the **Users** page, click the user you want to assign the roles to.
3. On the user's page, Scroll down to the **Roles** section, and click **Edit**.
4. Search for the new custom role and add it to the user. Also, assign the `itil` role to ensure access to standard tables like **Incident**. Click **Save**.
The **itil** role grants permissions for core ITIL-aligned tasks such as creating, reading, updating, and closing records in Incident, Problem, Change, and Configuration Management (CMDB) modules.
Once you've completed all the steps, you'll have a new table associated with your custom role, and the OAuth application user will have that role assigned. This setup enables you to authenticate using the Client ID and Secret you created earlier, and perform actions on standard and custom tables.
#### Creating your connection
1. In the Blink platform, navigate to the **Connections** page > **Add connection**. A New Connection dialog box opens displaying icons of external service providers available.
2. Select the **ServiceNow** icon. A dialog box with name of the connection and connection methods appear.
3. (Optional) Edit the name of the connection. At a later stage you cannot edit the name.
4. Select **Client ID & Secret** as the method to create the connection.
5. Fill in the parameters:
* The Instance Name
* The Client ID
* The Client Secret
6. (Optional) Click **Test Connection** to test it.
7. Click **Create connection**. The new connection appears on the **Connections** page.
### Using Client and User Credentials
To create the connection you need:
* An Instance Name
* A Client ID
* A Client Secret
* A Username
* A Password
Only ServiceNow **Admins** can create OAuth applications and obtain the Client ID and Secret.
### Obtaining the credentials
1. **ServiceNow instance name**: If your company’s ServiceNow address is `https://instance-name.service-now.com`, copy "instance-name".
2. **Username and password**: The username and password are the same as used to log in to your ServiceNow instance.
3. Follow the next steps carefully to obtain the **Client ID & Secret**.
#### Create a new App and obtain Client ID & Secret
1. Sign in to your ServiceNow instance.
2. In the navigation filter (under the `All` tab), search for **oauth** and click **Application Registry** under **System OAuth**.
3. On the **Application Registry** page, click **New**.
4. Select **Create an OAuth API endpoint for external clients**.
5. Insert a **name** to the new app. Click **Submit** to create the app.
As mentioned earlier, to grant non-admin users permission to access tables through the API, you must assign the appropriate roles to the user.
ServiceNow provides built-in roles that grant access to standard tables (e.g., the `itil` role for **incidents**). However, for custom tables, you’ll need to create a custom role, then assign it to both:
* The OAuth application user
* The table’s Access Control List (ACL)
**The next steps will walk you through how to do this.**
#### Create a New Role
1. In the navigation filter (under the `All` tab), search for **roles** and click **Roles** under **Users and Groups**.
2. On the **Roles** page, click **New**.
3. Enter a name for your new role. Click **Submit** to create it.
#### Assign Role to a Custom Table's ACL
1. In the navigation filter (under the `All` tab), search for **tables** and click **Tables** under **System Definition**.
2. On the **Tables** page, click **New**.
3. Enter a **Label** for the table, the **Name** will be generated automatically.
Scroll down to the **Controls** section, and in the **User role** field, select the custom role you created.
#### Assign Roles To User
1. In the navigation filter (under the `All` tab), search for **users** and click **Users** under **Organization**.
2. On the **Users** page, click the user you want to assign the roles to.
3. On the user's page, Scroll down to the **Roles** section, and click **Edit**.
4. Search for the new custom role and add it to the user. Also, assign the `itil` role to ensure access to standard tables like **Incident**. Click **Save**.
The **itil** role grants permissions for core ITIL-aligned tasks such as creating, reading, updating, and closing records in Incident, Problem, Change, and Configuration Management (CMDB) modules.
Once you've completed all the steps, you'll have a new table associated with your custom role, and the OAuth application user will have that role assigned. This setup enables you to authenticate using the Client ID and Secret you created earlier, and perform actions on standard and custom tables.
#### Creating your connection
1. In the Blink platform, navigate to the **Connections** page > **Add connection**. A New Connection dialog box opens displaying icons of external service providers available.
2. Select the **ServiceNow** icon. A dialog box with name of the connection and connection methods appear.
3. (Optional) Edit the name of the connection. At a later stage you cannot edit the name.
4. Select **Client ID & Secret** as the method to create the connection.
5. Fill in the parameters:
* The Instance Name
* The Client ID
* The Client Secret
6. (Optional) Click **Test Connection** to test it.
7. Click **Create connection**. The new connection appears on the **Connections** page.
### Using Client and User Credentials
To create the connection you need:
* An Instance Name
* A Client ID
* A Client Secret
* A Username
* A Password
Only ServiceNow **Admins** can create OAuth applications and obtain the Client ID and Secret.
### Obtaining the credentials
1. **ServiceNow instance name**: If your company’s ServiceNow address is `https://instance-name.service-now.com`, copy "instance-name".
2. **Username and password**: The username and password are the same as used to log in to your ServiceNow instance.
3. Follow the next steps carefully to obtain the **Client ID & Secret**.
#### Create a new App and obtain Client ID & Secret
1. Sign in to your ServiceNow instance.
2. In the navigation filter (under the `All` tab), search for **oauth** and click **Application Registry** under **System OAuth**.
3. On the **Application Registry** page, click **New**.
4. Select **Create an OAuth API endpoint for external clients**.
5. Insert a **name** to the new app. Click **Submit** to create the app.
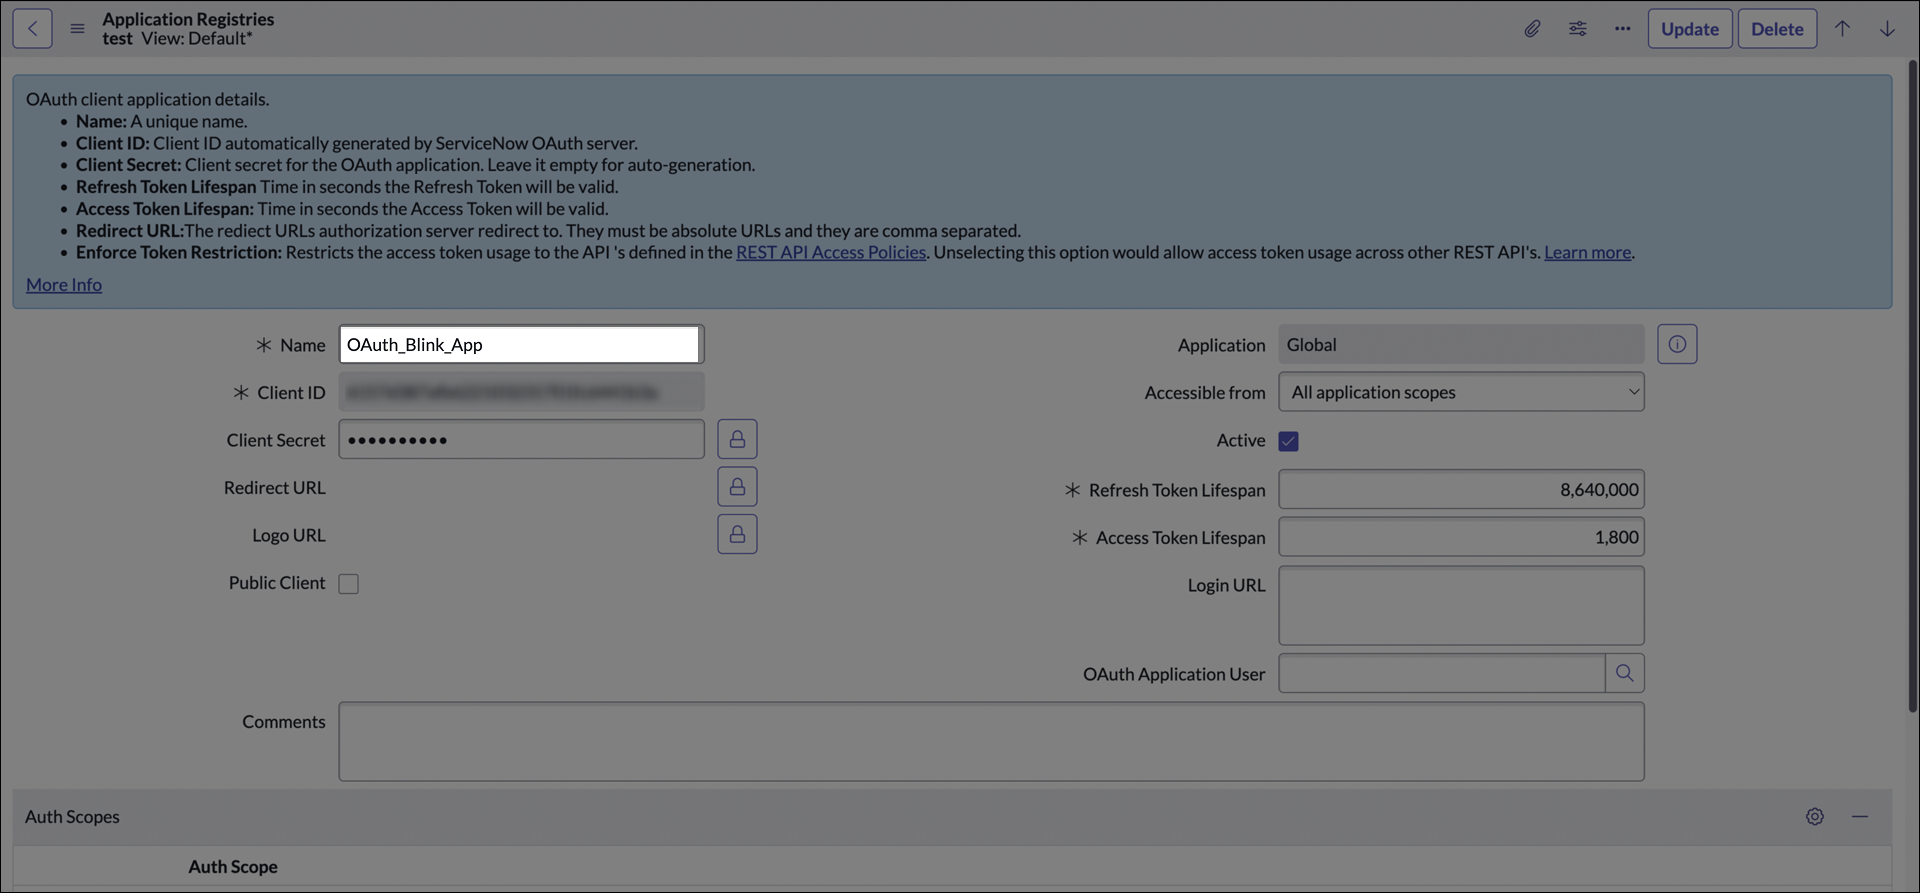 6. In the **Application Registry** page, search your new app and click on it.
7. Copy the displayed **Client ID**, then click the **lock icon** to reveal the **Client Secret**, and copy that as well.
**If the user executing the actions does not have Admin privileges, an Admin must follow the steps below to assign them the appropriate permissions.**
### Create a New Role
1. In the navigation filter (under the `All` tab), search for **roles** and click **Roles** under **Users and Groups**.
2. On the **Roles** page, click **New**.
3. Enter a name for your new role. Click **Submit** to create it.
#### Assign Role to a Custom Table's ACL
1. In the navigation filter (under the `All` tab), search for **tables** and click **Tables** under **System Definition**.
2. On the **Tables** page, click **New**.
3. Enter a **Label** for the table, the **Name** will be generated automatically.
Scroll down to the **Controls** section, and in the **User role** field, select the custom role you created.
#### Assign Roles To User
1. In the navigation filter (under the `All` tab), search for **users** and click **Users** under **Organization**.
2. On the **Users** page, click the user you want to assign the roles to.
3. On the user's page, Scroll down to the **Roles** section, and click **Edit**.
4. Search for the new custom role and add it to the user. Also, assign the `itil` role to ensure access to standard tables like **Incident**. Click **Save**.
The **itil** role grants permissions for core ITIL-aligned tasks such as creating, reading, updating, and closing records in Incident, Problem, Change, and Configuration Management (CMDB) modules.
After completing all the steps, a new table will be associated with your custom role, and the user will have that role assigned. As the admin, you’ve granted the necessary permissions, allowing the user to authenticate using the Client ID and Secret you created earlier, along with their own (non-admin) username and password. This enables them to perform actions on both standard and custom tables.
#### Creating your connection
1. In the Blink platform, navigate to the **Connections** page > **Add connection**. A New Connection dialog box opens displaying icons of external service providers available.
2. Select the **ServiceNow** icon. A dialog box with name of the connection and connection methods appear.
3. (Optional) Edit the name of the connection. At a later stage you cannot edit the name.
4. Select **Client & User Credentials** as the method to create the connection.
5. Fill in the parameters:
* The Instance Name
* The Client ID
* The Client Secret
* The Username
* The Password
6. (Optional) Click **Test Connection** to test it.
7. Click **Create connection**. The new connection appears on the **Connections** page.
6. In the **Application Registry** page, search your new app and click on it.
7. Copy the displayed **Client ID**, then click the **lock icon** to reveal the **Client Secret**, and copy that as well.
**If the user executing the actions does not have Admin privileges, an Admin must follow the steps below to assign them the appropriate permissions.**
### Create a New Role
1. In the navigation filter (under the `All` tab), search for **roles** and click **Roles** under **Users and Groups**.
2. On the **Roles** page, click **New**.
3. Enter a name for your new role. Click **Submit** to create it.
#### Assign Role to a Custom Table's ACL
1. In the navigation filter (under the `All` tab), search for **tables** and click **Tables** under **System Definition**.
2. On the **Tables** page, click **New**.
3. Enter a **Label** for the table, the **Name** will be generated automatically.
Scroll down to the **Controls** section, and in the **User role** field, select the custom role you created.
#### Assign Roles To User
1. In the navigation filter (under the `All` tab), search for **users** and click **Users** under **Organization**.
2. On the **Users** page, click the user you want to assign the roles to.
3. On the user's page, Scroll down to the **Roles** section, and click **Edit**.
4. Search for the new custom role and add it to the user. Also, assign the `itil` role to ensure access to standard tables like **Incident**. Click **Save**.
The **itil** role grants permissions for core ITIL-aligned tasks such as creating, reading, updating, and closing records in Incident, Problem, Change, and Configuration Management (CMDB) modules.
After completing all the steps, a new table will be associated with your custom role, and the user will have that role assigned. As the admin, you’ve granted the necessary permissions, allowing the user to authenticate using the Client ID and Secret you created earlier, along with their own (non-admin) username and password. This enables them to perform actions on both standard and custom tables.
#### Creating your connection
1. In the Blink platform, navigate to the **Connections** page > **Add connection**. A New Connection dialog box opens displaying icons of external service providers available.
2. Select the **ServiceNow** icon. A dialog box with name of the connection and connection methods appear.
3. (Optional) Edit the name of the connection. At a later stage you cannot edit the name.
4. Select **Client & User Credentials** as the method to create the connection.
5. Fill in the parameters:
* The Instance Name
* The Client ID
* The Client Secret
* The Username
* The Password
6. (Optional) Click **Test Connection** to test it.
7. Click **Create connection**. The new connection appears on the **Connections** page.