> ## Documentation Index
> Fetch the complete documentation index at: https://docs.blinkops.com/llms.txt
> Use this file to discover all available pages before exploring further.
# Microsoft Defender for Endpoint
> Microsoft Defender for Endpoint is an enterprise endpoint security platform designed to help enterprise networks prevent, detect, investigate, and respond to advanced threats.
## Creating a Microsoft Defender For Endpoints connection
Create the connection by using one of the following methods:
* [OAuth](#using-oauth)
* [App Registration](#using-app-registration)
### Using OAuth
#### Creating your connection
1. In the Blink platform, navigate to the **Connections** page > **Add connection**. A New Connection dialog box opens displaying icons of external service providers available.
2. Select the **Microsoft Defender For Endpoints** icon. A dialog box with name of the connection and connection methods appear.
3. (Optional) Edit the name of the connection. At a later stage you cannot edit the name.
4. Click **OAuth** to authenticate using OAuth.
5. Sign in using your credentials.
Need admin approval? please refer to the [Need Admin
Approval](/docs/integrations/microsoft-defender-for-endpoints/admin-approval)
guide.
### Using App Registration
To create the connection you need:
* A Client ID
* A Client Secret
* A Tenant ID
#### Obtaining the credentials
1. Log into the [Azure Portal](https://portal.azure.com/#home).
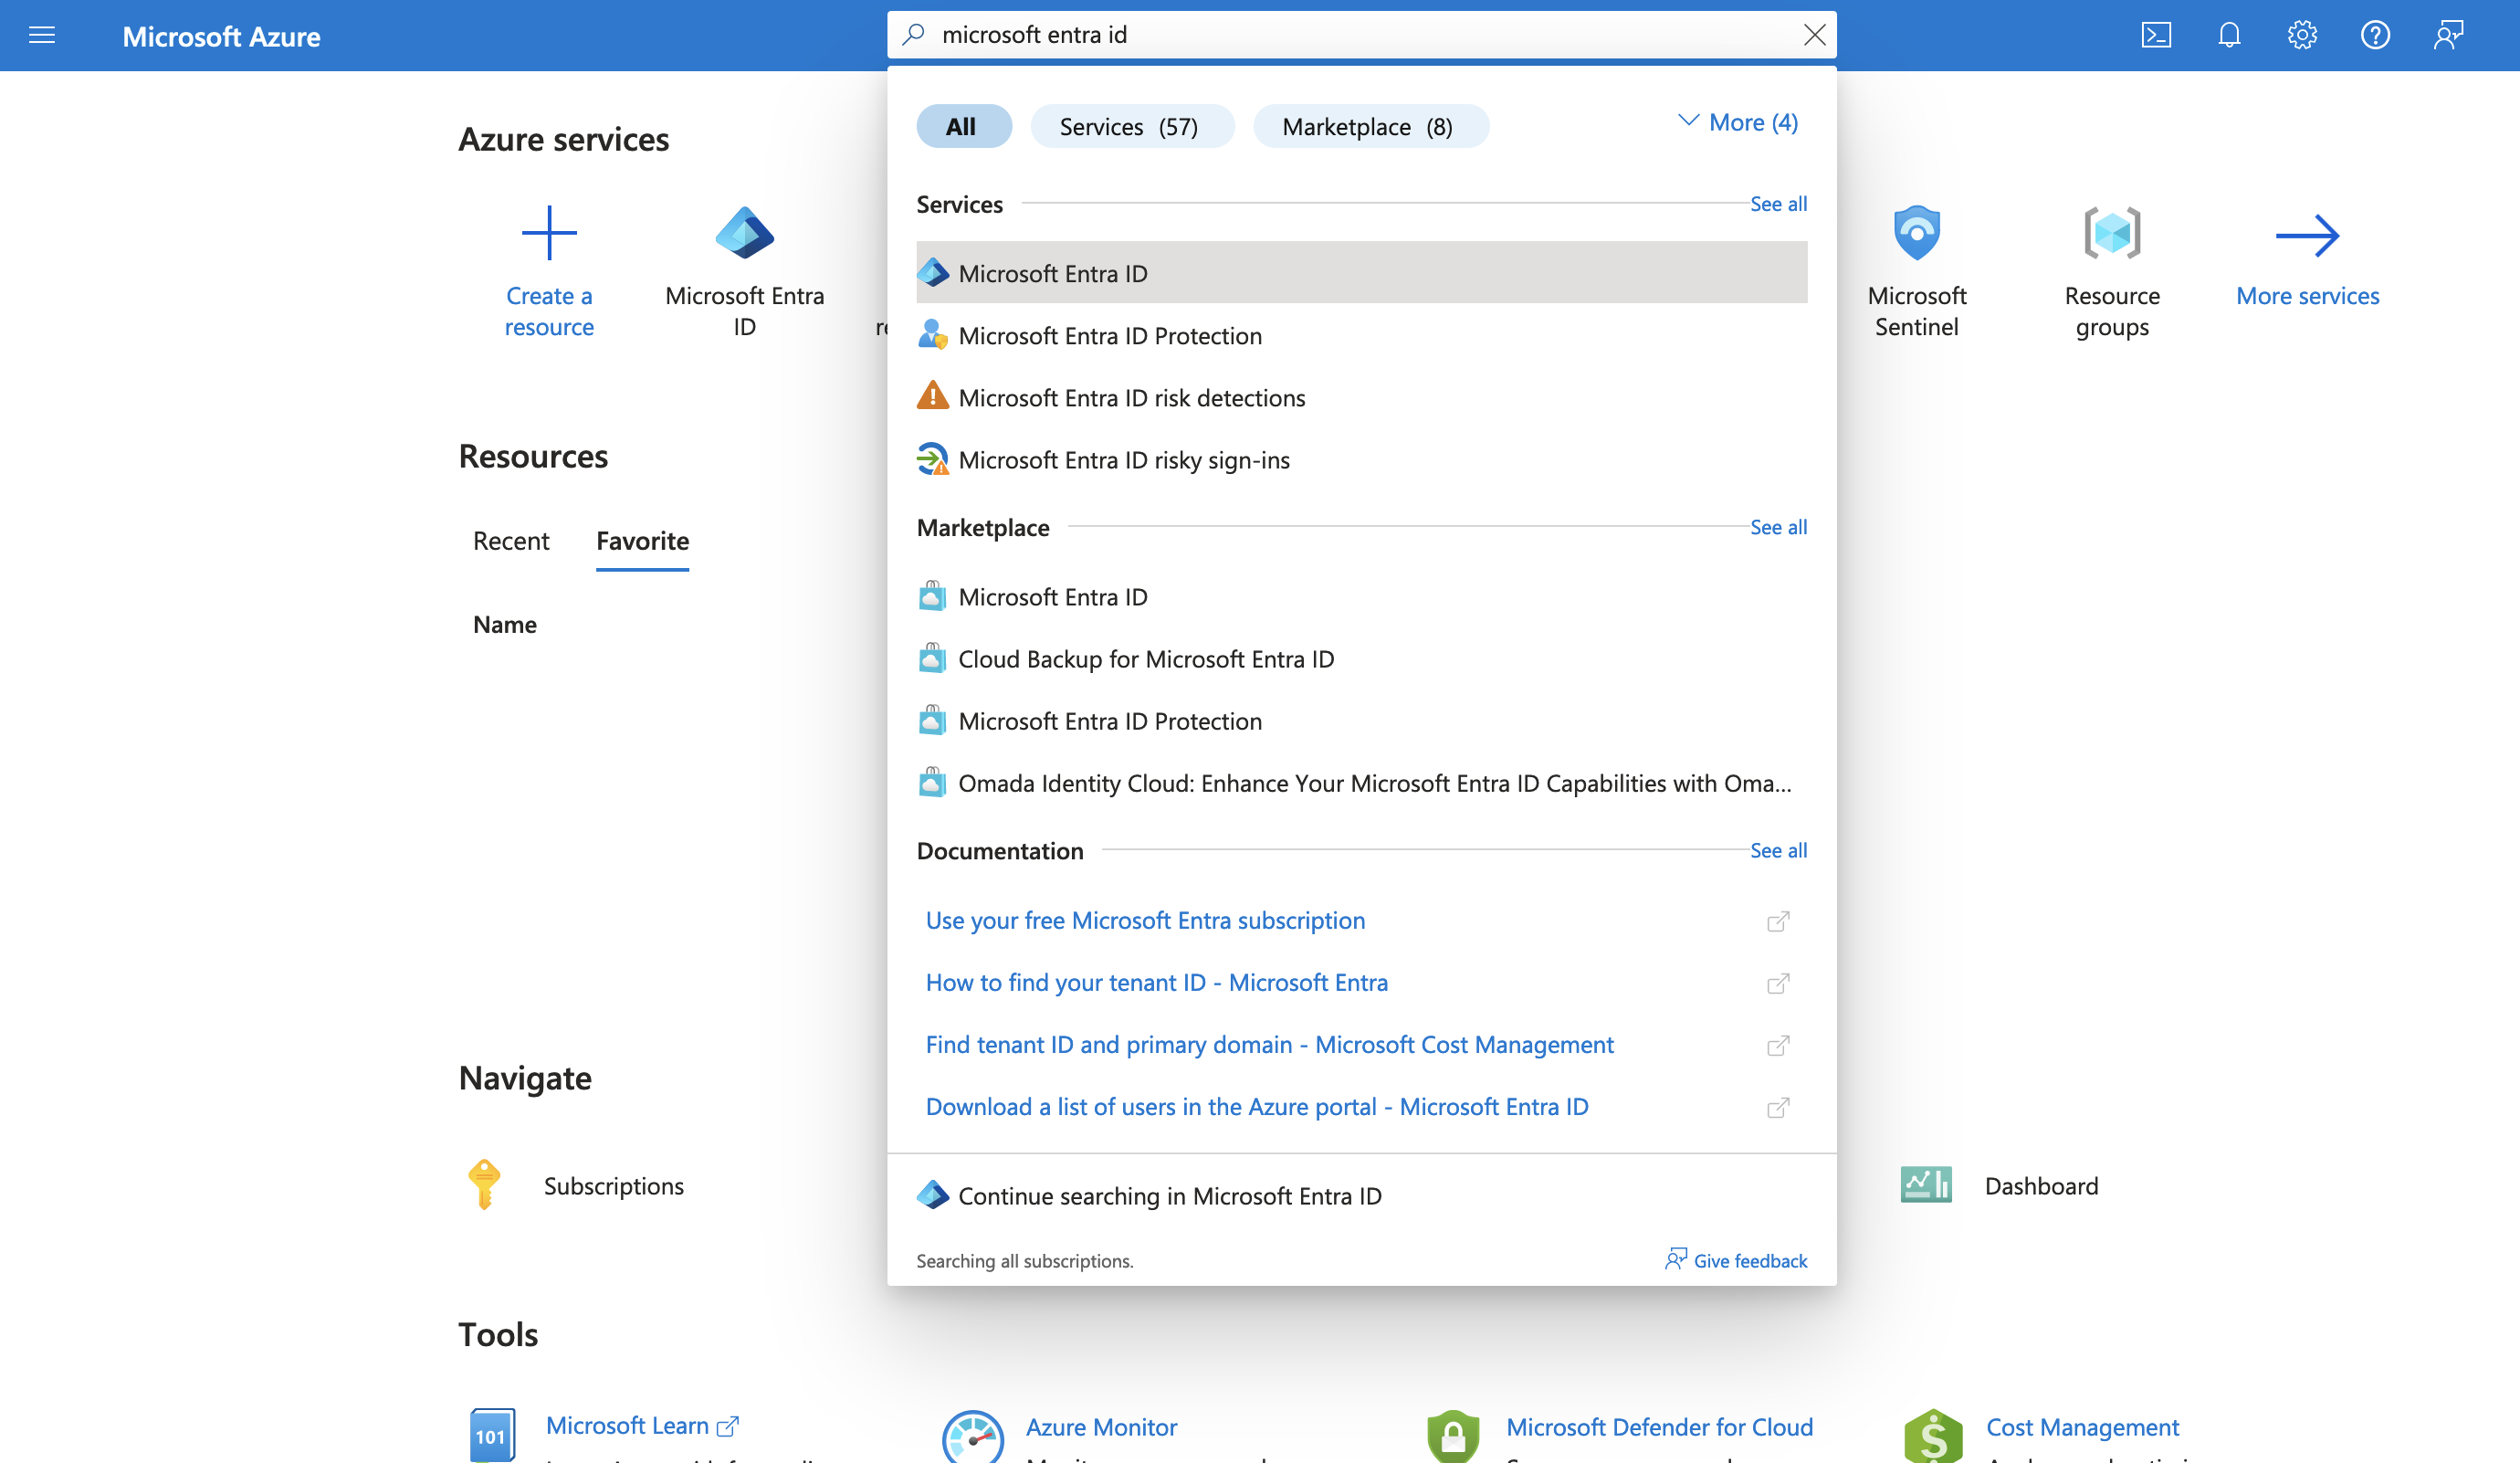
2. Go to the *Microsoft Entra ID* resource.
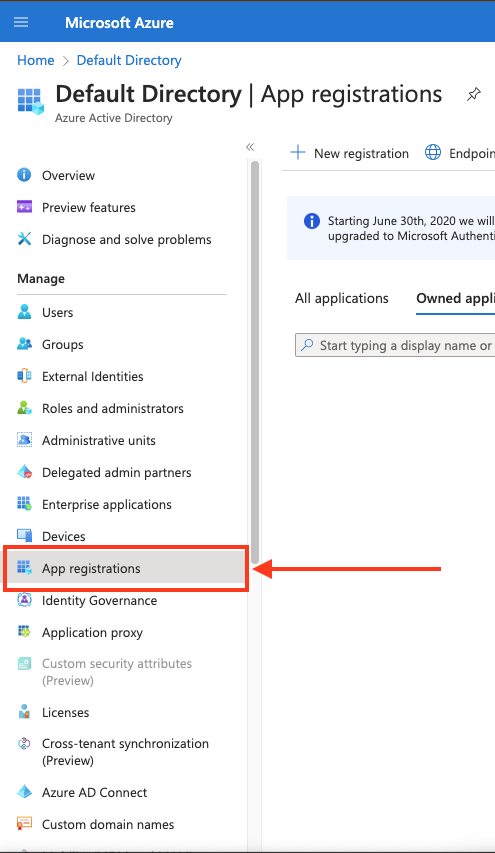
 3. In the left-hand menu, click **App registrations**.
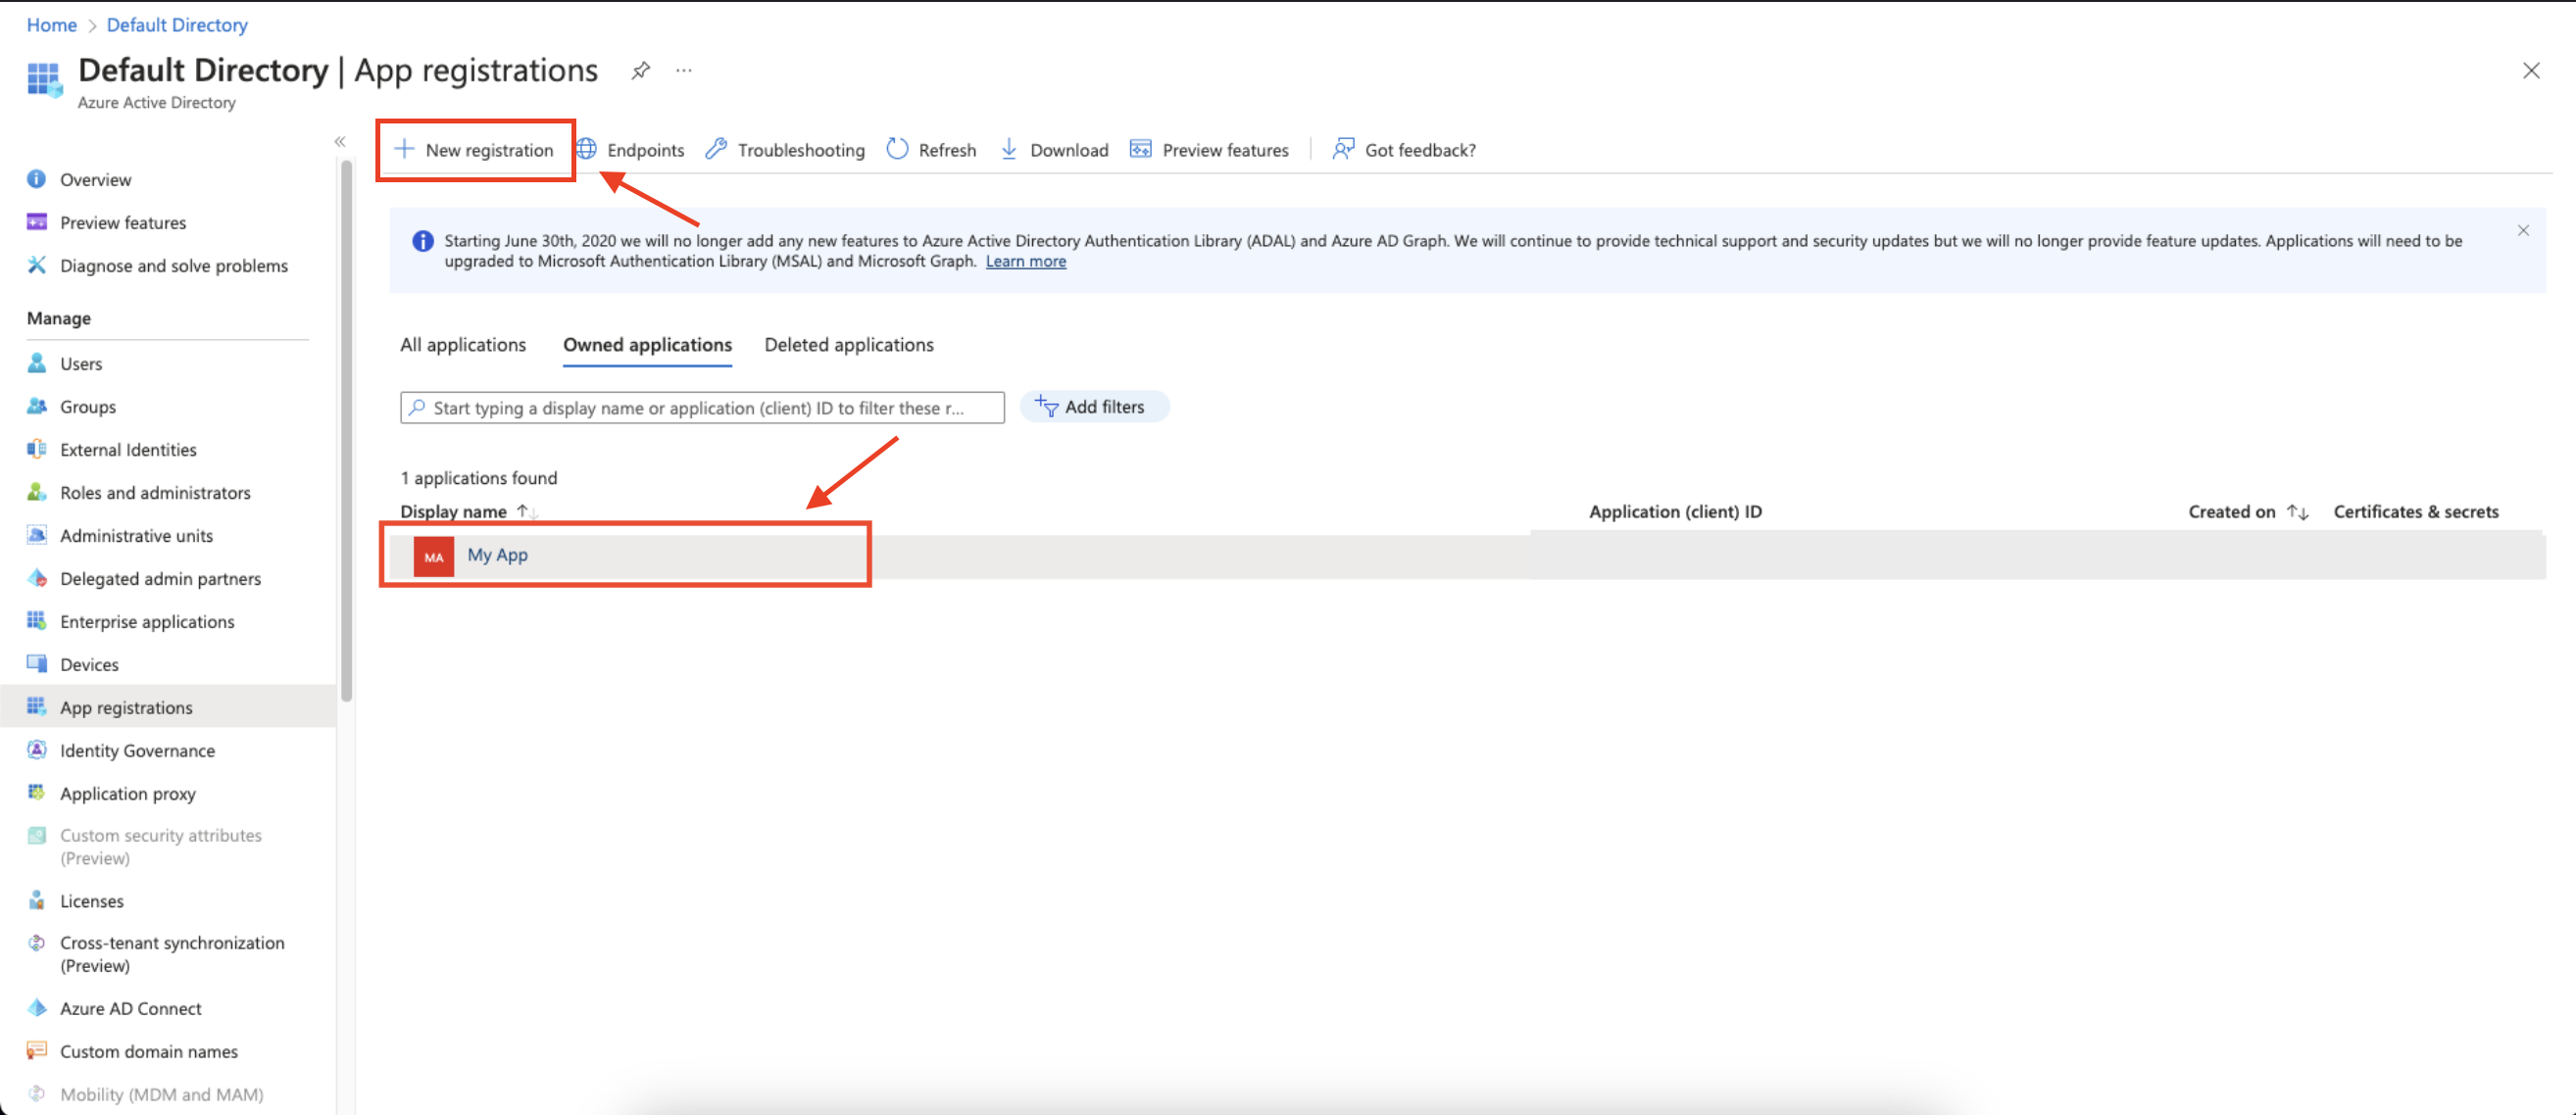
 4. Create a new application registration or click on one of your existing applications.
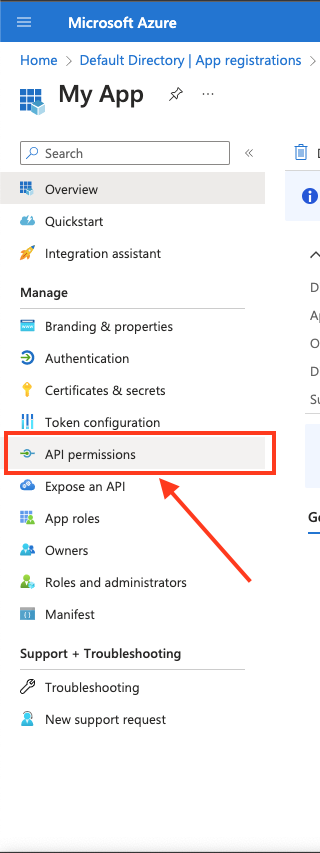
 5. In the left-hand menu, click **API permissions**.
 6. Click **Add a permission** > **APIs my organization uses** > **WindowsDefenderATP**.
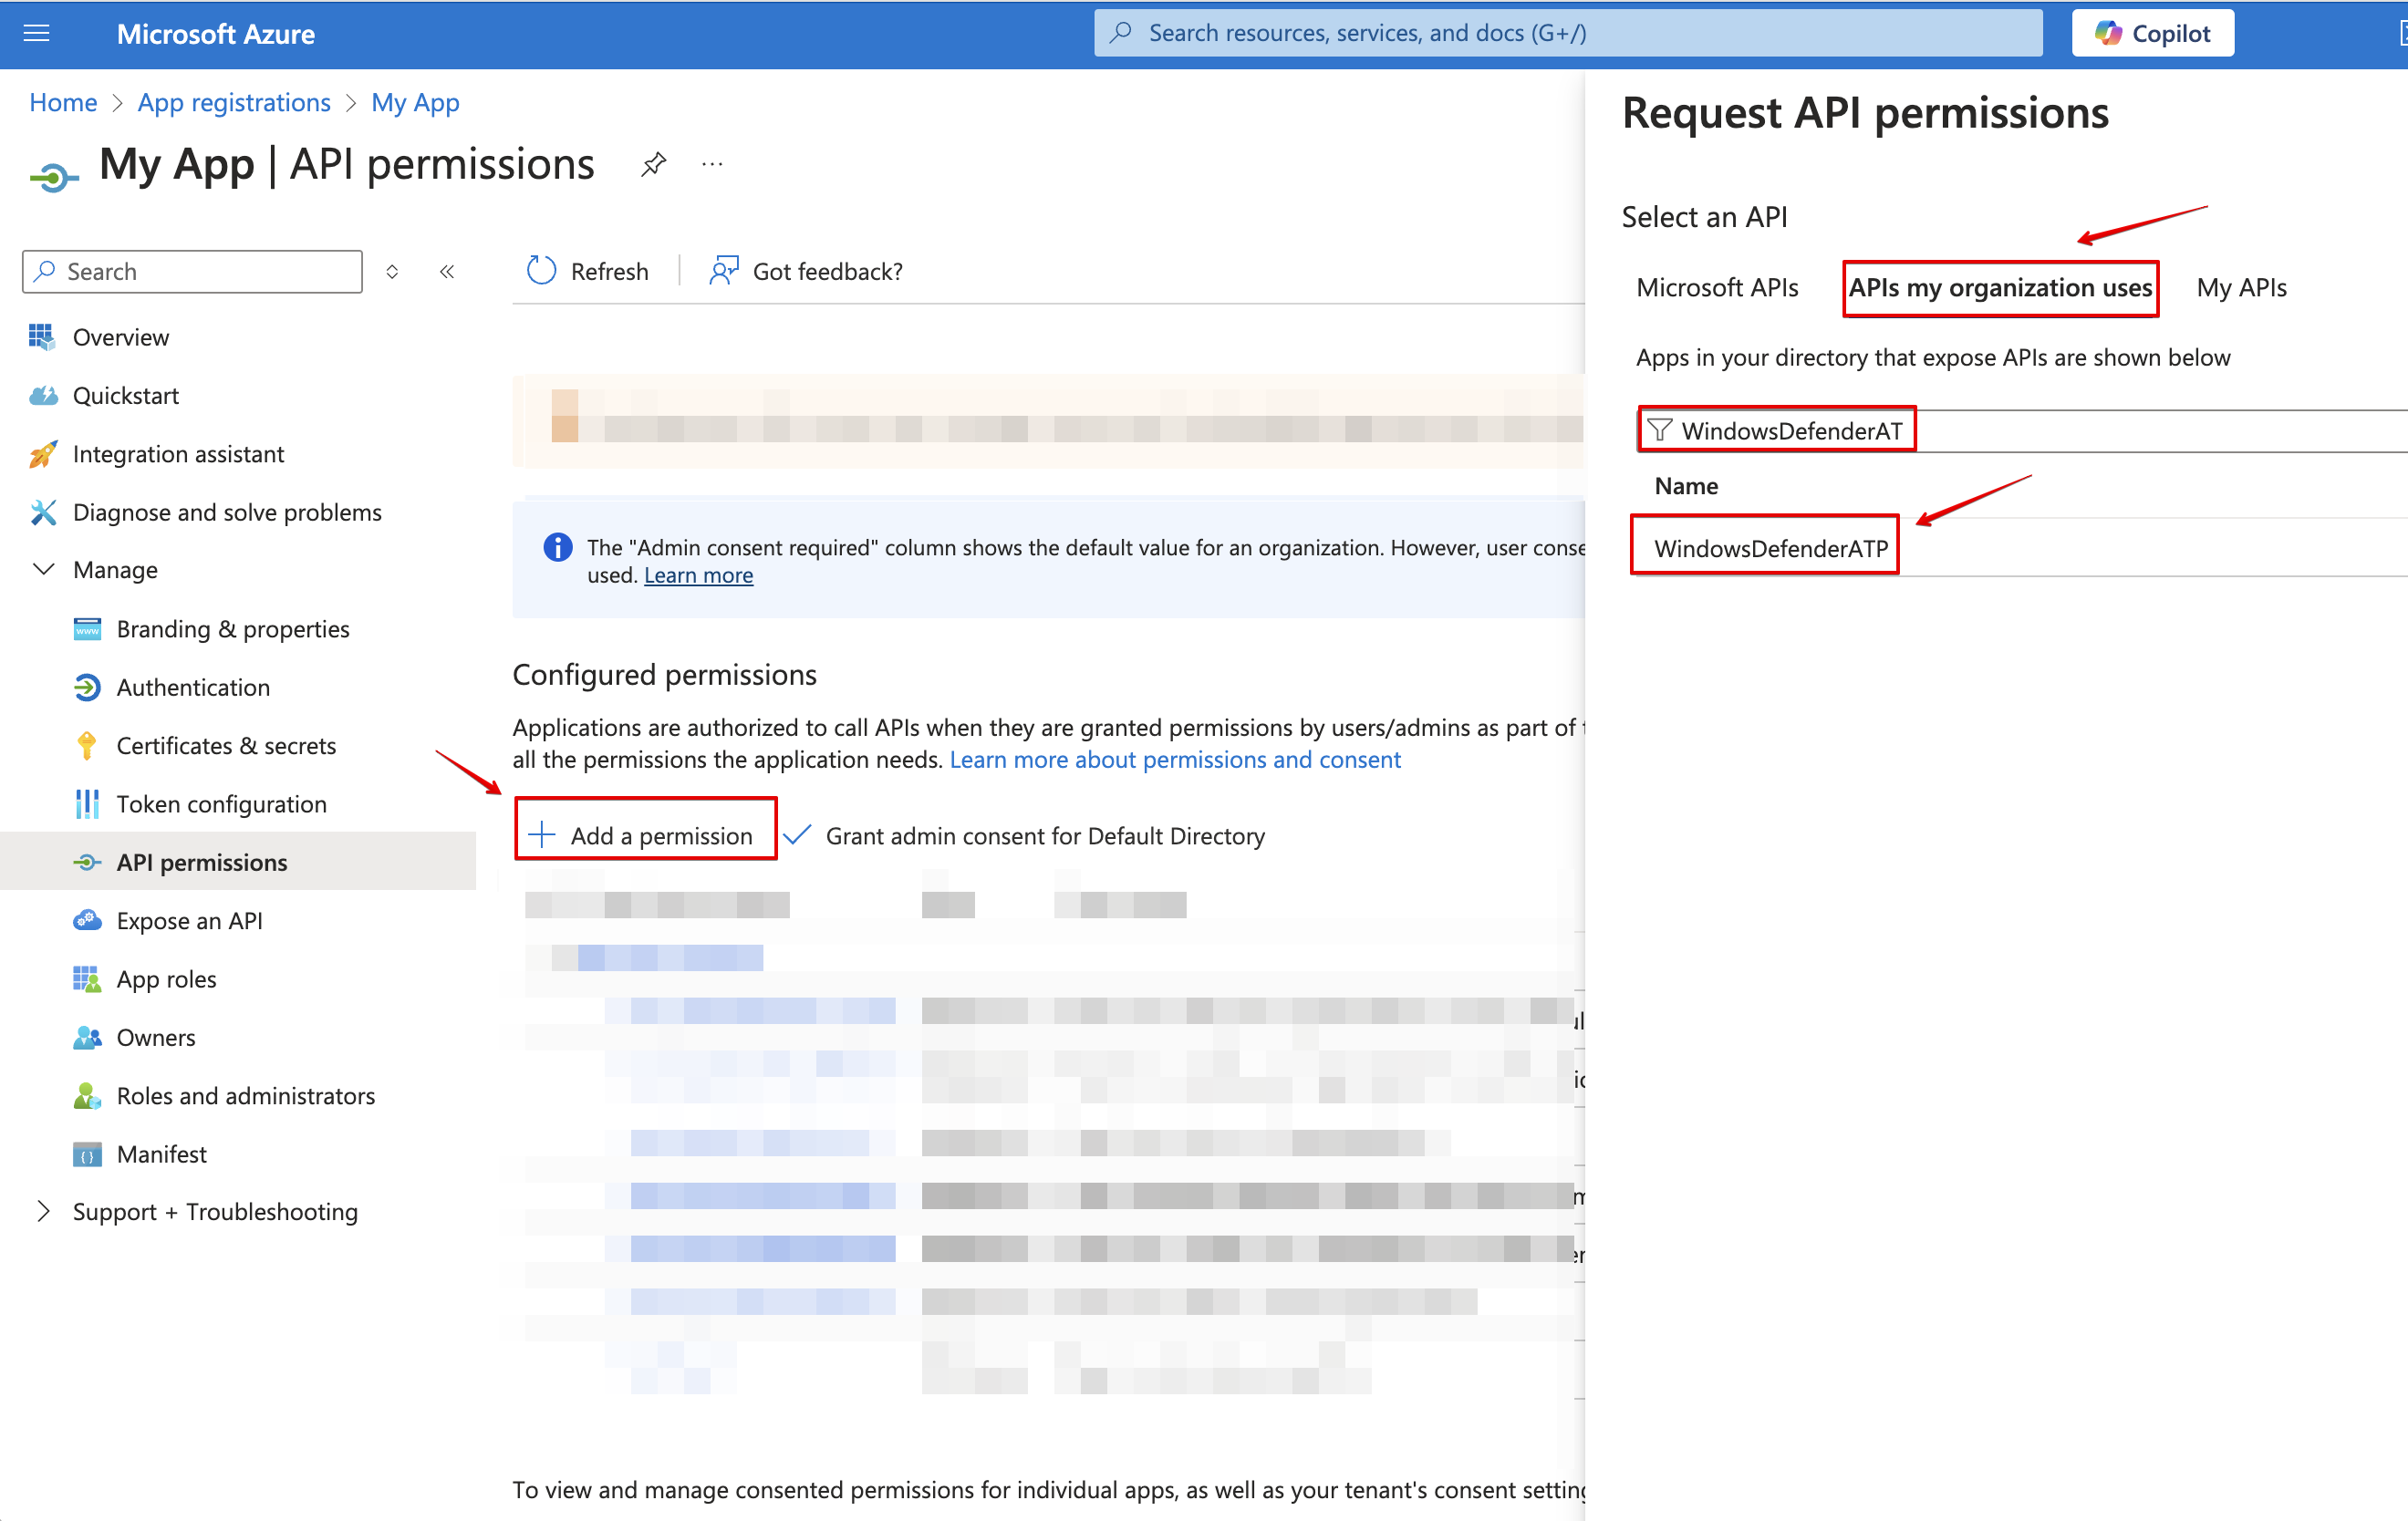 7. Choose **Application permissions** and mark the permissions you wish to add.
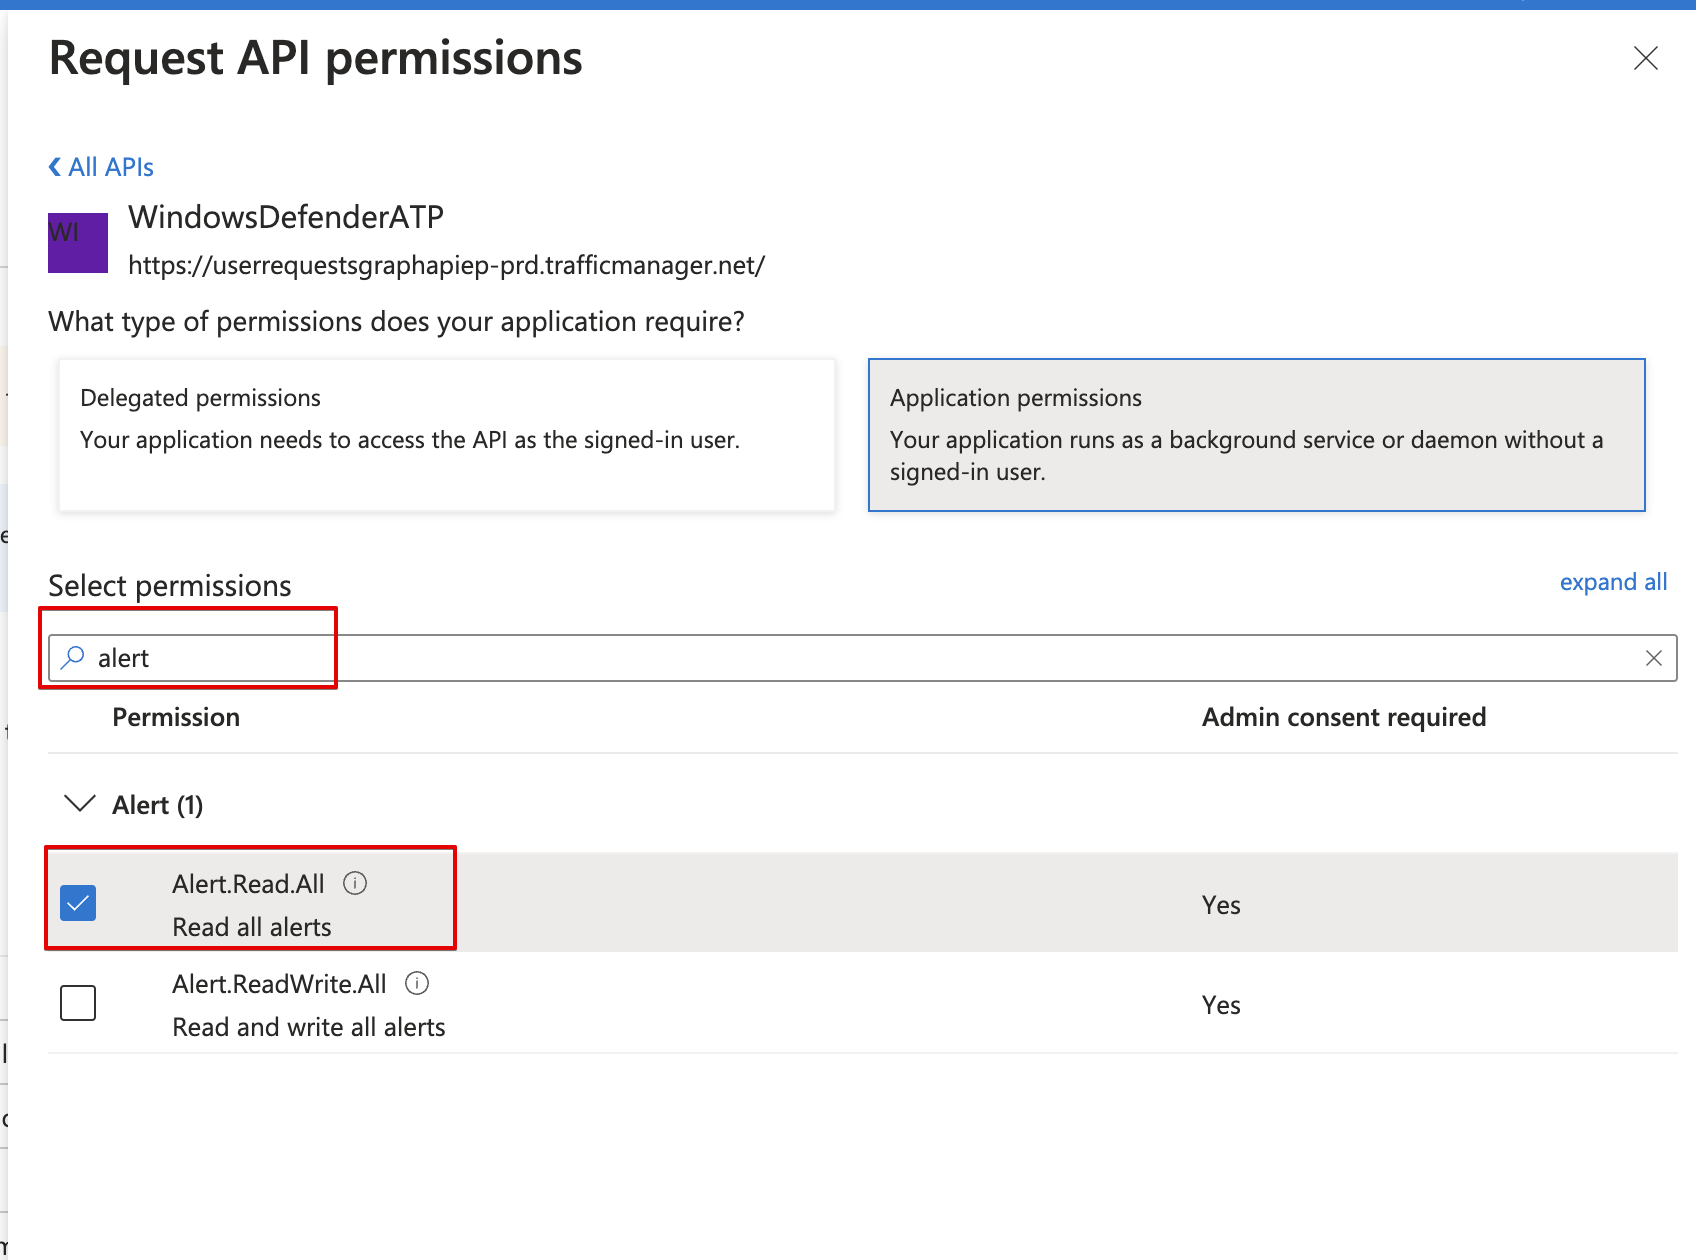 To support all Blink actions, these are the required **application** permissions:
| Required Permissions |
| ------------------------- |
| Alert.Read.All |
| Alert.ReadWrite.All |
| Machine.LiveResponse |
| Machine.Read.All |
| Machine.ReadWrite.All |
| Machine.StopAndQuarantine |
| Machine.Isolate |
| AdvancedQuery.Read.All |
| Machine.Scan |
8. Click **Add permissions** to save the changes.
9. Click **Grant admin consent for ``** on the API permissions page. **Only admins can grant consent**.
To support all Blink actions, these are the required **application** permissions:
| Required Permissions |
| ------------------------- |
| Alert.Read.All |
| Alert.ReadWrite.All |
| Machine.LiveResponse |
| Machine.Read.All |
| Machine.ReadWrite.All |
| Machine.StopAndQuarantine |
| Machine.Isolate |
| AdvancedQuery.Read.All |
| Machine.Scan |
8. Click **Add permissions** to save the changes.
9. Click **Grant admin consent for ``** on the API permissions page. **Only admins can grant consent**.
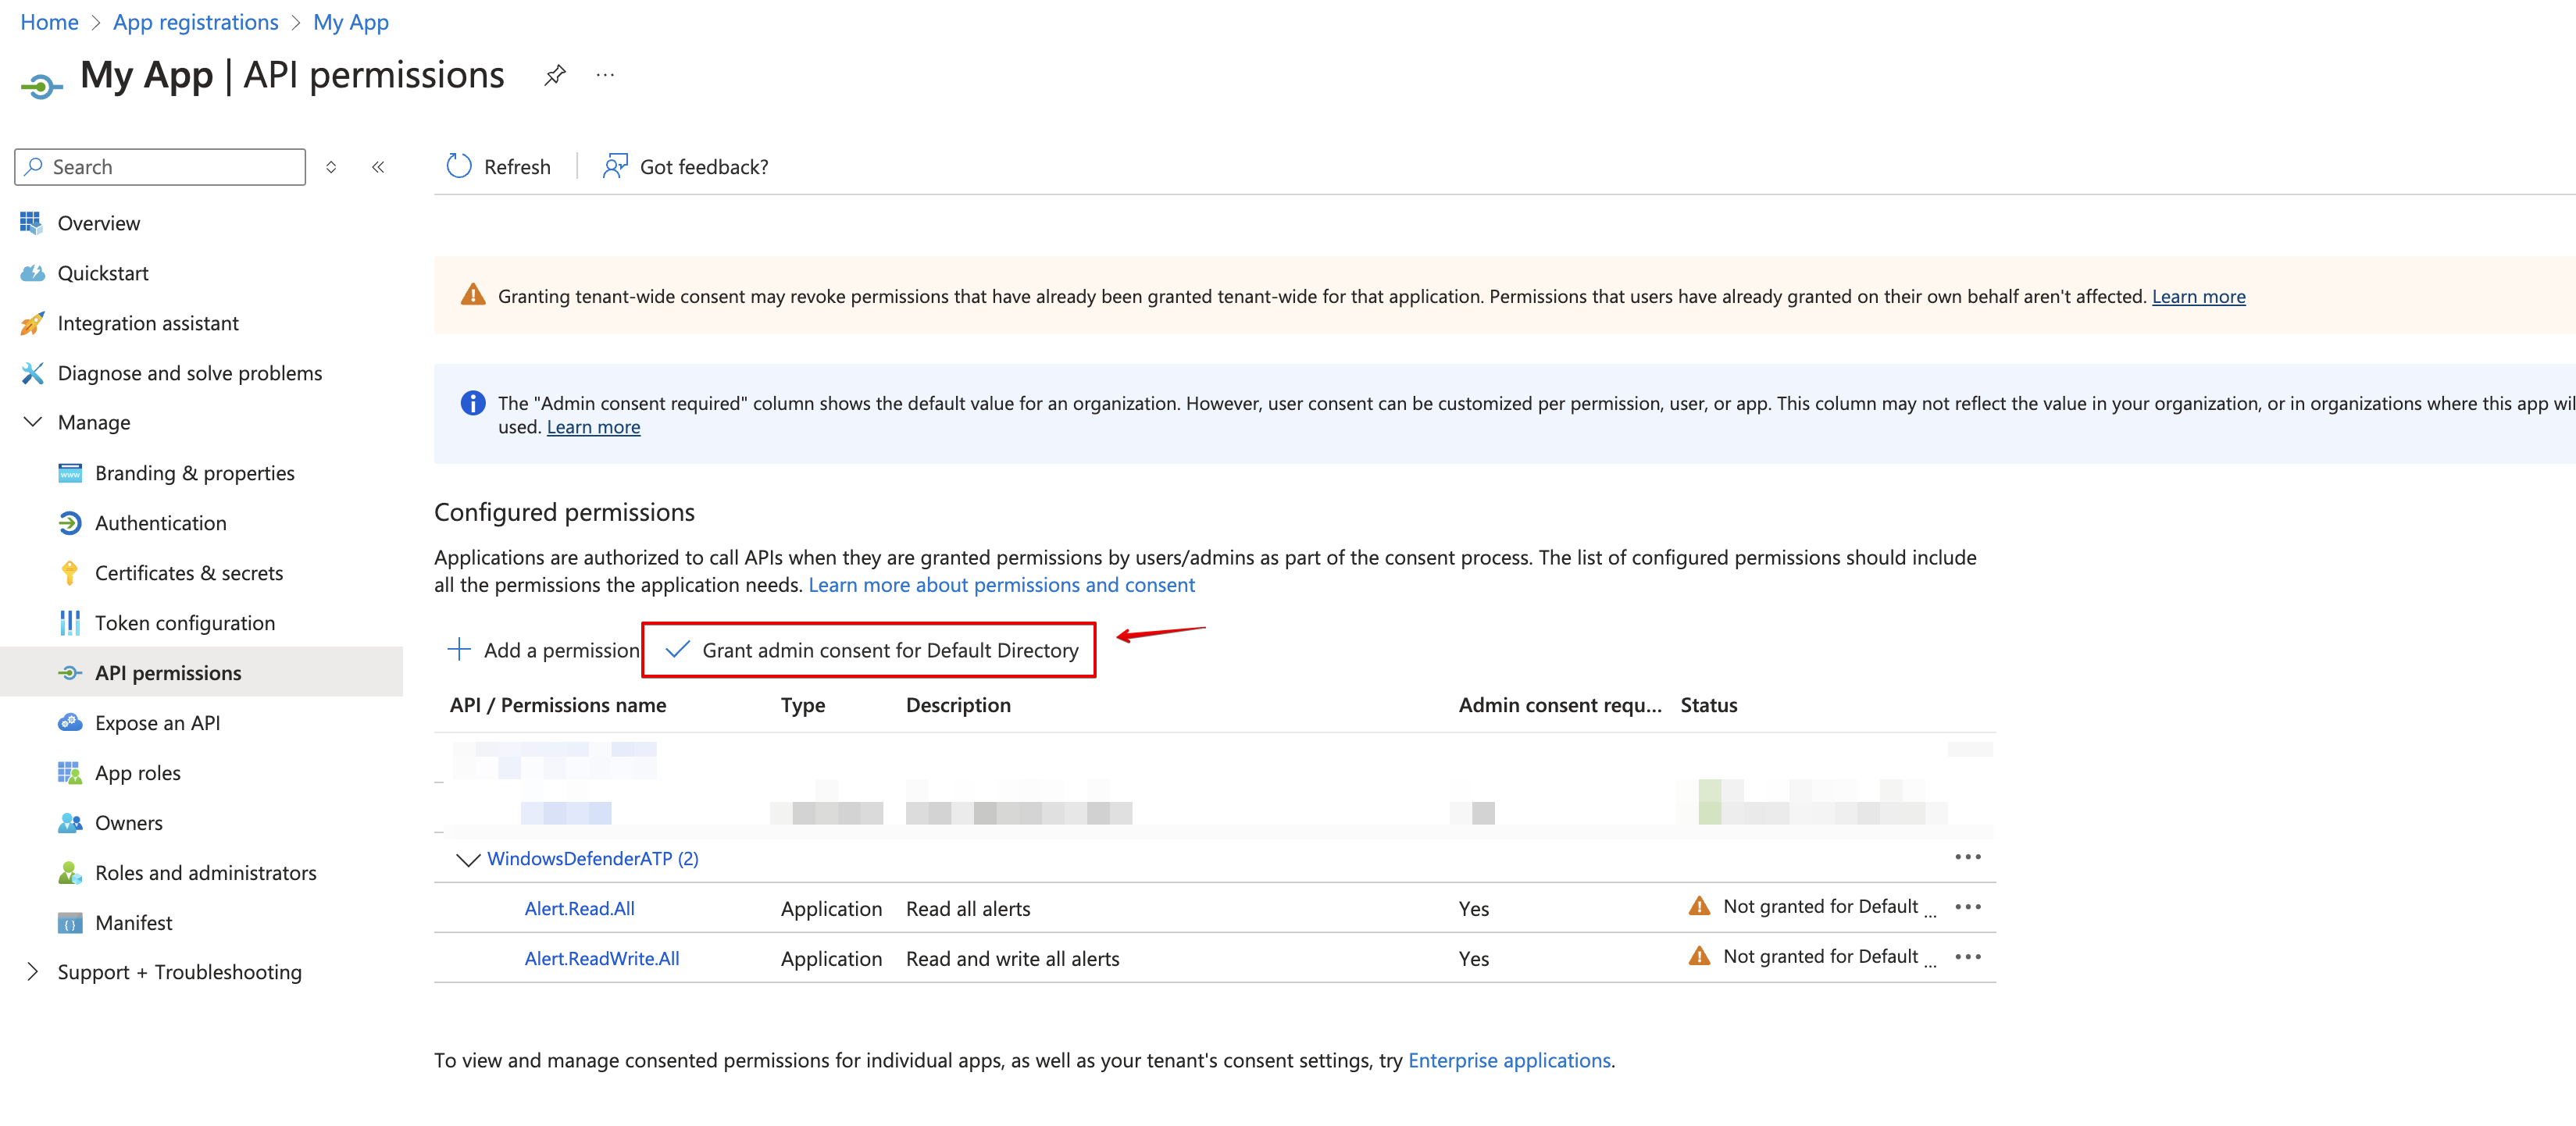 10. Confirm that the added permissions are now verified.
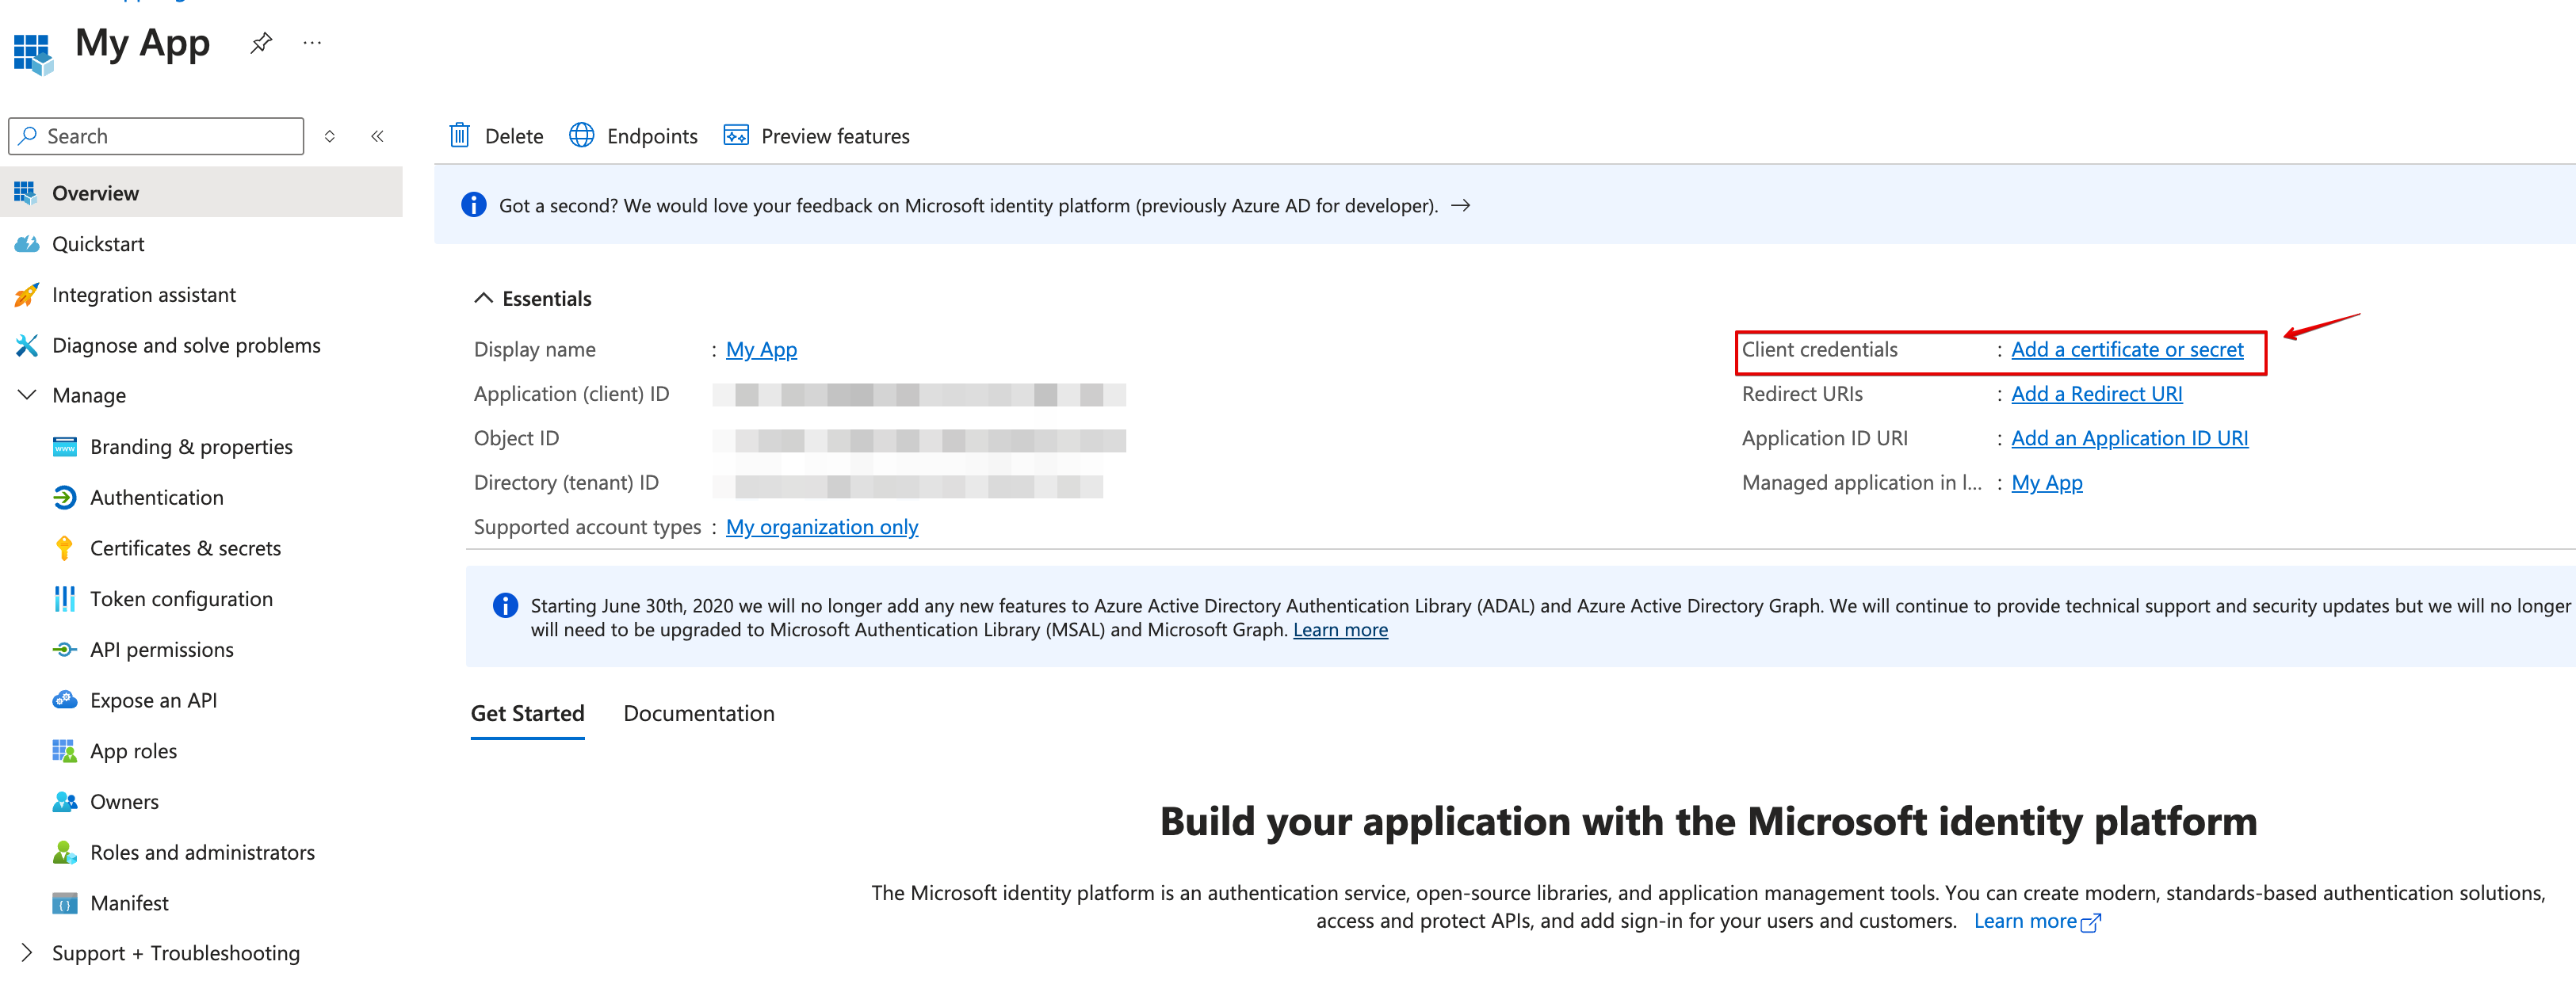
 11. Navigate to **Overview** and Copy your **client ID** and **tenant ID**.
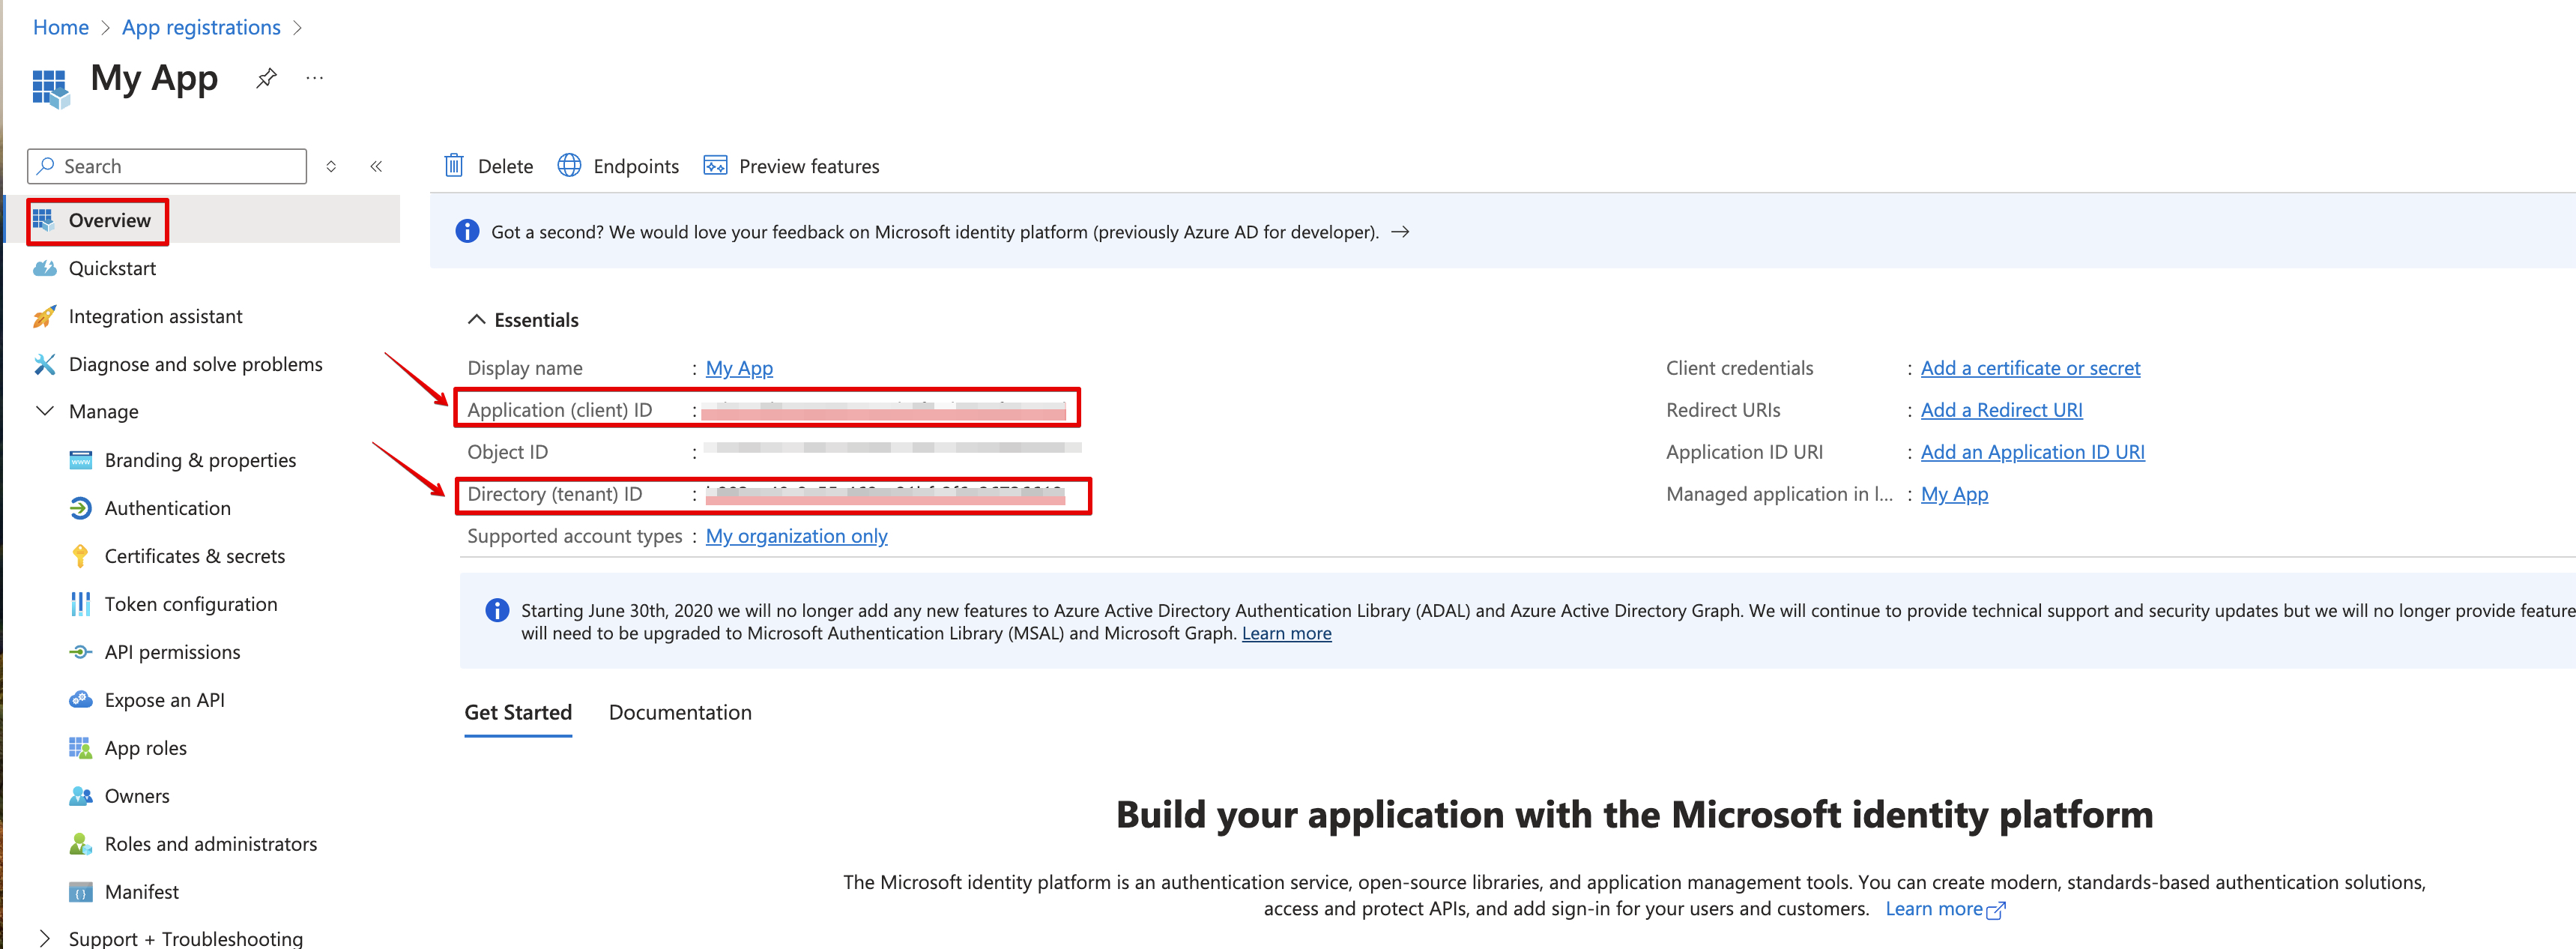 12. Create a new **client secret**.
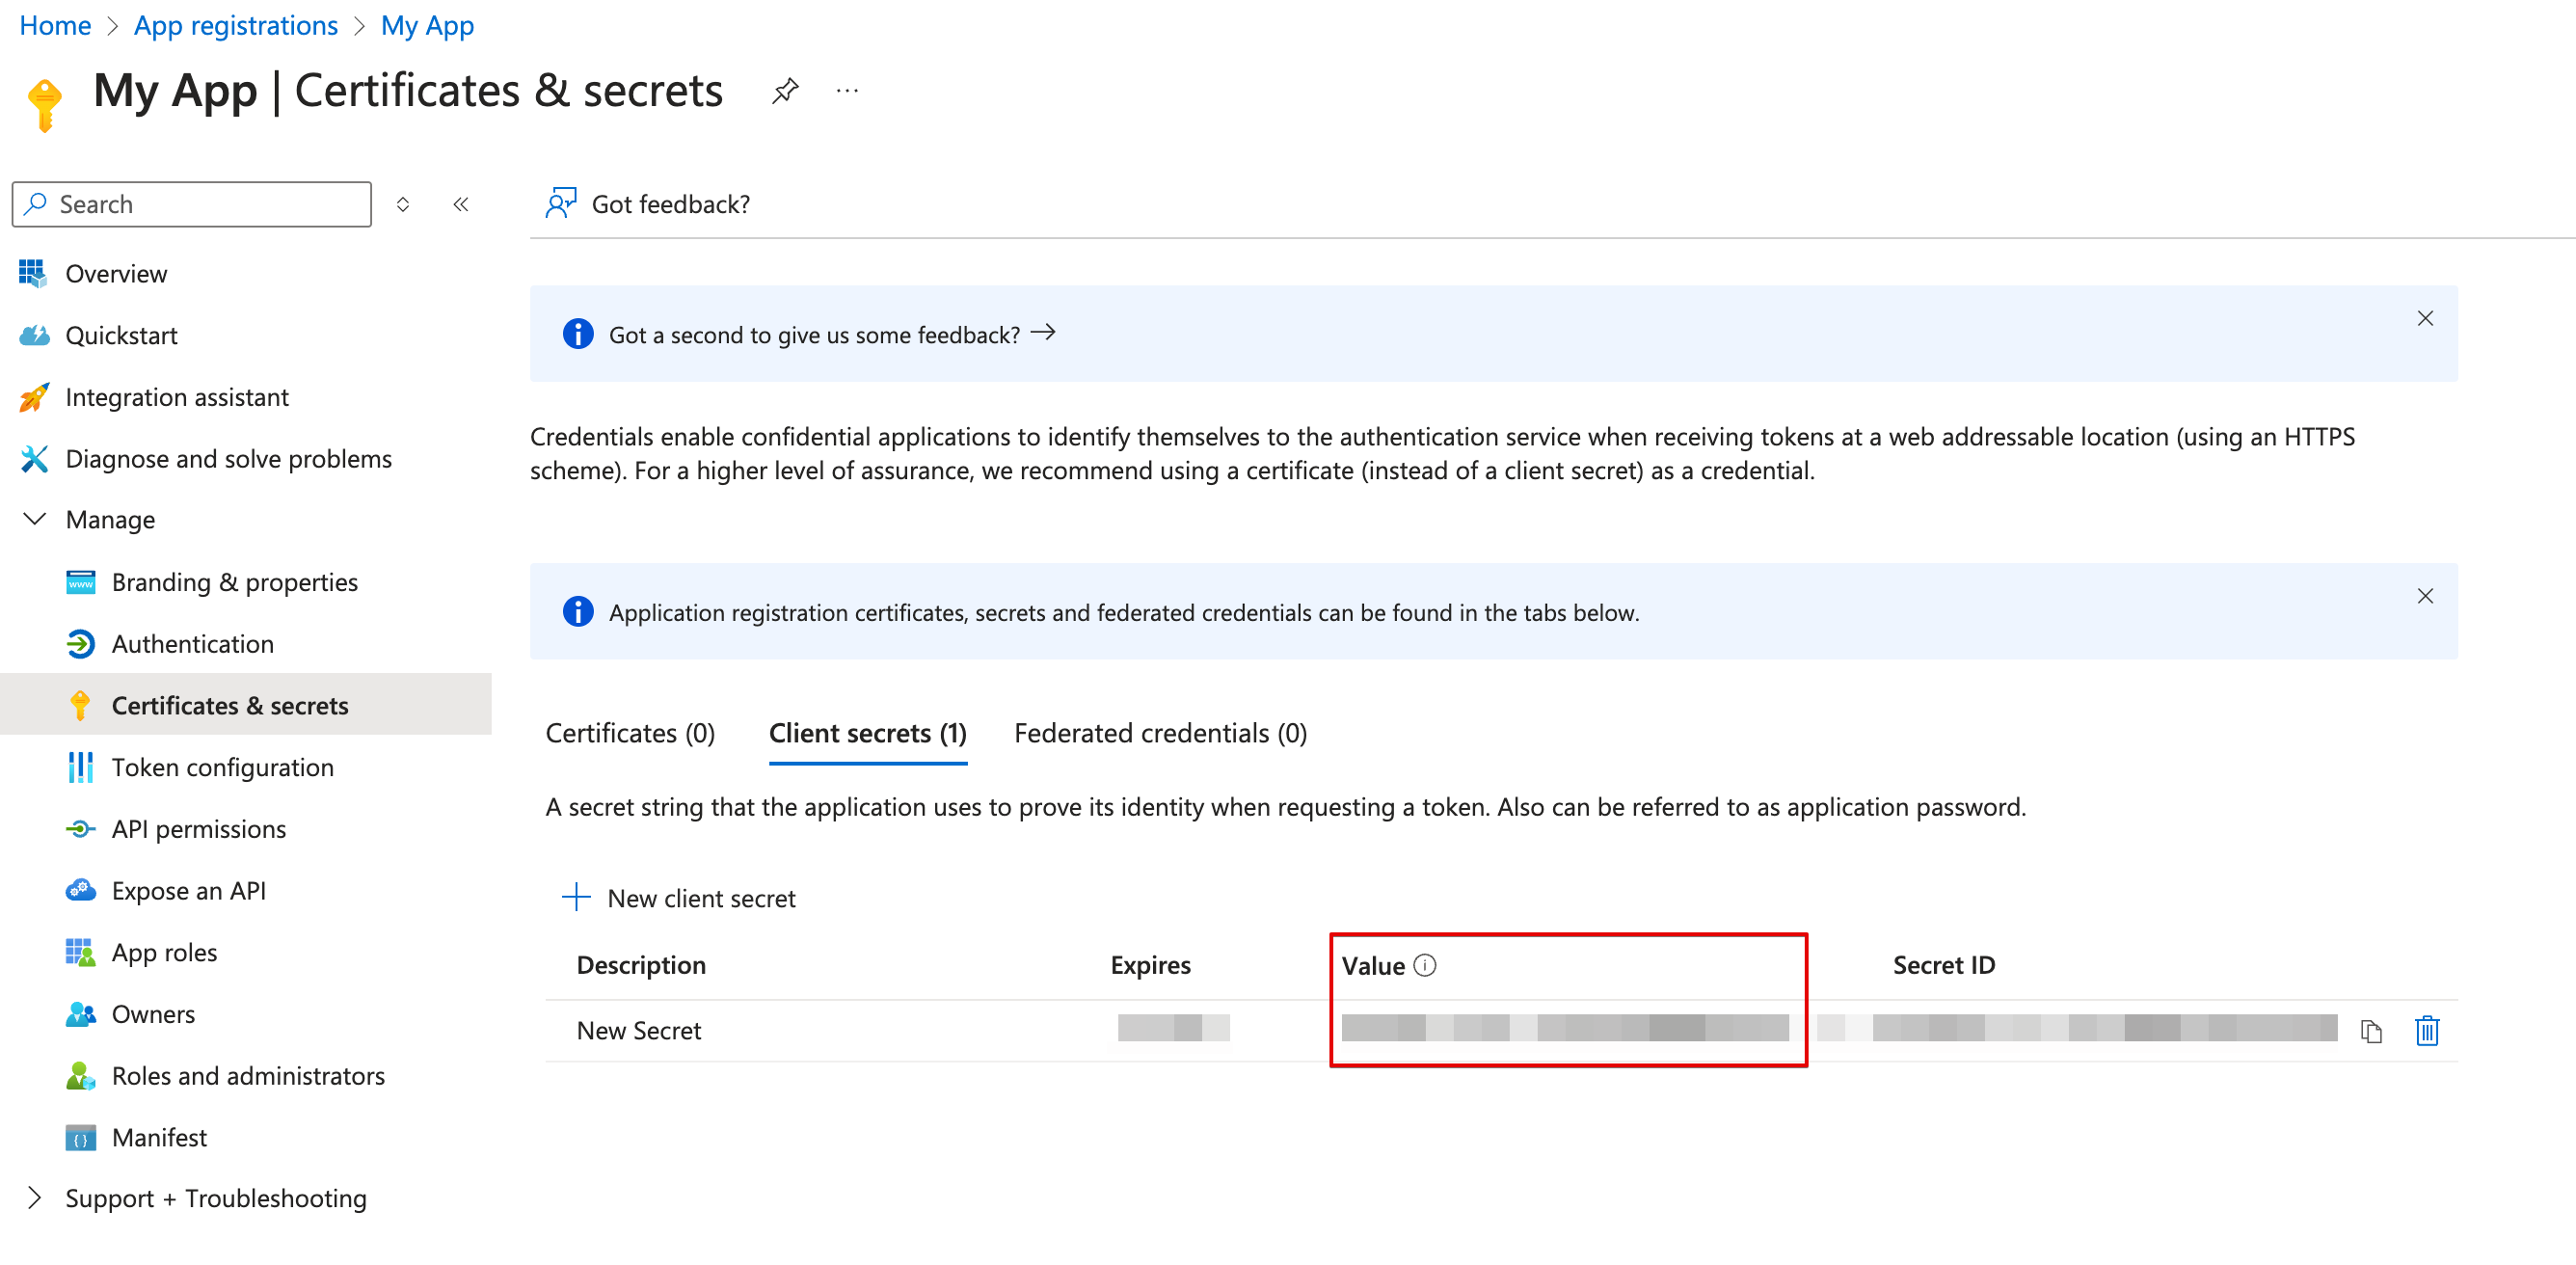
 13. Copy the **secret value**.
 #### Creating your connection
1. In the Blink platform, navigate to the **Connections** page > **Add connection**. A New Connection dialog box opens displaying icons of external service providers available.
2. Select the **Microsoft Defender For Endpoints** icon. A dialog box with name of the connection and connection methods appear.
3. (Optional) Edit the name of the connection. At a later stage you cannot edit the name.
4. Select **App Registration** as the method to create the connection.
5. Fill in the parameters:
* The Client ID
* The Client Secret
* The Tenant ID
6. (Optional) Click **Test Connection** to test it.
7. Click **Create connection**. The new connection appears on the **Connections** page.
### Interactive Tutorial Guides
You can also refer to the following tutorial guides for a more in-depth understanding of how to create a Microsoft Defender for Endpoints connection.
[Creating a Microsoft Defender for Endpoints Connection](https://demo.arcade.software/hbo7amE0DcnM6b4dbTg1?embed\&show_copy_link=true)
[Creating a Microsoft Defender for Endpoints Connection in Blink Ops](https://demo.arcade.software/4OHHVHZqJV6hyH2ESBCb?embed\&show_copy_link=true)
#### Creating your connection
1. In the Blink platform, navigate to the **Connections** page > **Add connection**. A New Connection dialog box opens displaying icons of external service providers available.
2. Select the **Microsoft Defender For Endpoints** icon. A dialog box with name of the connection and connection methods appear.
3. (Optional) Edit the name of the connection. At a later stage you cannot edit the name.
4. Select **App Registration** as the method to create the connection.
5. Fill in the parameters:
* The Client ID
* The Client Secret
* The Tenant ID
6. (Optional) Click **Test Connection** to test it.
7. Click **Create connection**. The new connection appears on the **Connections** page.
### Interactive Tutorial Guides
You can also refer to the following tutorial guides for a more in-depth understanding of how to create a Microsoft Defender for Endpoints connection.
[Creating a Microsoft Defender for Endpoints Connection](https://demo.arcade.software/hbo7amE0DcnM6b4dbTg1?embed\&show_copy_link=true)
[Creating a Microsoft Defender for Endpoints Connection in Blink Ops](https://demo.arcade.software/4OHHVHZqJV6hyH2ESBCb?embed\&show_copy_link=true)