> ## Documentation Index
> Fetch the complete documentation index at: https://docs.blinkops.com/llms.txt
> Use this file to discover all available pages before exploring further.
# Jamf
> Jamf Pro is a comprehensive management system for Apple macOS and iOS devices. With Jamf Pro, IT Technicians can proactively manage the entire lifecycle of Apple devices. This includes deploying and maintaining software, responding to security threats, distributing settings, and analyzing inventory data.
## Creating a Jamf connection
Create the connection by using one of the following methods:
* [Client ID & Secret](#using-client-id-and-secret)
* [Username & Password](#using-username-and-password)
### Using Client ID and Secret
To create the connection you need:
* An API Address
* A Client ID
* A Client Secret
### Obtaining the credentials
1. In your Jamf Pro dashboard, click on **Settings** in the left hand menu and select the **System** tab.
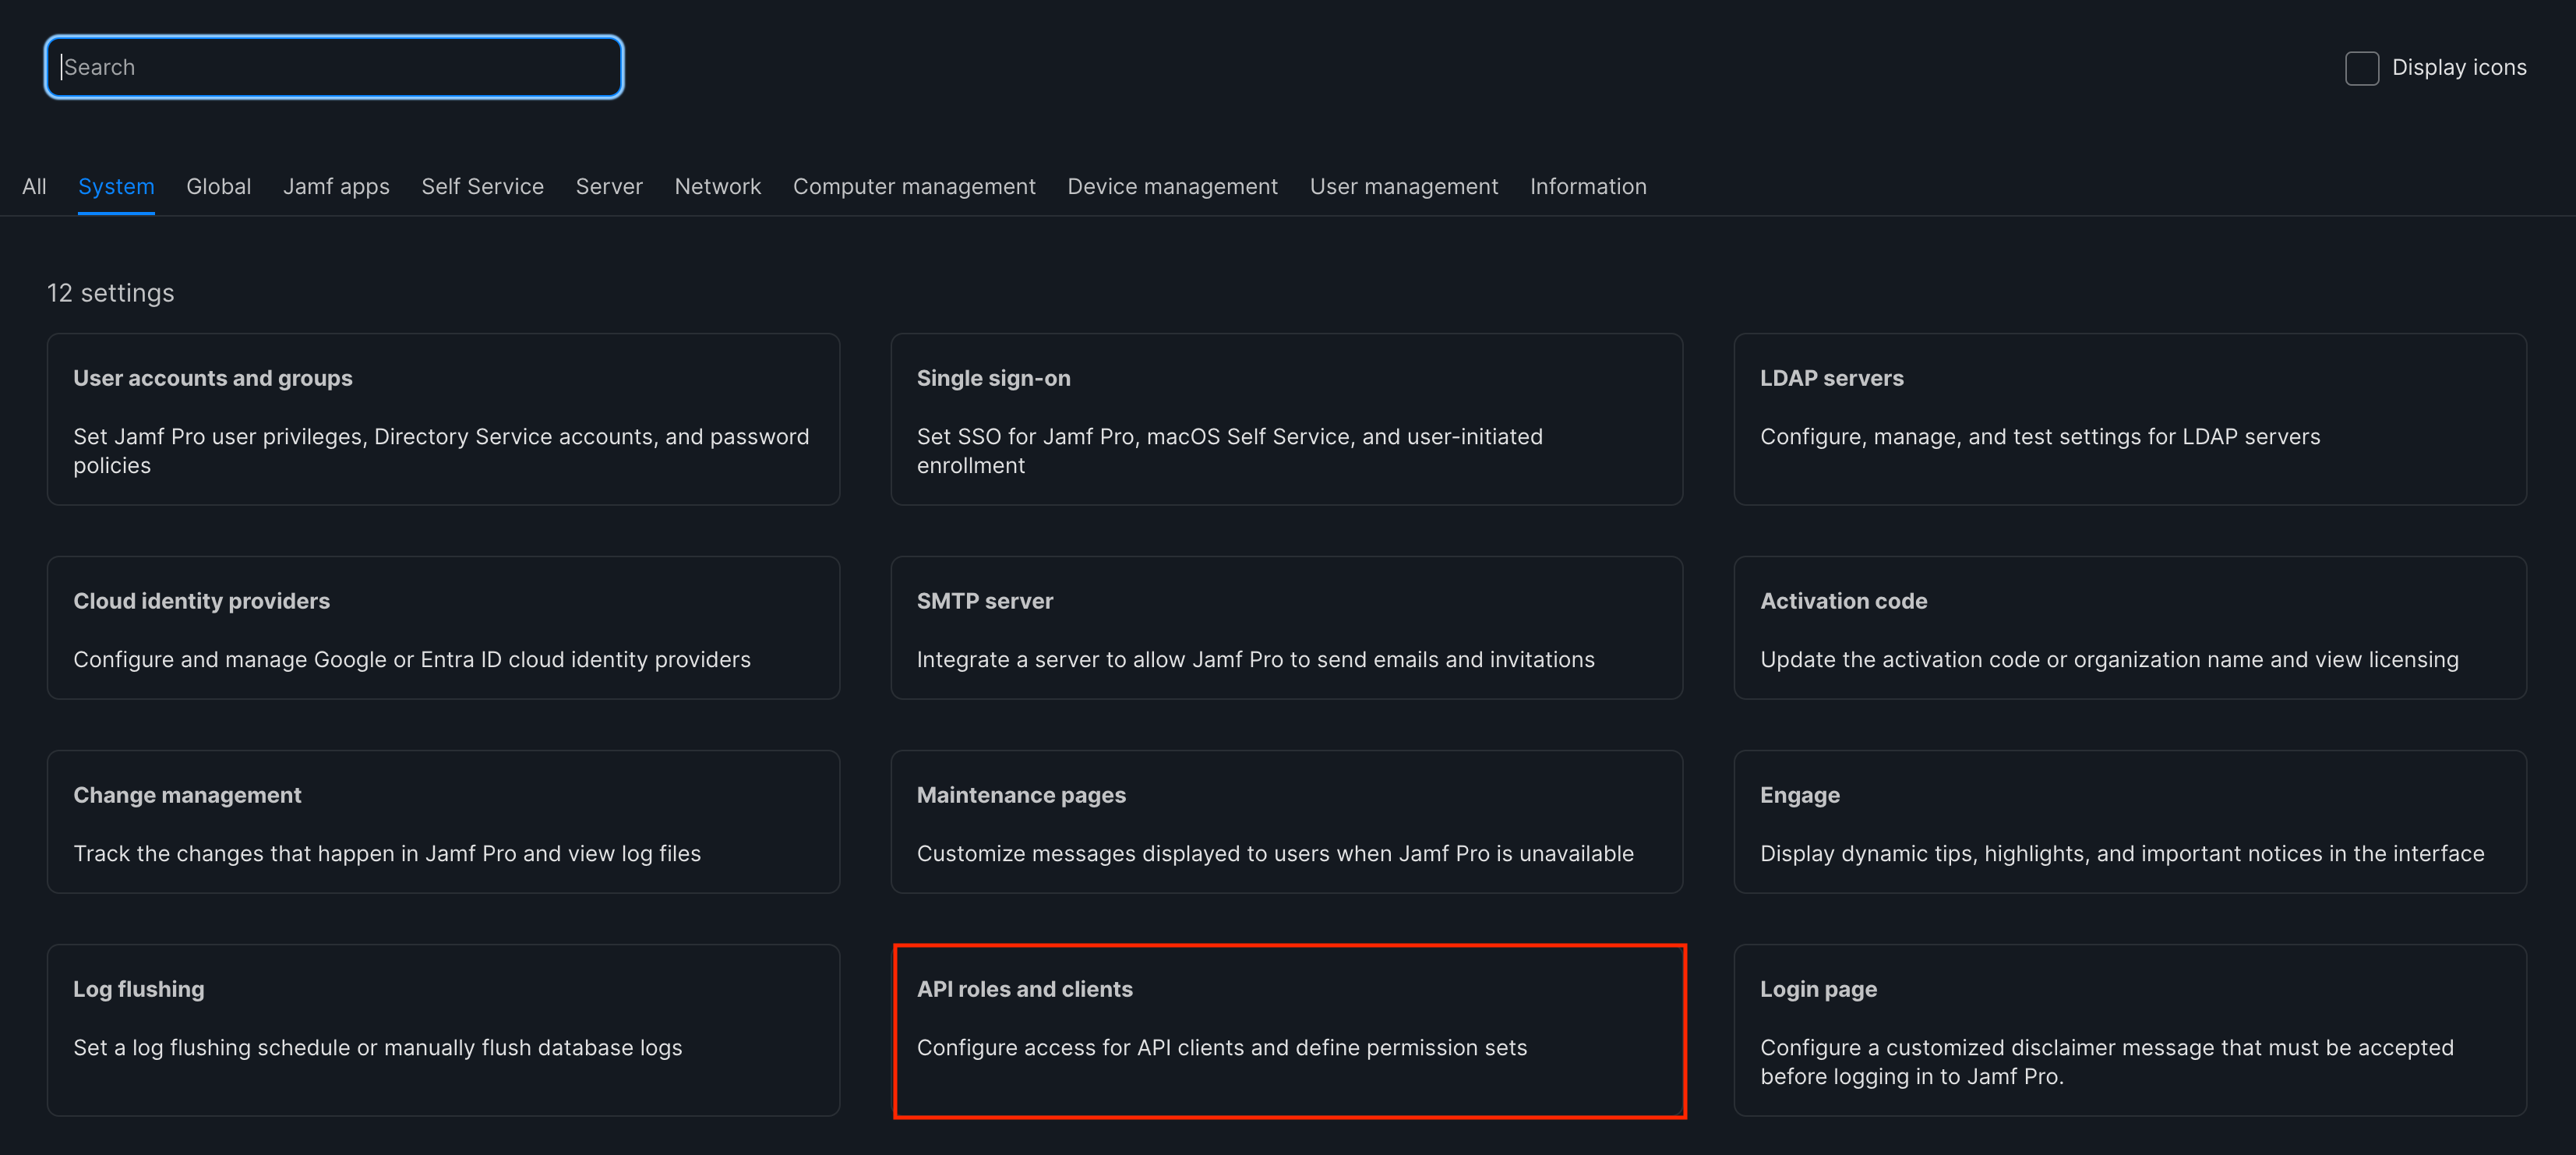
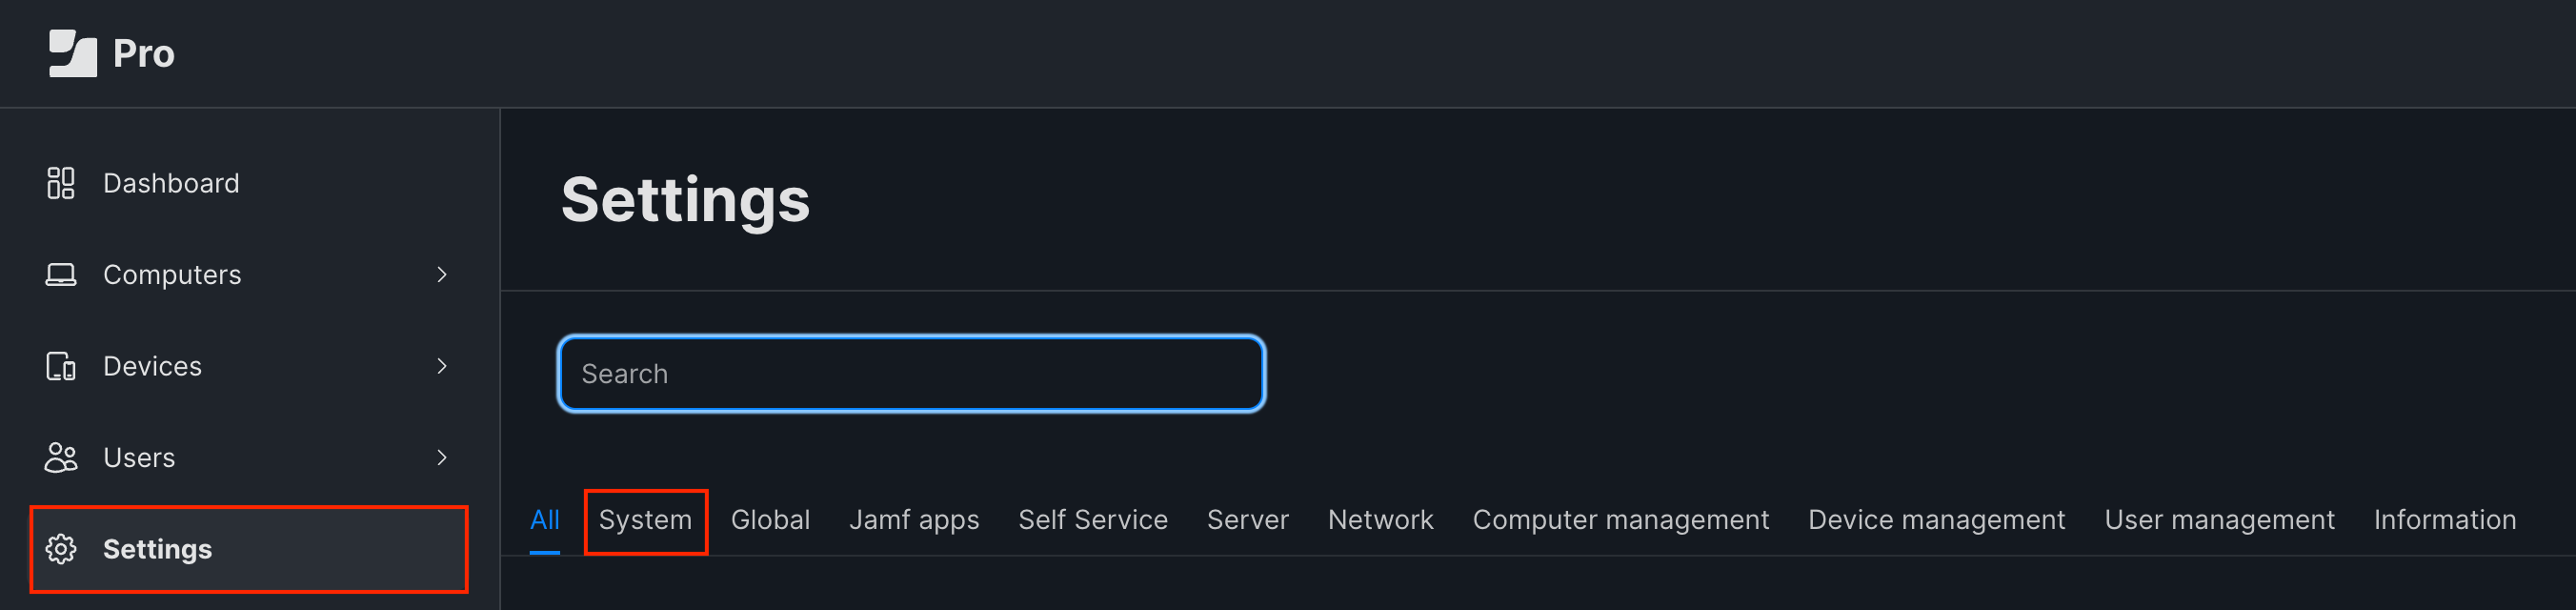 2. Click on **API roles and clients**.
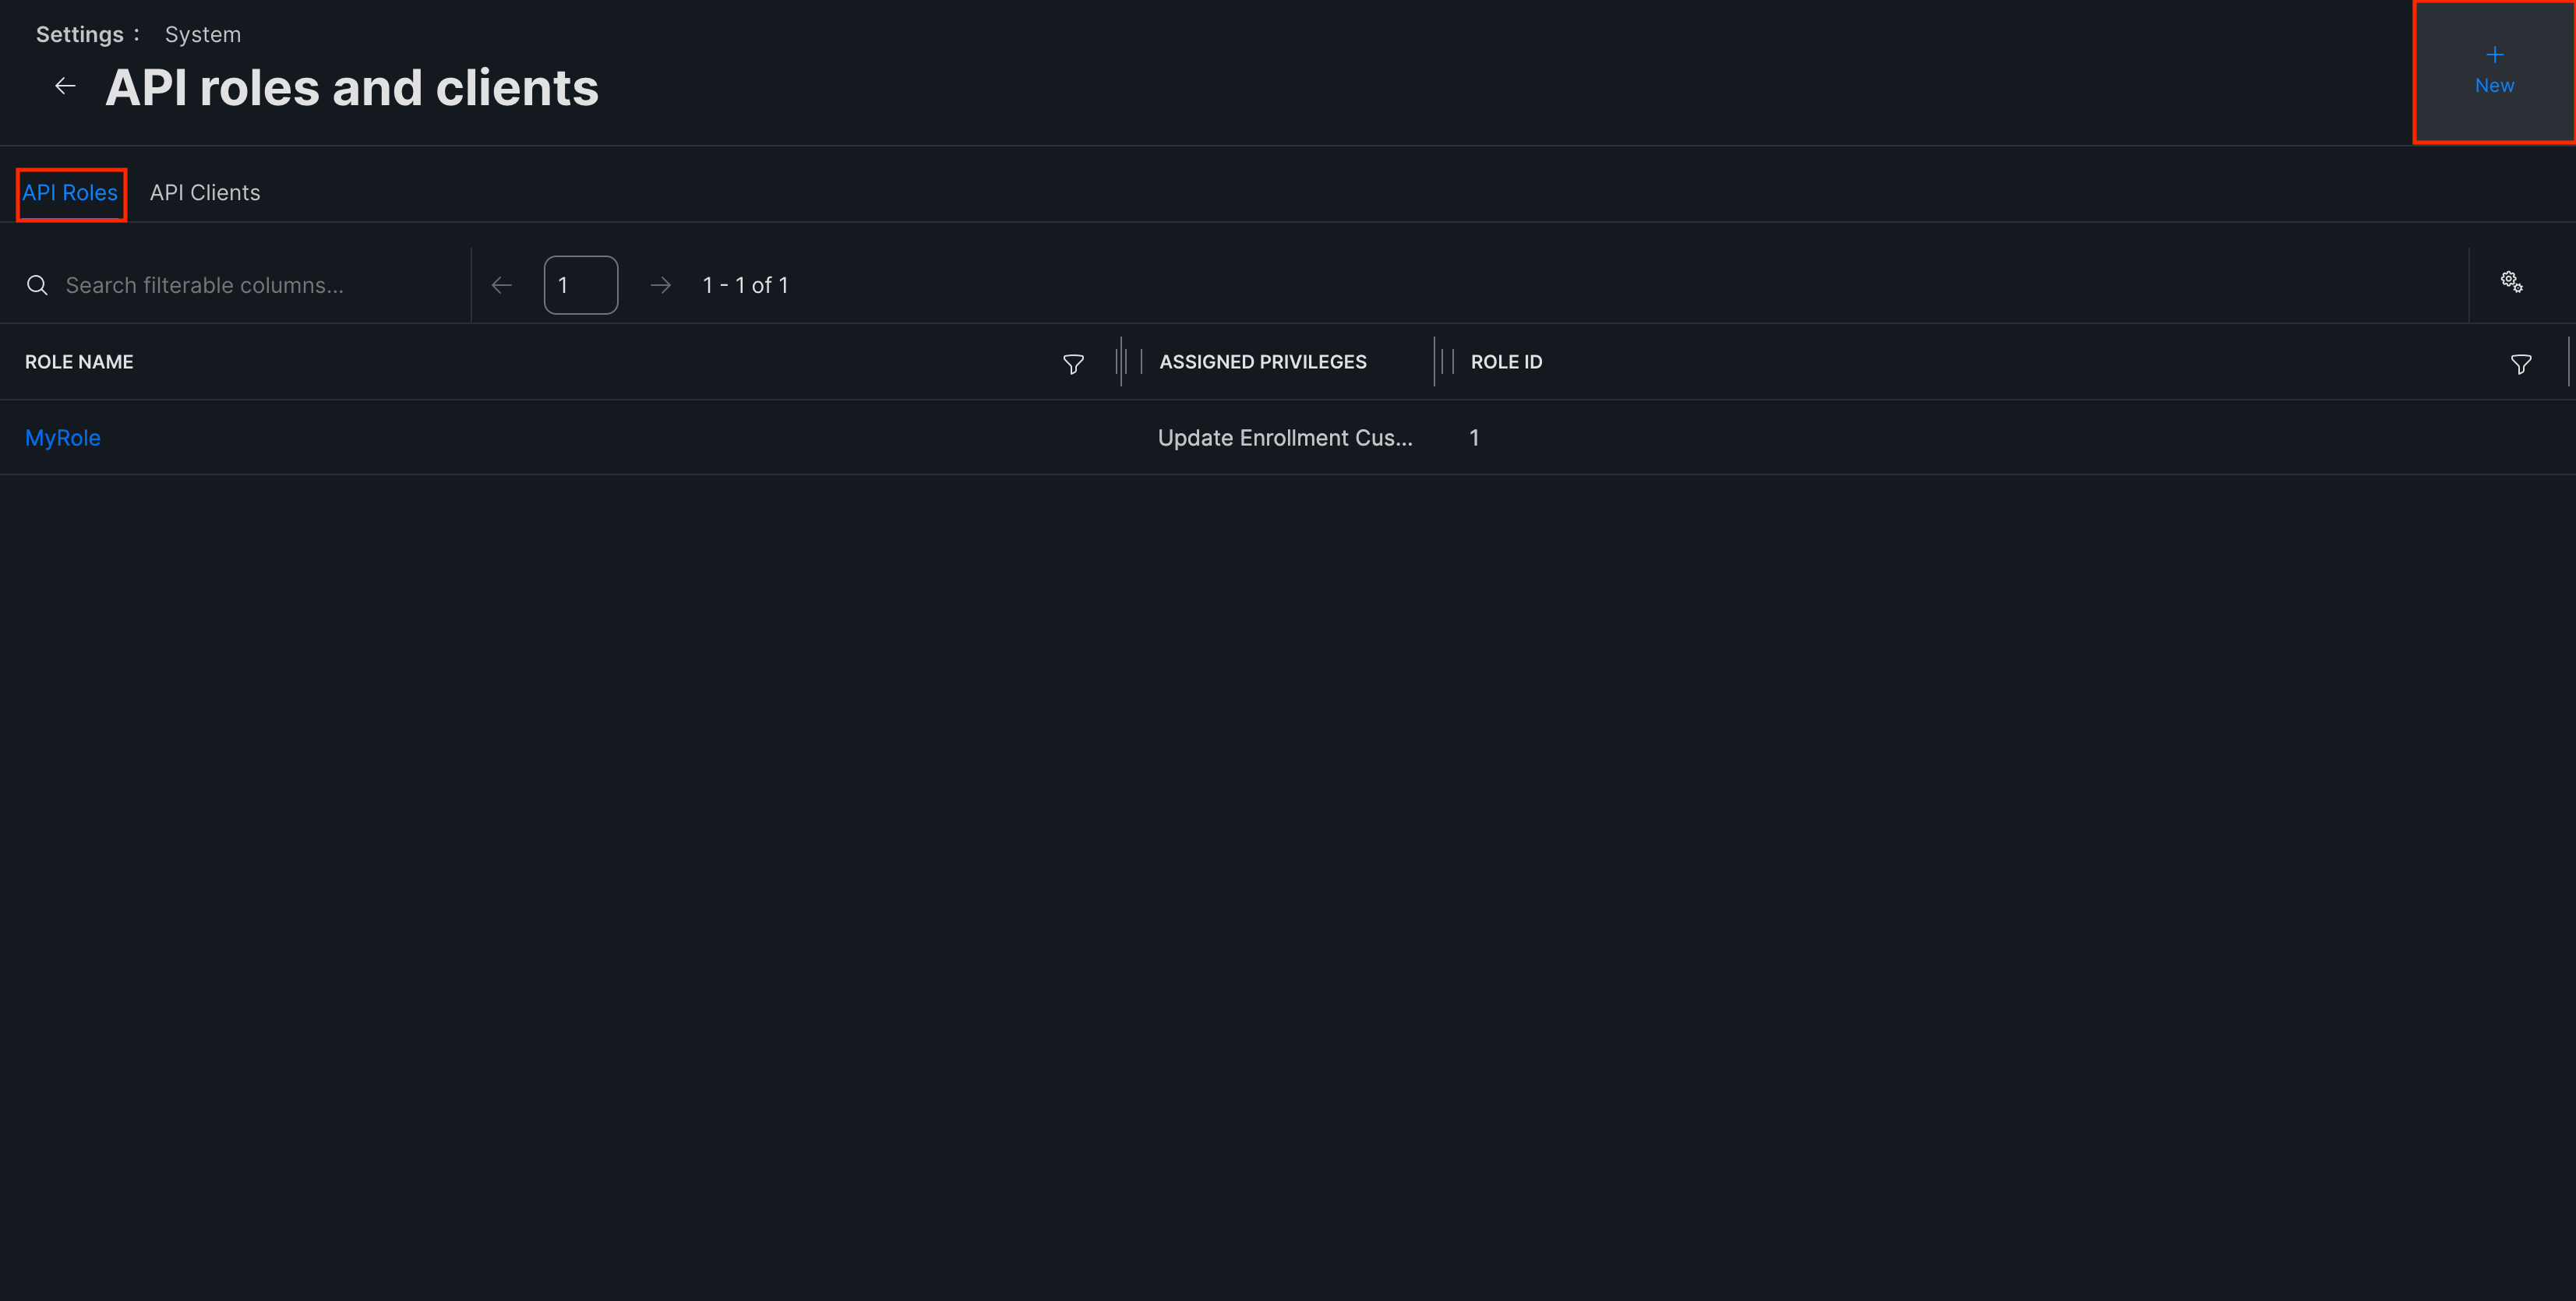
 3. Select the **API Roles** tab and click on **New** in the top-right corner. Select all the roles you want the API client to have and create the new role.
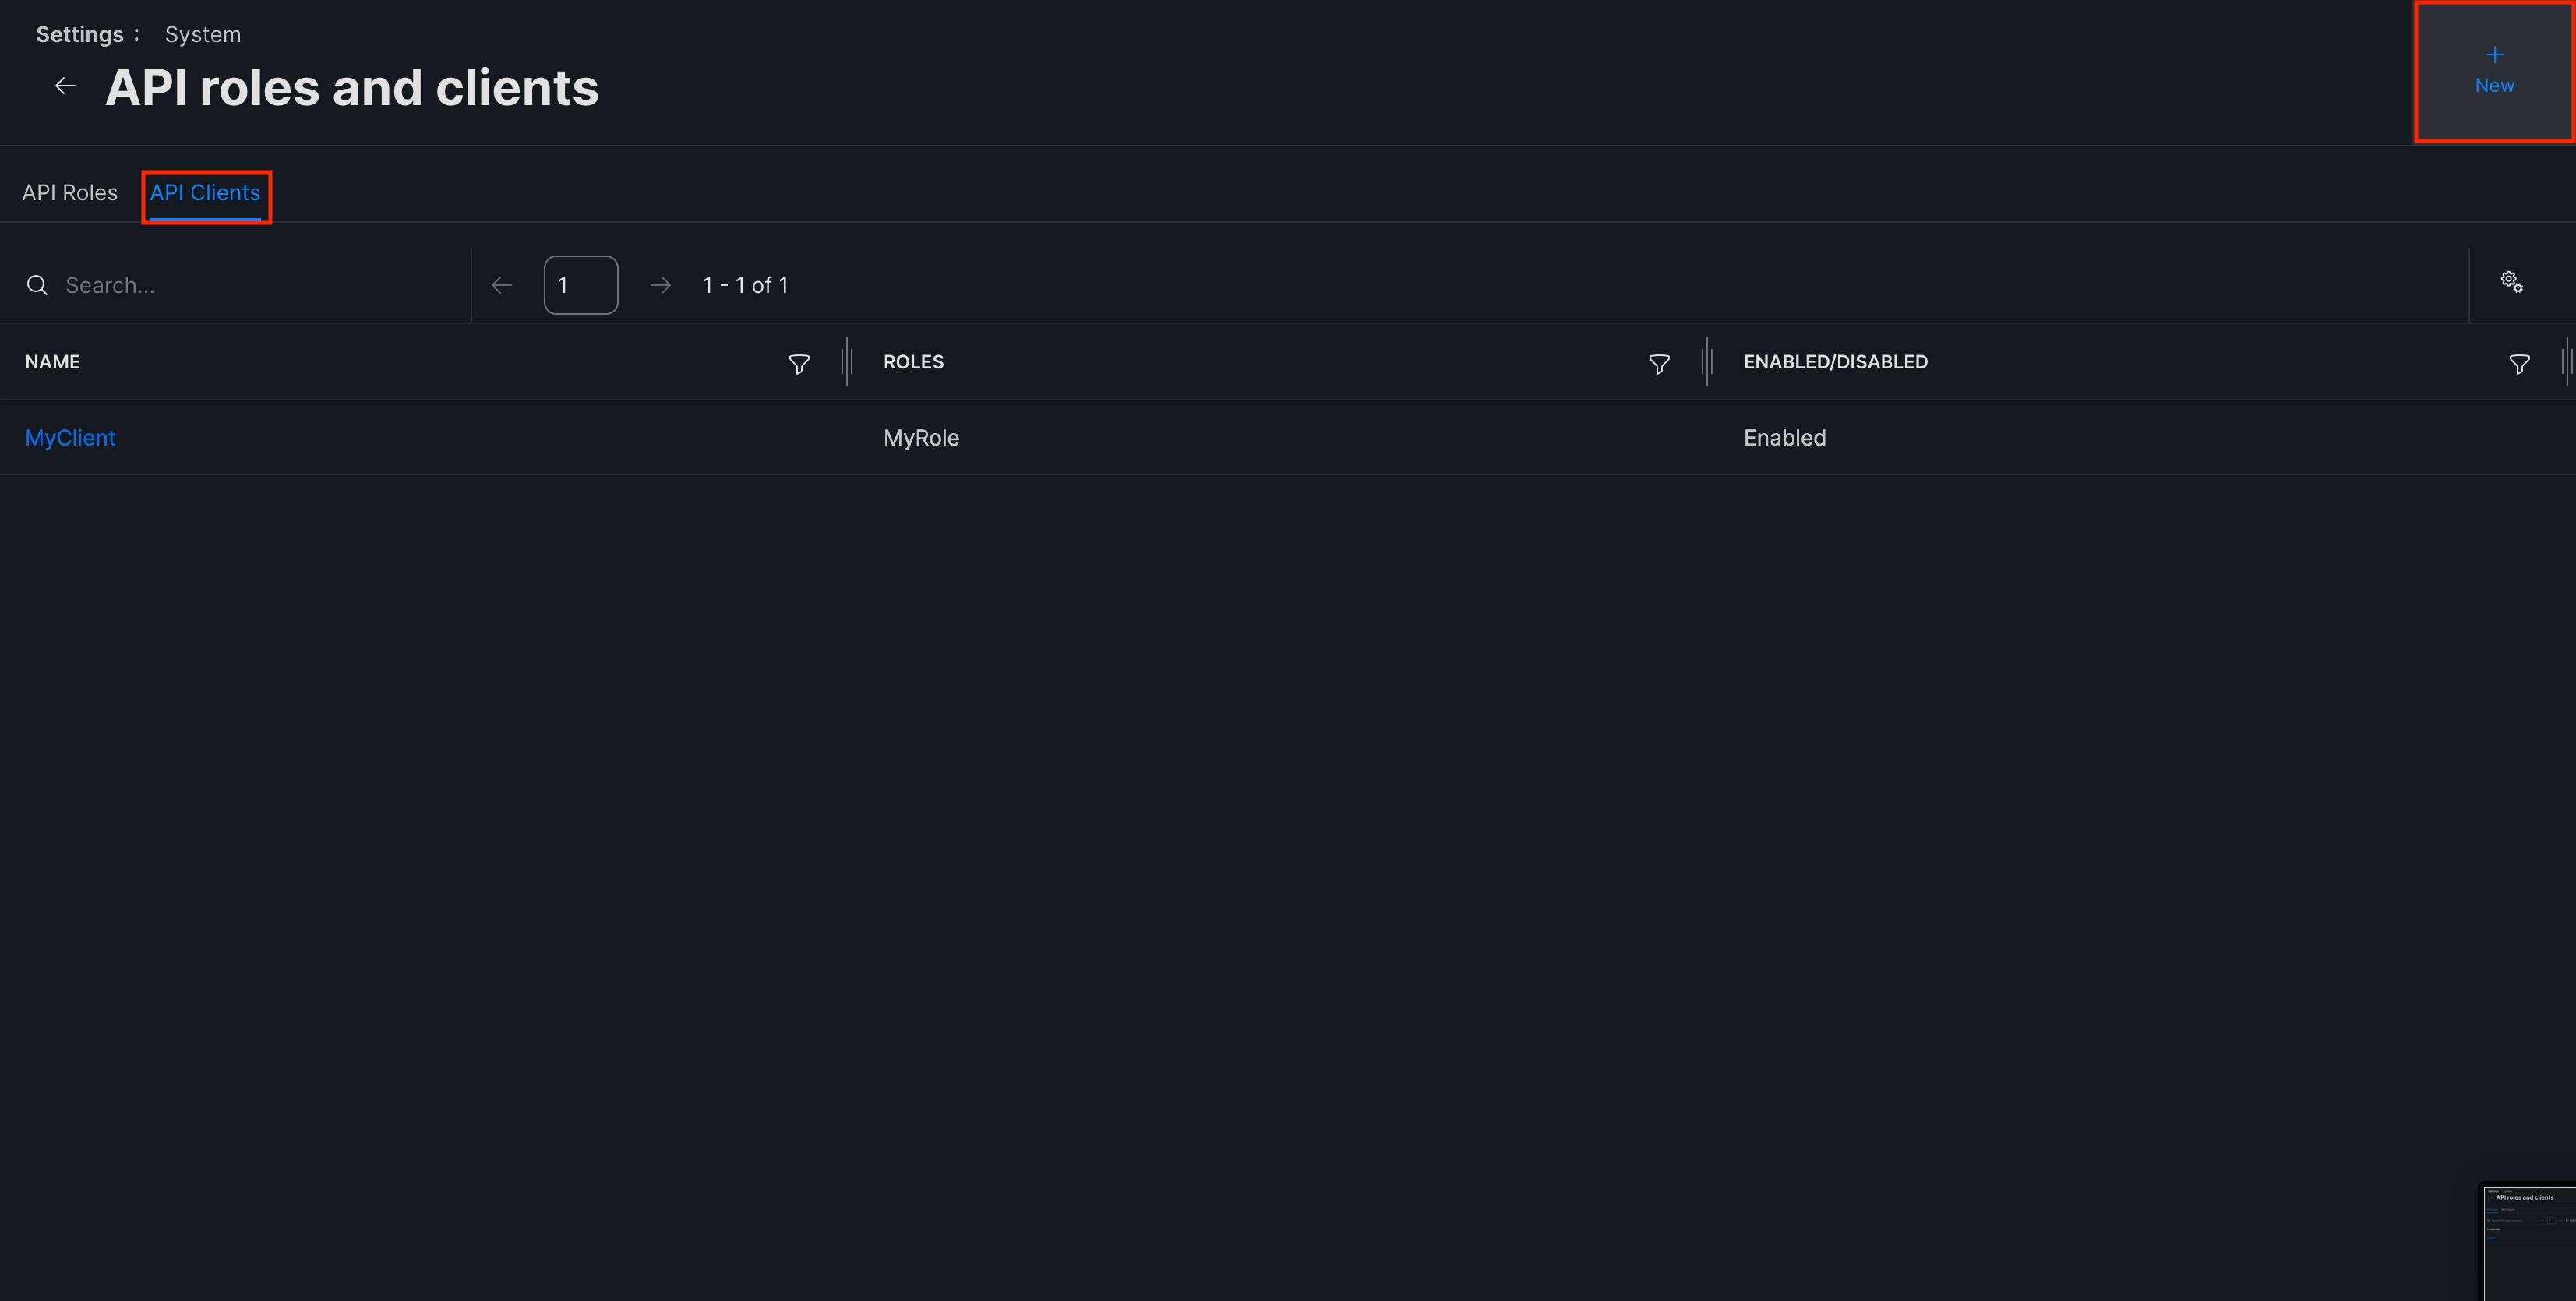
 4. Switch over to the **API Clients** tab and click on **New** in the top-right corner. Select the role you created for the client and create the new client.
 #### Creating your connection
1. In the Blink platform, navigate to the **Connections** page > **Add connection**. A New Connection dialog box opens displaying icons of external service providers available.
2. Select the **Jamf** icon. A dialog box with name of the connection and connection methods appear.
3. (Optional) Edit the name of the connection. At a later stage you cannot edit the name.
4. Select **Client ID & Secret** as the method to create the connection.
5. Fill in the parameters:
* The API Address
* The Client ID
* The Client Secret
6. (Optional) Click **Test Connection** to test it.
7. Click **Create connection**. The new connection appears on the **Connections** page.
### Using Username and Password
To create the connection you need:
* A Jamf Pro user account to be used with the Blink integration
* An API address
* If your instance is hosted in Jamf's cloud: `https://.jamfcloud.com`
* If your instance is hosted on-premises: `https://jamf..com:8443`
### Obtaining the credentials
A guide on how to create a Jamf Pro user account can be found [here](https://docs.jamf.com/10.30.0/jamf-pro/administrator-guide/Jamf_Pro_User_Accounts_and_Groups.html). It is highly recommended that this user will be created with a custom privilege set and only have the necessary permissions that Blink needs:
* Mobile Devices: Read
* Accounts: Read
* Computers: Read
#### Creating your connection
1. In the Blink platform, navigate to the **Connections** page > **Add connection**. A New Connection dialog box opens displaying icons of external service providers available.
2. Select the **Jamf** icon. A dialog box with name of the connection and connection methods appear.
3. (Optional) Edit the name of the connection. At a later stage you cannot edit the name.
4. Select **Username & Password** as the method to create the connection.
5. Fill in the parameters:
* The API Address
* The Username
* The Password
6. (Optional) Click **Test Connection** to test it.
7. Click **Create connection**. The new connection appears on the **Connections** page.
#### Creating your connection
1. In the Blink platform, navigate to the **Connections** page > **Add connection**. A New Connection dialog box opens displaying icons of external service providers available.
2. Select the **Jamf** icon. A dialog box with name of the connection and connection methods appear.
3. (Optional) Edit the name of the connection. At a later stage you cannot edit the name.
4. Select **Client ID & Secret** as the method to create the connection.
5. Fill in the parameters:
* The API Address
* The Client ID
* The Client Secret
6. (Optional) Click **Test Connection** to test it.
7. Click **Create connection**. The new connection appears on the **Connections** page.
### Using Username and Password
To create the connection you need:
* A Jamf Pro user account to be used with the Blink integration
* An API address
* If your instance is hosted in Jamf's cloud: `https://.jamfcloud.com`
* If your instance is hosted on-premises: `https://jamf..com:8443`
### Obtaining the credentials
A guide on how to create a Jamf Pro user account can be found [here](https://docs.jamf.com/10.30.0/jamf-pro/administrator-guide/Jamf_Pro_User_Accounts_and_Groups.html). It is highly recommended that this user will be created with a custom privilege set and only have the necessary permissions that Blink needs:
* Mobile Devices: Read
* Accounts: Read
* Computers: Read
#### Creating your connection
1. In the Blink platform, navigate to the **Connections** page > **Add connection**. A New Connection dialog box opens displaying icons of external service providers available.
2. Select the **Jamf** icon. A dialog box with name of the connection and connection methods appear.
3. (Optional) Edit the name of the connection. At a later stage you cannot edit the name.
4. Select **Username & Password** as the method to create the connection.
5. Fill in the parameters:
* The API Address
* The Username
* The Password
6. (Optional) Click **Test Connection** to test it.
7. Click **Create connection**. The new connection appears on the **Connections** page.