> ## Documentation Index
> Fetch the complete documentation index at: https://docs.blinkops.com/llms.txt
> Use this file to discover all available pages before exploring further.
# Self-Service: Create a Workflow to Consume a Terraform Project
> Tutorial for creating a self-service workflow that lets users trigger automation on demand in Blink.
In this tutorial we will show you how to create a Workflow that consumes a Terraform project. Based on calculated changes (Terraform plan) and escalation rules, it asks for approval and deploys the changes.
Once created, the Automated Workflow will be exposed in the Self-service portal of selected users and groups. Selected users are able to create a new environment on demand with an approval step, conditioned by your escalation rule.
In our example the project deploys a load-balanced web server. Approval will be required if the instance type selected by the user is not the default one or if deletion of resources is detected in calculated changes.
## Prerequisites
* A Blink account. Sign up [here](https://app.blinkops.com).
* An AWS connection or an AWS account to create [an AWS connection.](/docs/integrations/aws)
* A Slack connection or a token to create [a Slack connection.](/docs/integrations/slack)
## Overview
This is an overview of the procedure of creating the On-Demand Workflow.
Before we begin.
1. Creating a new Pack.
2. Creating a new Automation.
3. Setting input parameters.
Creating Workflow Steps:
1. Using an `if` Step to control the workflow.
2. Asking permission via Slack.
3. Using `if` Step to check answer.
4. Aborting the Step.
5. Cloning the Git repository.
6. Installing the Terraform provider.
7. Calculating the Plan to execute for Terraform.
8. Saving the plan to an AWS S3 bucket
9. Using an `if` Step to control the workflow.
10. Asking a question via Slack.
11. Using `if` Step to check answer.
12. Aborting the Step.
13. Cloning the Git repository.
14. Fetching the plan from the AWS S3 bucket
15. Applying the changes in Terraform.
16. Getting output in Terraform.
Defining output parameters.
Testing the Automation.
Exposing the Automation as a request in the Self-service portal.
## Before we begin
### Creating a new Pack
A Pack is a collection of Workflows. If you already have a Pack you can open it and skip ahead to [creating a new Automation](#creating-a-new-automation).
If you don't have an existing pack, follow these steps:
1. On your Automation screen, click **Create new Pack**.
2. Enter
**Pack name**: *Infrastructure as Code portal*
**Description**: portal of Infrastructure as Code Workflows.
3. Click **Create**.
The new Pack is displayed on your Workflows screen.
### Creating a new Automation
1. Click **Create Automation**.
2. Enter **Automation name**: *AWS webserver with Terraform as a service*
3. Select a [type of trigger](/docs/workflows/building-workflows/triggers/triggers): ***Manual***
4. Click **Create Automation**. You are redirected to the **Edit page** of the Automation.
### Setting input parameters
1. Click **Input Parameters**.
2. Fill in the parameters:
| Parameter Name | Description | Selection type | Options |
| -------------- | ----------------------------------------------------------------------------------------------------------- | -------------- | --------------------------------------- |
| instance\_type | The size of the instance. | Single-select | t2.micro (default), t2.medium, t2.large |
| reason | Reason for request. Will be sent with the approval request if the user selects a non default instance size. | String | |
3. Click **Apply**. The parameters are displayed under **Input Parameters**.
## Creating the Automation Steps
You have created an Automation with Input Parameters. Proceed to create the Steps of your Automation as described in the following section.
### Step 1: Using an `if` Step to control the workflow
1. Click to open the **Action panel**. Alternatively, you can drag Actions to your flow, from the menu on the left side of your **Edit** screen.
2. Select `if` Step using the icon: 
3. Enter the condition using the variable picker.
| Left value | Operator | Right value |
| -------------------------- | ---------- | ----------- |
| `{{inputs.instance_type}}` | Not equals | `t2.micro` |
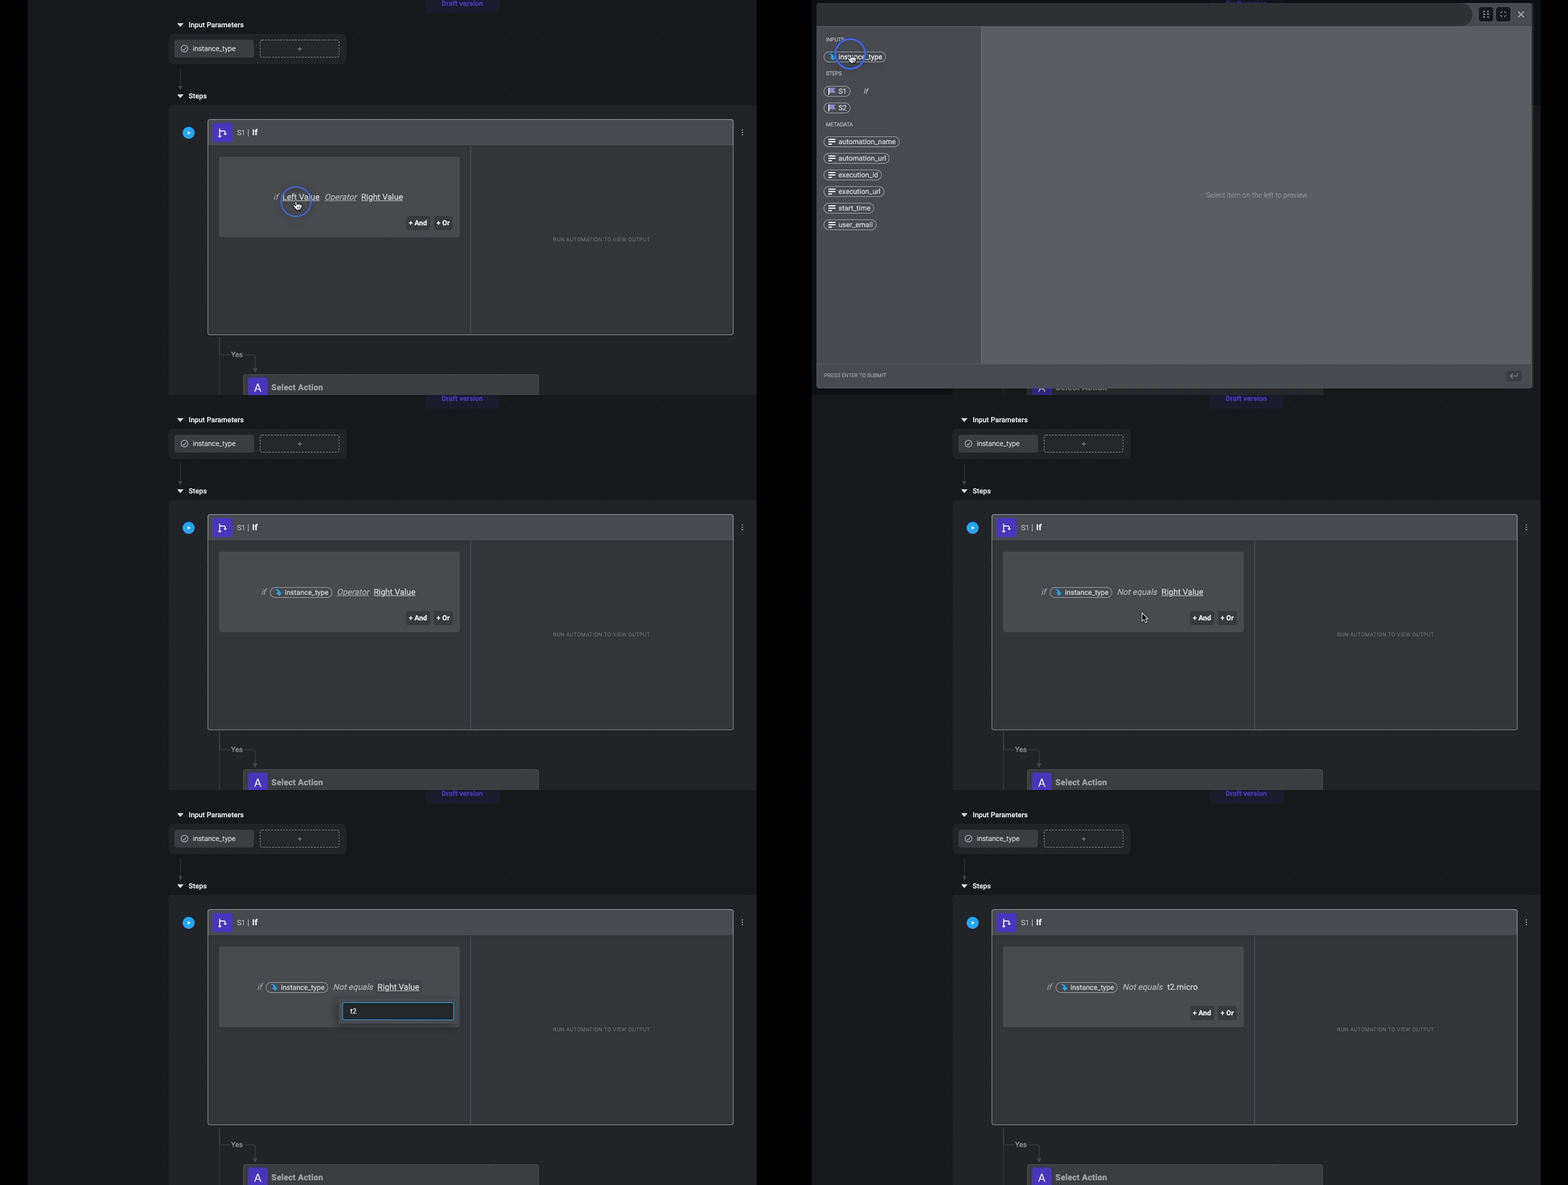 If the instance type is not t2.micro.
If the condition is met (need escalation), go to Step 2.
If the condition is not met (instance type is t2.micro, thus no need for escalation), go to Step 5.
### Step 2: Asking permission via Slack
1. Click to open the **Action panel**. Alternatively, you can drag Actions to your flow, from the menu on the left side of your **Edit** screen.
2. Search and select the *Asks questions via Slack* Action.
3. For the Step to work, a connection to Slack is required. On the right-hand corner of your Step, select **Select Connection** > **slack\_connection**. If you do not have a Slack connection, click **Create new connection**.
4. Click on **Action #2** to change the name of the action to *Asking a question via Slack*.
5. Enter the condition using the variable picker.
| Parameter | Description | Example |
| --------- | ------------------------------------------ | ------------------------------------------------------------------------------------------------------ |
| Approver | Recipient's email address or channel name. | *Random* |
| Question | Question to be answered. | \*\{\{metadata.user\_email}} is trying to use \{\{inputs.instance\_type}}. Reason: \{\{inputs.reason}} |
| Answers | Commas separating possible answers | Yes, No |
### Step 3: Using `if` Step to check answer
1. Click to open the **Action panel**. Alternatively, you can drag Actions to your flow, from the menu on the left side of your **Edit** screen.
2.
If the instance type is not t2.micro.
If the condition is met (need escalation), go to Step 2.
If the condition is not met (instance type is t2.micro, thus no need for escalation), go to Step 5.
### Step 2: Asking permission via Slack
1. Click to open the **Action panel**. Alternatively, you can drag Actions to your flow, from the menu on the left side of your **Edit** screen.
2. Search and select the *Asks questions via Slack* Action.
3. For the Step to work, a connection to Slack is required. On the right-hand corner of your Step, select **Select Connection** > **slack\_connection**. If you do not have a Slack connection, click **Create new connection**.
4. Click on **Action #2** to change the name of the action to *Asking a question via Slack*.
5. Enter the condition using the variable picker.
| Parameter | Description | Example |
| --------- | ------------------------------------------ | ------------------------------------------------------------------------------------------------------ |
| Approver | Recipient's email address or channel name. | *Random* |
| Question | Question to be answered. | \*\{\{metadata.user\_email}} is trying to use \{\{inputs.instance\_type}}. Reason: \{\{inputs.reason}} |
| Answers | Commas separating possible answers | Yes, No |
### Step 3: Using `if` Step to check answer
1. Click to open the **Action panel**. Alternatively, you can drag Actions to your flow, from the menu on the left side of your **Edit** screen.
2. Select `if` Step using the icon:
3. Enter the condition using the variable picker.
| Left value | Operator | Right value |
| --------------------- | -------- | ----------- |
| `{{steps.S2.output}}` | Equals | `No` |
If the condition is met (answer is no), go to Step 4.
If the condition is not met (answer is yes), go to Step 5.
### Step 4: Abort Step
1. Click  and type *Abort Step*. No input parameters are required.
### Step 5: Cloning the Git repository
1. In the **New section** block, click to open the **Action panel**. Alternatively, you can drag Actions to your flow, from the menu on the left side of your **Edit** screen.
2. Search and select the *Github clone* Action.
3. For the Step to work, a connection to Github is required. On the right-hand corner of your Step, select **Select Connection** > **github\_connection**. If you do not have a Github connection, click **Create new connection**.
4. Click on **Action #5** to change the name of the action to *Cloning the Git repository*.
5. Enter the following parameters in your Step.
* **Repository URL**: enter the URL of the Github repository you wish to clone.
* **Destination** folder where you want to clone your repository.
### Step 6: Installing the Terraform provider
1. Click to open the **Action panel**. Alternatively, you can drag Actions to your flow, from the menu on the left side of your **Edit** screen.
2. Search and select the *Terraform* Action.
3. For the Step to work, a connection to Terraform is required. On the right-hand corner of your Step, select **Select Connection** > **aws\_connection**. If you do not have an AWS connection, click **Create new connection**.
4. Click on **Action #6** to change the name of the action to *Installing the Terraform provider*.
5. Enter the following parameters in your Step.
* **Command**:
```
cd repository_folder
terraform init
```
### Step 7: Calculating the Plan to execute for Terraform
1. Click to open the **Action panel**. Alternatively, you can drag Actions to your flow, from the menu on the left side of your **Edit** screen.
2. Search and select the *Terraform* Action.
3. For the Step to work, a connection to Terraform is required. On the right-hand corner of your Step, select **Select Connection** > **aws\_connection**. If you do not have an AWS connection, click **Create new connection**.
4. Click on **Action #7** to change the name of the action to *Calculating the Plan to execute for Terraform*.
5. Enter the following parameters in your Step.
* **Command**:
```bash theme={"dark"}
cd repository_folder
terraform plan -var="instance_type={{inputs.instance_type}}" --out=../out.txt > /dev/null
terraform show -json ../out.txt
```
The command calculates the Terraform plan and stores it in out.txt file, then it shows this plan in a json format.
### Step 8: Saving the plan to an AWS S3 bucket
1. Click to open the **Action panel**. Alternatively, you can drag Actions to your flow, from the menu on the left side of your **Edit** screen.
2. Search and select the *AWS CLI* Action.
3. For the Step to work, a connection to AWS is required. On the right-hand corner of your Step, select **Select Connection** > **aws\_connection**. If you do not have an AWS connection, click **Create new connection**.
4. Click on **Action #8** to change the name of the action to *Saving the plan to an AWS S3 bucket*.
5. Enter the following parameters in your Step.
* **Command**:
```
aws s3api put-object --bucket s3-bucket-with-versioning-enabled --key plan/out.txt --body ./out.txt
```
* **Region**: s3 bucket region endpoint
The command will store the out.txt file generated in the previous step into an S3 bucket that we assume exists and has versioning enabled.
### Step 9: Using an `if` Step to control the workflow
1. Click to open the **Action panel**. Alternatively, you can drag Actions to your flow, from the menu on the left side of your **Edit** screen.
2. Select `if` Step using the icon:
3. Enter the following condition using expression language and built in function to detect if any resources will be deleted by the Terraform plan.
| Left value | Operator | Right value |
| --------------------------------------------------------------------------- | -------- | ----------- |
| `{{any(steps.S7.output.resource_changes, {'delete' in #.change.actions})}}` | equals | `true` |
If the condition is met (need escalation), go to Step 10.
If the condition is not met (no deleted resources, thus no need for escalation), go to Step 13.
### Step 10: Asking a question via Slack
1. Click to open the **Action panel**. Alternatively, you can drag Actions to your flow, from the menu on the left side of your **Edit** screen.
2. Search and select the *Asks questions via Slack* Action.
3. For the Step to work, a connection to Slack is required. On the right-hand corner of your Step, select **Select Connection** > **slack\_connection**. If you do not have a Slack connection, click **Create new connection**.
4. Click on **Action #10** to change the name of the action to *Asking a question via Slack*.
5. Enter the condition using the variable picker.
| Parameter | Description | Example |
| --------- | ------------------------------------------ | ---------------------------------------------------------------------------------------------------------------------------------------------------------------------------------------------------------- |
| To | Recipient's email address or channel name. | *Random* |
| Question | Question to be answered. | *Apply the following changes: \{\{steps.S7.output}}* For more details, refer to [expression language.](/docs/workflows/building-workflows/dynamic-variables/expression-language/workflow-engine-variables) |
| Answers | Commas separating possible answers | Yes, No |
### Step 11: Using `if` Step to check answer
1. Click to open the **Action panel**. Alternatively, you can drag Actions to your flow, from the menu on the left side of your **Edit** screen.
2. Select `if` Step using the icon:
3. Enter the condition using the variable picker.
| Left value | Operator | Right value |
| --------------------- | -------- | ----------- |
| `{{steps.S2.output}}` | Equals | `No` |
If the condition is met (answer is no), go to Step 12.
If the condition is not met (answer is yes), go to Step 13.
### Step 12: Abort Step
1. Click and type *Abort Step*. No input parameters are required.
### Step 13: Cloning the Git repository
1. In the **New section** block, click to open the **Action panel**. Alternatively, you can drag Actions to your flow, from the menu on the left side of your **Edit** screen.
2. Search and select the *Git clone* Action.
3. For the Step to work, a connection to Github is required. On the right-hand corner of your Step, select **Select Connection** > **github\_connection**.
4. Click on **Action #13** to change the name of the action to *Cloning the Git repository*.
5. Enter the following parameters in your Step.
* **Repository URL**: enter the URL of the Github repository you wish to clone.
* **Destination** folder where you want to clone your repository.
### Step 14: Fetching the plan from the AWS S3 bucket
1. Click to open the **Action panel**. Alternatively, you can drag Actions to your flow, from the menu on the left side of your **Edit** screen.
2. Search and select the *AWS CLI* Action.
3. For the Step to work, a connection to Terraform is required. On the right-hand corner of your Step, select **Select Connection** > **aws\_connection**. If you do not have an AWS connection, click **Create new connection**.
4. Click on **Action #14** to change the name of the action to *Fetching the plan from the AWS S3 bucket*.
5. Enter the following parameters in your Step.
* **Command**:
```
aws s3api get-object --bucket s3-bucket-with-versioning-enabled --key plan/out.txt ./out.txt --version-id {{steps.S7.output.VersionId}}
```
* **Region**: us-west-2
### Step 15: Applying the changes in Terraform
1. Click to open the **Action panel**. Alternatively, you can drag Actions to your flow, from the menu on the left side of your **Edit** screen.
2. Search and select the *Terraform* Action.
3. For the Step to work, a connection to AWS is required. On the right-hand corner of your Step, select **Select Connection** > **aws\_connection**.
4. Click on **Action #15** to change the name of the action to *Applying the changes in Terraform*.
5. Enter the following parameters in your Step.
* **Command**:
```
cd repository_folder
terraform apply "../out.txt"
```
### Step 16: Getting output in Terraform
1. Click to open the **Action panel**. Alternatively, you can drag Actions to your flow, from the menu on the left side of your **Edit** screen.
2. Search and select the *Terraform* Action.
3. For the Step to work, a connection to AWS is required. On the right-hand corner of your Step, select **Select Connection** > **aws\_connection**.
4. Click on **Action #16** to change the name of the action to *Getting output in Terraform*.
5. Enter the following parameters in your Step.
* **Command**:
```
cd repository_folder
terraform output -json
```
## Defining output parameters
1. Click **Output parameter**.
2. Enter the following parameters:
**Name**: alb\_dns
**Value**: \{\{steps.S11.output.alb\_dns\_name.value}}
3. Click **Apply**.
## Testing the Automation
You can test your Automation before you publish it.
1. From the **Edit** mode, save your draft and do a **Test run** of your Automation.
2. Enter input parameters you wish to test.
3. Click **Run**. The entire Automation will run. A dialogue box will inform you if your Automation was executed successfully or not.
4. Click **Go To Execution**. You can see the output of each Step in the **Output** field on the right of your Step. In **Session History**, you can see the status of your Automation execution.
5. When your Automation is successful, you can **Publish** it. This will override any previous versions created and published.
### Exposing the Automation as a Request in the Self-service portal
Expose the Automation as a Request to make it available in the Self-service portal of other members.
1. On the Workflows screen, use the toggle to **Expose in portal**. The **Expose as Request** dialog box opens.
2. Select one of the following:
* Specific users and groups
* Everyone in your account
If users and groups was selected, in **Add Members** specify who you want to add.
 3. Click **Add** and exit the dialog box. Your changes will be saved.
4.
3. Click **Add** and exit the dialog box. Your changes will be saved.
4. The Self-service portal is found on the top left of your screen, click  > **Portal**. All Workflows exposed to you are presented. Users with access to this request can use the Automation by filling in the input parameters and running the Request. The creator will get notified every new run of the Automation for auditing purposes.