> ## Documentation Index
> Fetch the complete documentation index at: https://docs.blinkops.com/llms.txt
> Use this file to discover all available pages before exploring further.
# Event-Based: Tag Control on a New EC2 Instance
> In this tutorial we will show you how to create a Workflow that controls tags applied when a new EC2 instance is created.
This enables a simple way to manage and use best practices, as the Automation checks the tags as soon as the instance is created on your account. The Workflow determines whether one or less tags are applied to the instance, and if so it will notify a predefined channel or user on Slack.
## Prerequisites
* A Blink account. Sign up [here](https://app.blinkops.com).
* A Slack connection or a Slack token to [create a Slack connection.](/docs/integrations/slack)
## Overview
Before we begin:
1. Creating a new Pack.
2. Creating a new Workflow.
Creating Workflow Steps:
1. Using an `if` Step to check if there is one or less tags assigned to the new EC2 instance.
2. Asking permission via Slack.
Testing the Workflow.
## Before we begin
### Creating a new Pack
A Pack is a collection of Workflows. If you already have a Pack you can open it and skip ahead to [creating a new Workflow ](#creating-a-new-workflow).
If you don't have an existing pack, follow these steps:
1. On your Workflow screen, click **Create new Pack**.
2. Enter
**Pack name**: *My first Pack*
3. Click **Create**.
The new Pack is displayed on your Workflow screen.
### Creating a new Workflow
1. Click **Create Workflow**.
2. Enter the parameters:
**Workflow name**: *Tag control on a new EC2 instance*
**Description**: This Workflow will be triggered when a new EC2 instance is created and will check the tags.
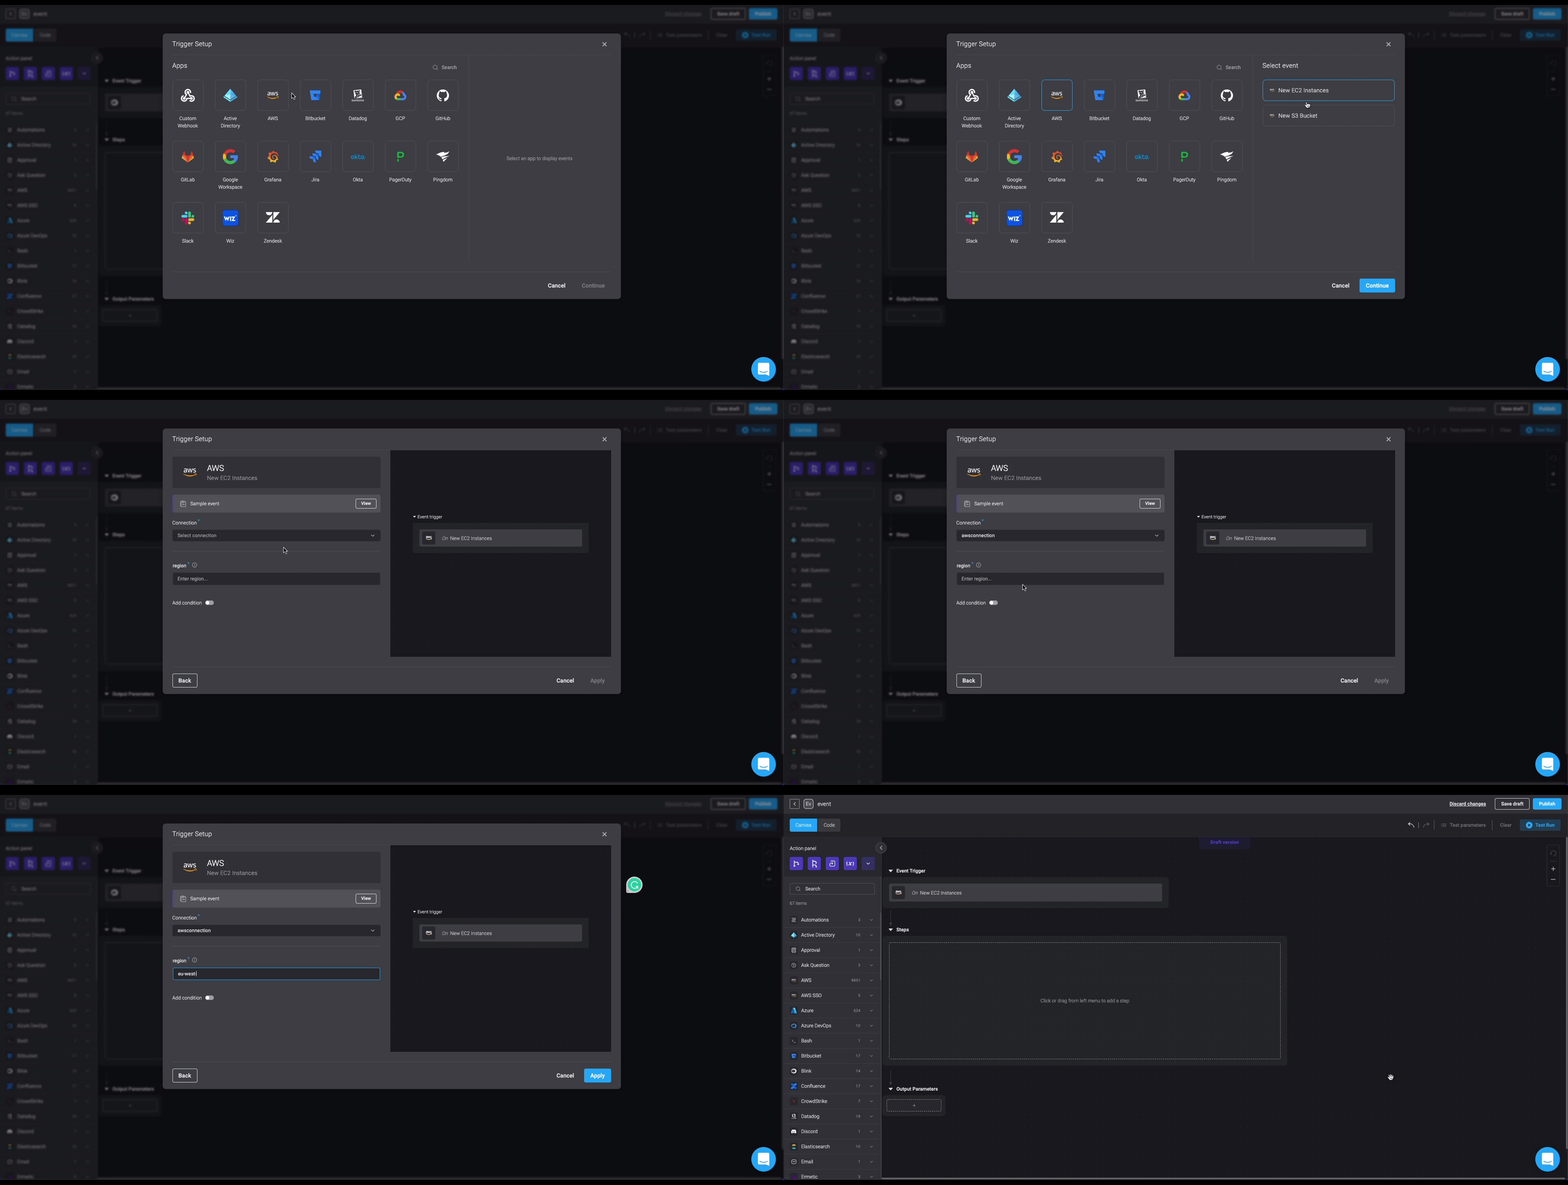
3. Select a [type of trigger](/docs/workflows/building-workflows/triggers/triggers): **Event-based Workflow**.
4. Select **AWS** > **AWS EC2 new instances** > **Continue**.
5. In **Trigger setup** select or create an AWS connection (*awsconnection*).
6. Enter **Region**: *eu-west-1*.
7. Click **Apply** > **Create Workflow**. You are redirected to the [**Editor page**](#creating-a-new-workflow) of the Workflow.
 ## Creating the Workflow Steps
Proceed to create the Steps of your Workflow as described in the following section.
### Step 1: Using an `if` Step to check if there is one or less tags assigned to the new EC2 instance
1. Click to open the **Action panel**. Alternatively, you can drag Actions to your flow, from the menu on the left side of your **Edit** screen.
2. Select `if` Step by clicking
## Creating the Workflow Steps
Proceed to create the Steps of your Workflow as described in the following section.
### Step 1: Using an `if` Step to check if there is one or less tags assigned to the new EC2 instance
1. Click to open the **Action panel**. Alternatively, you can drag Actions to your flow, from the menu on the left side of your **Edit** screen.
2. Select `if` Step by clicking  .
3. Click on **Action #1** to change the name of the action to *Checking number of tags*.
4. Enter the condition using expression language into the condition editor.
`{{len(event_payload.tags)}} Less or equal to 1`
If one tag or less is found, Step 2 occurs.
If more than one tag is found, Workflow stops.
### Step 2: Asking permission via Slack
1. Click to open the **Action panel**. Alternatively, you can drag Actions to your flow, from the menu on the left side of your **Edit** screen.
2. Search and select the *Slack* > *Send message to channel* Action.
3. For the Step to work, a connection to Slack is required. On the right-hand corner of your Step, select **Select Connection** > **slack\_connection**. If you do not have a Slack connection, click **Create new connection**.
4. Enter the following parameters in your Step.
* Click on **Action #7** to change the name of the action to *Notify via Slack*.
| Parameter | Description | Example |
| --------- | ------------------------- | ------------------------------------------------------------------------------------------------------------------------------------------------------------------ |
| Channel | Recipient's channel name. | *Random* |
| Text | Descriptive text. | The following instance `{{event_payload.instance}}` in `{{event_payload.placement}}` violates tagging policy. Here are the attached tags: `{{event_payload.tags}}` |
## Testing the Workflow
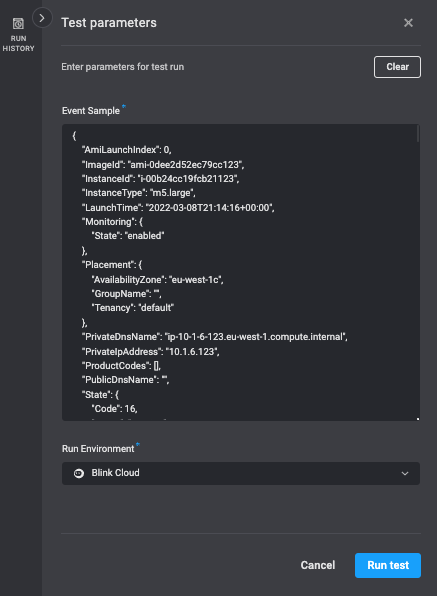
You can test your Workflow before you publish it. An event-based Workflow can be tested using a JSON sample of a potential incoming event. To run a test, use the following instructions:
1. From the **Edit** mode, save your draft and do a **Test run** of your Workflow.
2. Click **Test run**. A sample event is displayed in the **Event sample** text area and the sample can be edited.
3. You can change the runner to run the Workflow with a runner that is not the default. The default runner is Blink Cloud.
4. Click **Apply**.
5. Click **Run test**.
6. When your Workflow is successful, you can **Publish** it. This will override any previous versions created and published.
.
3. Click on **Action #1** to change the name of the action to *Checking number of tags*.
4. Enter the condition using expression language into the condition editor.
`{{len(event_payload.tags)}} Less or equal to 1`
If one tag or less is found, Step 2 occurs.
If more than one tag is found, Workflow stops.
### Step 2: Asking permission via Slack
1. Click to open the **Action panel**. Alternatively, you can drag Actions to your flow, from the menu on the left side of your **Edit** screen.
2. Search and select the *Slack* > *Send message to channel* Action.
3. For the Step to work, a connection to Slack is required. On the right-hand corner of your Step, select **Select Connection** > **slack\_connection**. If you do not have a Slack connection, click **Create new connection**.
4. Enter the following parameters in your Step.
* Click on **Action #7** to change the name of the action to *Notify via Slack*.
| Parameter | Description | Example |
| --------- | ------------------------- | ------------------------------------------------------------------------------------------------------------------------------------------------------------------ |
| Channel | Recipient's channel name. | *Random* |
| Text | Descriptive text. | The following instance `{{event_payload.instance}}` in `{{event_payload.placement}}` violates tagging policy. Here are the attached tags: `{{event_payload.tags}}` |
## Testing the Workflow
You can test your Workflow before you publish it. An event-based Workflow can be tested using a JSON sample of a potential incoming event. To run a test, use the following instructions:
1. From the **Edit** mode, save your draft and do a **Test run** of your Workflow.
2. Click **Test run**. A sample event is displayed in the **Event sample** text area and the sample can be edited.
3. You can change the runner to run the Workflow with a runner that is not the default. The default runner is Blink Cloud.
4. Click **Apply**.
5. Click **Run test**.
6. When your Workflow is successful, you can **Publish** it. This will override any previous versions created and published.