> ## Documentation Index
> Fetch the complete documentation index at: https://docs.blinkops.com/llms.txt
> Use this file to discover all available pages before exploring further.

# About Cases

> Create, manage, and investigate security cases using Blink's case management interface.

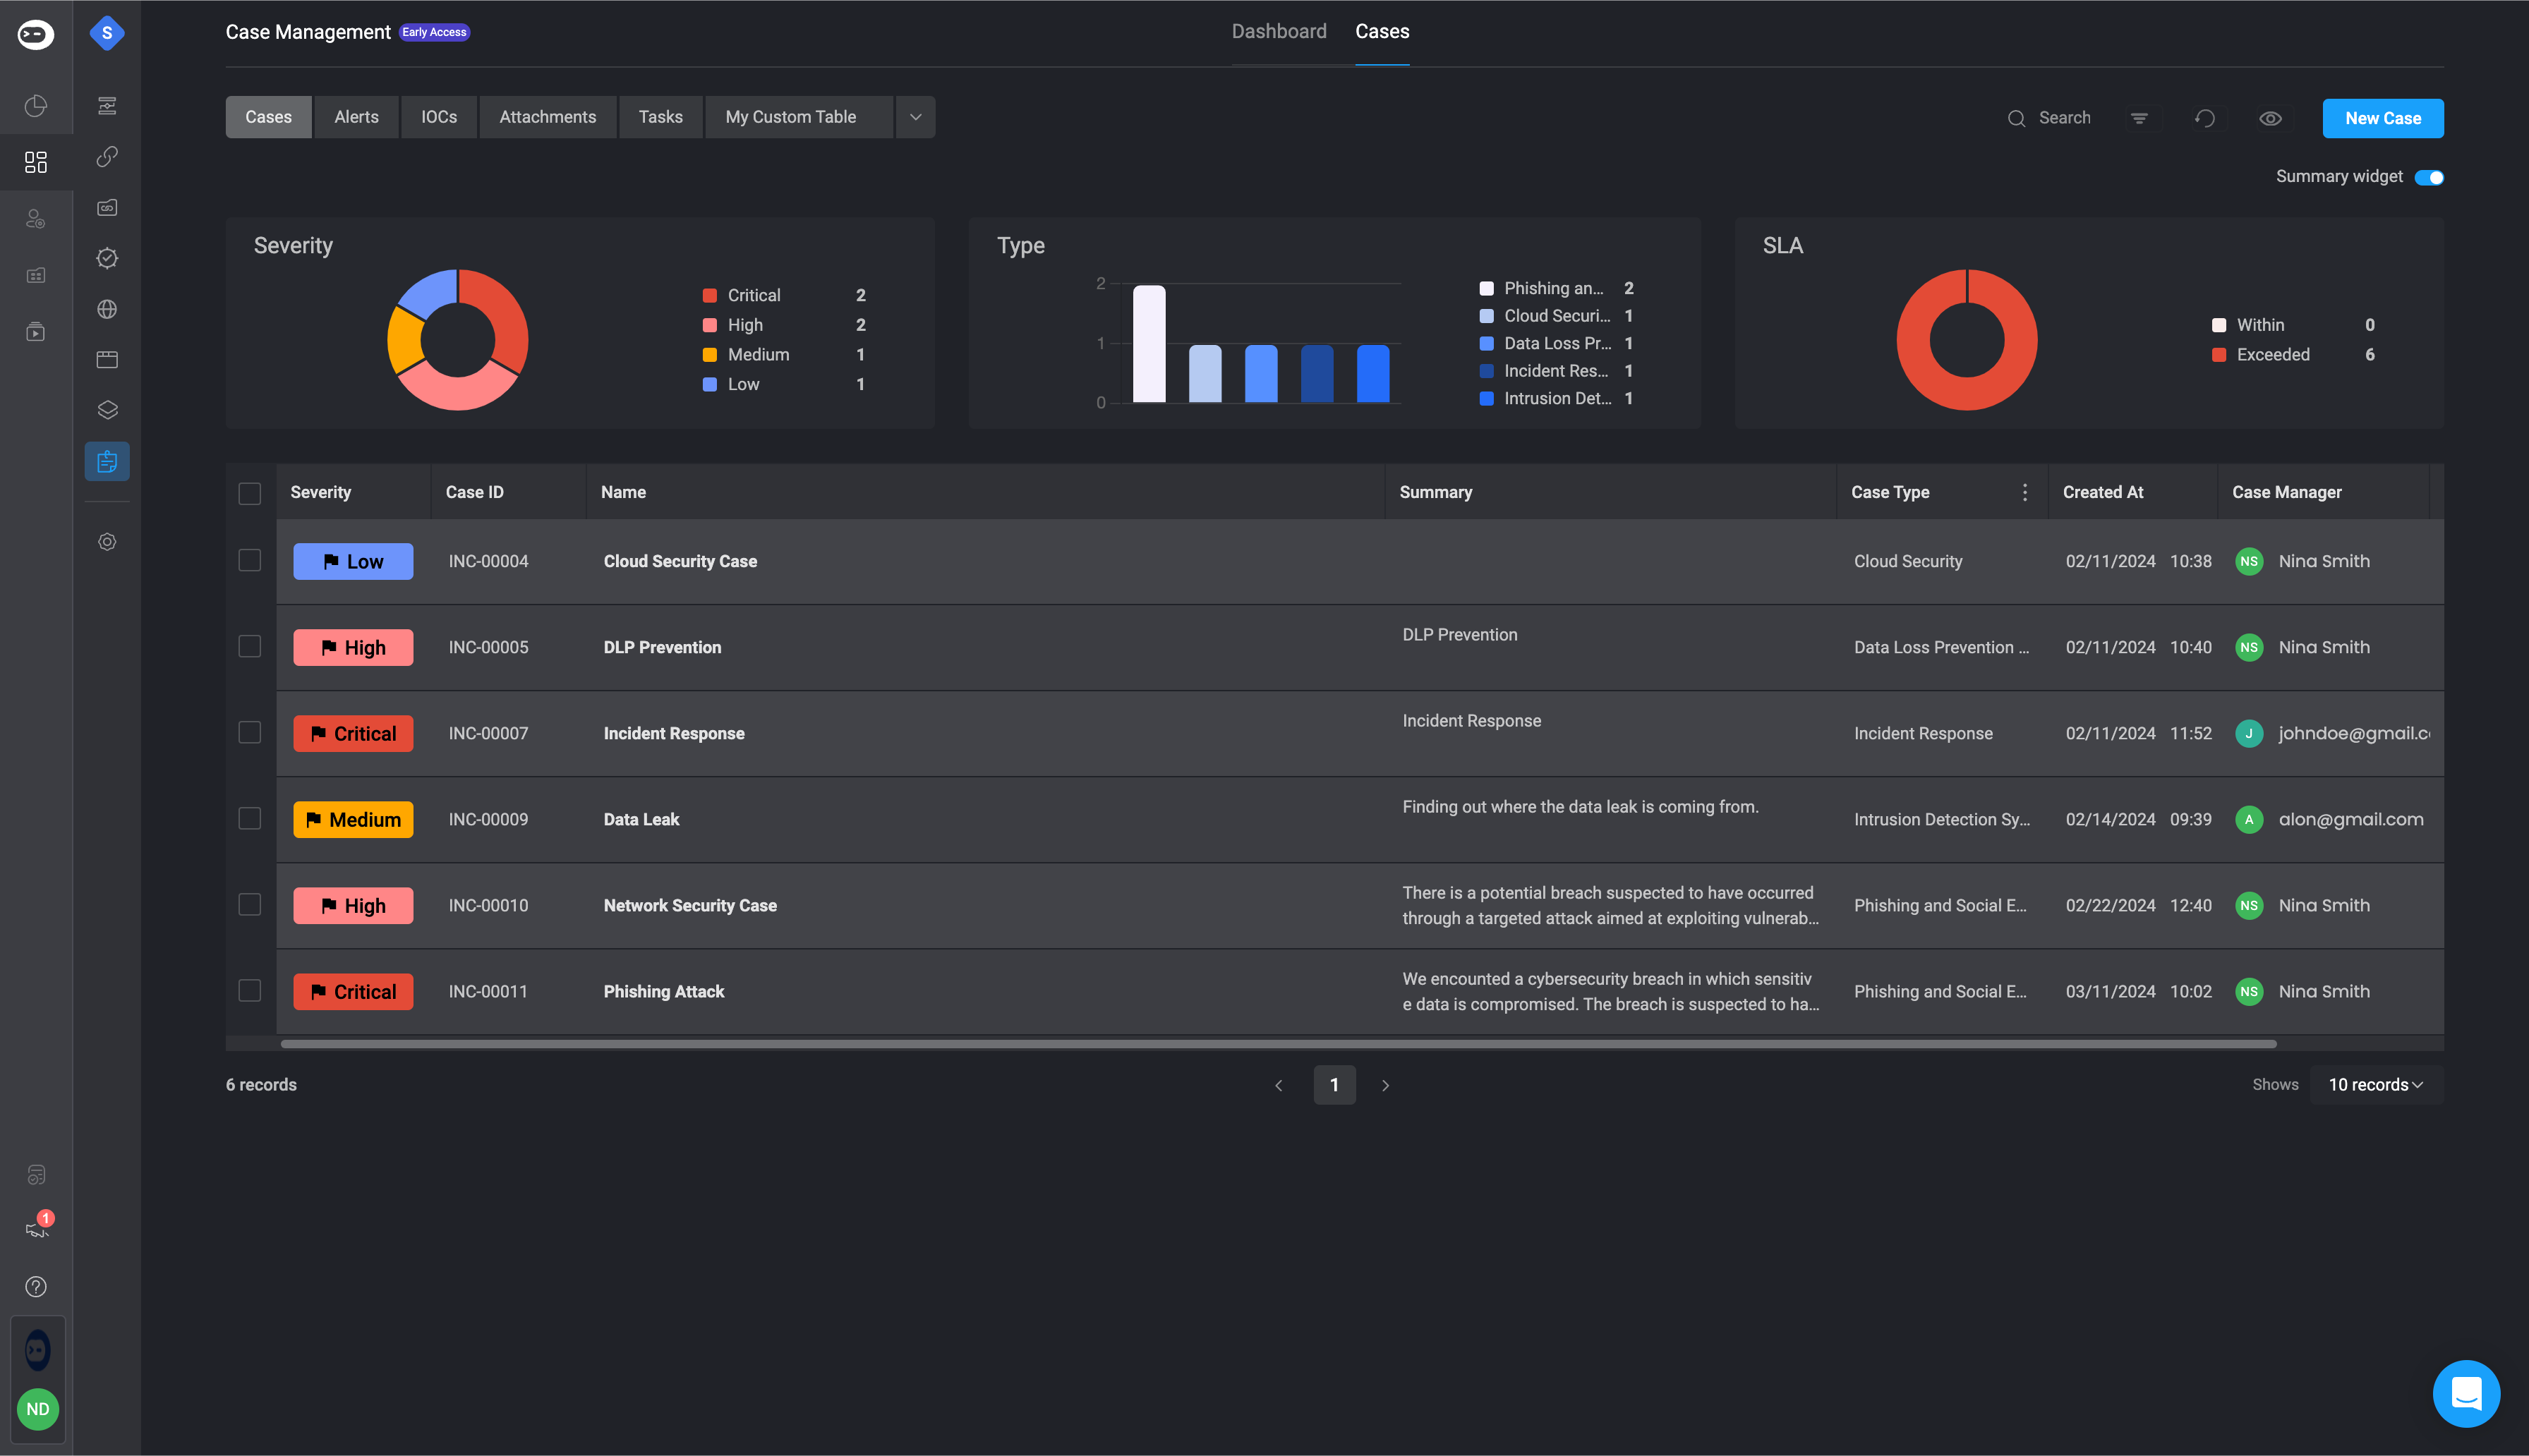
A case in Case Management refers to a structured record of an issue, request, or investigation that requires tracking, resolution, and collaboration. Cases typically contain relevant details such as the issue description, assigned users, status, priority, timestamps, and associated actions or documentation.

In Blink’s Case Management, a case represents a security event, incident, or investigation that is logged and managed through automated workflows and integrations with 3rd-party security systems. Each case helps teams track progress, document findings, and ensure timely resolution.

<Tip> To view the `Case Tables Runtime Limitations` click [here](/docs/blink-platform/tables/system-limits). Keep in mind that the `Tables in Cases` have the same `runtime limitations` as the **tables** in the workspace.</Tip>

<Frame>
  <img src="https://mintcdn.com/blinkops-2/jkJg6KPC0uV-ty21/img/CaseManagement/Cases.png?fit=max&auto=format&n=jkJg6KPC0uV-ty21&q=85&s=6f8cfb21bfe007cb1abb6ed2af95ed75" width="3584" height="2064" data-path="img/CaseManagement/Cases.png" />
</Frame>

***

## Create a New Case

<Tip>To learn more about how to automate the process of creating a new case, navigate to [Blink's Automated Case Management](/docs/case-management/blinks-automated-case-management/blinks-automated-case-management) documentation, to learn more</Tip>

<Steps>
  <Step title="Navigate to Cases">
    In your selected workspace, navigate to the sidebar and select the 'Case' tab.
  </Step>

  <Step title="Open the New Case Form">
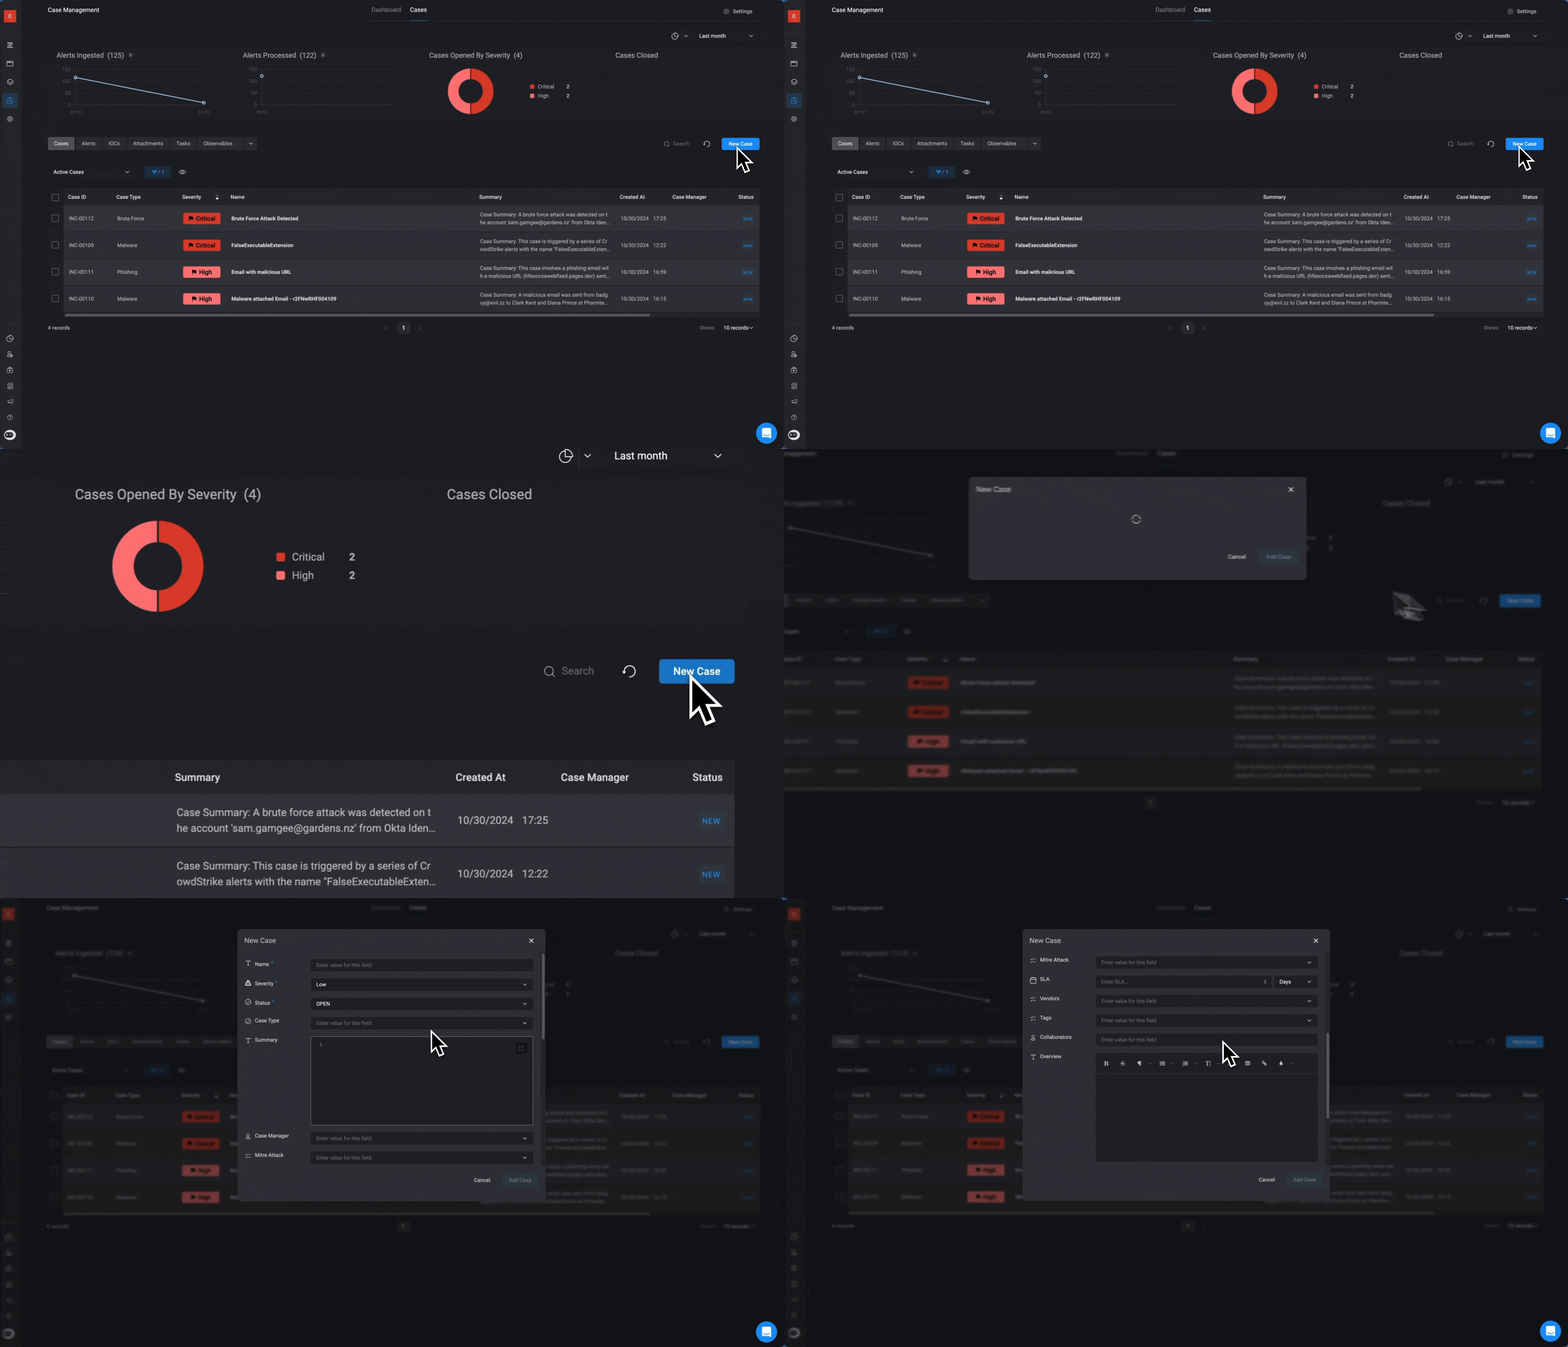
    Navigate to the top-right corner and click the 'New Case' button.

    <Frame>
      <img src="https://mintcdn.com/blinkops-2/jkJg6KPC0uV-ty21/img/CaseManagement/CreateNewCase.gif?s=3fc9bbedaee3b61991ad07261dc6c708" width="1884" height="1080" data-path="img/CaseManagement/CreateNewCase.gif" />
    </Frame>
  </Step>

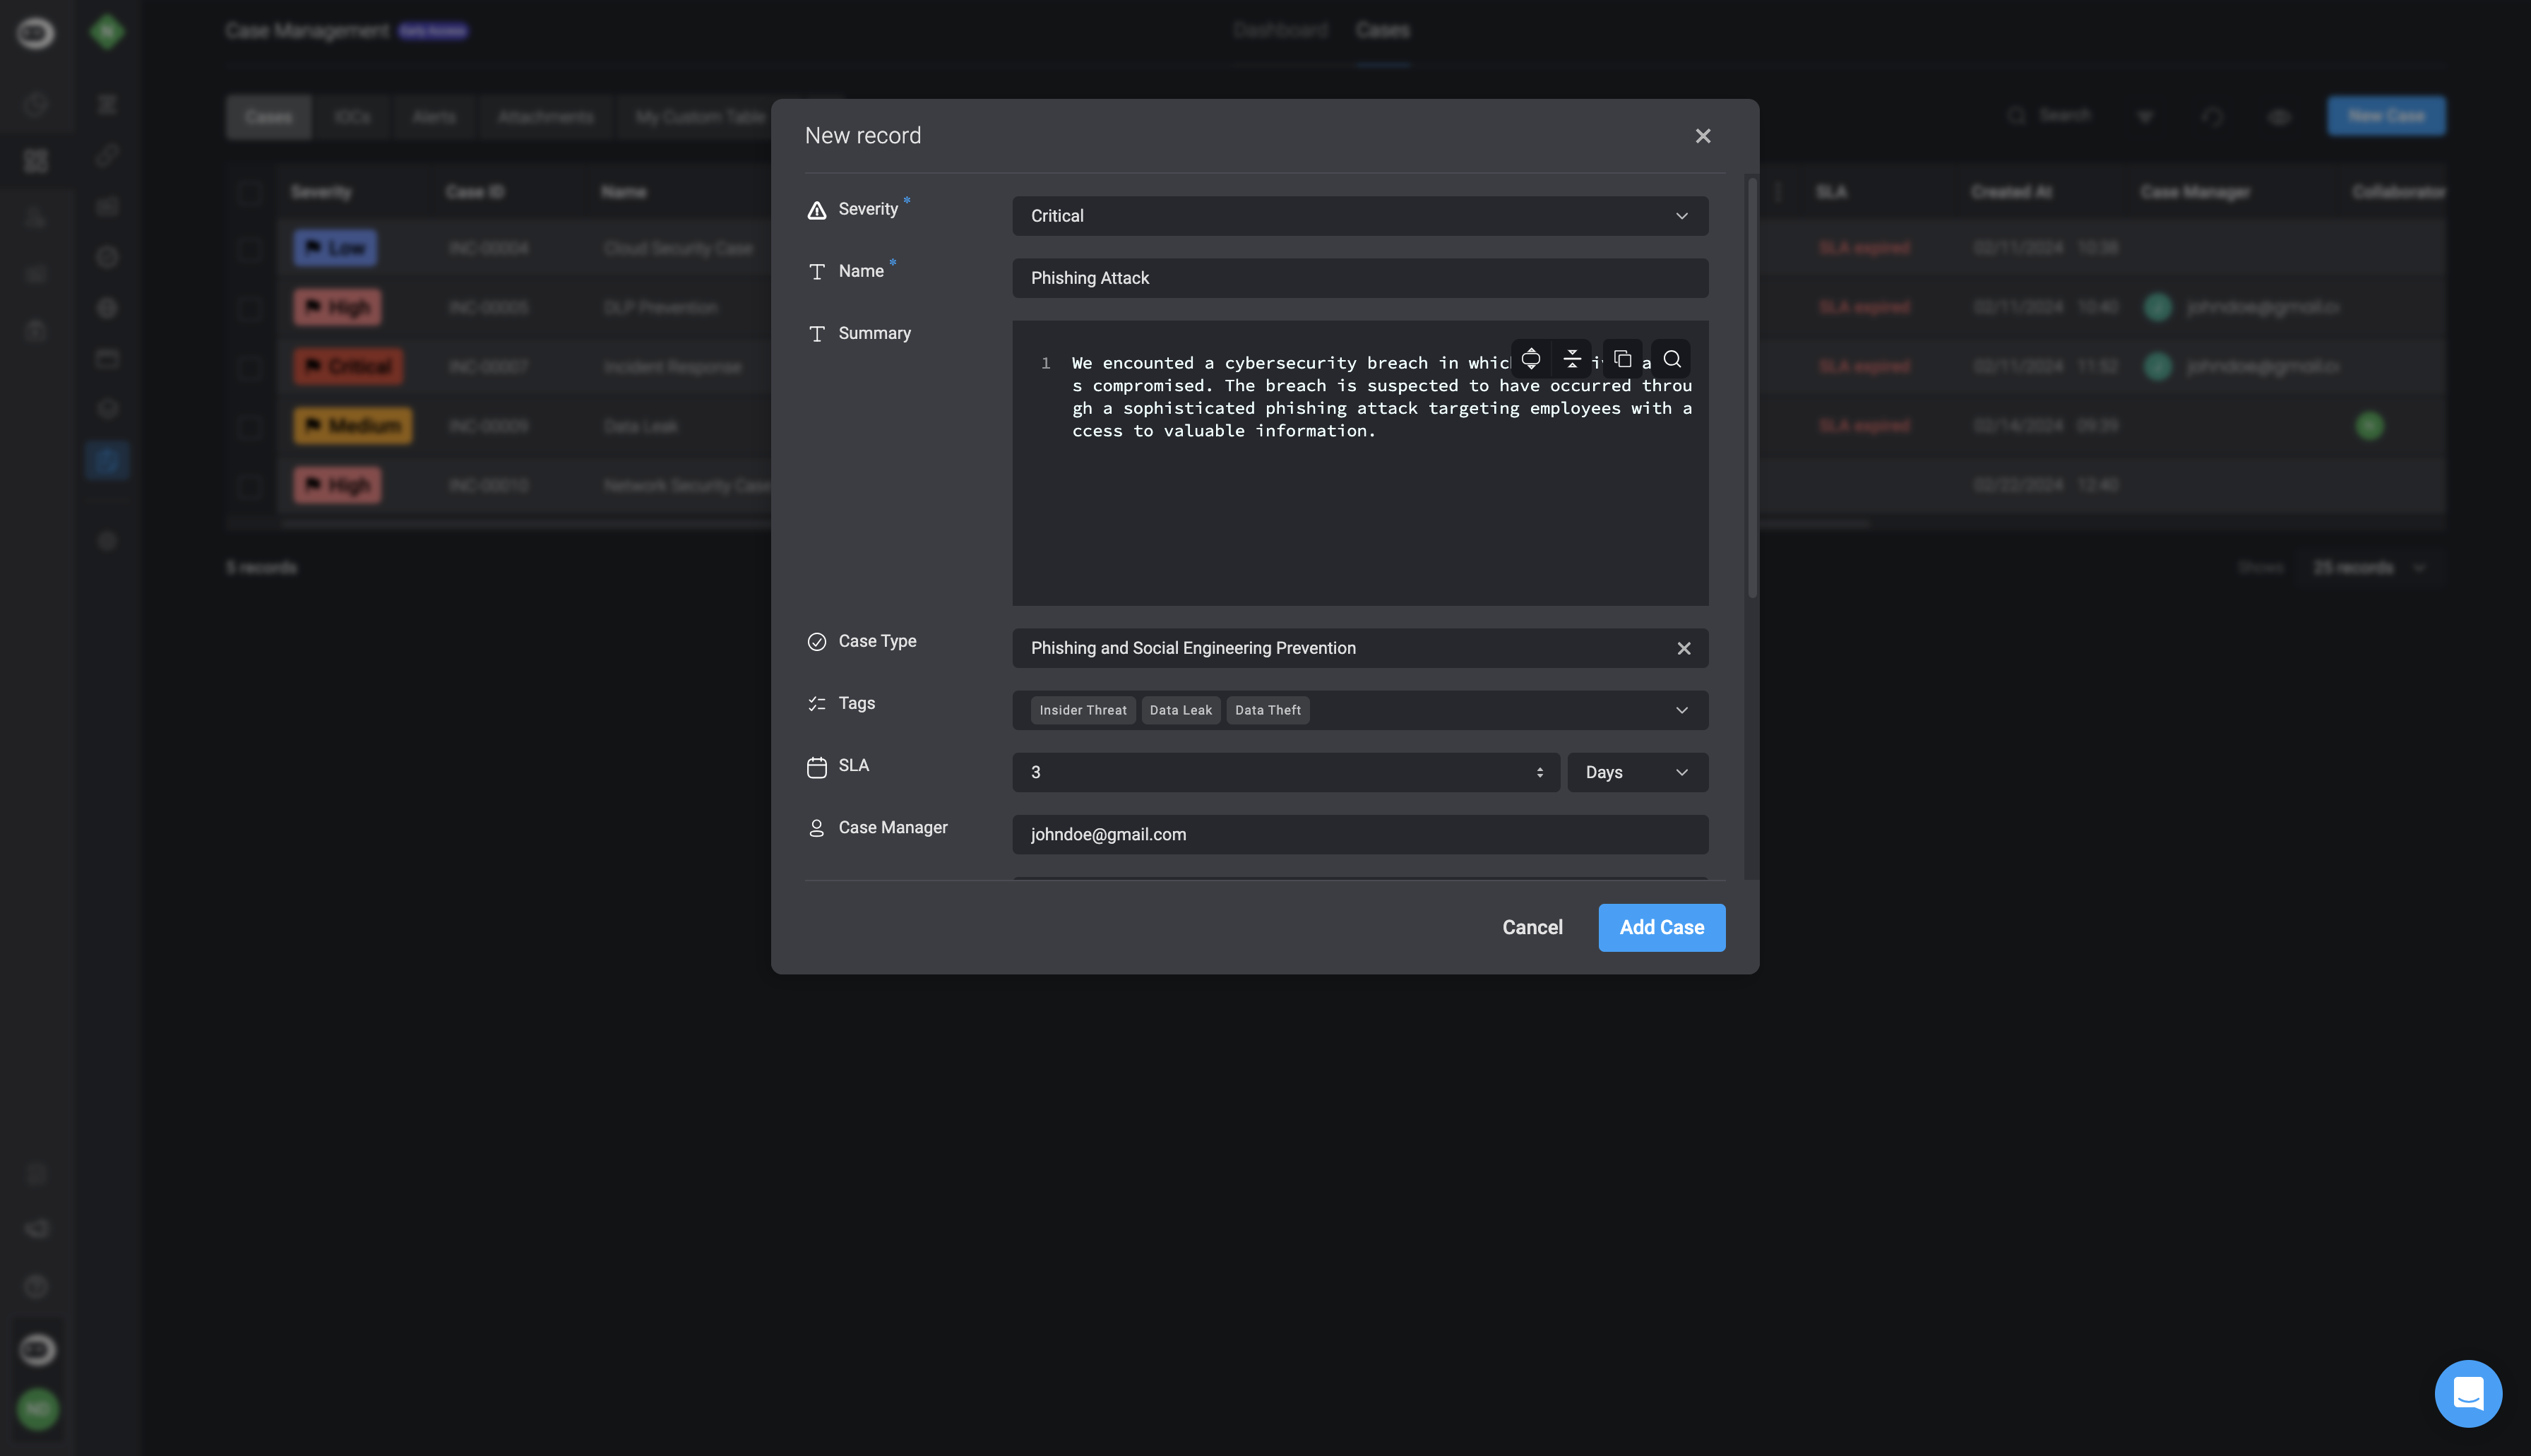
  <Step title="Fill in all the necessary fields">
    Once completed, select the 'Add Record' button in the bottom-right corner.

    <Accordion title="Case's Table Fields" icon="up-down">
      <div className="integrations-table">
        | Parameter          | Description                                                                                                                                                                                                                                       |
        | ------------------ | ------------------------------------------------------------------------------------------------------------------------------------------------------------------------------------------------------------------------------------------------- |
        | Name               | The name of the Case.                                                                                                                                                                                                                             |
        | Severity           | The severity rank of your Case. It can be: **Low, Medium, High or Critical**.                                                                                                                                                                     |
        | Status             | The Case's Status                                                                                                                                                                                                                                 |
        | Case Type          | The type of case.                                                                                                                                                                                                                                 |
        | Summary            | A brief summary of the case.                                                                                                                                                                                                                      |
        | Case Manager       | The email address of the user who created the case.                                                                                                                                                                                               |
        | Vendors            | The vendor associated with the Case                                                                                                                                                                                                               |
        | Overview           | An overview of the Case.                                                                                                                                                                                                                          |
        | SLA                | The duration of time within which a task pertaining to the case must be completed before the **SLA time period** is reached.                                                                                                                      |
        | Tags               | Tags linked to the case.                                                                                                                                                                                                                          |
        | Collaborators      | Users who collaborate on the case                                                                                                                                                                                                                 |
        | Mitre Attack       | A MITRE ATTACK method or strategy used in the attack. This helps categorize and understand the attack better. For more information about the MITRE ATTACK feature, click [here](/docs/case-management/cases/case-overview#additional-information) |
        | Linked Alerts      | The Name and ID of the Alert(s) you want to link to this current case.                                                                                                                                                                            |
        | Linked Cases       | The Name and ID of the Case(s) you want to link to this current case.                                                                                                                                                                             |
        | Linked Tasks       | The Name and ID of the Tasks(s) you want to link to this current case.                                                                                                                                                                            |
        | Linked Observables | The Name and ID of the Observable(s) you want to link to this current case.                                                                                                                                                                       |
        | Linked Attachments | The Name and ID of the Attachment(s) you want to link to this current case.                                                                                                                                                                       |
      </div>
    </Accordion>

    <Frame>
      <img src="https://mintcdn.com/blinkops-2/a1zzdVRAg2RBMsIZ/img/CaseManagement/NewCaseRecord.png?fit=max&auto=format&n=a1zzdVRAg2RBMsIZ&q=85&s=bec60e8a9eecb953aa63ead5deab96a0" width="3584" height="2062" data-path="img/CaseManagement/NewCaseRecord.png" />
    </Frame>
  </Step>
</Steps>

***

## Editing a Case's Status

<Steps>
  <Step>
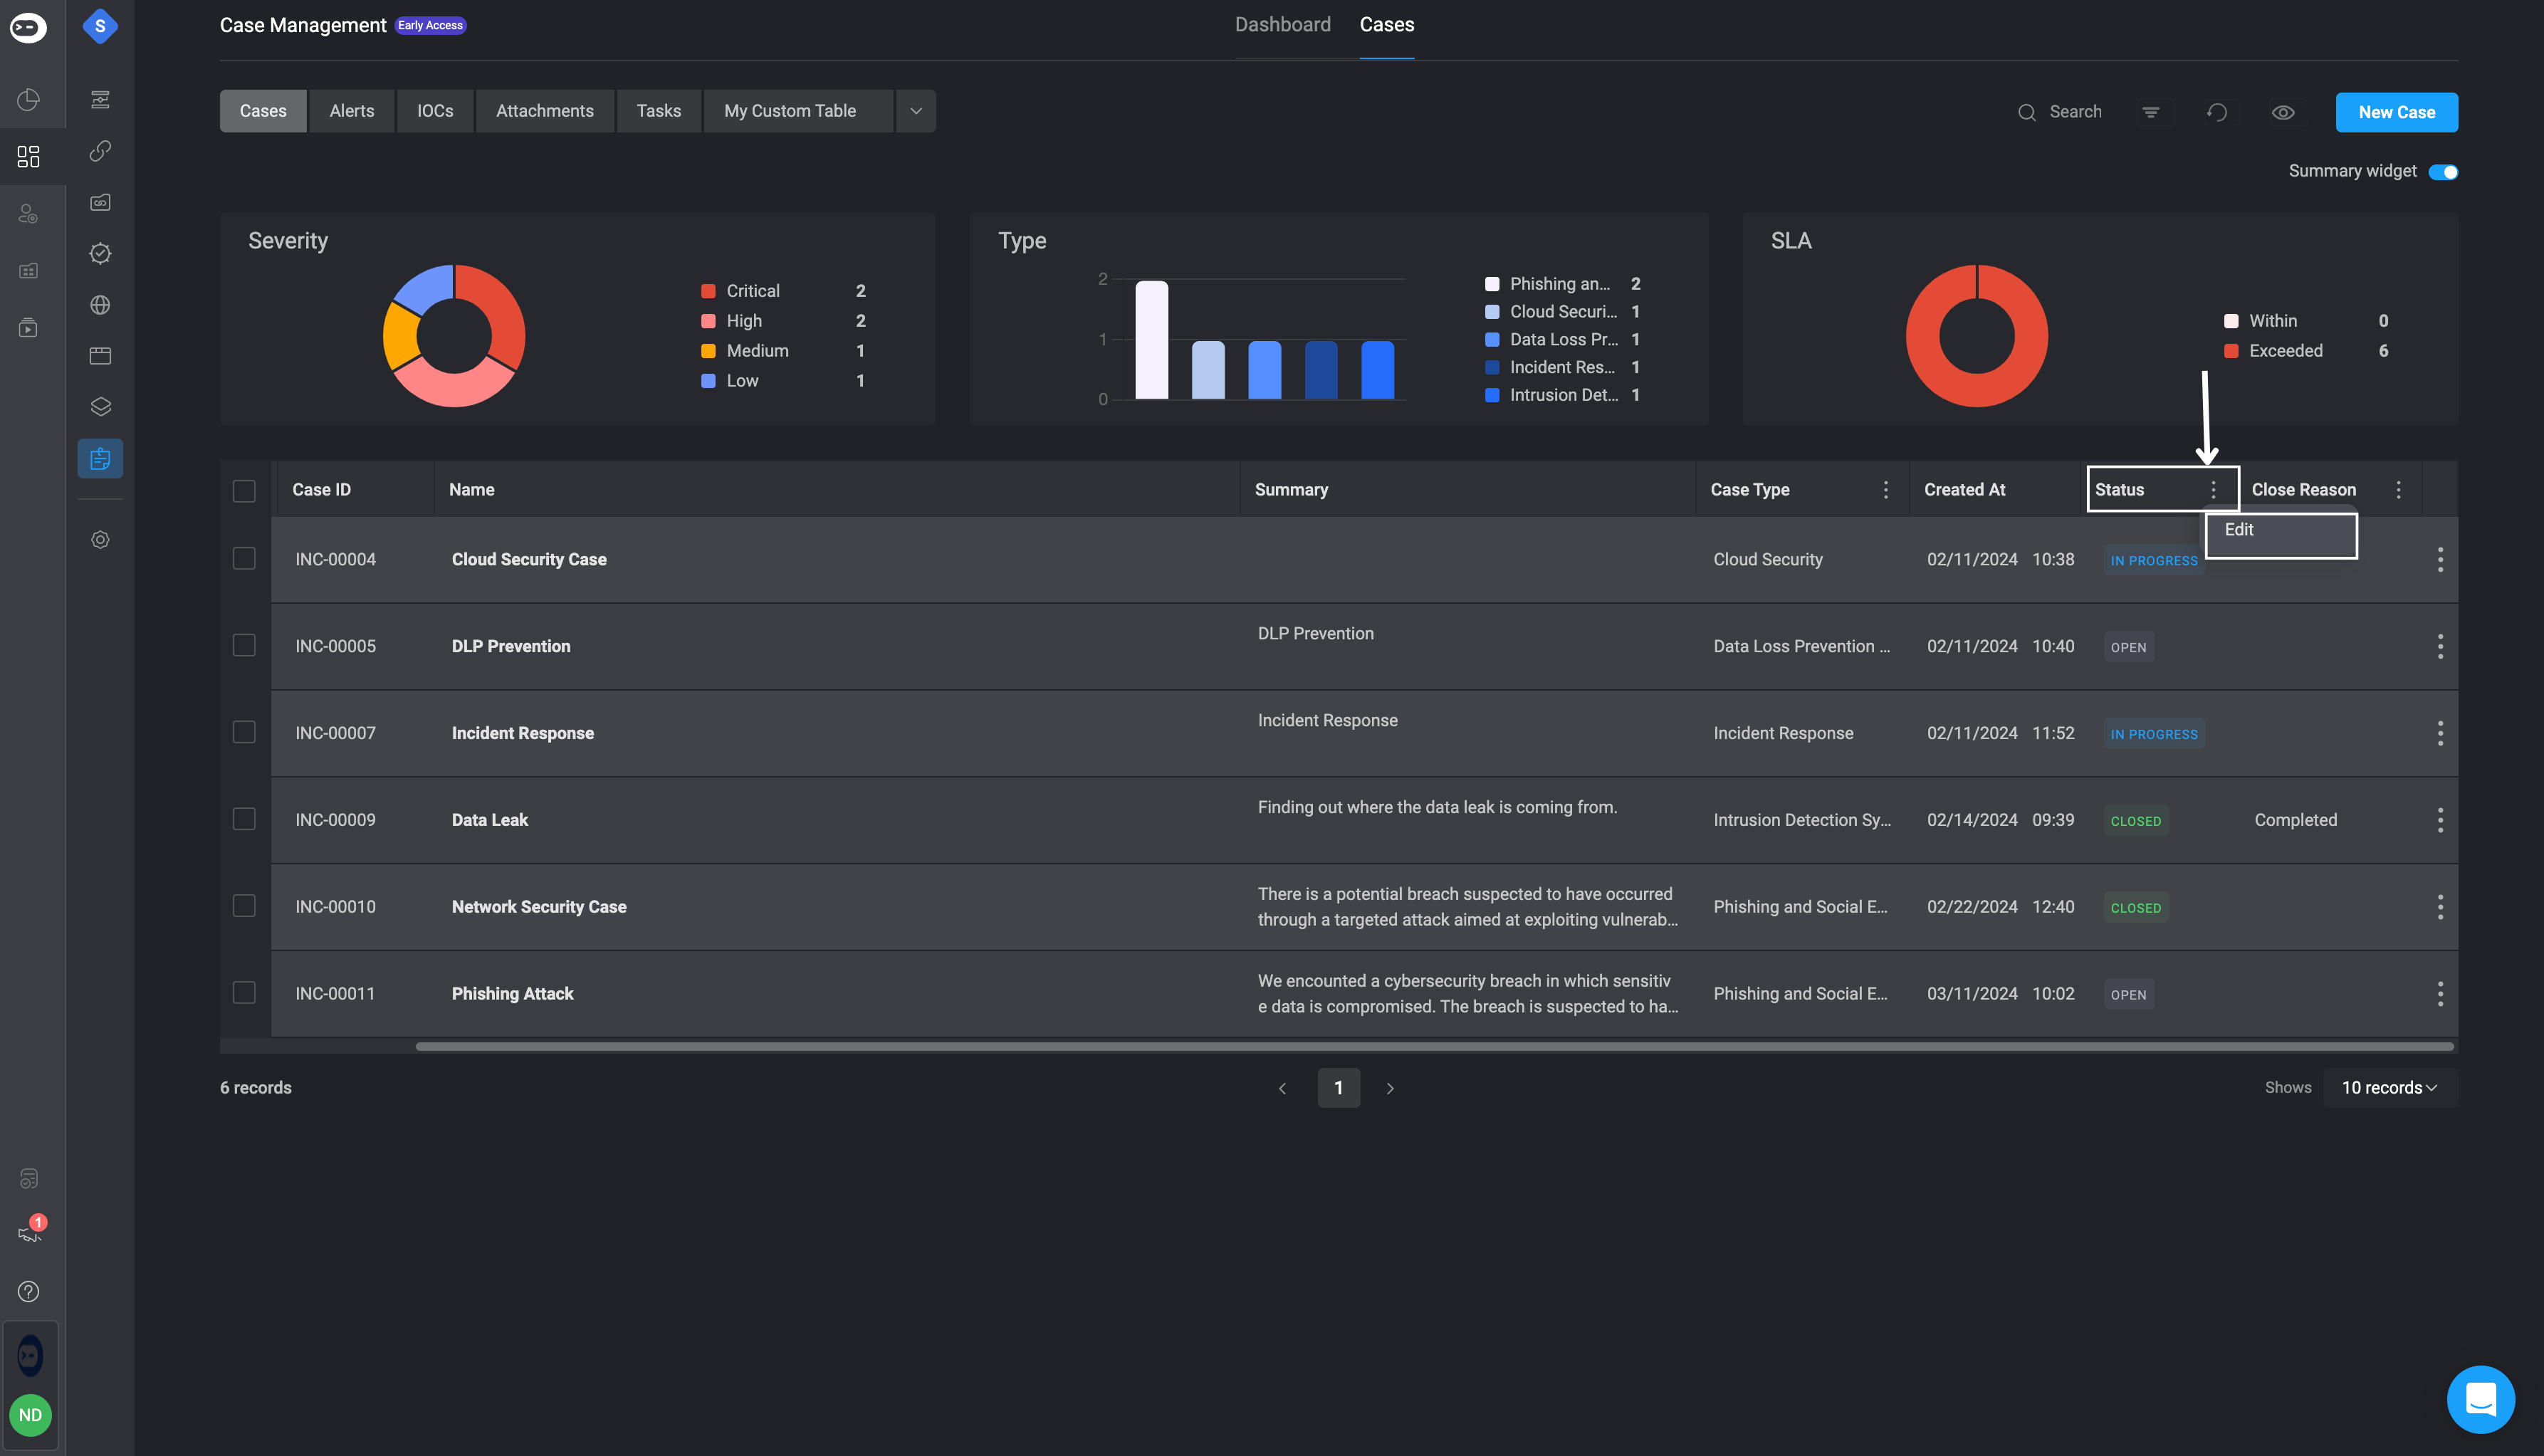
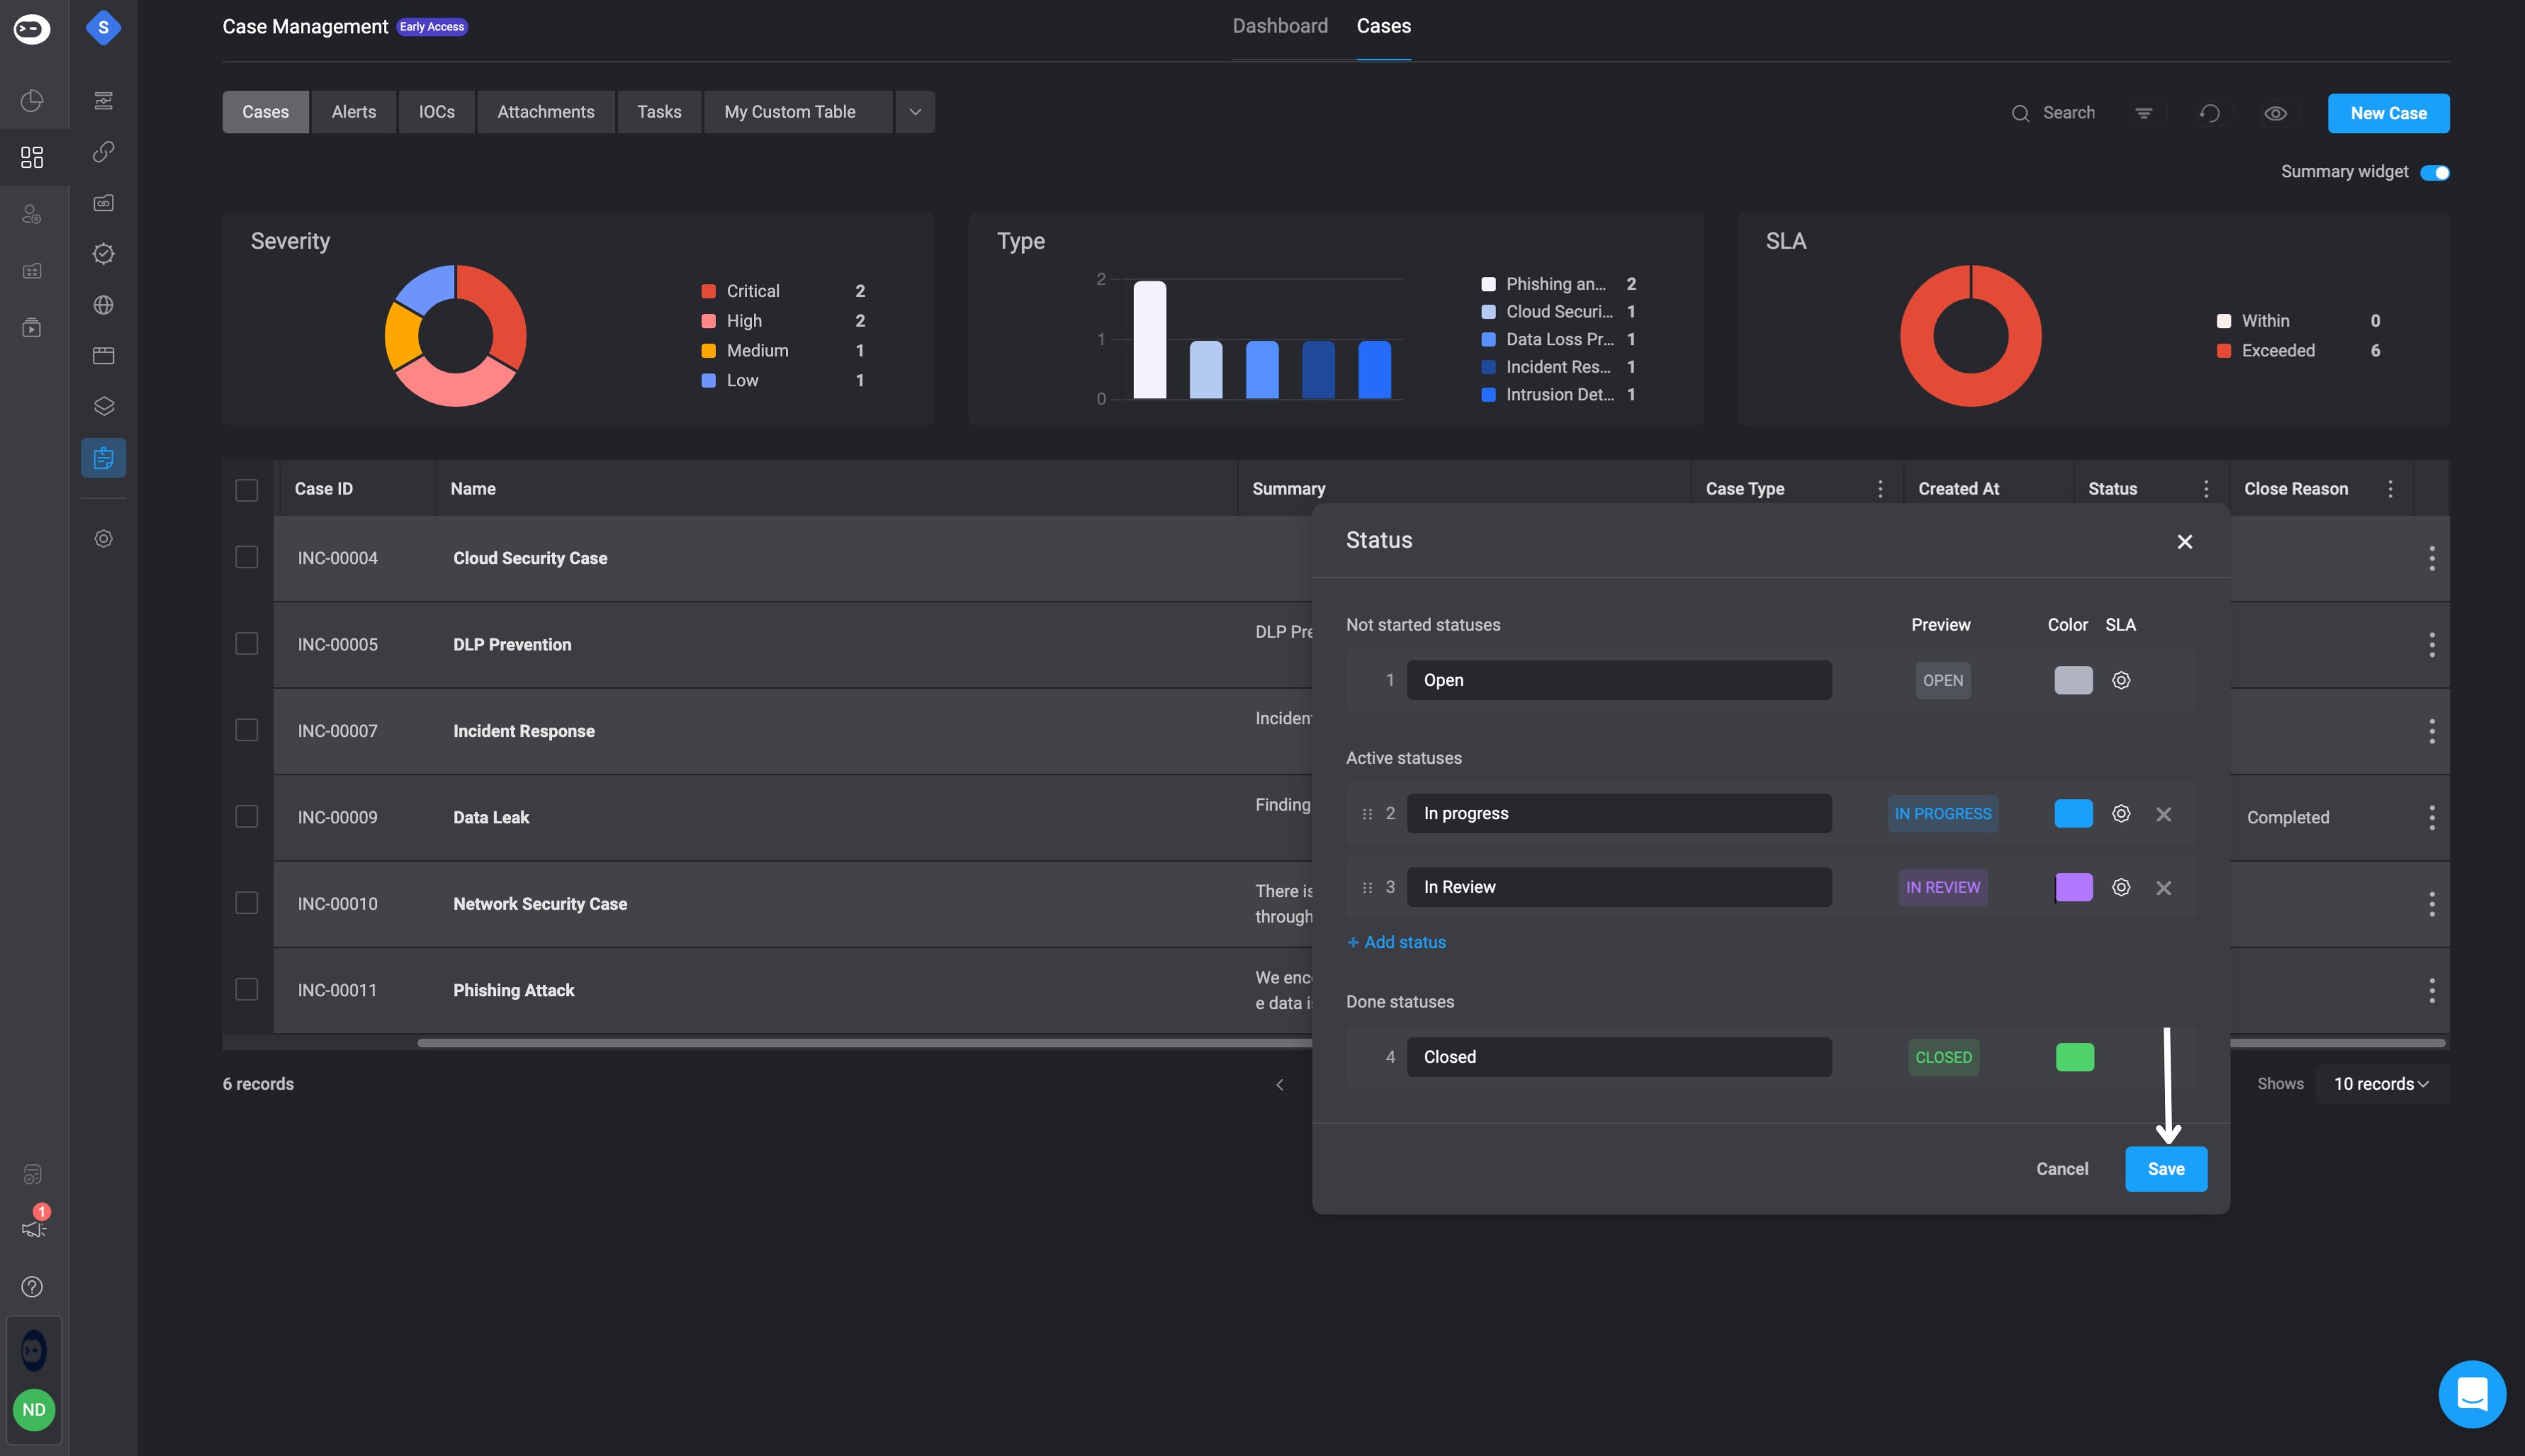
    <p>You can customize your case's status by clicking on  <Icon icon="square-ellipsis-vertical" />  icon next to the **Status** field in the case table and selecting the **edit** option. </p>

    <Frame>
      <img src="https://mintcdn.com/blinkops-2/sb7Z70HzlwQjgWp7/img/CaseManagement/StatusTable.png?fit=max&auto=format&n=sb7Z70HzlwQjgWp7&q=85&s=bf4e59752ca596098f4cd2ab2af40c80" width="3573" height="2045" data-path="img/CaseManagement/StatusTable.png" />
    </Frame>
  </Step>

  <Step>
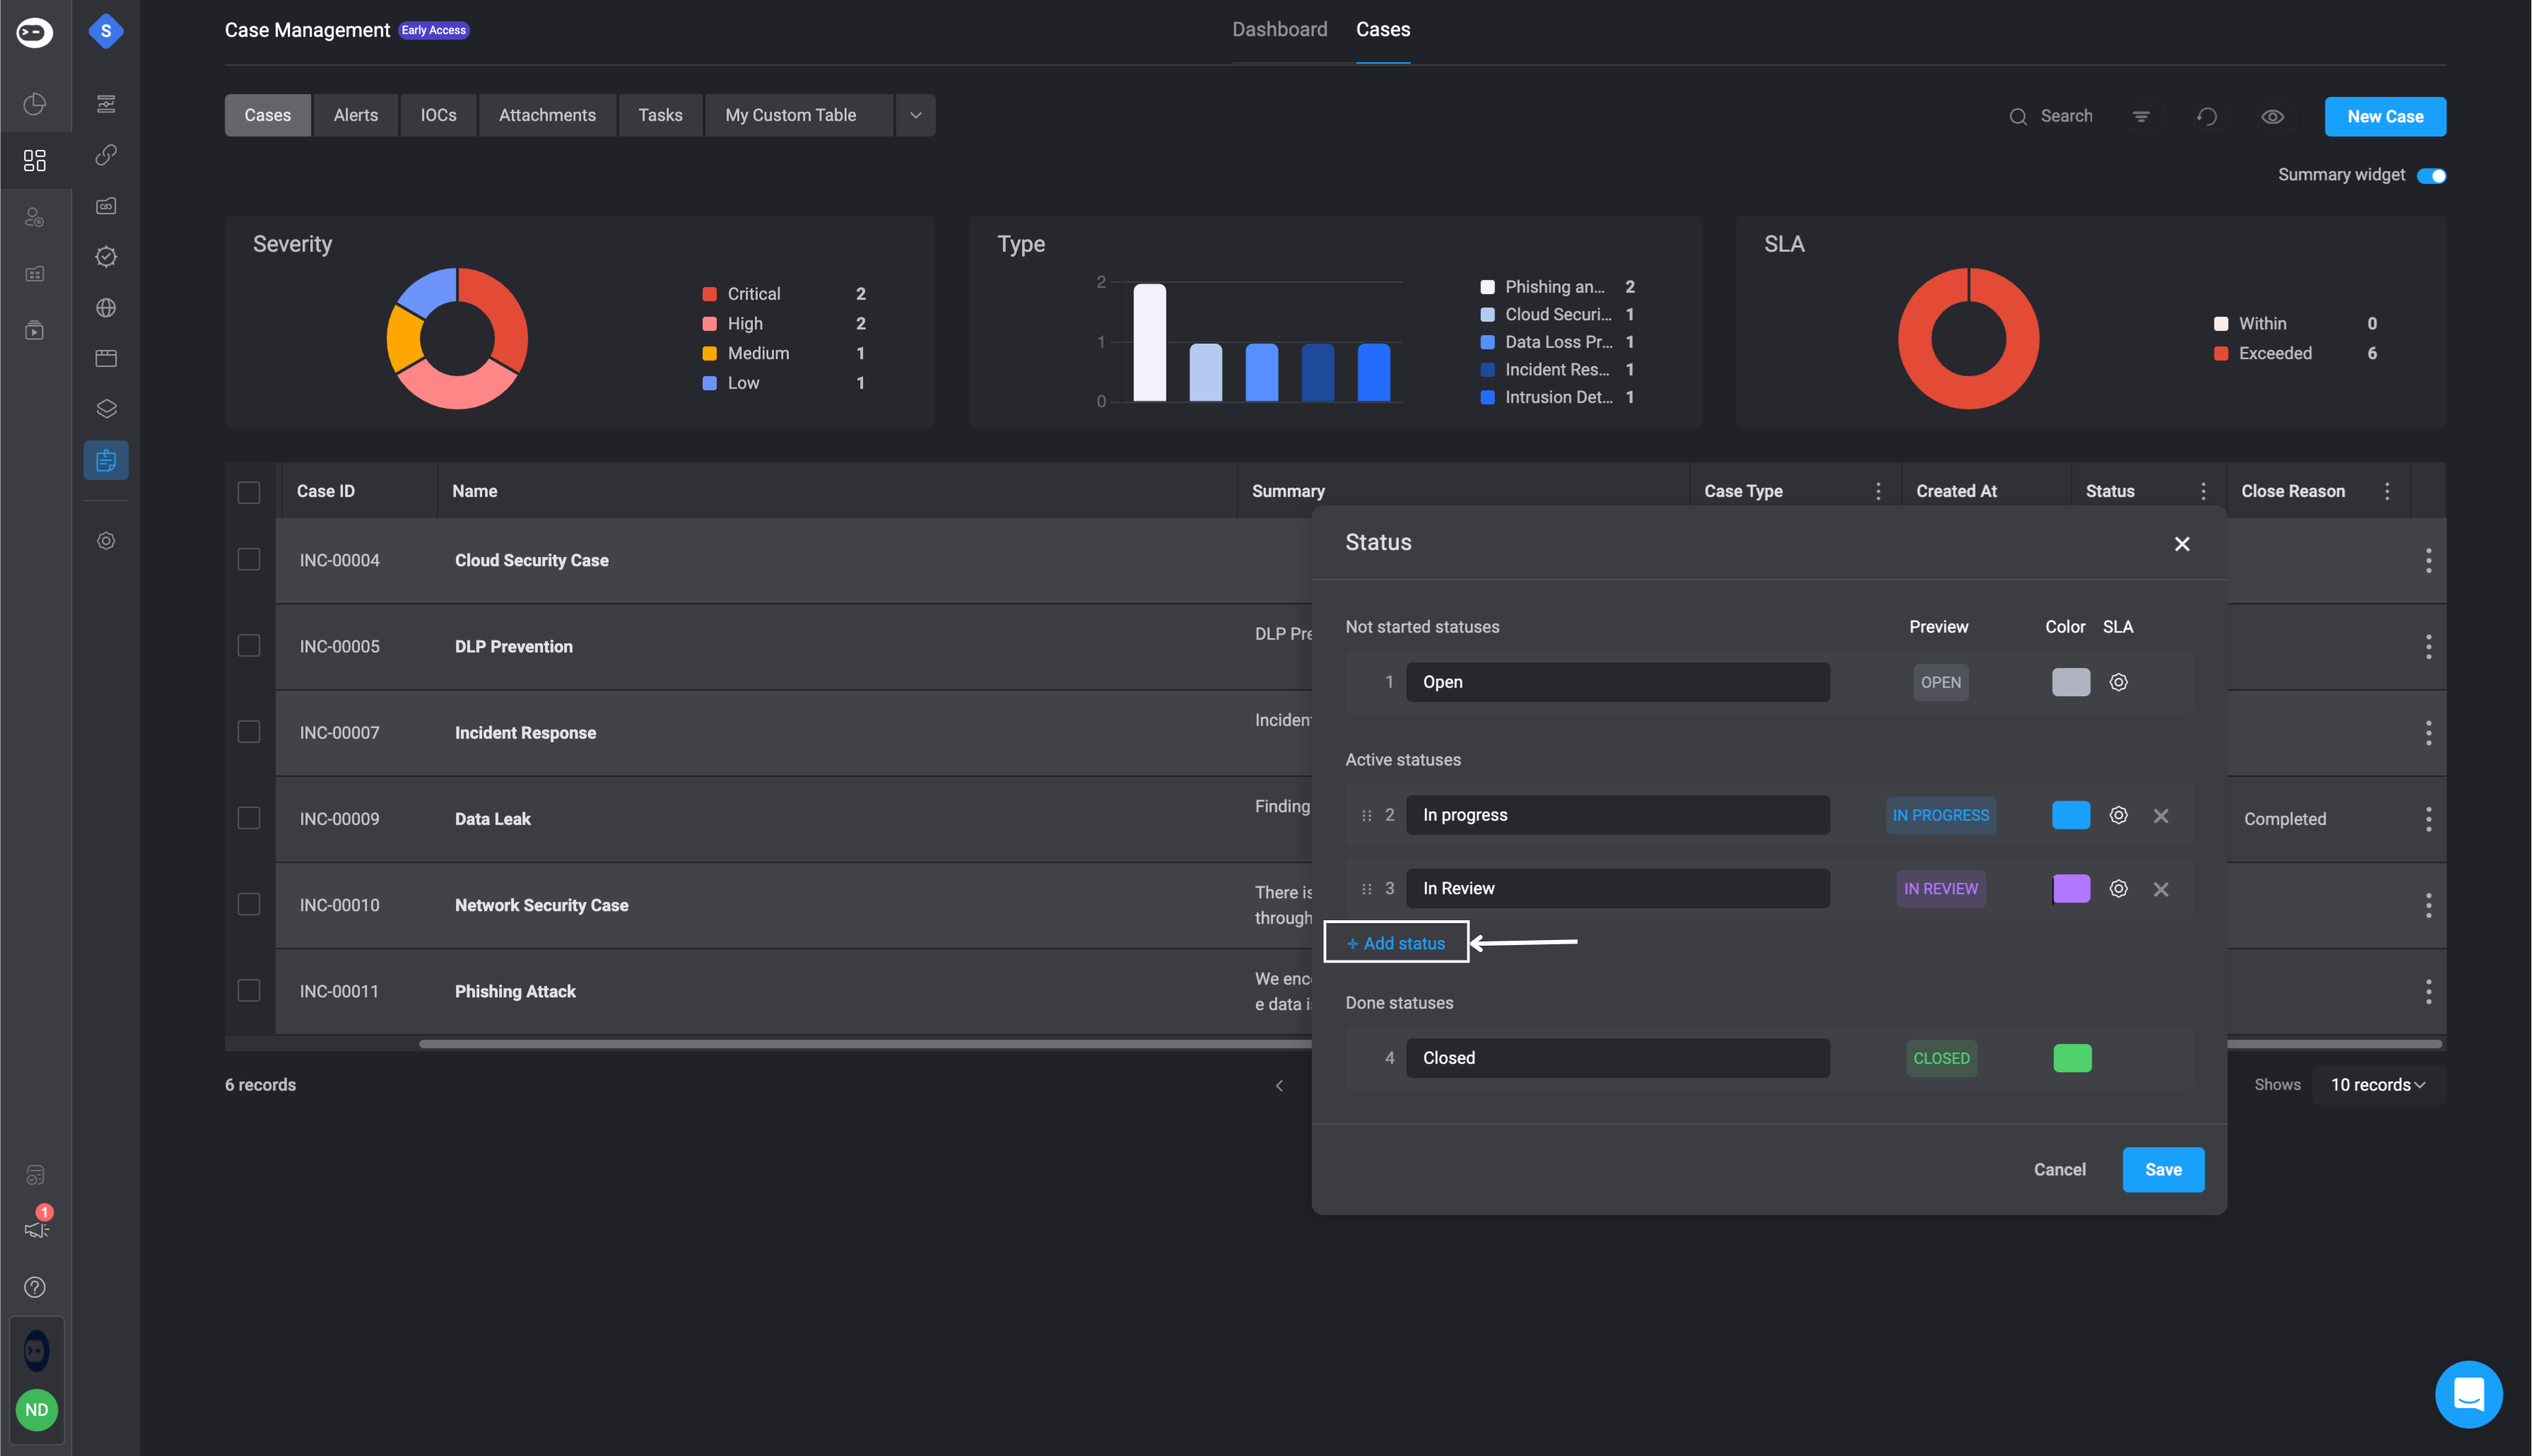
    You can edit your case's status by modifying the names, the color that represents the status and add your own **active statuses**.

    <Frame>
      <img src="https://mintcdn.com/blinkops-2/UGyZ3yX79lqyx4Hr/img/CaseManagement/AddStatus.png?fit=max&auto=format&n=UGyZ3yX79lqyx4Hr&q=85&s=2ade1a3059987502f5f13b0835b90d08" width="3582" height="2060" data-path="img/CaseManagement/AddStatus.png" />
    </Frame>
  </Step>

  <Step>
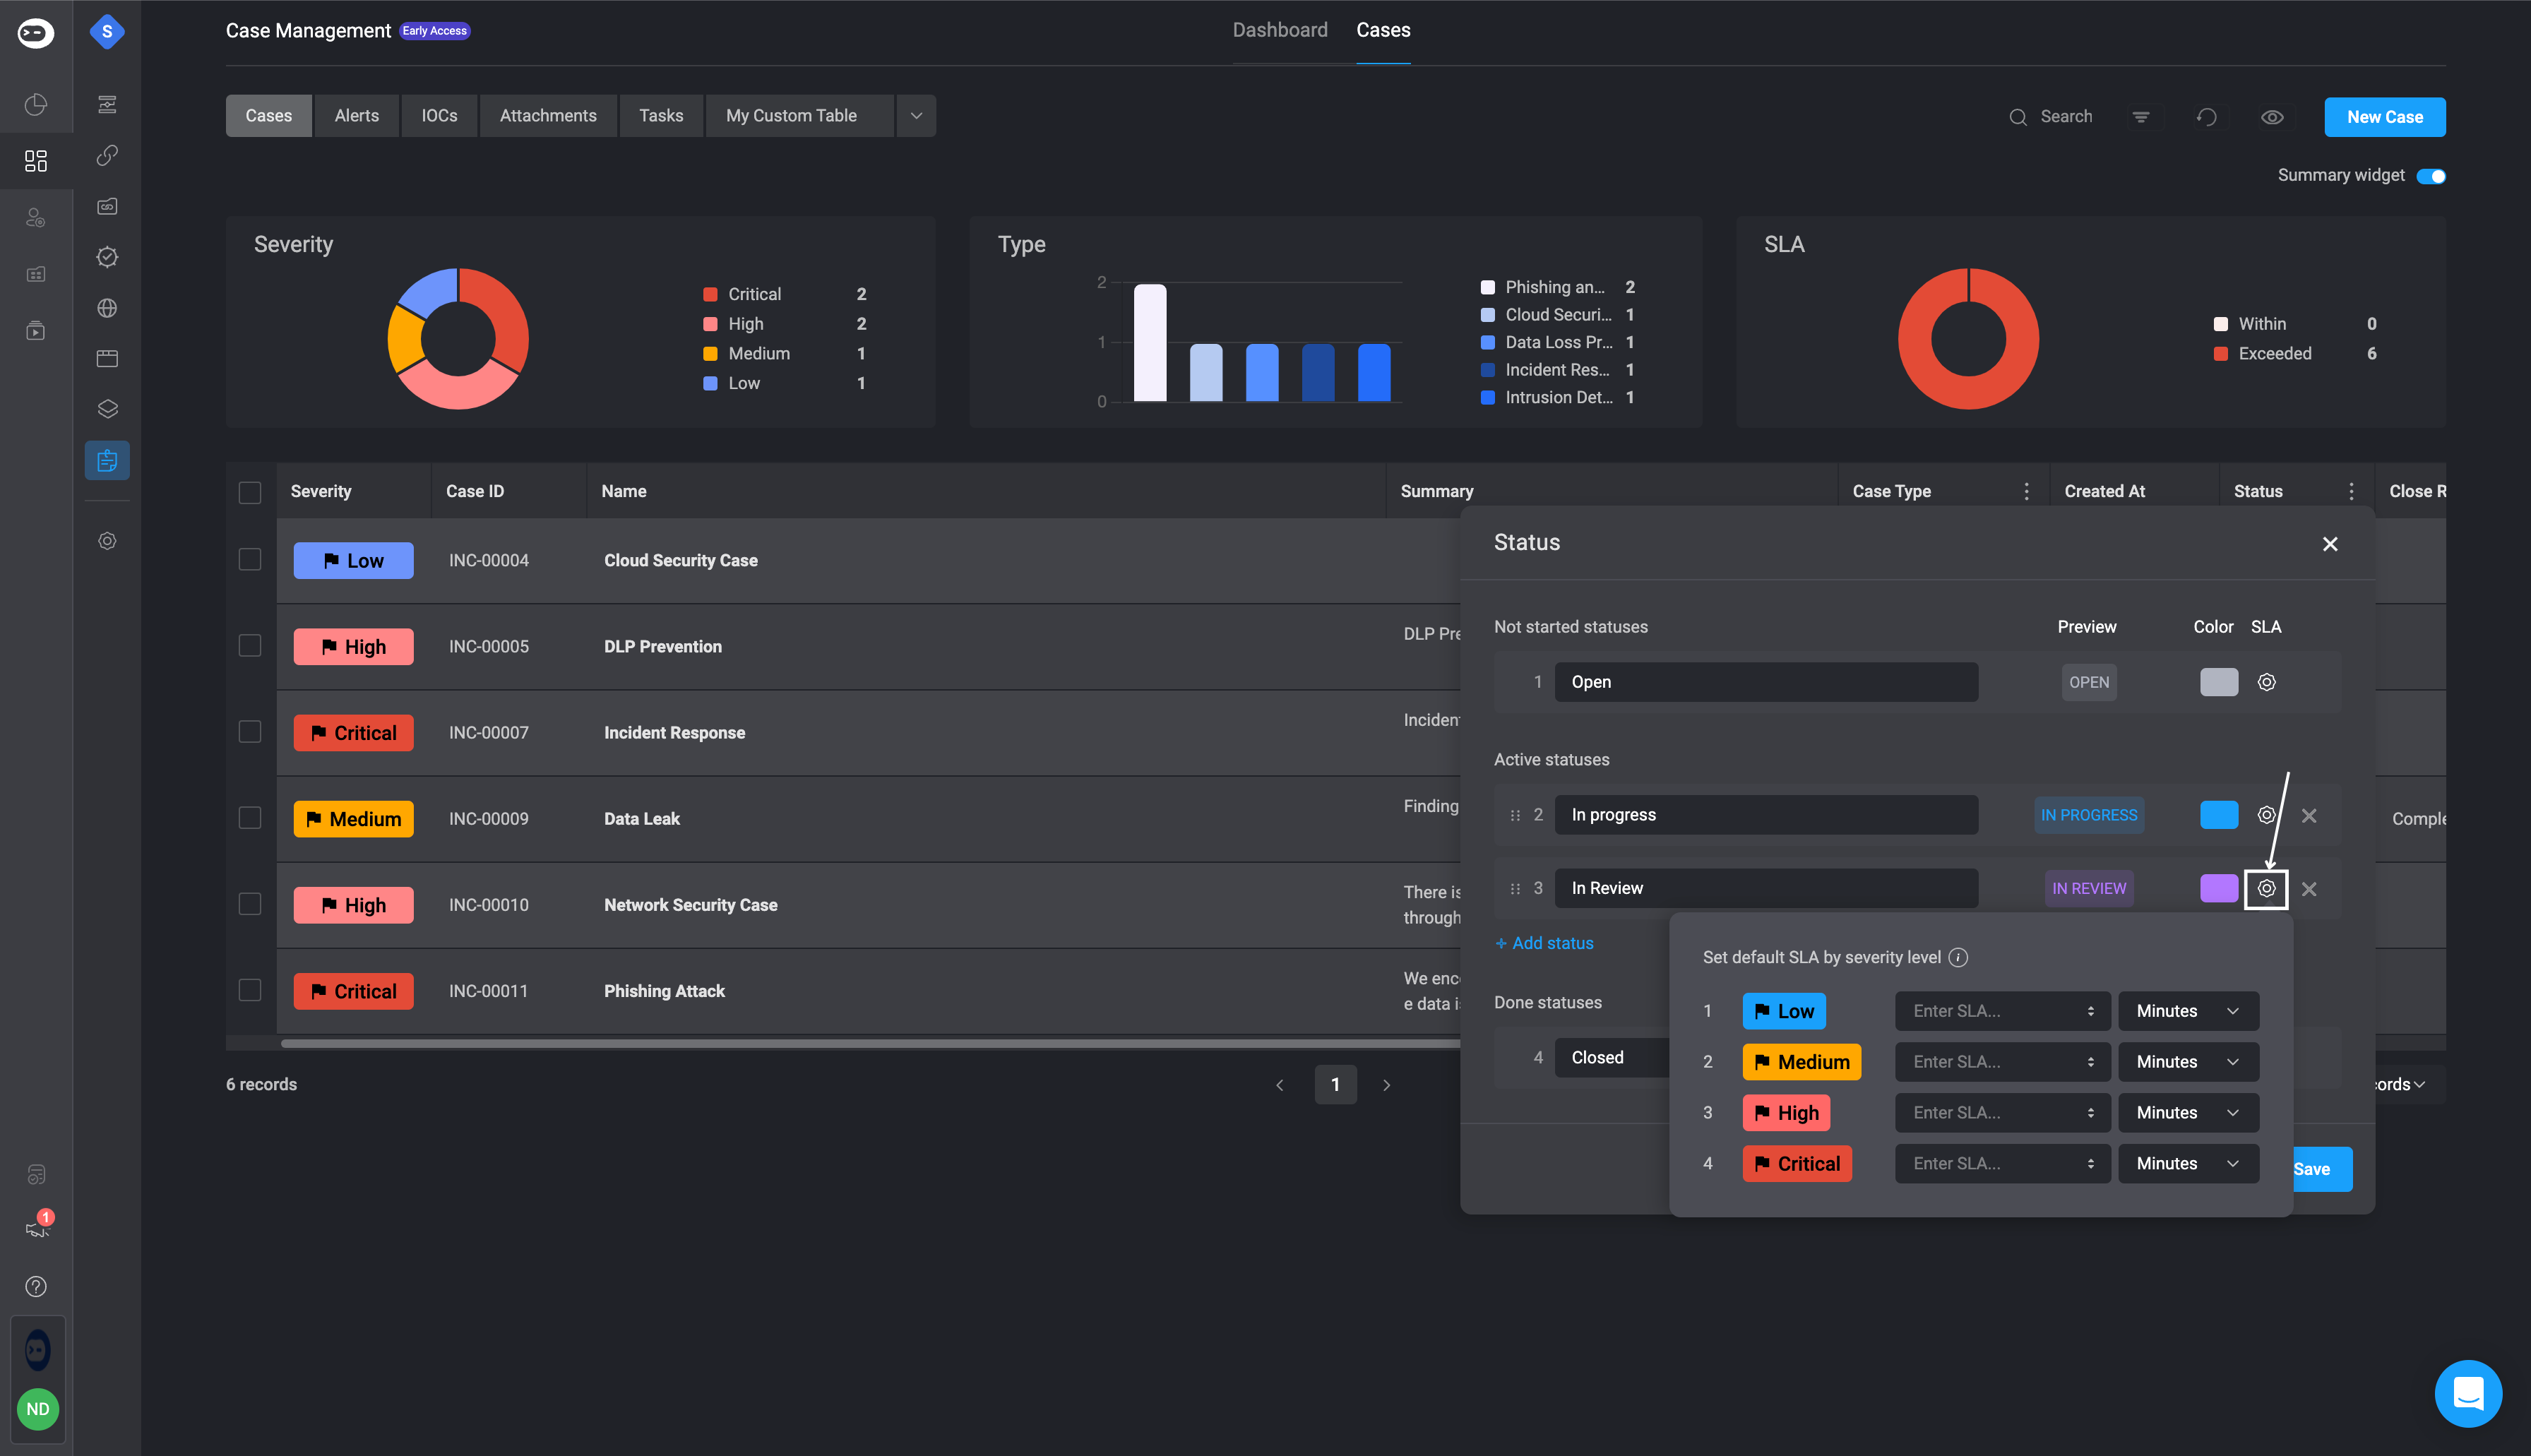
    Lastly, you can modify the **SLA** for the maximum time a case can remain in the specific status.

    <Frame>
      <img src="https://mintcdn.com/blinkops-2/BRfSL_EOO1Uh43ic/img/CaseManagement/EditStatusSLATable.png?fit=max&auto=format&n=BRfSL_EOO1Uh43ic&q=85&s=92dc3554e7b9799b2a2536259c61287b" width="3584" height="2062" data-path="img/CaseManagement/EditStatusSLATable.png" />
    </Frame>
  </Step>

  <Step>
    4. After you have made your desired changes click the **Save** button.

    <Frame>
      <img src="https://mintcdn.com/blinkops-2/sb7Z70HzlwQjgWp7/img/CaseManagement/SaveStatus.png?fit=max&auto=format&n=sb7Z70HzlwQjgWp7&q=85&s=66e871ee57bce60b8a594e3ef2fe1265" width="3563" height="2055" data-path="img/CaseManagement/SaveStatus.png" />
    </Frame>
  </Step>
</Steps>

***

## Summary Widget

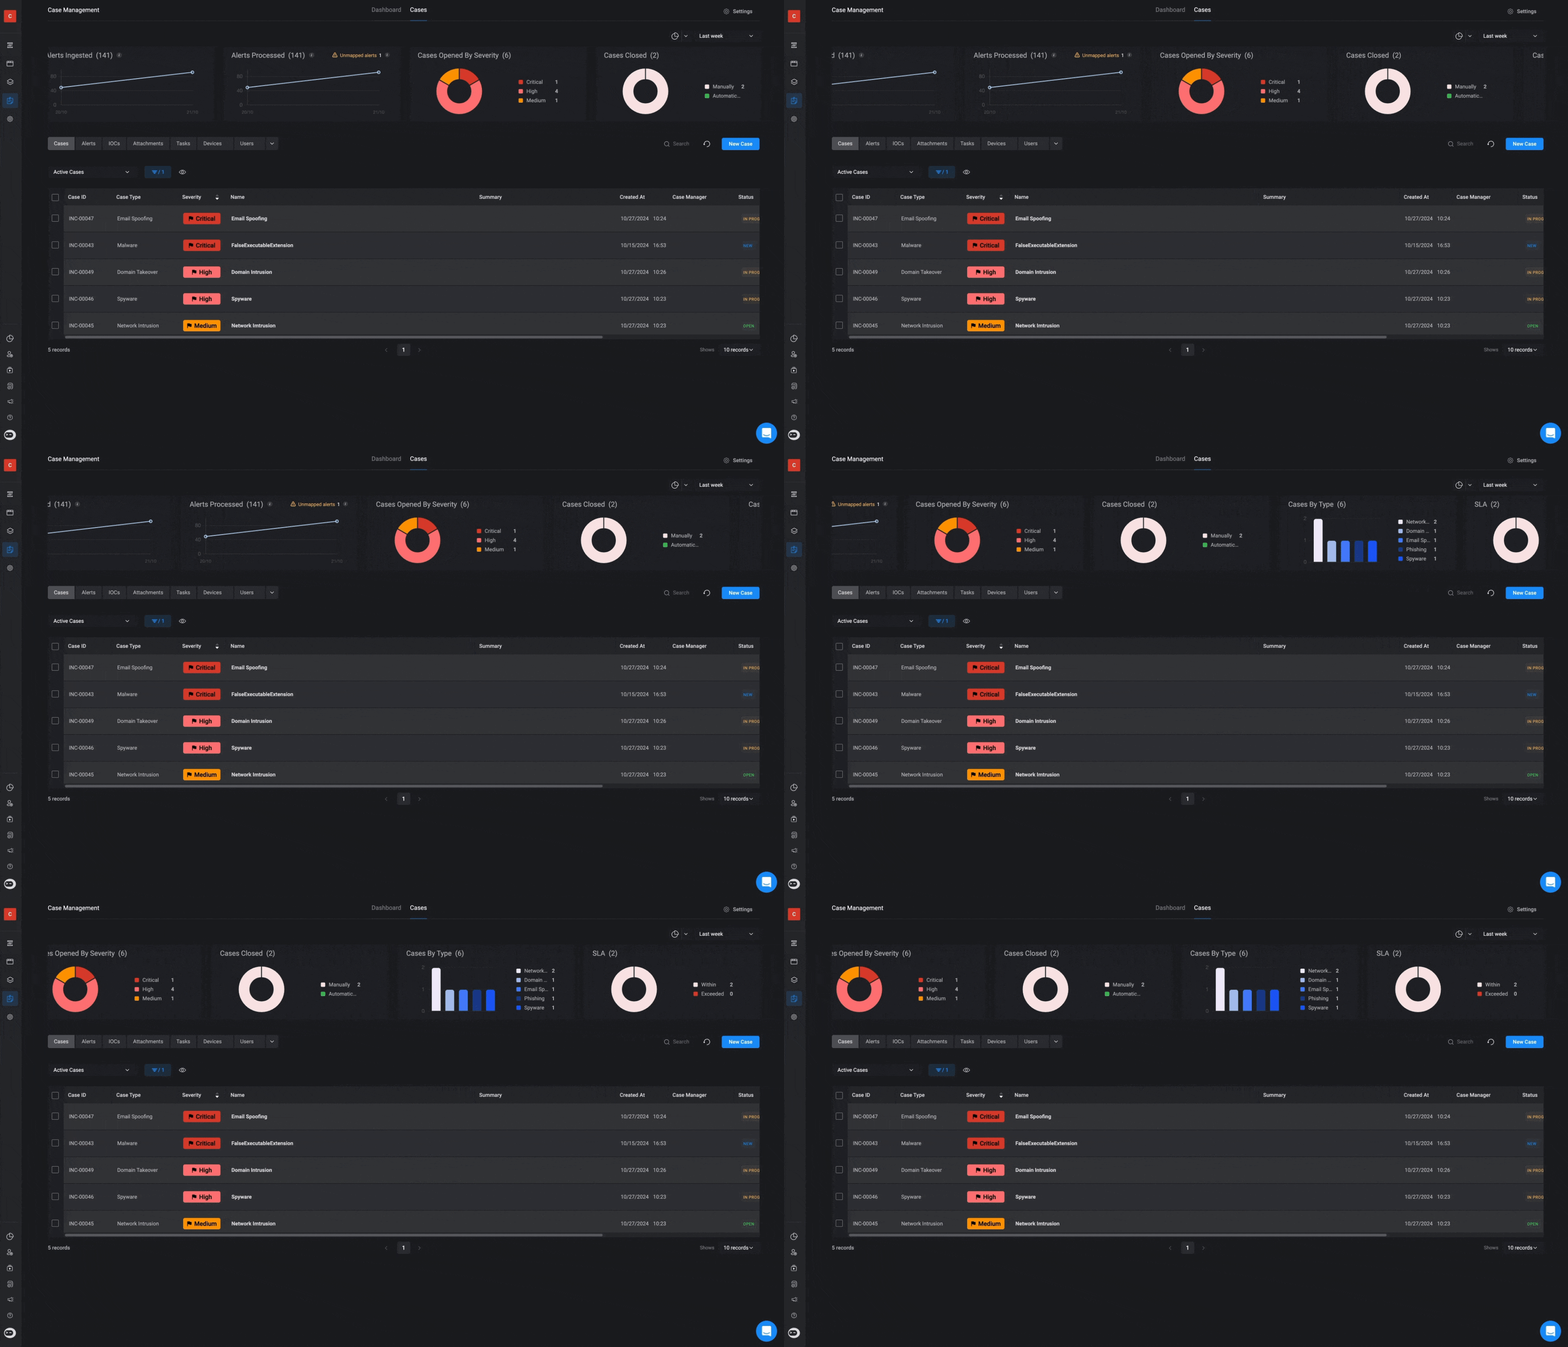
Above the case table, you will find the Summary Widgets, showing the total alerts ingested (line chart), the total number of alerts processed (line chart), the total number of cases opened by severity (donut chart), the total number of closed cases (donut chart), the total number of cases categorized by type (bar chart) and whether the SLA status was met or exceeded (donut chart).

<Frame>
  <img src="https://mintcdn.com/blinkops-2/wrPfqyb0-QUMOKmy/img/CaseManagement/Widgets.gif?s=46db60387e14022f6aece0d434b565ae" width="1884" height="1080" data-path="img/CaseManagement/Widgets.gif" />
</Frame>

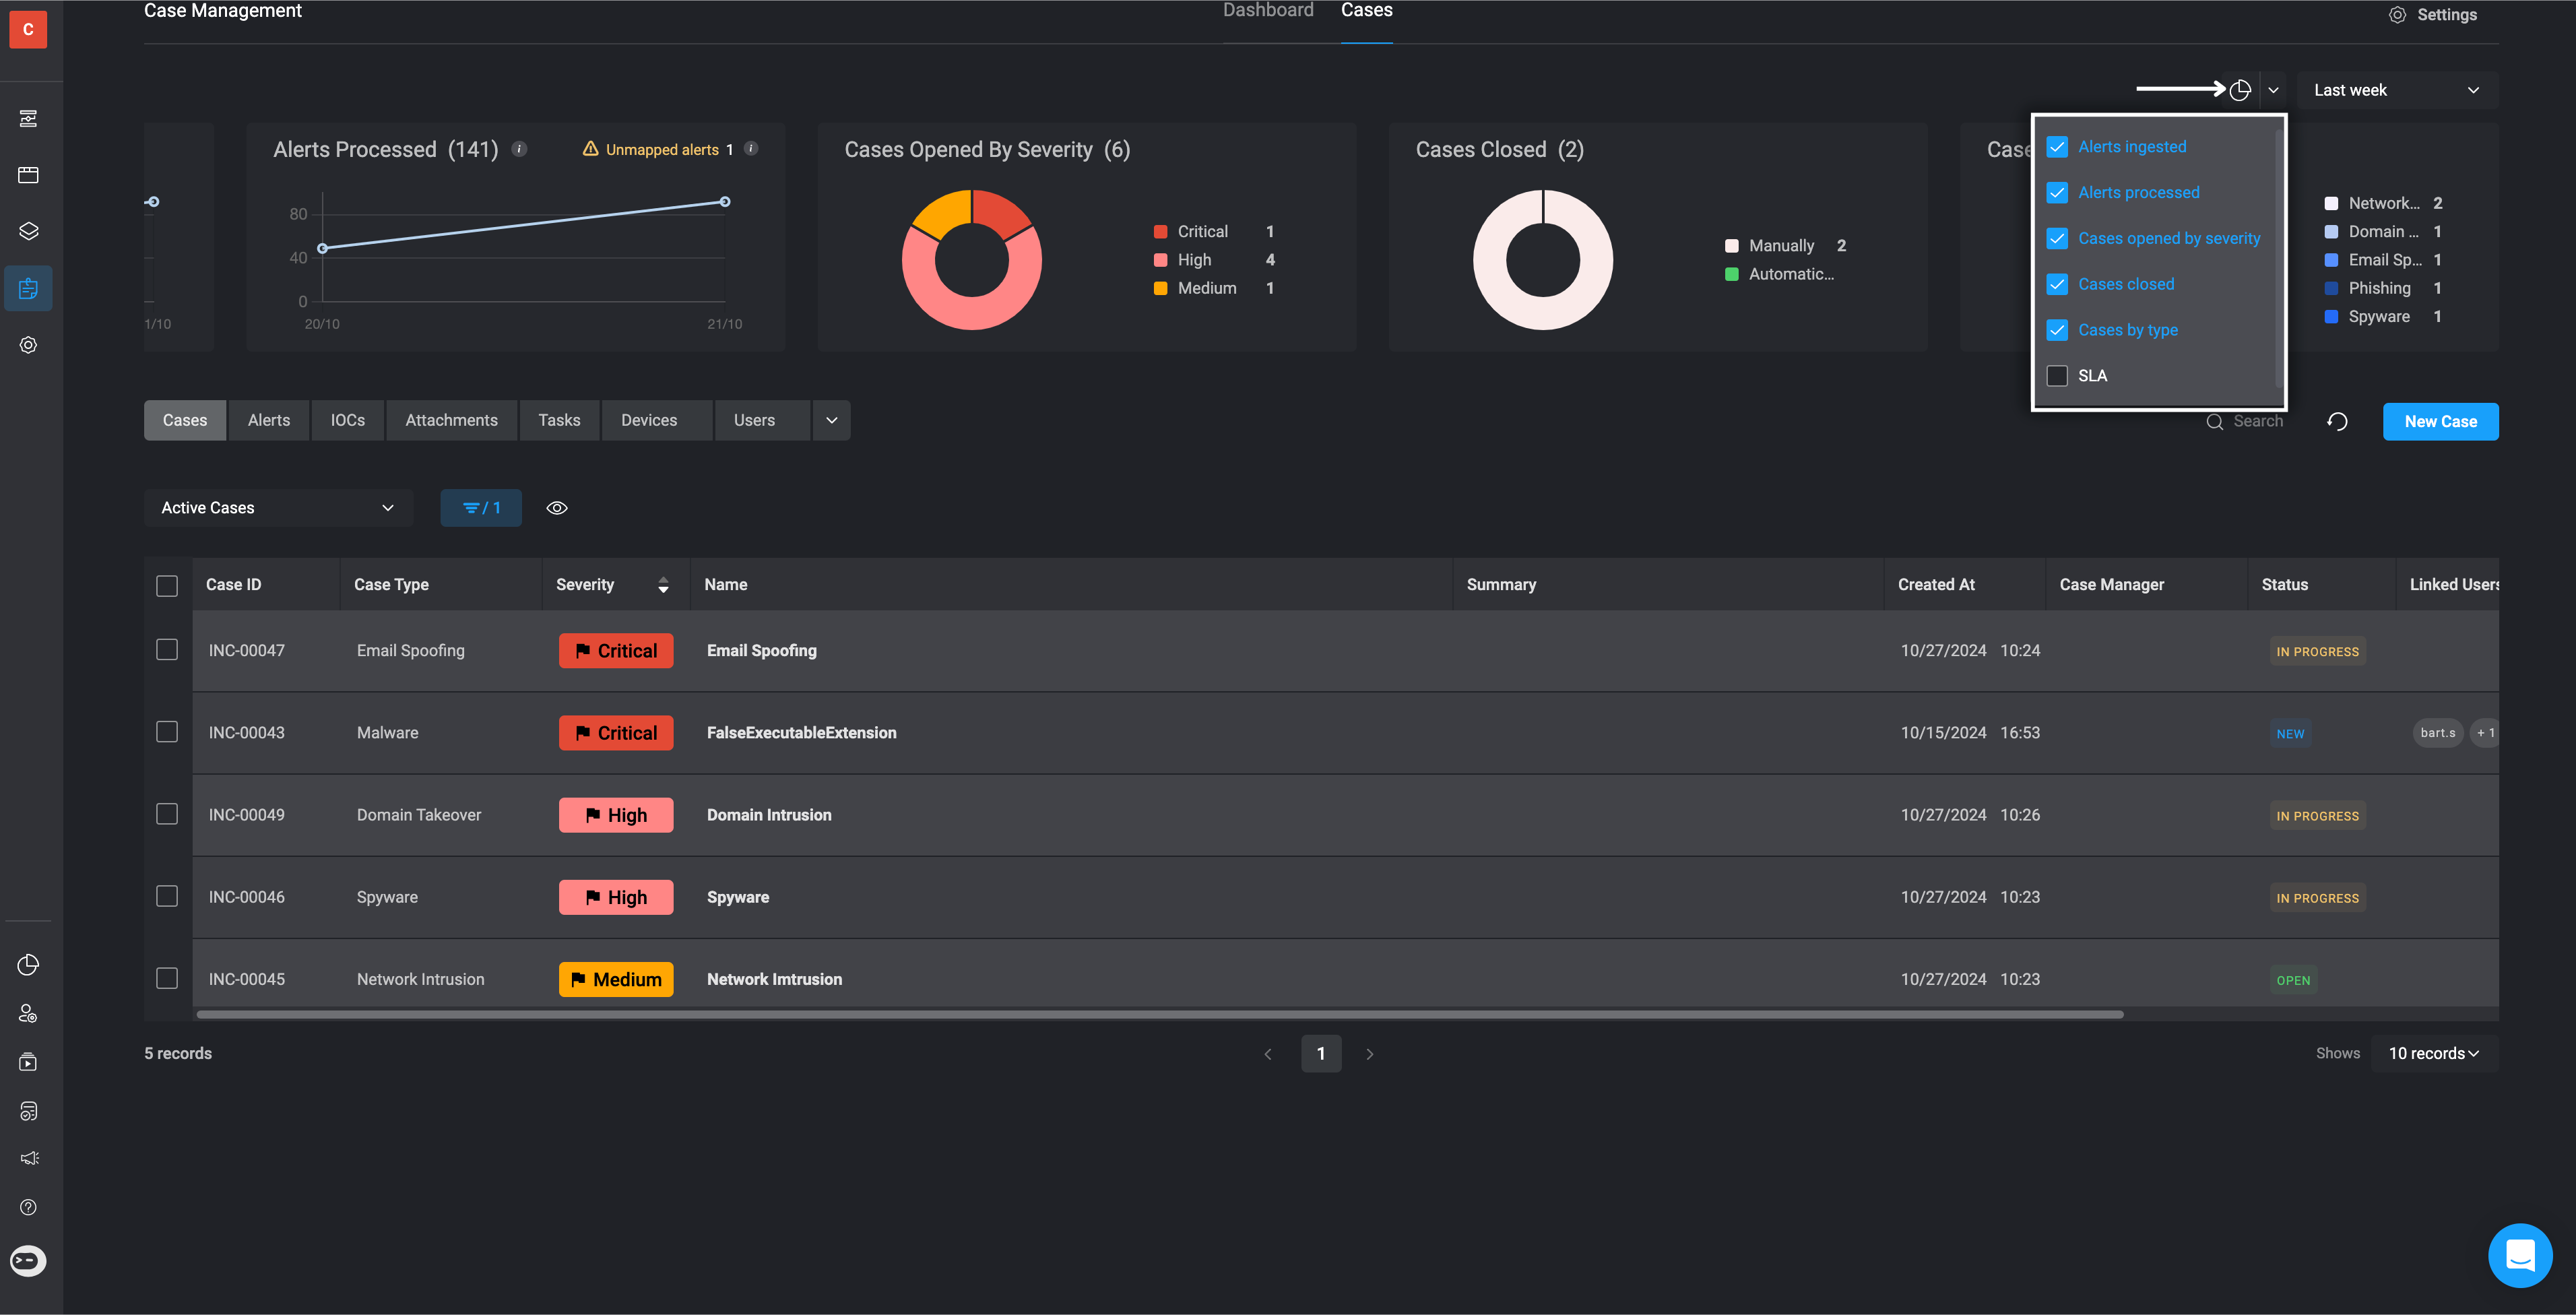
<Tip>**Tip:** In the top right corner, click the bar chart icon. Then, check the box next to the Summary widgets you want to show, or uncheck it to hide any widgets you don't want displayed.</Tip>

<Frame>
  <img src="https://mintcdn.com/blinkops-2/sb7Z70HzlwQjgWp7/img/CaseManagement/SummaryWidget.png?fit=max&auto=format&n=sb7Z70HzlwQjgWp7&q=85&s=4466576262f657184533bc1c9a9930a7" width="3824" height="1952" data-path="img/CaseManagement/SummaryWidget.png" />
</Frame>

***

## Clickable Tags in the Linked Cases Columns

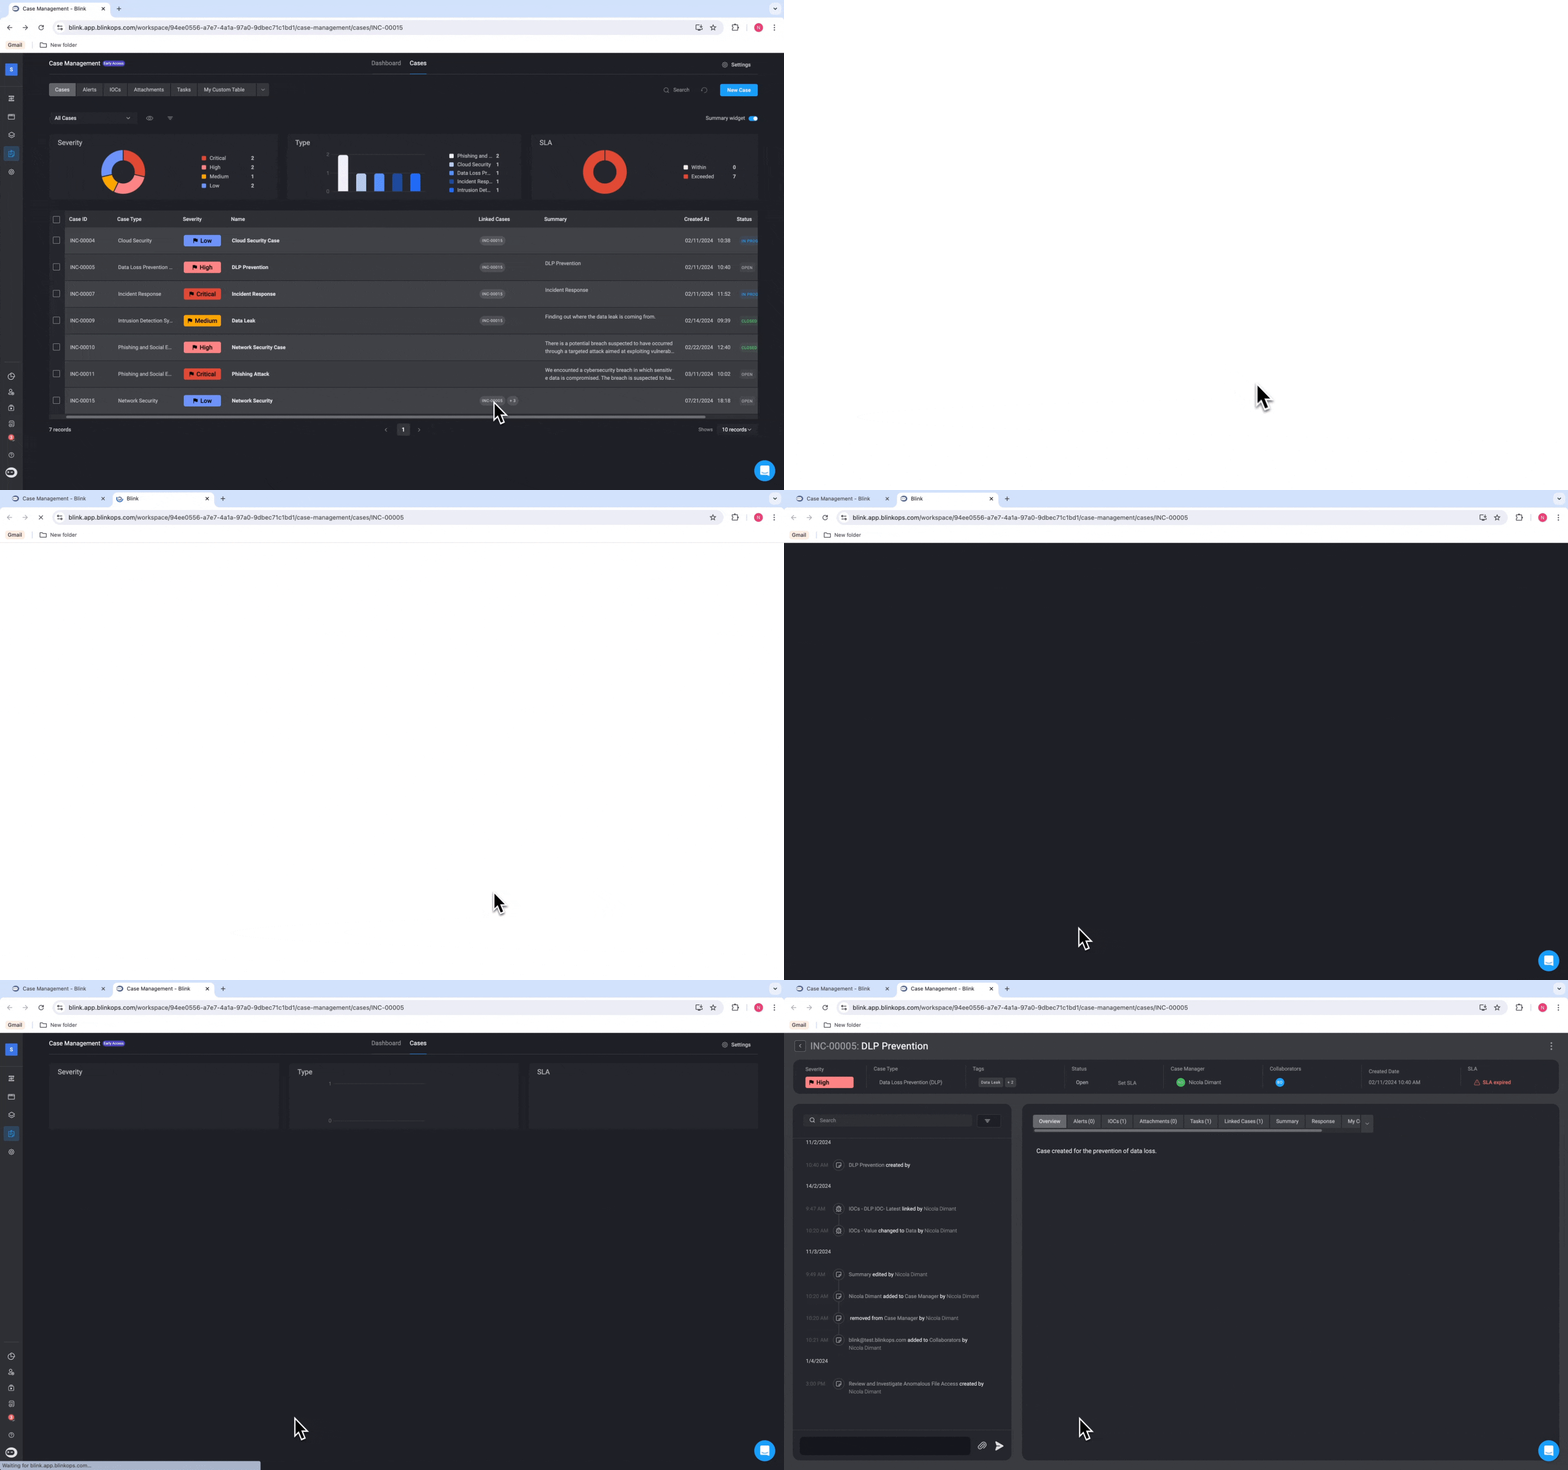
Clicking on the tags in the "Linked Cases" column in the selected Case Management table (such as the Cases Table, Observables Table, Alerts Table, or Attachments Table) will open its Case Overview in a new browser tab.
<Frame>
  <img src="https://mintcdn.com/blinkops-2/a1zzdVRAg2RBMsIZ/img/CaseManagement/LinkedTags.gif?s=3e664b6d811e0442a3abe9e0a48b4272" width="1728" height="1080" data-path="img/CaseManagement/LinkedTags.gif" />
</Frame>

***