> ## Documentation Index
> Fetch the complete documentation index at: https://docs.blinkops.com/llms.txt
> Use this file to discover all available pages before exploring further.
# Web Form Event-Based Trigger
> Use web form submissions as triggers to start automated workflows in Blink.
The Web Form Event-Based Trigger serves as a powerful tool for collecting information directly from end users through a static URL hosting a Web Form. This trigger can then propel workflows forward based on the responses provided. The trigger enables workflows to be initiated automatically when a user submits a response to a Web Form, offering seamless automated workflows based on form submissions. By using this feature, users can streamline their processes, ensuring that the right actions are taken at the right time without manual intervention.
***
## Supported Web Form Flow Types
The Web Form Event-Based Trigger is designed to support two distinct flow types
1. **Single Step**: Creates static and non-interactive web forms.
2. **New Interactive**: Creates a web form that can be used in an interactive web form session, initiated either by a previous web form step or a Web Form Trigger.
***
## Configure a Single Step Web Form Trigger
### Workflow Overview: Web Form Reset User Password
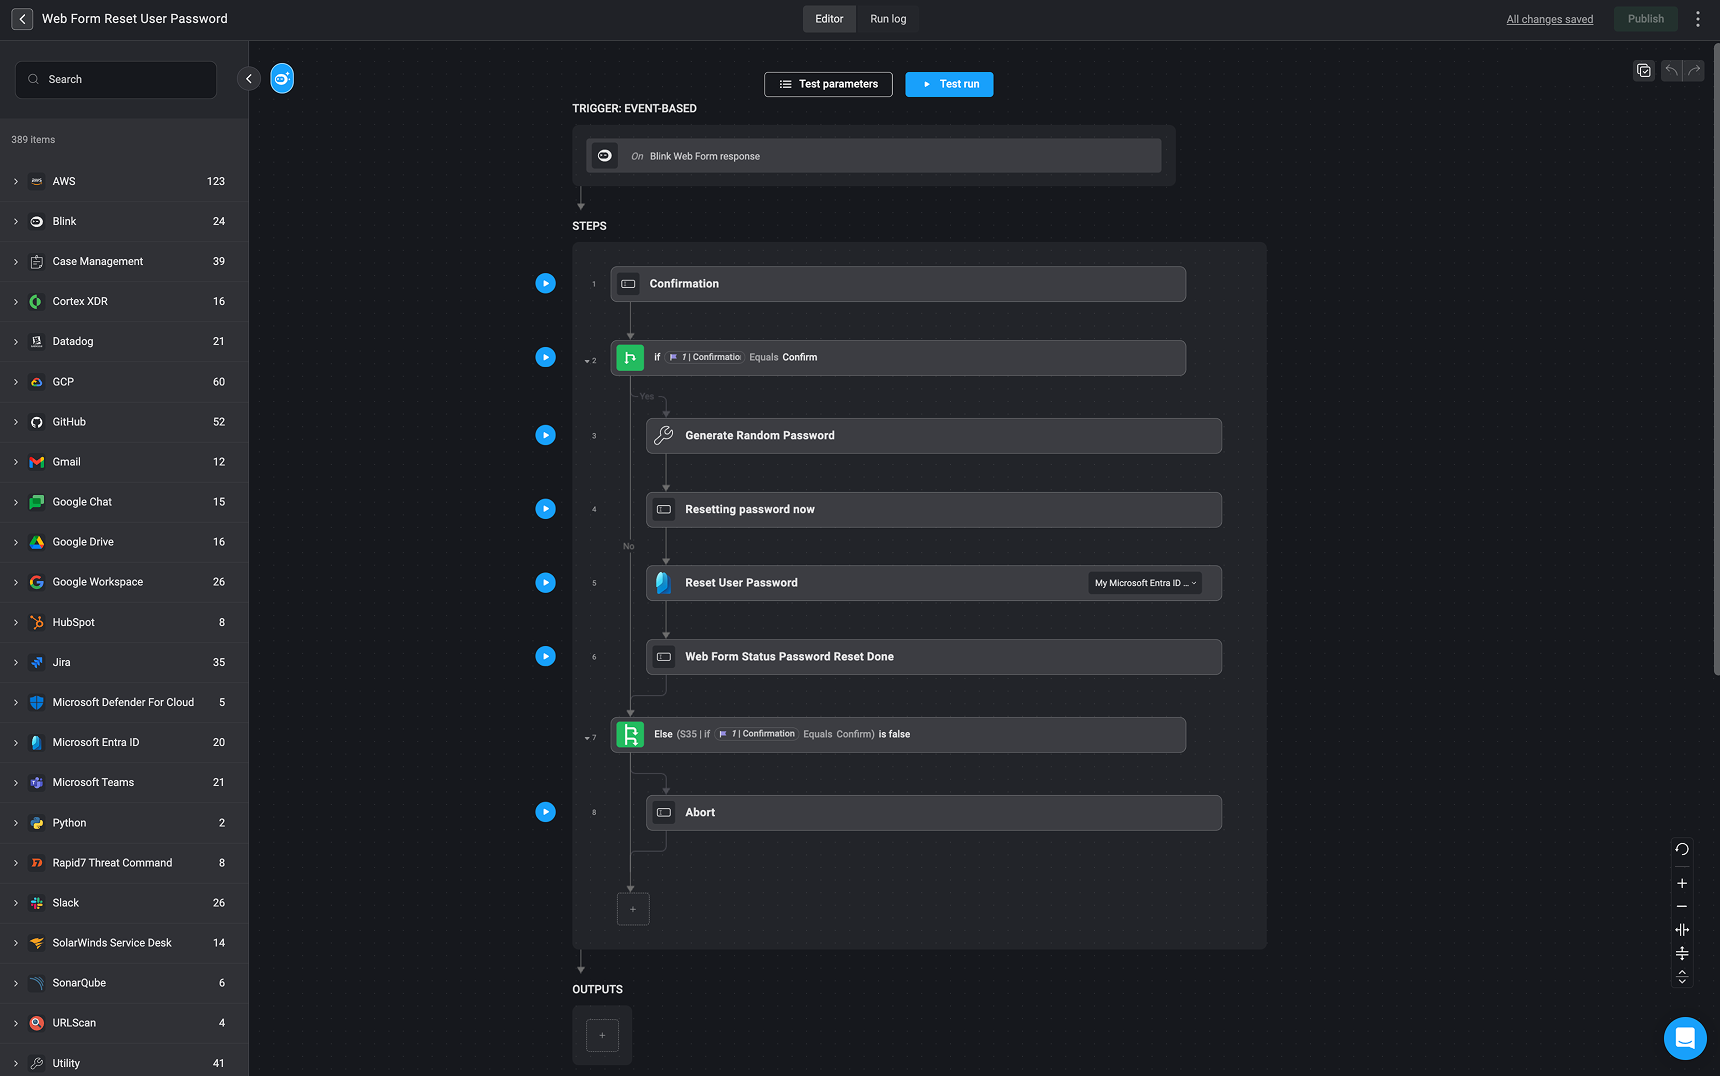
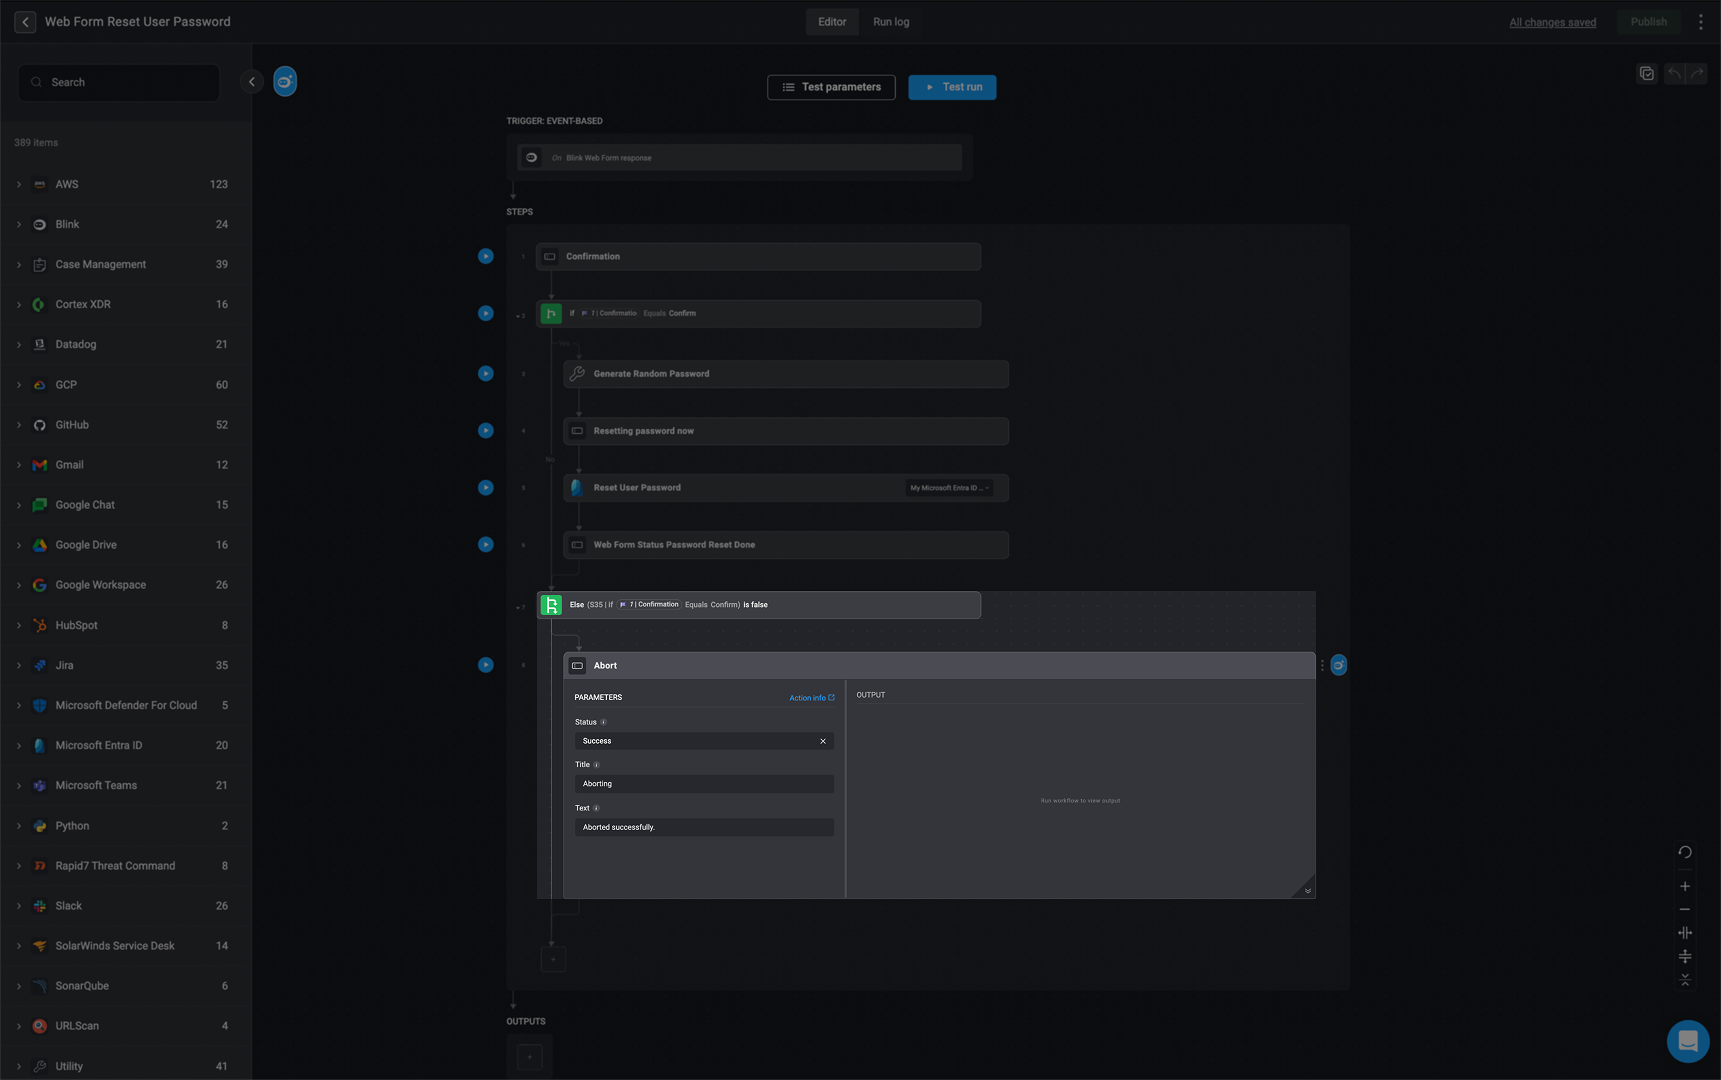
**Purpose**: This workflow automates the process of resetting a user’s password in response to a Blink Web Form submission. It includes built-in safeguards to ensure that no action is taken without explicit user confirmation. Once confirmed, it generates a new password, updates the user’s credentials through Microsoft Entra ID, and communicates the result.
 ***
### Workflow Logic and Steps
**Trigger**
* **Type:** [Event-Based Trigger](/docs/workflows/building-workflows/triggers/event-based-triggers/event-based-triggers)
* **Event:** Blink Web Form response
* **Web form flow type**: [New Interactive](/docs/blink-platform/web-form/web-form#web-form-types)
***
### Workflow Logic and Steps
**Trigger**
* **Type:** [Event-Based Trigger](/docs/workflows/building-workflows/triggers/event-based-triggers/event-based-triggers)
* **Event:** Blink Web Form response
* **Web form flow type**: [New Interactive](/docs/blink-platform/web-form/web-form#web-form-types)
 The workflow is triggered when a user submits a specific Blink Web Form designed to request a password reset, like seen in the following video:
**Step 1: Confirmation**
This step captures the user's response to a confirmation prompt within the web form (e.g., "Are you sure you want to reset the password?").
**Step 2: Conditional Check**
Evaluates the confirmation input:
* If the user selected **"Confirm"**, the workflow proceeds with the password reset process.
* If not, the workflow exits without taking any further action.
**If Confirmed:**
* **Step 3: Generate Random Password**: A secure, randomly generated password is created for the user. This will be used to update their credentials.
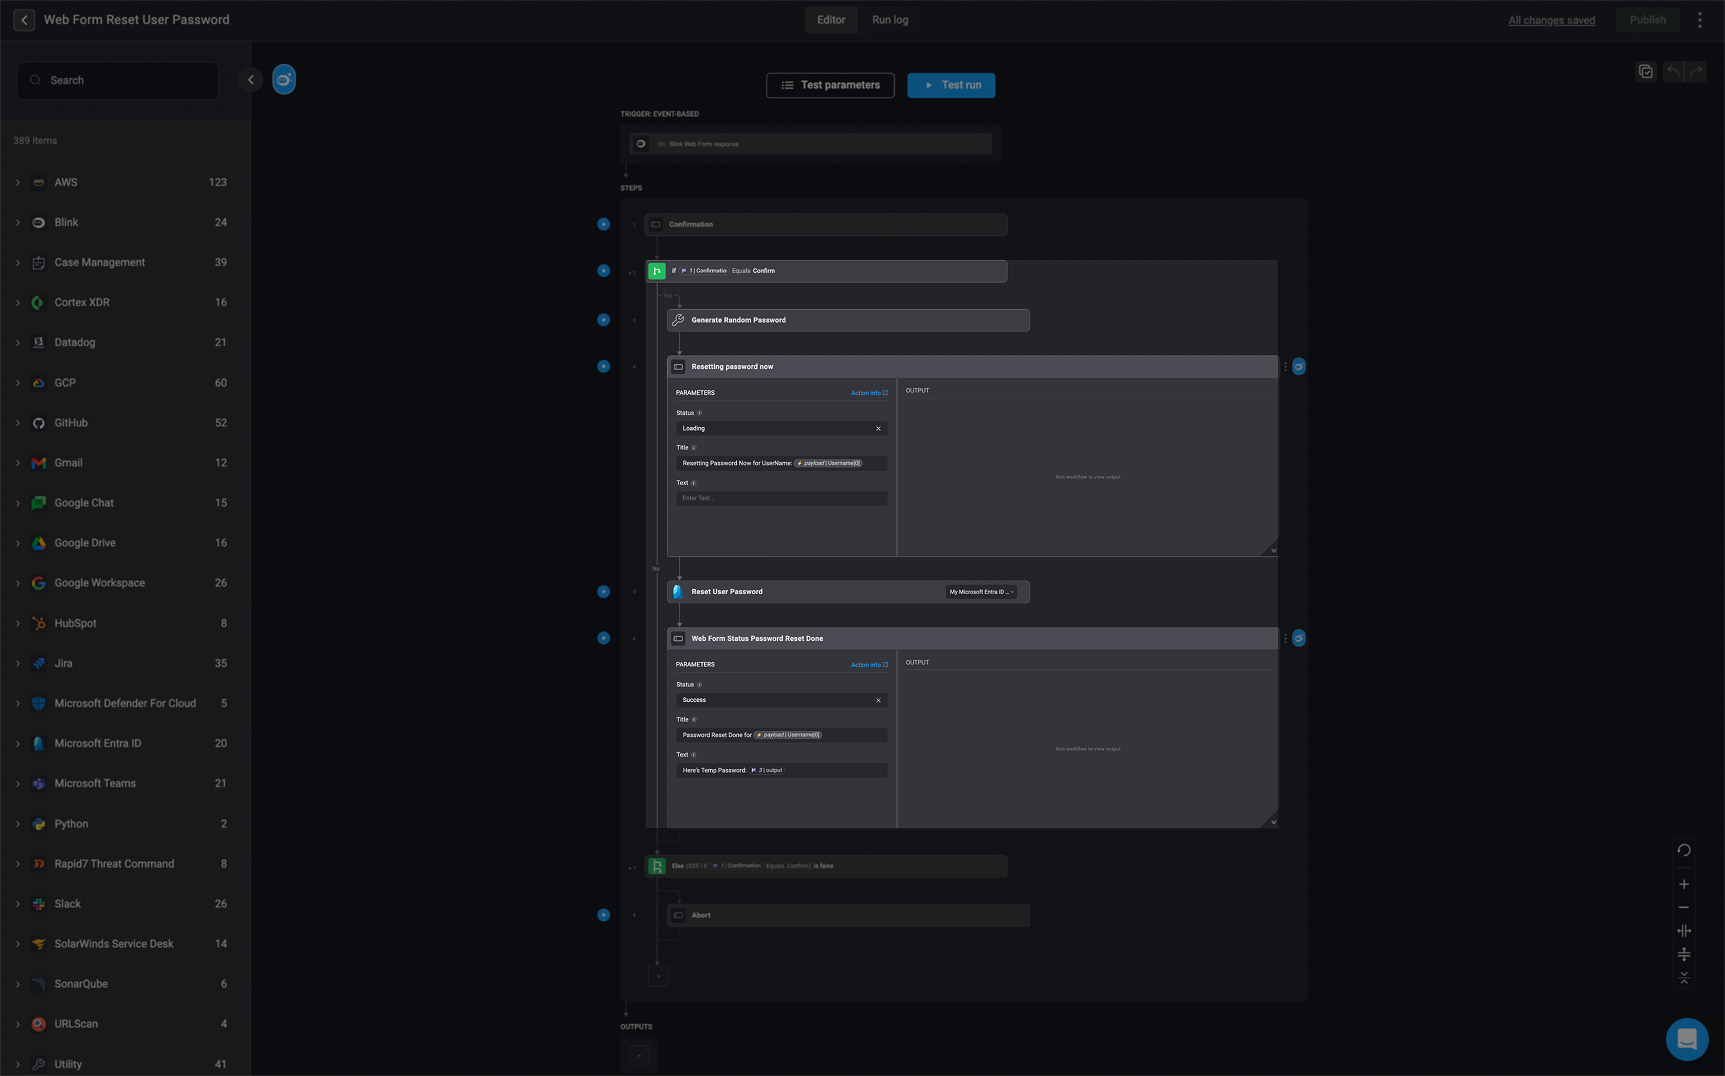
* **Step 4: Resetting Password Now**: This step logs or communicates that the password reset process has started. This may involve sending a notification or writing a message to a log.
* **Step 5: Reset User Password**: Uses the Microsoft Entra ID integration to reset the user's password to the one generated in Step 3. The user is identified using their Entra ID value collected earlier or from the form submission.
* **Step 6: Web Form Status - Password Reset Done**: Provides feedback via the web form or notification that the password reset has been successfully completed.
The workflow is triggered when a user submits a specific Blink Web Form designed to request a password reset, like seen in the following video:
**Step 1: Confirmation**
This step captures the user's response to a confirmation prompt within the web form (e.g., "Are you sure you want to reset the password?").
**Step 2: Conditional Check**
Evaluates the confirmation input:
* If the user selected **"Confirm"**, the workflow proceeds with the password reset process.
* If not, the workflow exits without taking any further action.
**If Confirmed:**
* **Step 3: Generate Random Password**: A secure, randomly generated password is created for the user. This will be used to update their credentials.
* **Step 4: Resetting Password Now**: This step logs or communicates that the password reset process has started. This may involve sending a notification or writing a message to a log.
* **Step 5: Reset User Password**: Uses the Microsoft Entra ID integration to reset the user's password to the one generated in Step 3. The user is identified using their Entra ID value collected earlier or from the form submission.
* **Step 6: Web Form Status - Password Reset Done**: Provides feedback via the web form or notification that the password reset has been successfully completed.
 **If Not Confirmed:**
* **Step 7: Else Condition**: Handles all cases where the user’s confirmation response is not "Confirm".
* **Step 8: Abort**: The workflow stops, ensuring that no changes are made unless explicit confirmation was provided.
**If Not Confirmed:**
* **Step 7: Else Condition**: Handles all cases where the user’s confirmation response is not "Confirm".
* **Step 8: Abort**: The workflow stops, ensuring that no changes are made unless explicit confirmation was provided.
 ***
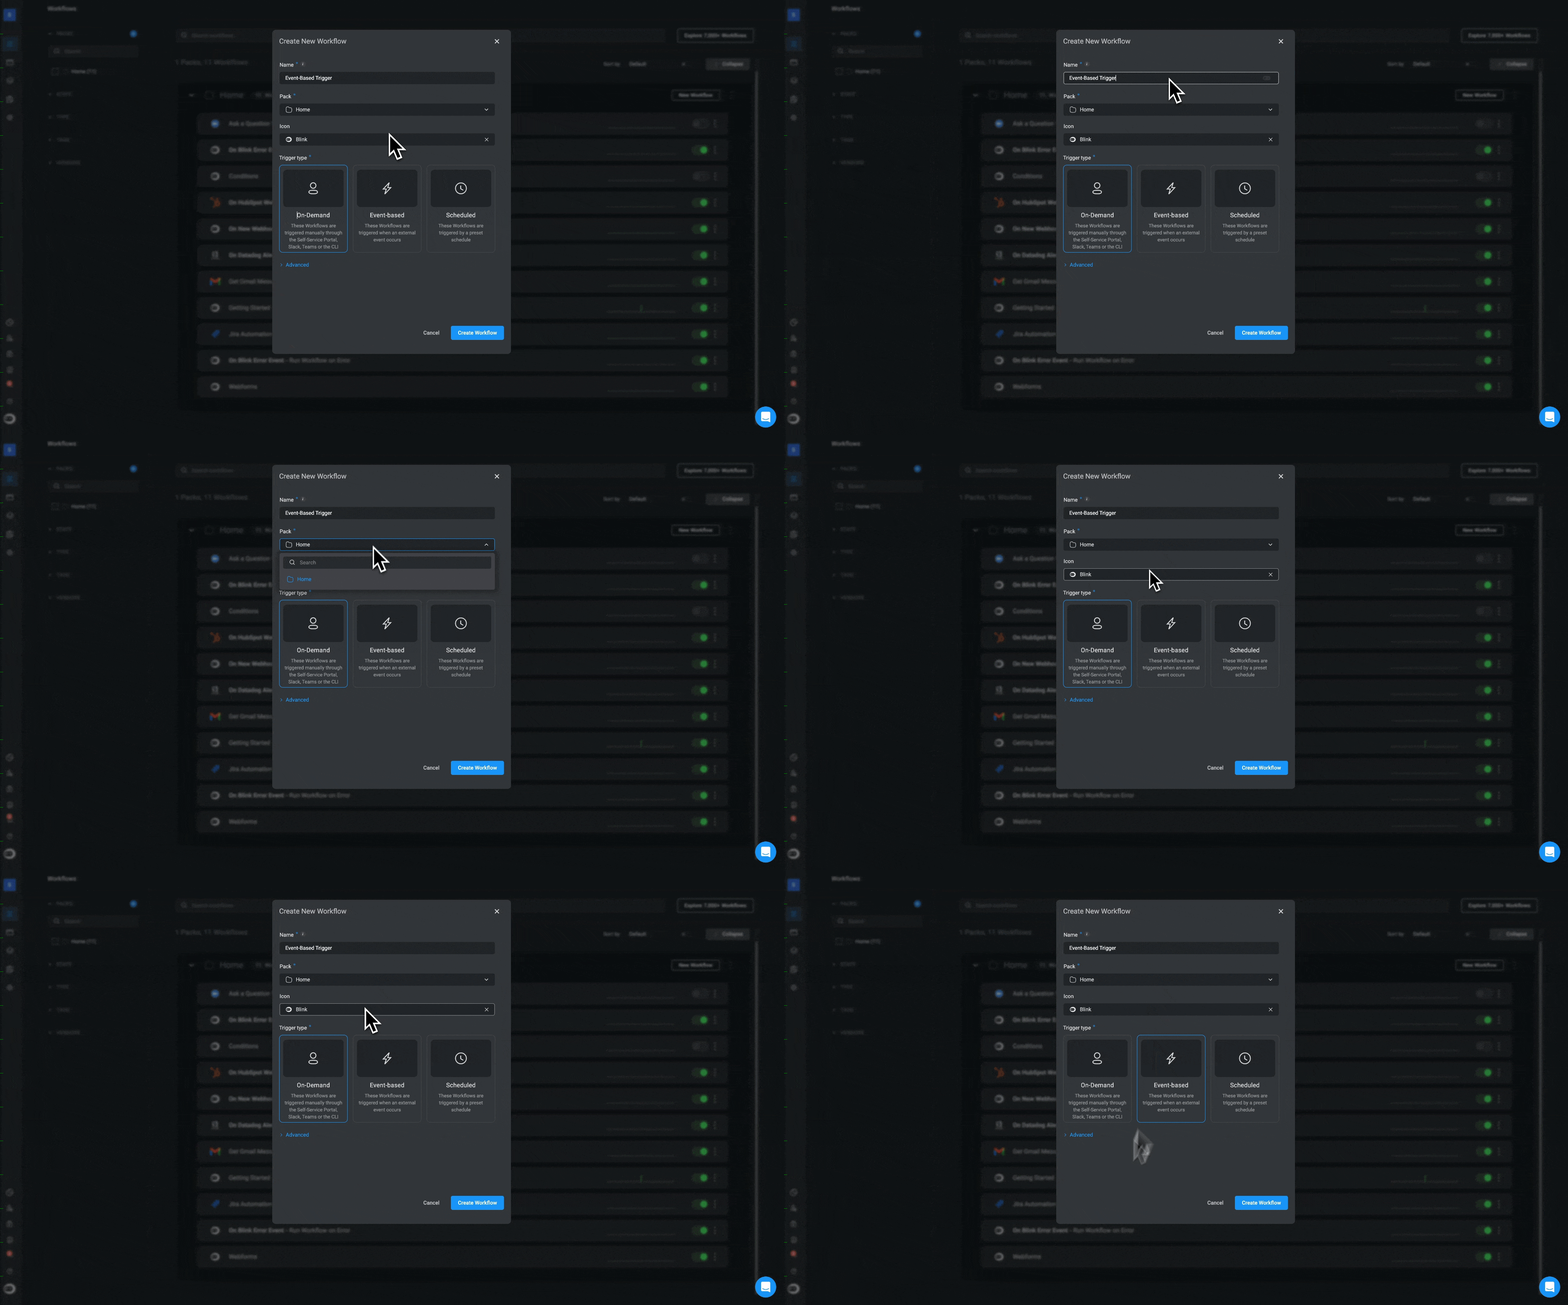
**Optional:** Configure the advanced settings if needed, then click **Create Workflow**. This will open the Workflow Editor.
***
**Optional:** Configure the advanced settings if needed, then click **Create Workflow**. This will open the Workflow Editor.
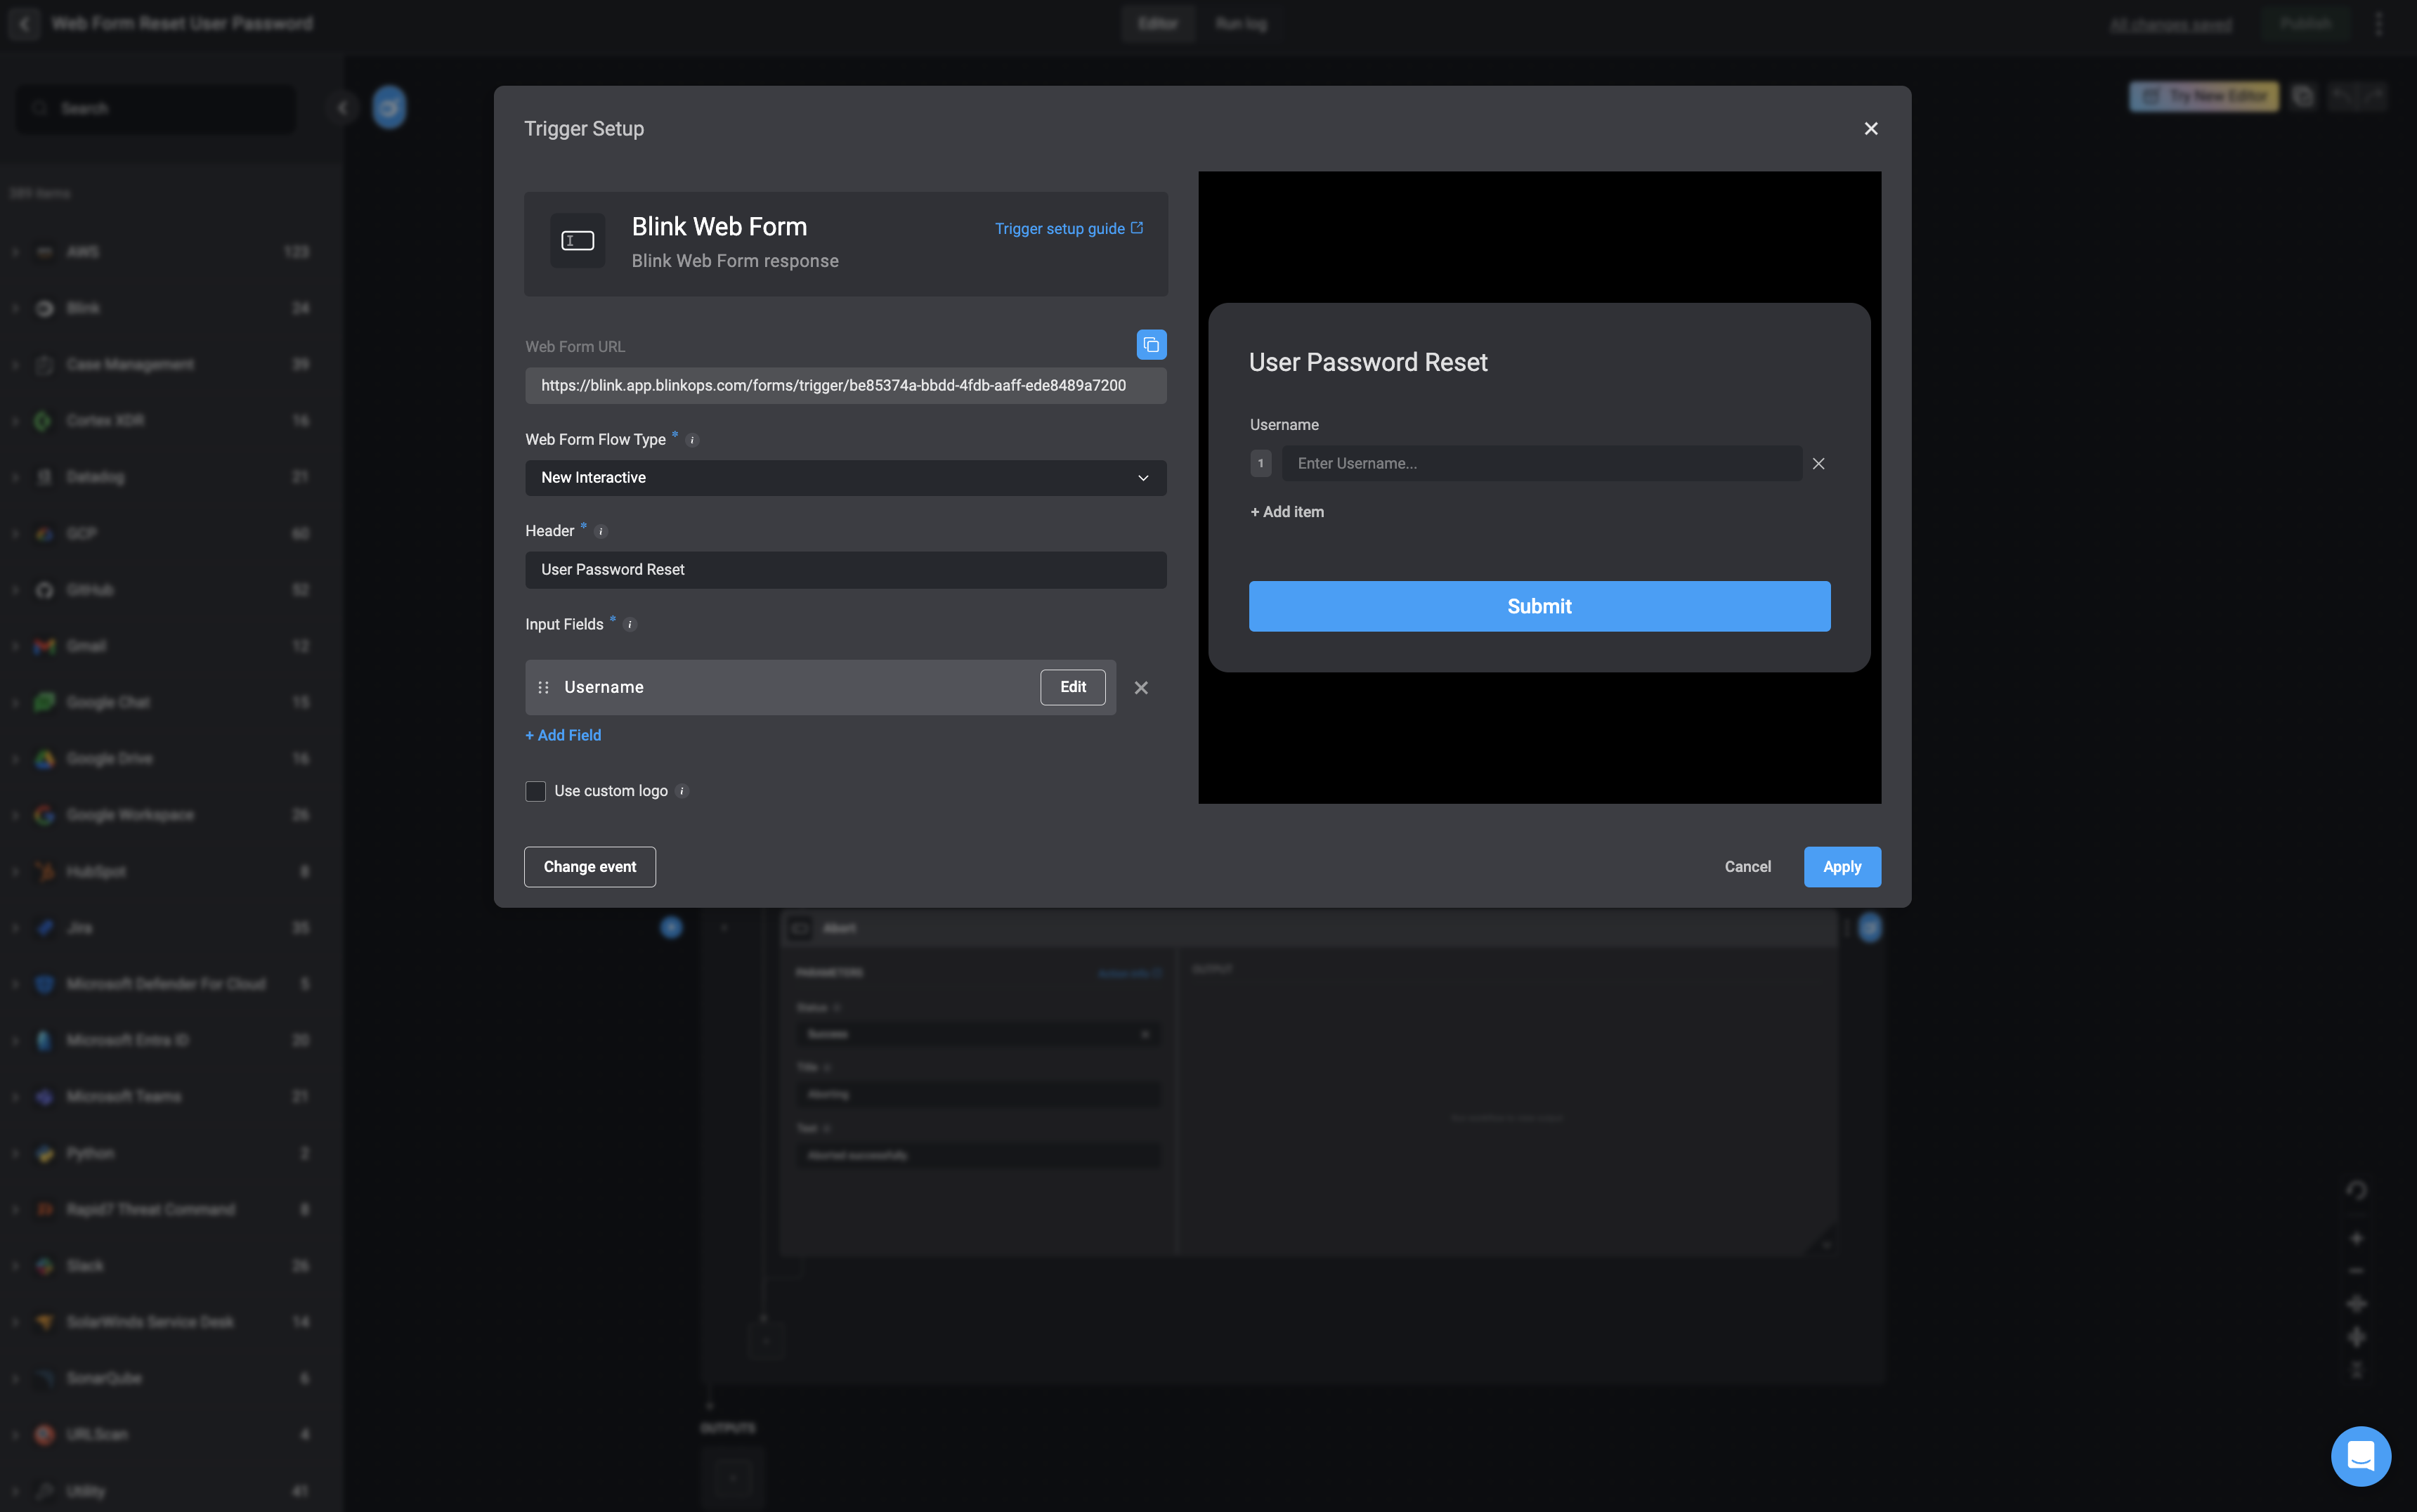
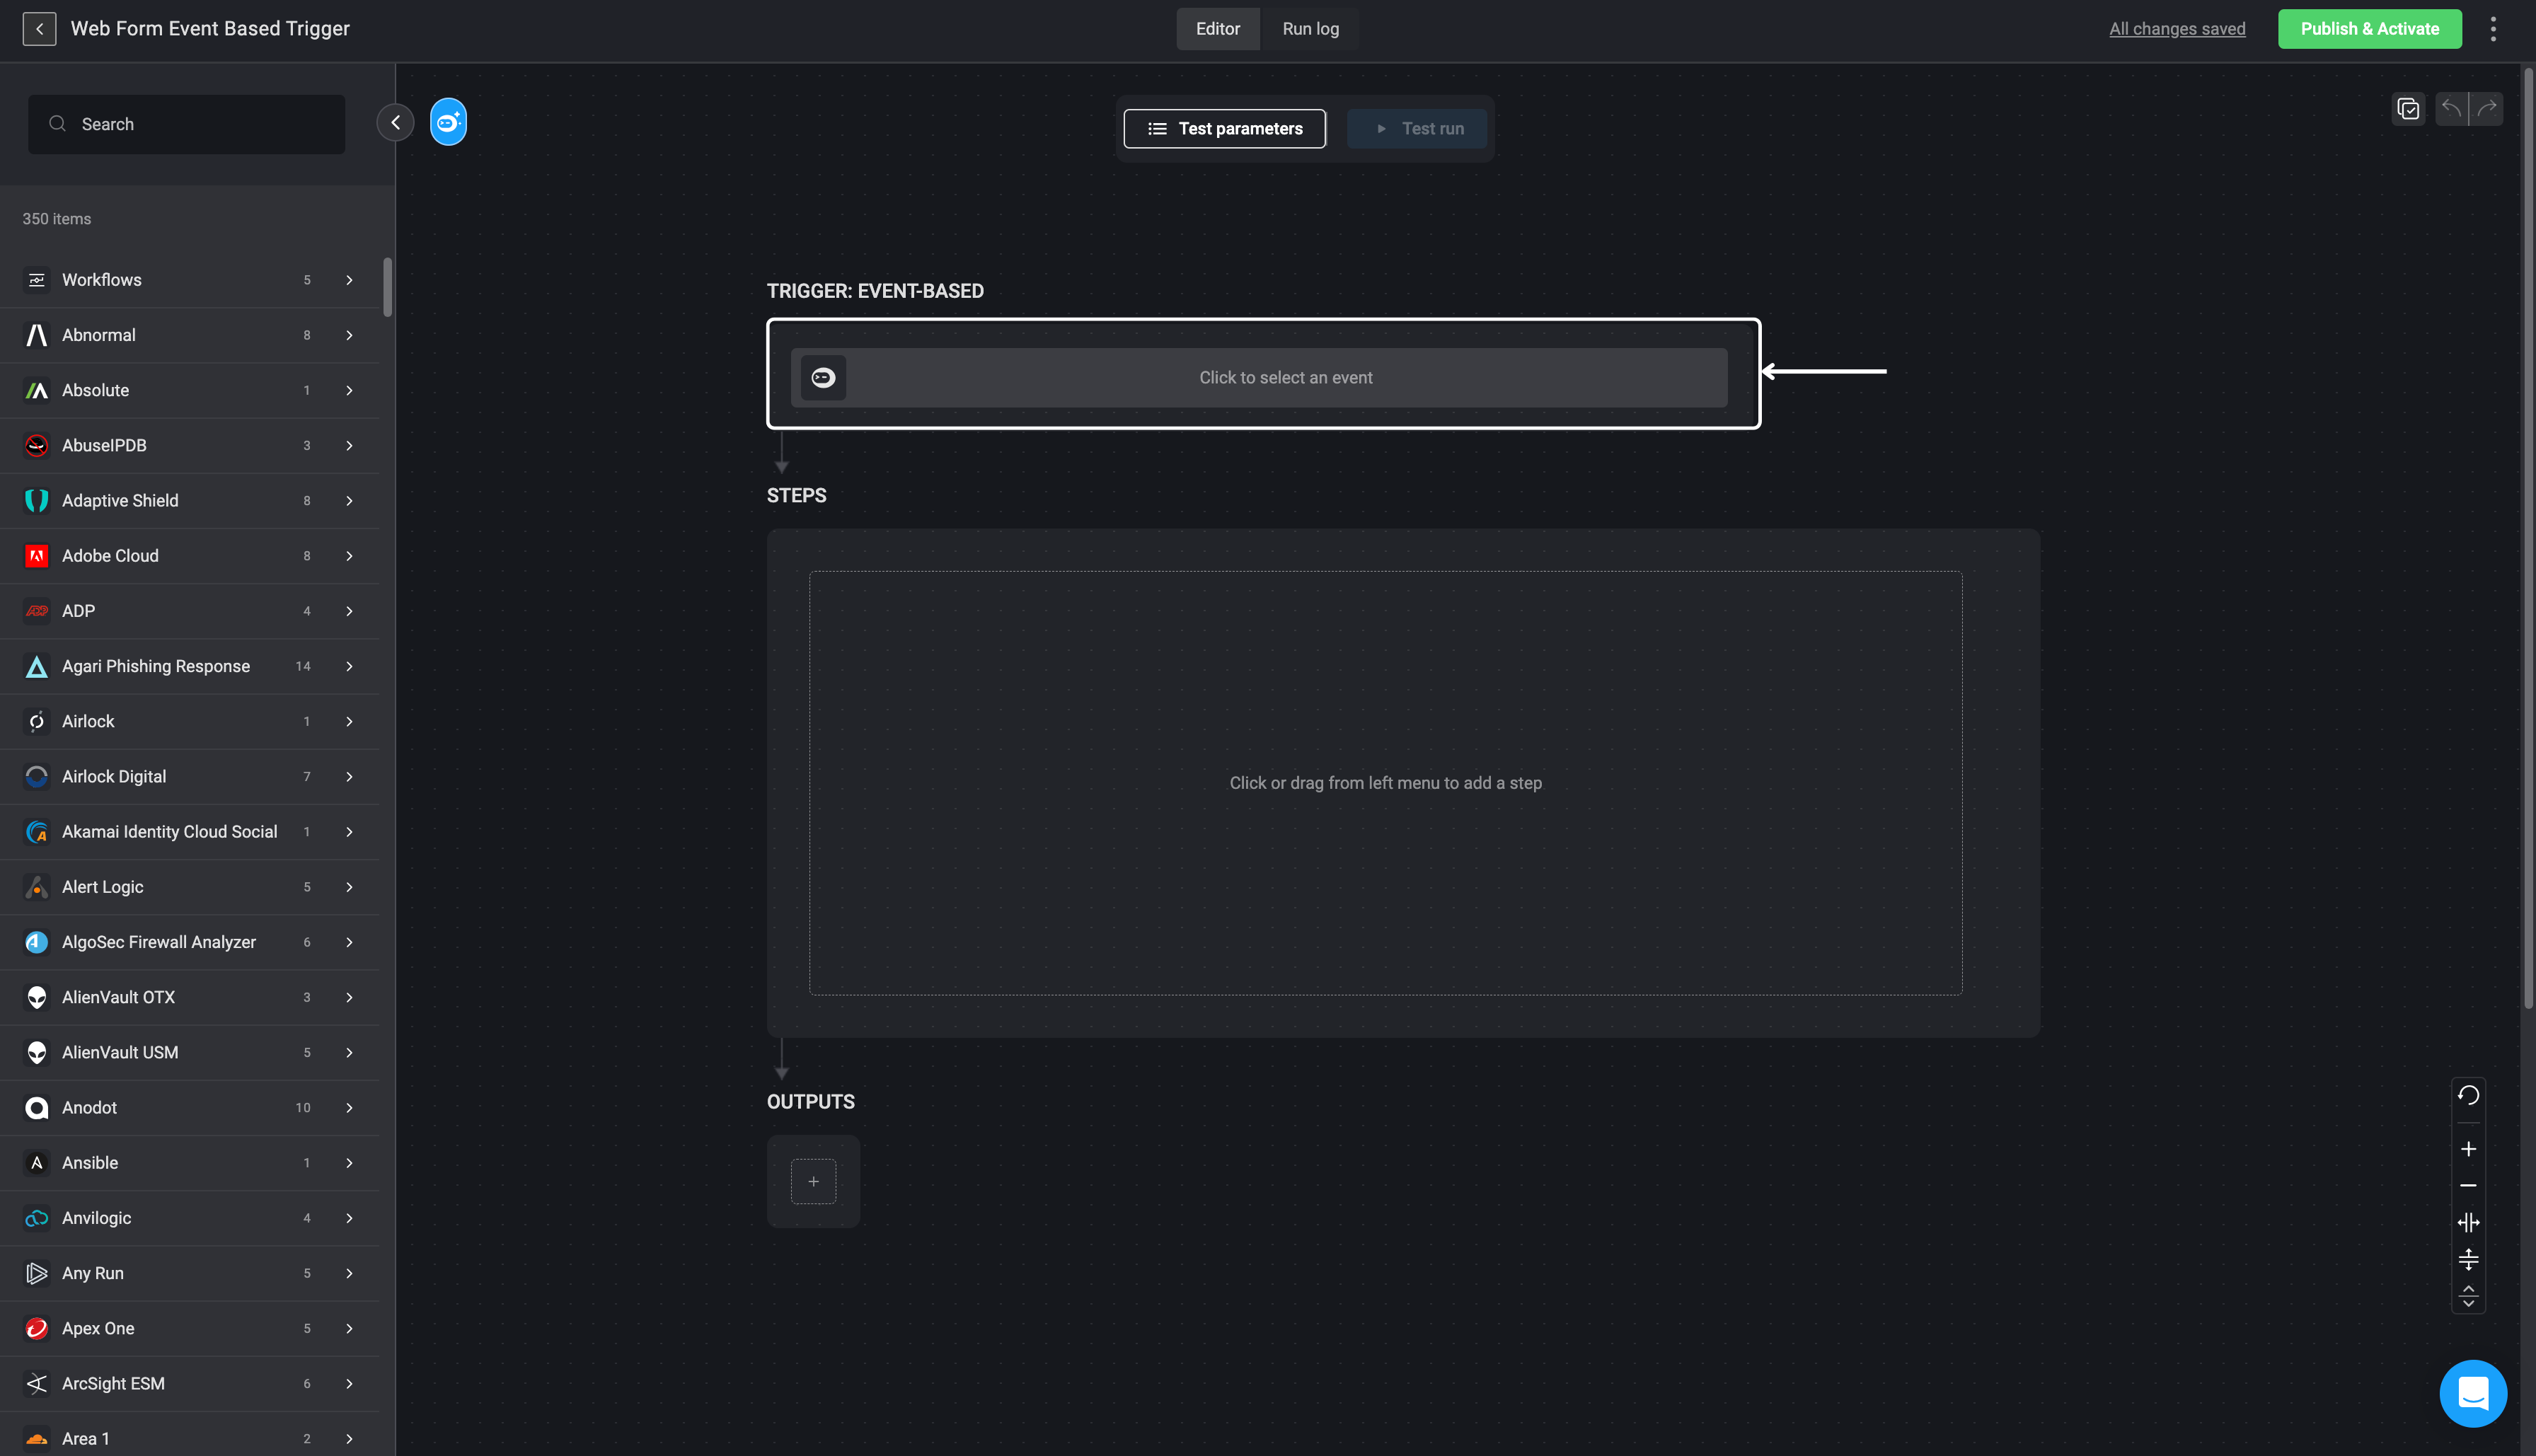
 In the *Trigger: Event-Based* section, click the *"Click to select an event"*.
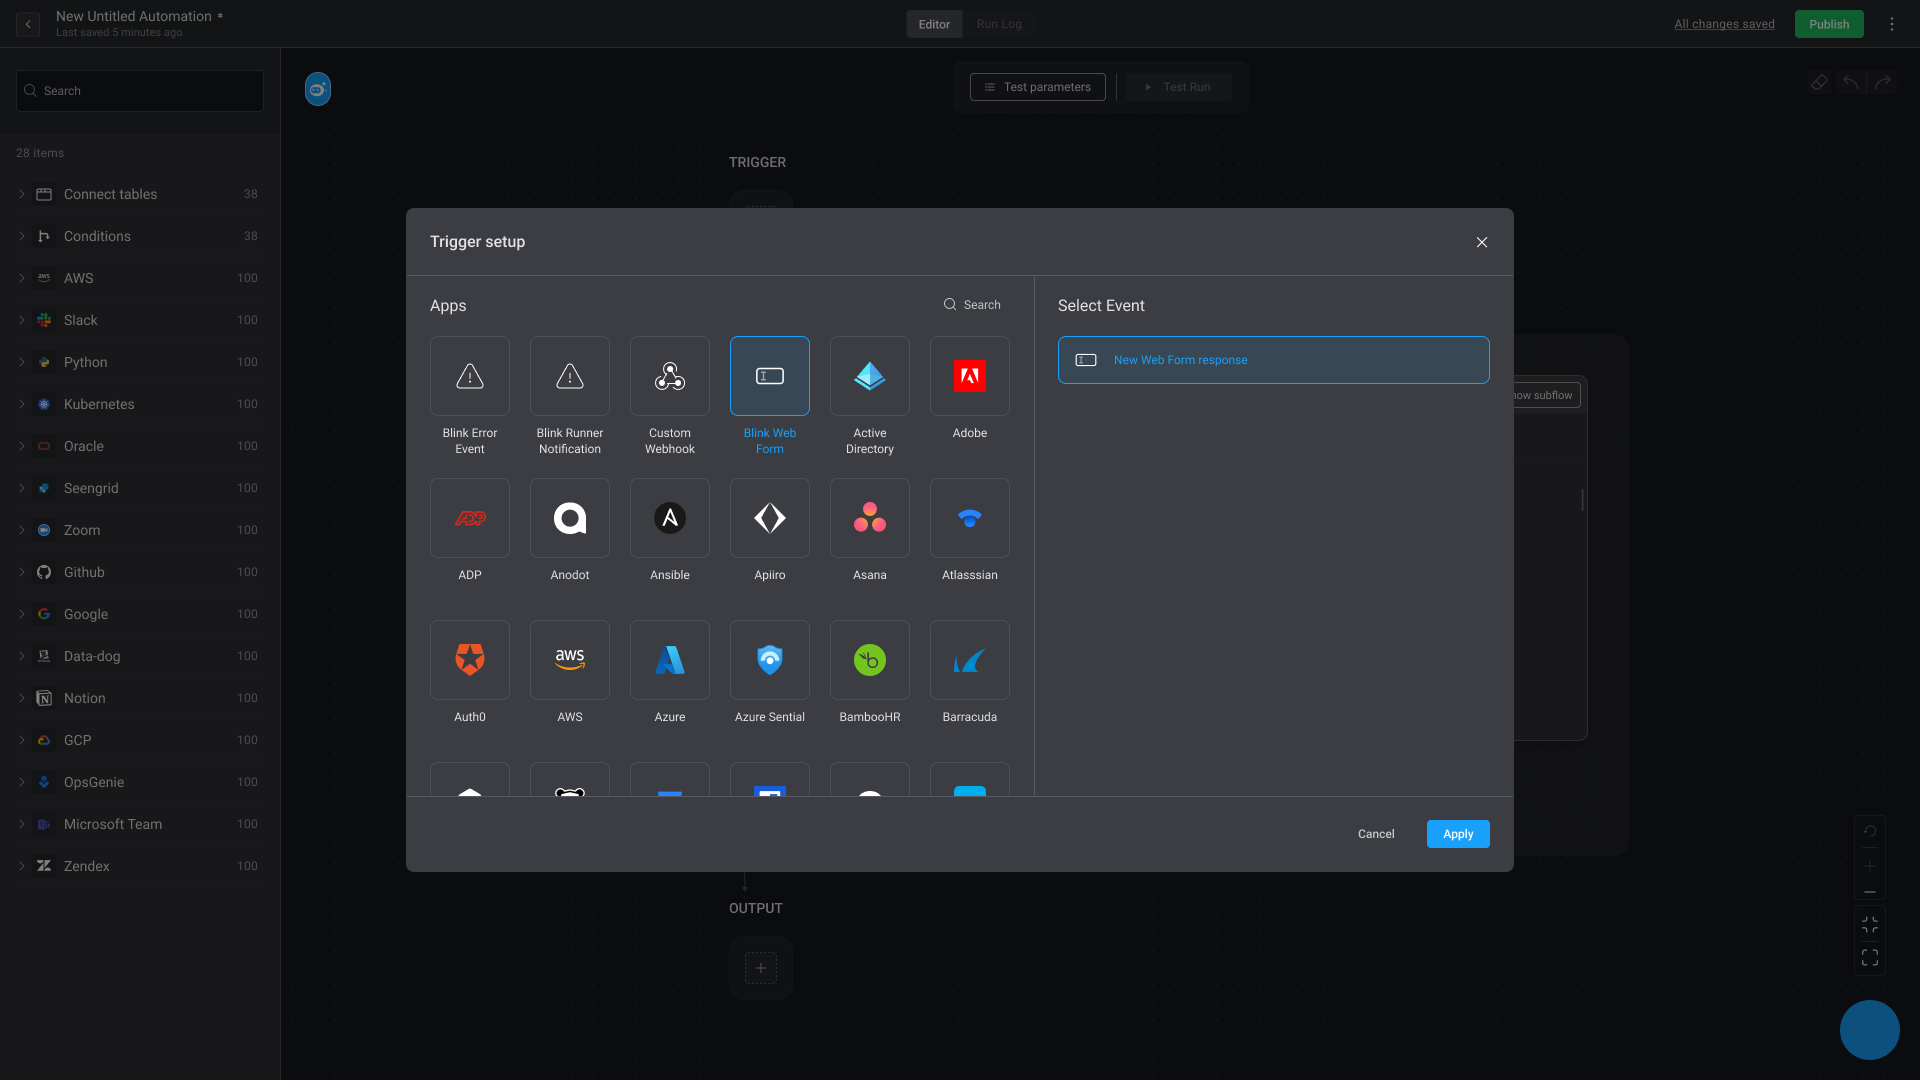
 Then choose the "Blink Web Form response" event and click **Apply** button to confirm.
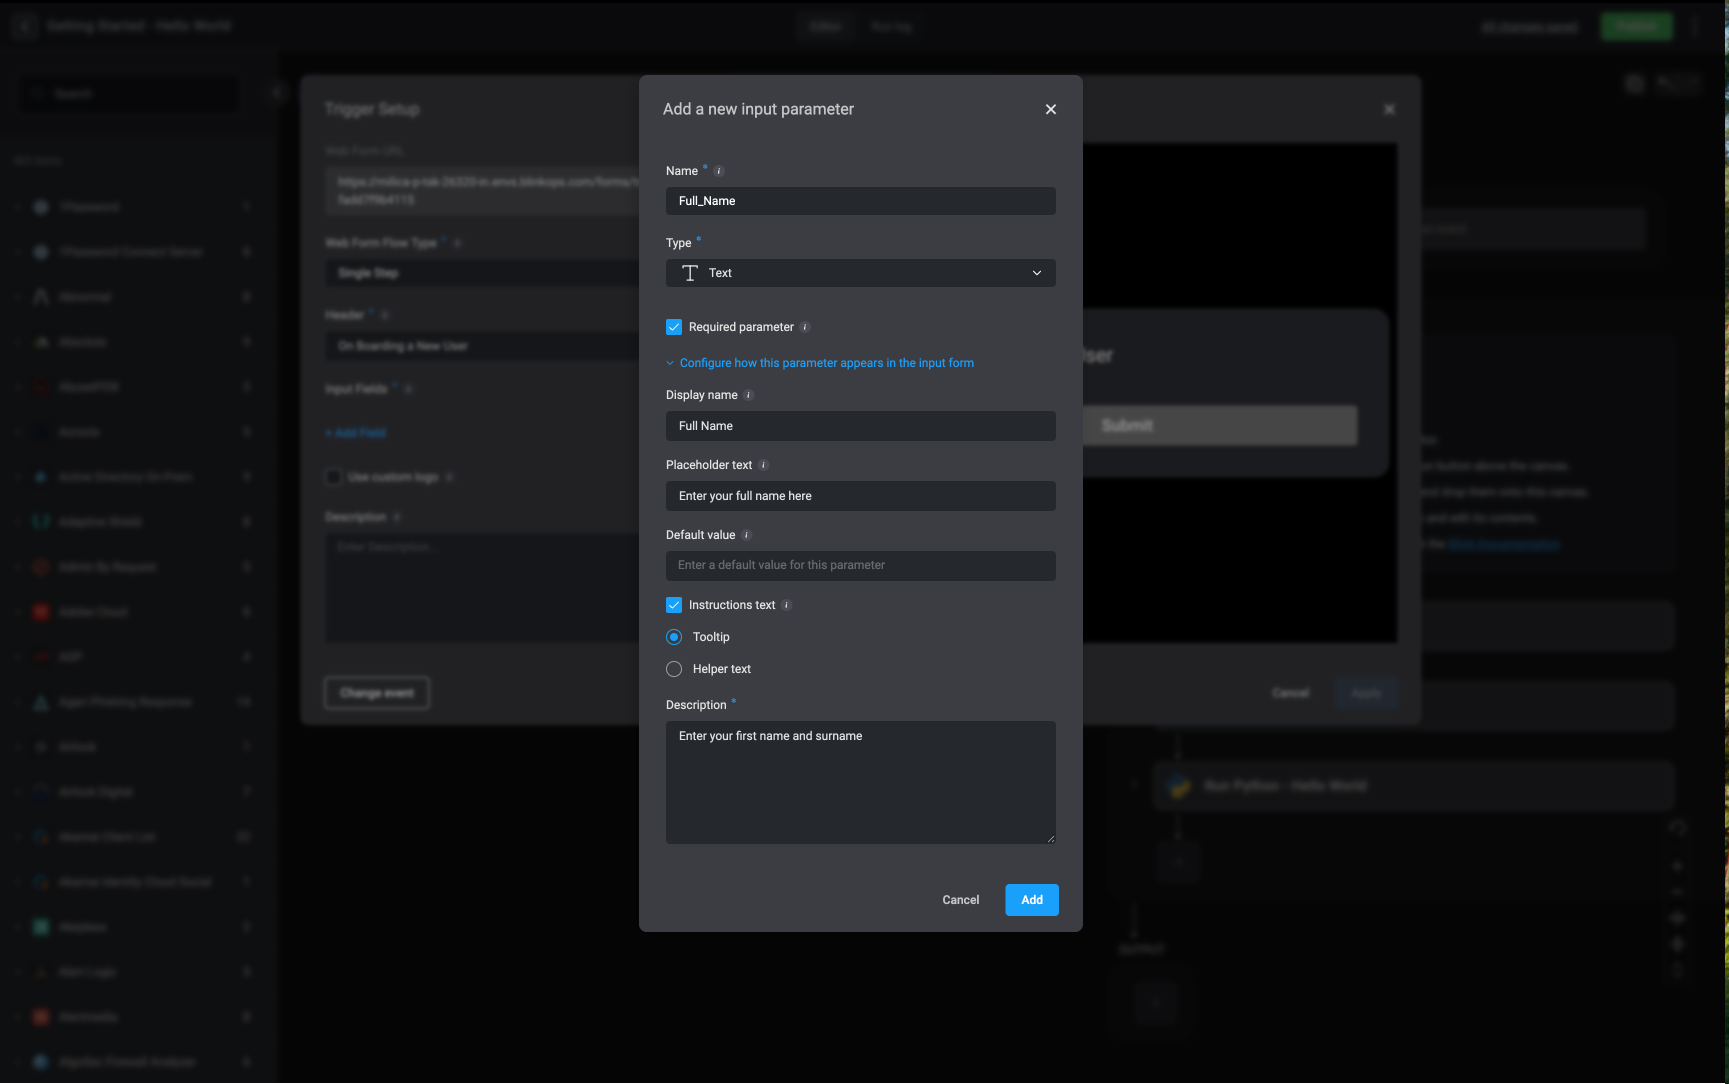
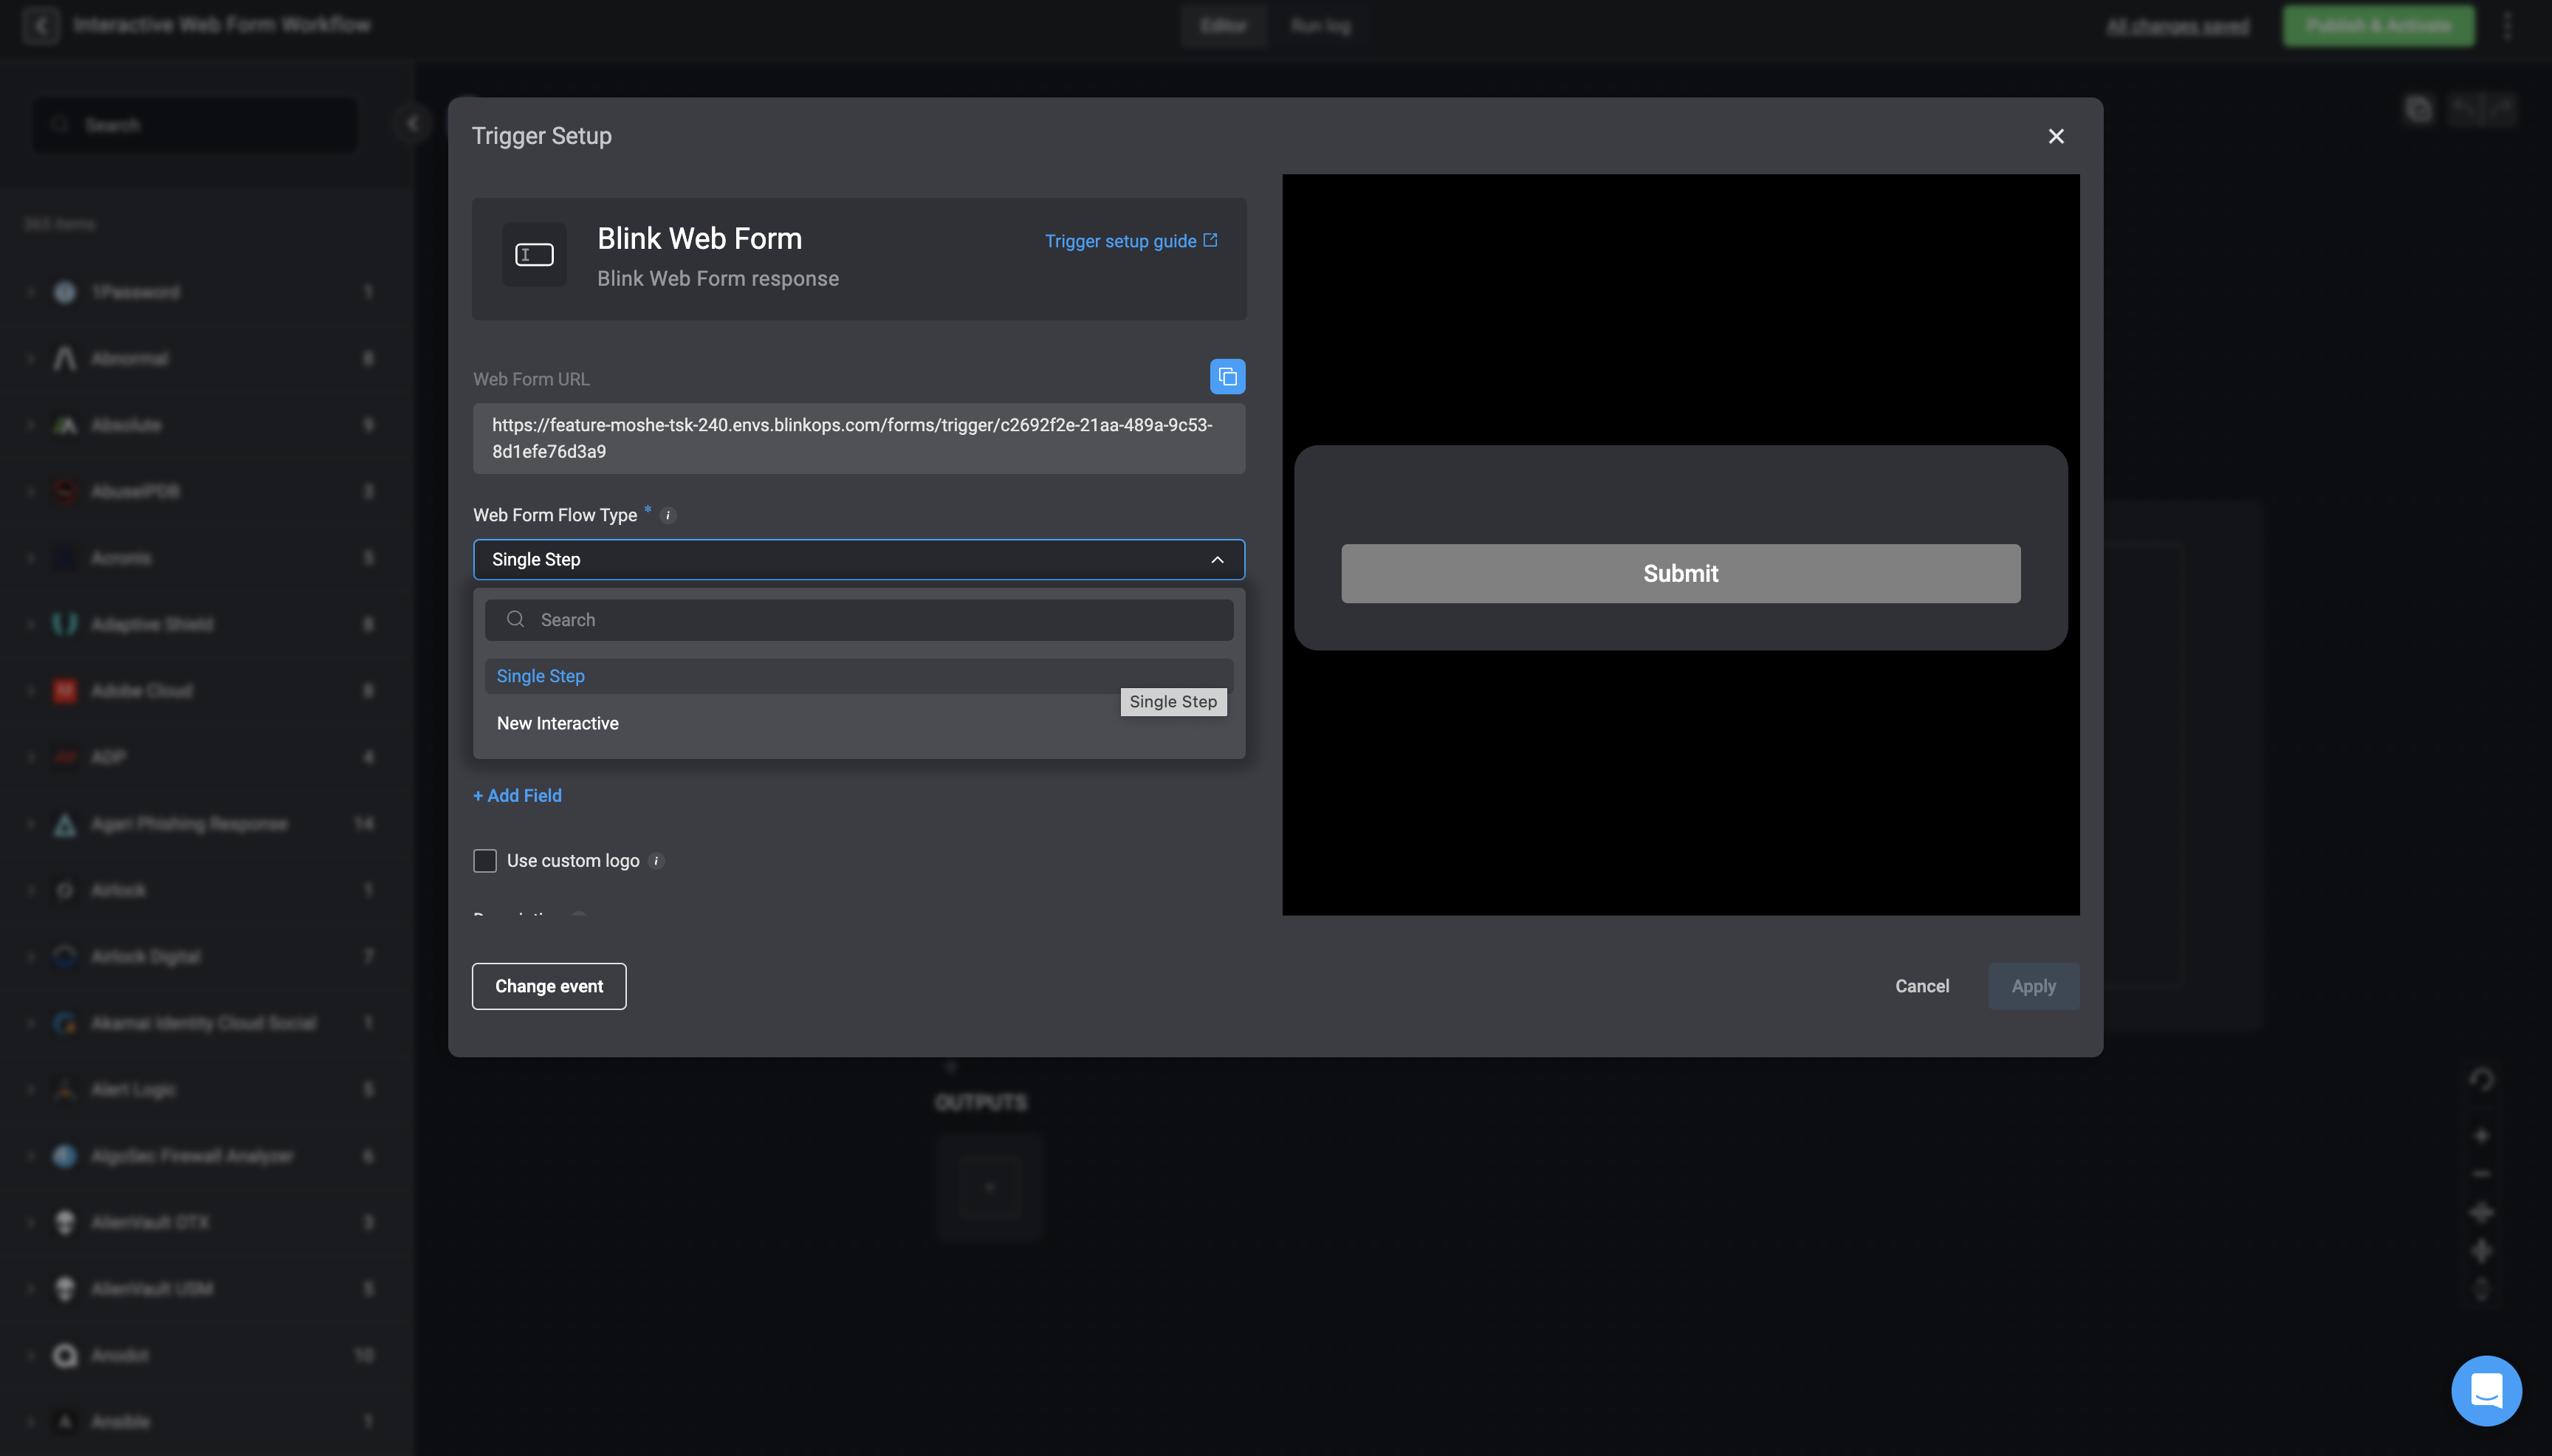 Next, add input parameters and customize how they are displayed in the Webform
* **Parameter Name**: The name given to the input parameter
* **Parameter Type**: Select the appropriate [input type](/docs/workflows/building-workflows/triggers/on-demand-triggers/input-parameters#input-parameter-types) based on the expected data (for example, string, number, boolean).
* **Optional:**
* **Display Name**: The label shown to users for this input parameter.
* **Required**: Enable this option to make the parameter mandatory. Disable it to allow the parameter to remain optional.
* **Placeholder** *(available for relevant types)*: Optional sample text displayed inside the input field to guide users on the expected format (for example, a sample username or email address).
* **Default Value**: The value automatically used if the user does not provide an input
* **Instructions Text:**
* **Tooltip**: Contextual text that appears on hover, offering additional explanation or clarification for the parameter.
* **Helper Text**: Supporting text shown below the input field to guide the user on how to complete it correctly.
* **Description**: The text shown to the user, either as a tooltip or as helper text, depending on the selected option.
Next, add input parameters and customize how they are displayed in the Webform
* **Parameter Name**: The name given to the input parameter
* **Parameter Type**: Select the appropriate [input type](/docs/workflows/building-workflows/triggers/on-demand-triggers/input-parameters#input-parameter-types) based on the expected data (for example, string, number, boolean).
* **Optional:**
* **Display Name**: The label shown to users for this input parameter.
* **Required**: Enable this option to make the parameter mandatory. Disable it to allow the parameter to remain optional.
* **Placeholder** *(available for relevant types)*: Optional sample text displayed inside the input field to guide users on the expected format (for example, a sample username or email address).
* **Default Value**: The value automatically used if the user does not provide an input
* **Instructions Text:**
* **Tooltip**: Contextual text that appears on hover, offering additional explanation or clarification for the parameter.
* **Helper Text**: Supporting text shown below the input field to guide the user on how to complete it correctly.
* **Description**: The text shown to the user, either as a tooltip or as helper text, depending on the selected option.
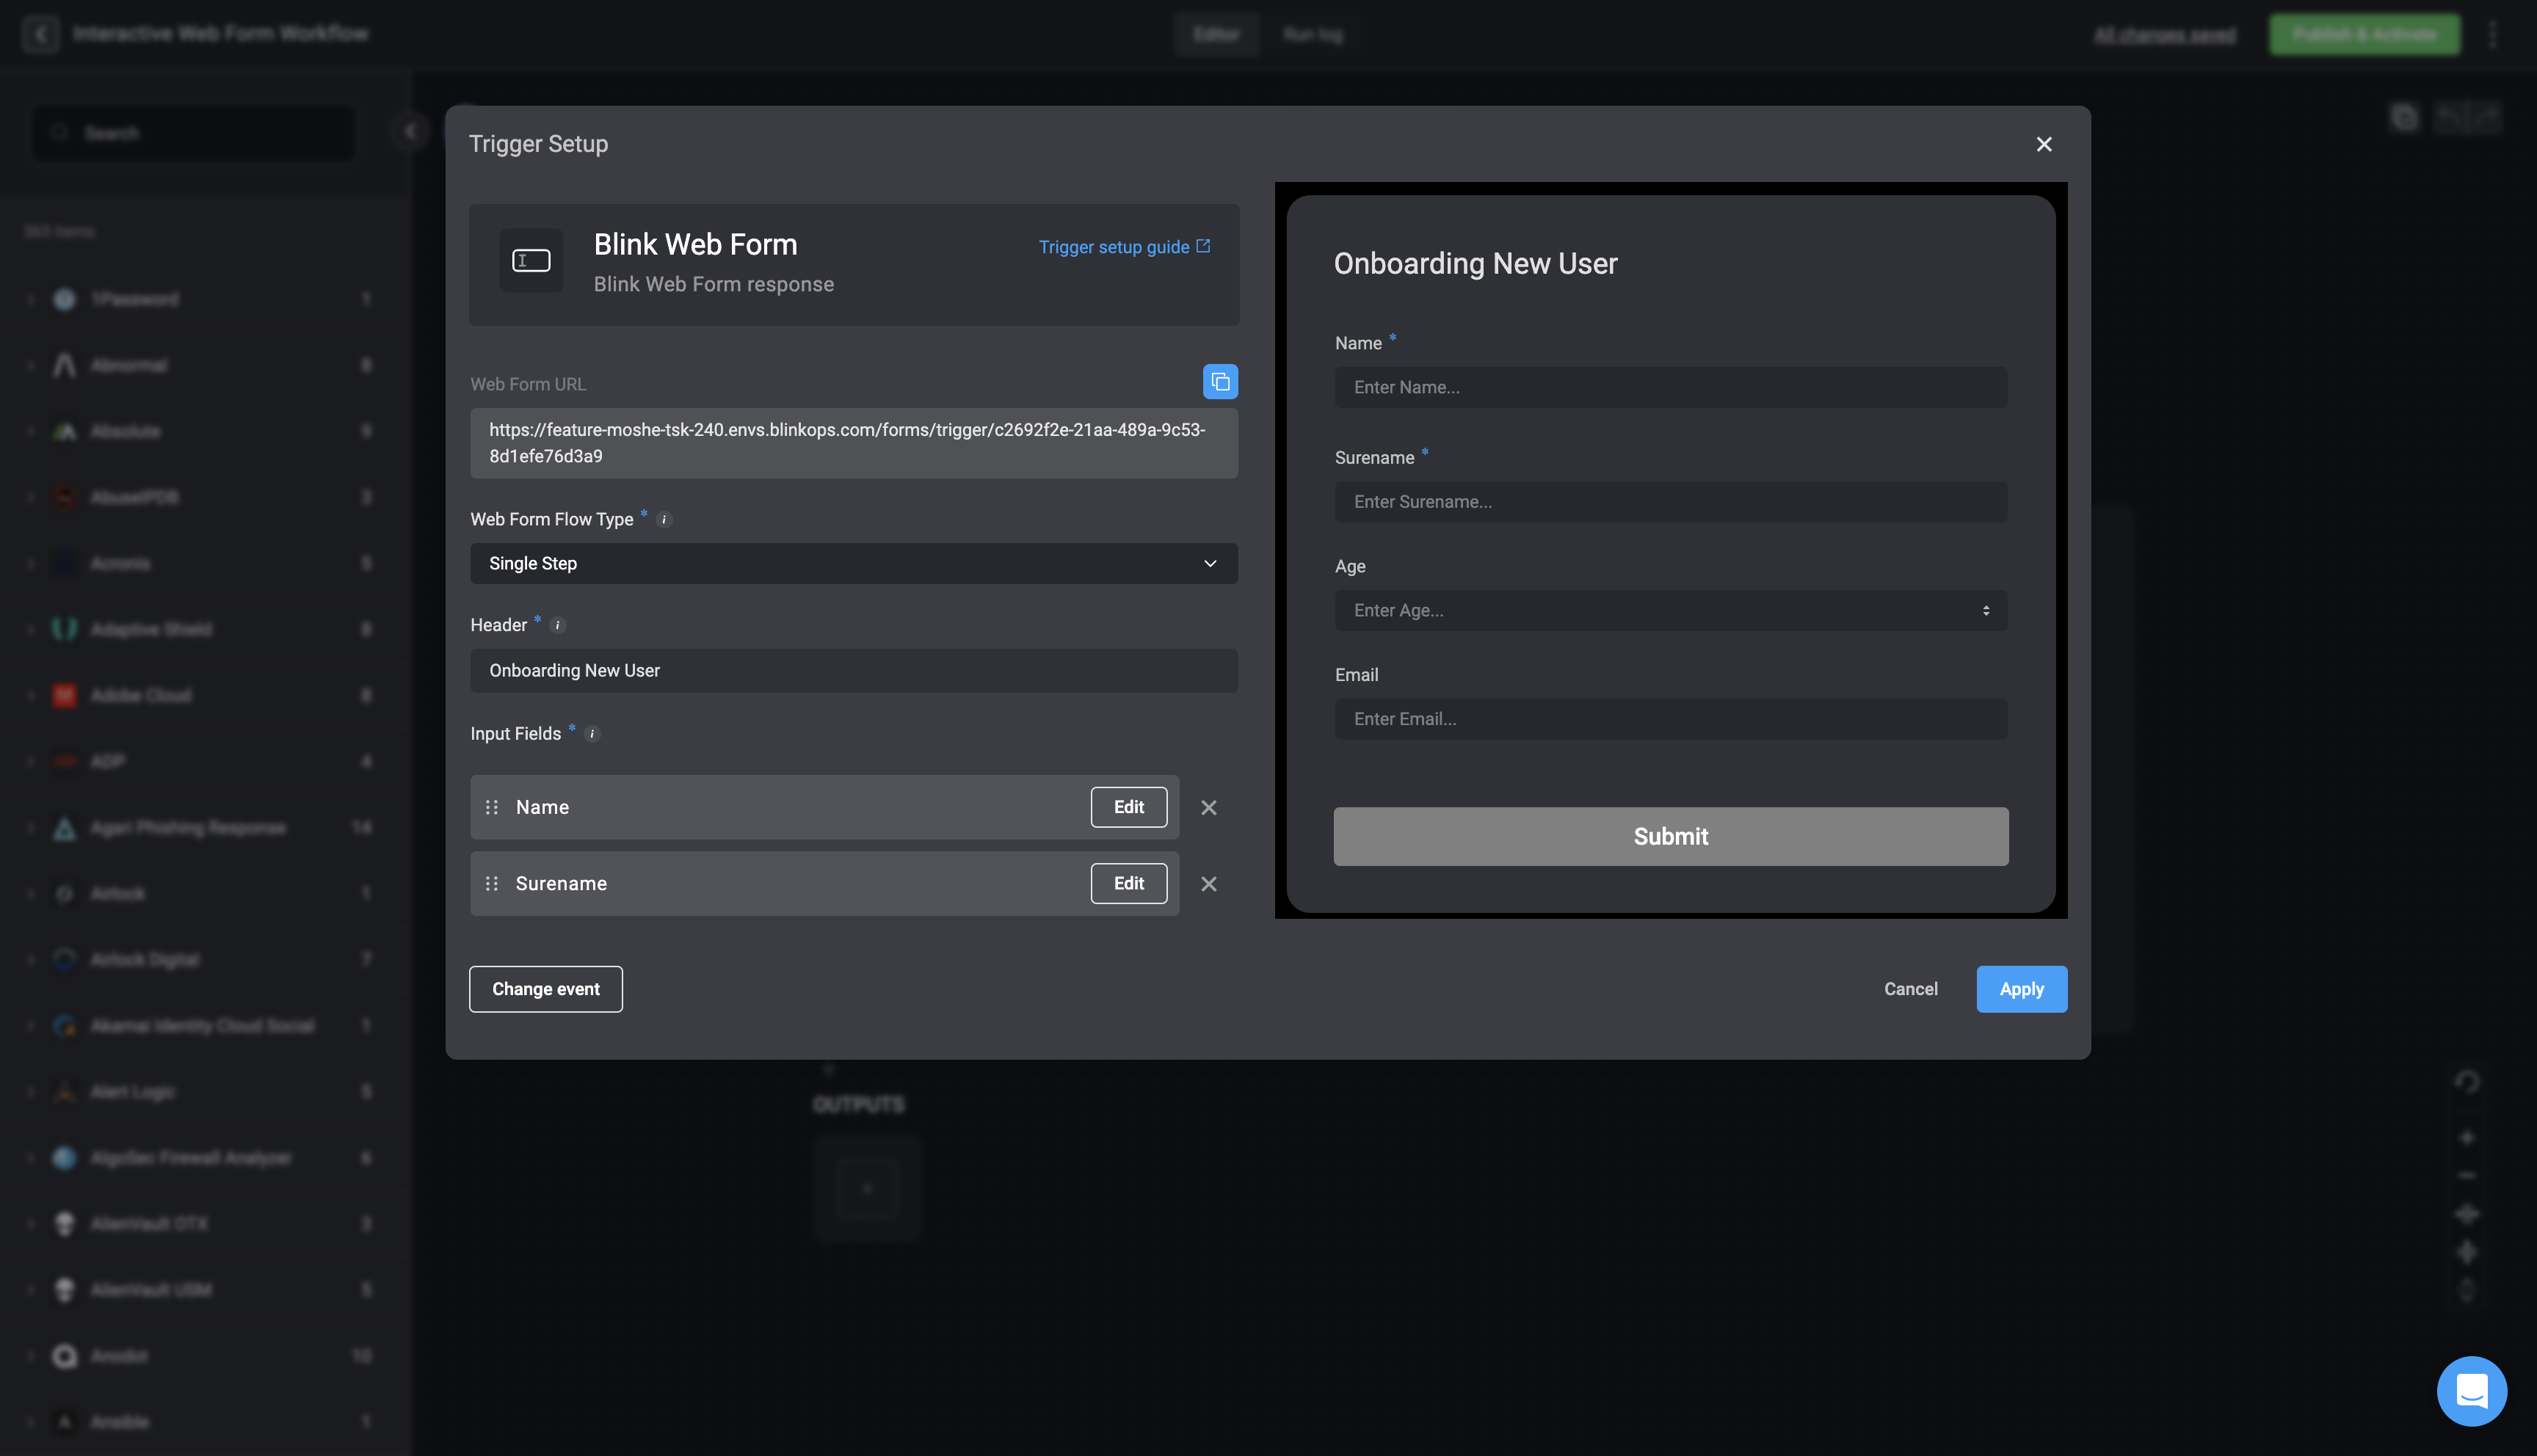
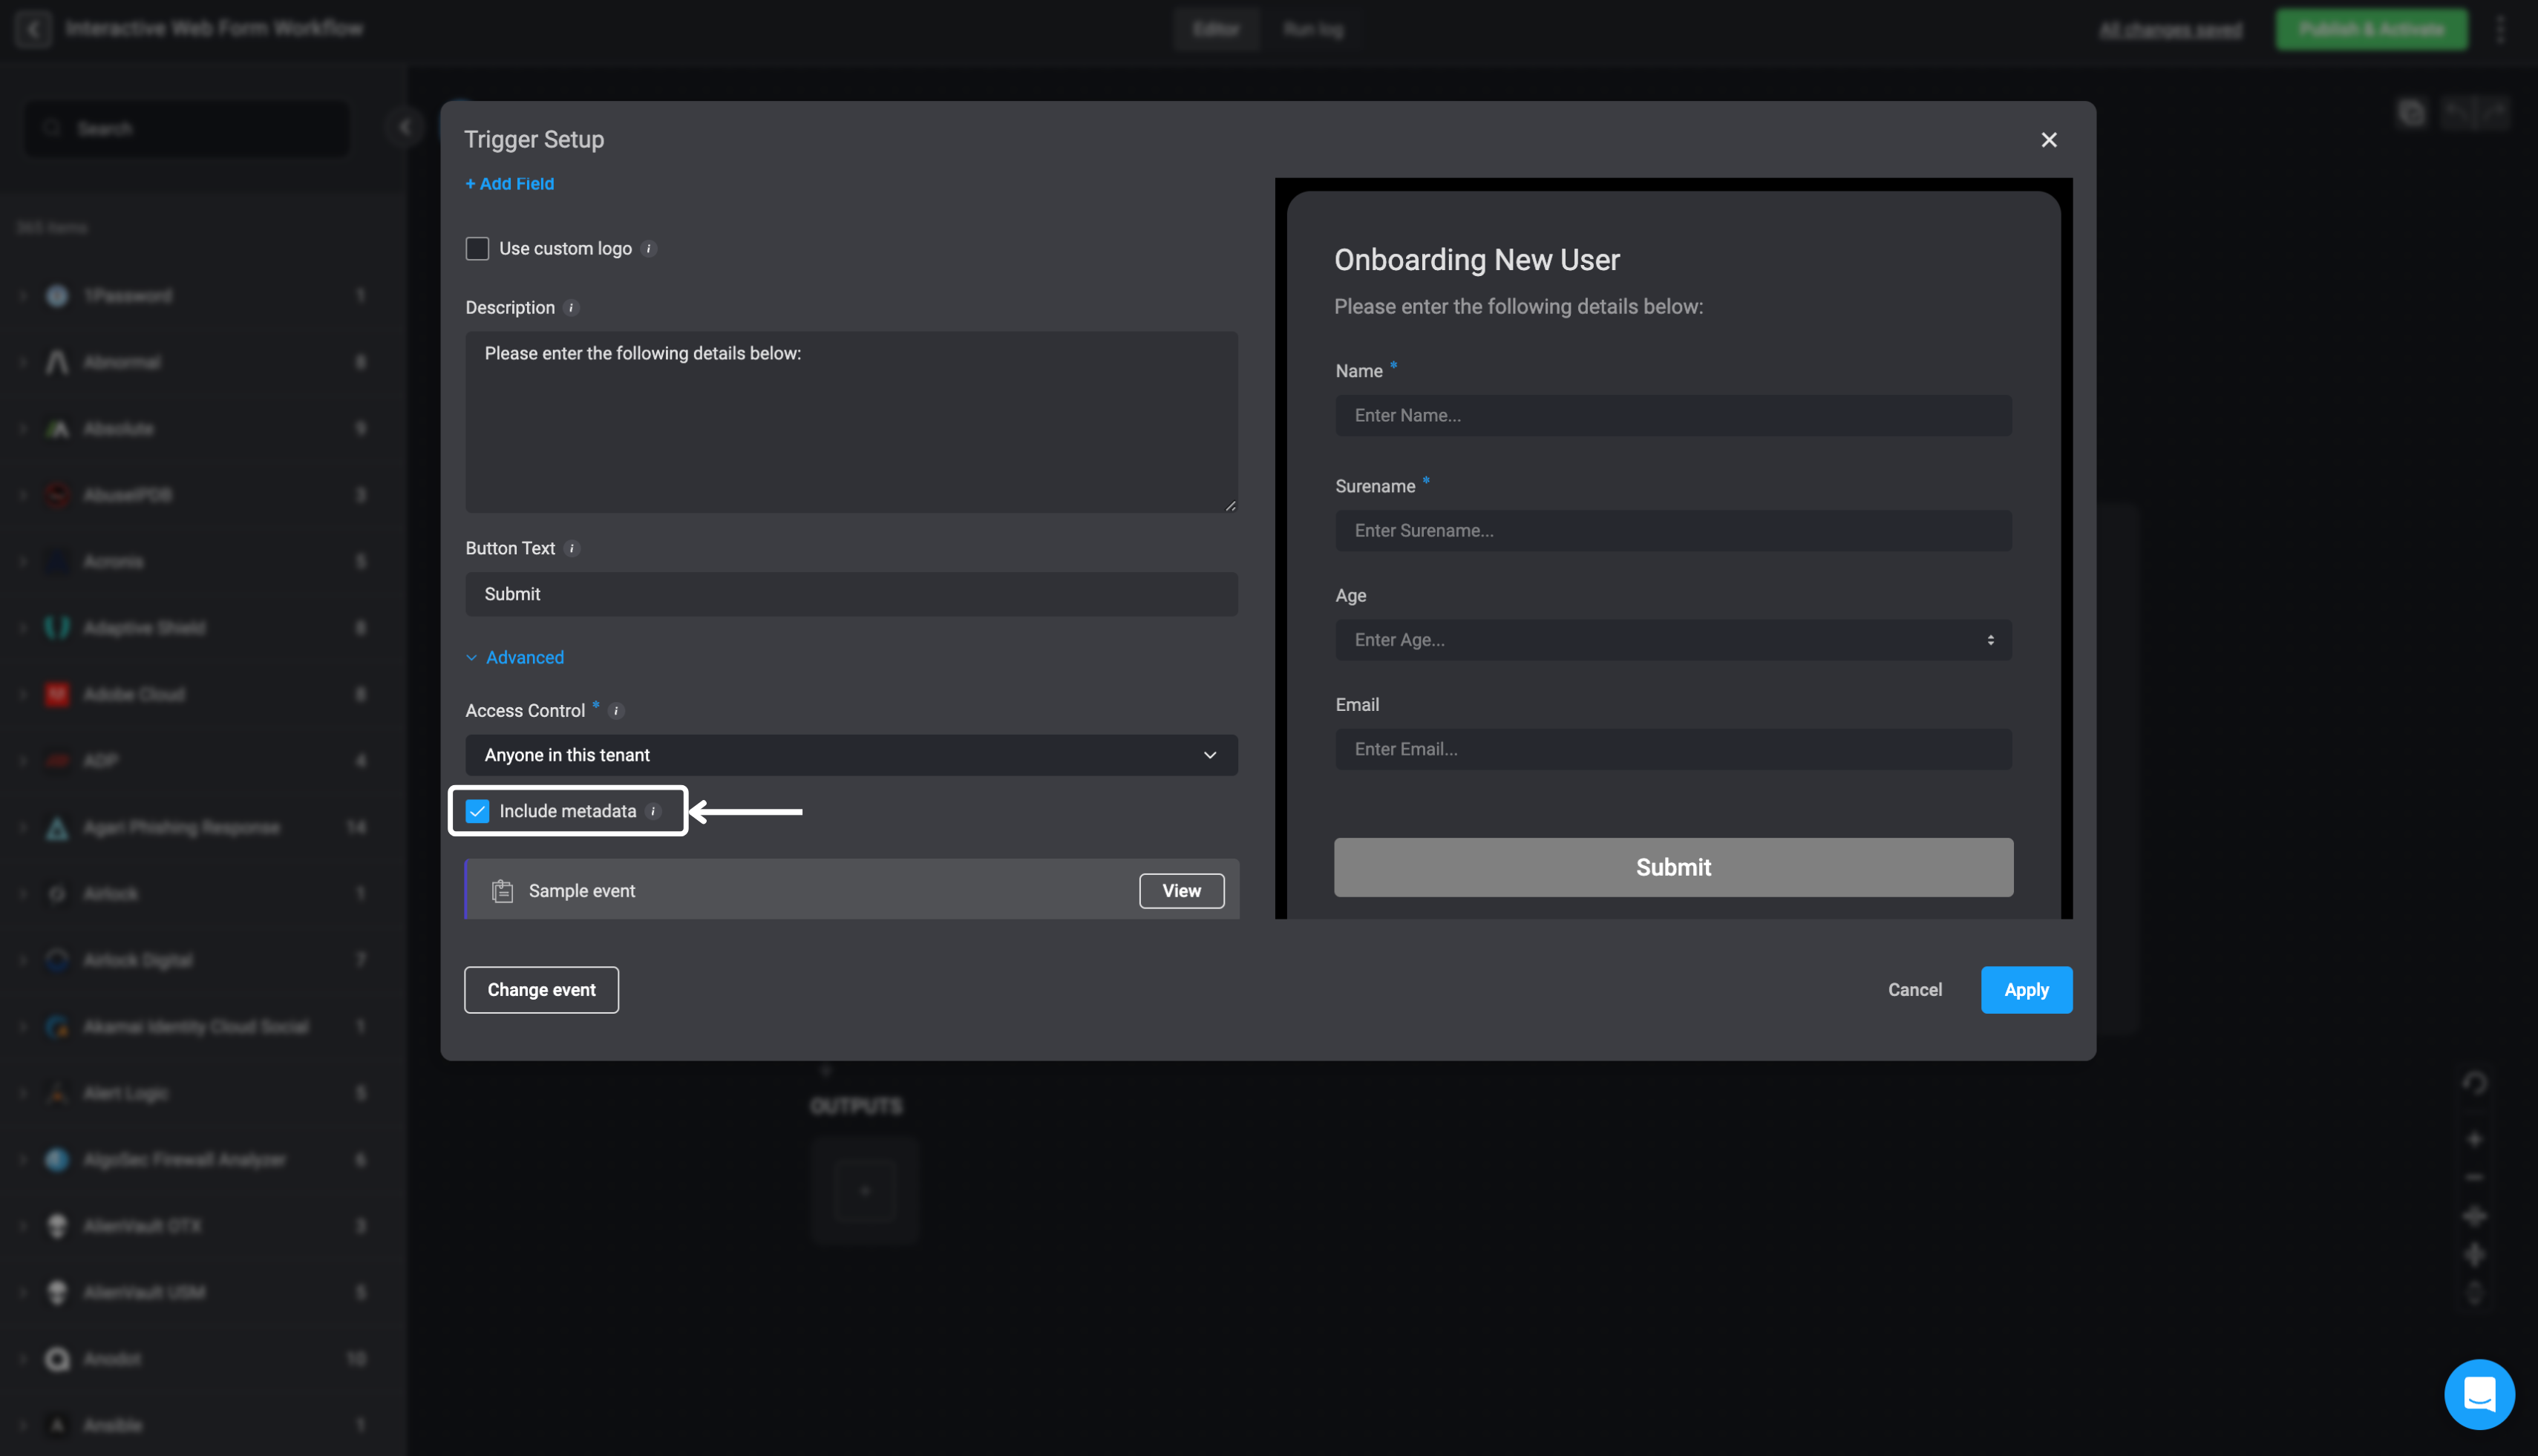
 * **URL Link**: Copy the link provided.
* **Header**: Add a title for your web form.
* **Use Custom Logo**: **(Optional)** Check the box to include a custom logo and provide the image URL.
* **Description**: **(Optional)** Add a brief description.
* **Button Text**: Enter the text you want displayed on the form’s submit button.
* **URL Link**: Copy the link provided.
* **Header**: Add a title for your web form.
* **Use Custom Logo**: **(Optional)** Check the box to include a custom logo and provide the image URL.
* **Description**: **(Optional)** Add a brief description.
* **Button Text**: Enter the text you want displayed on the form’s submit button.
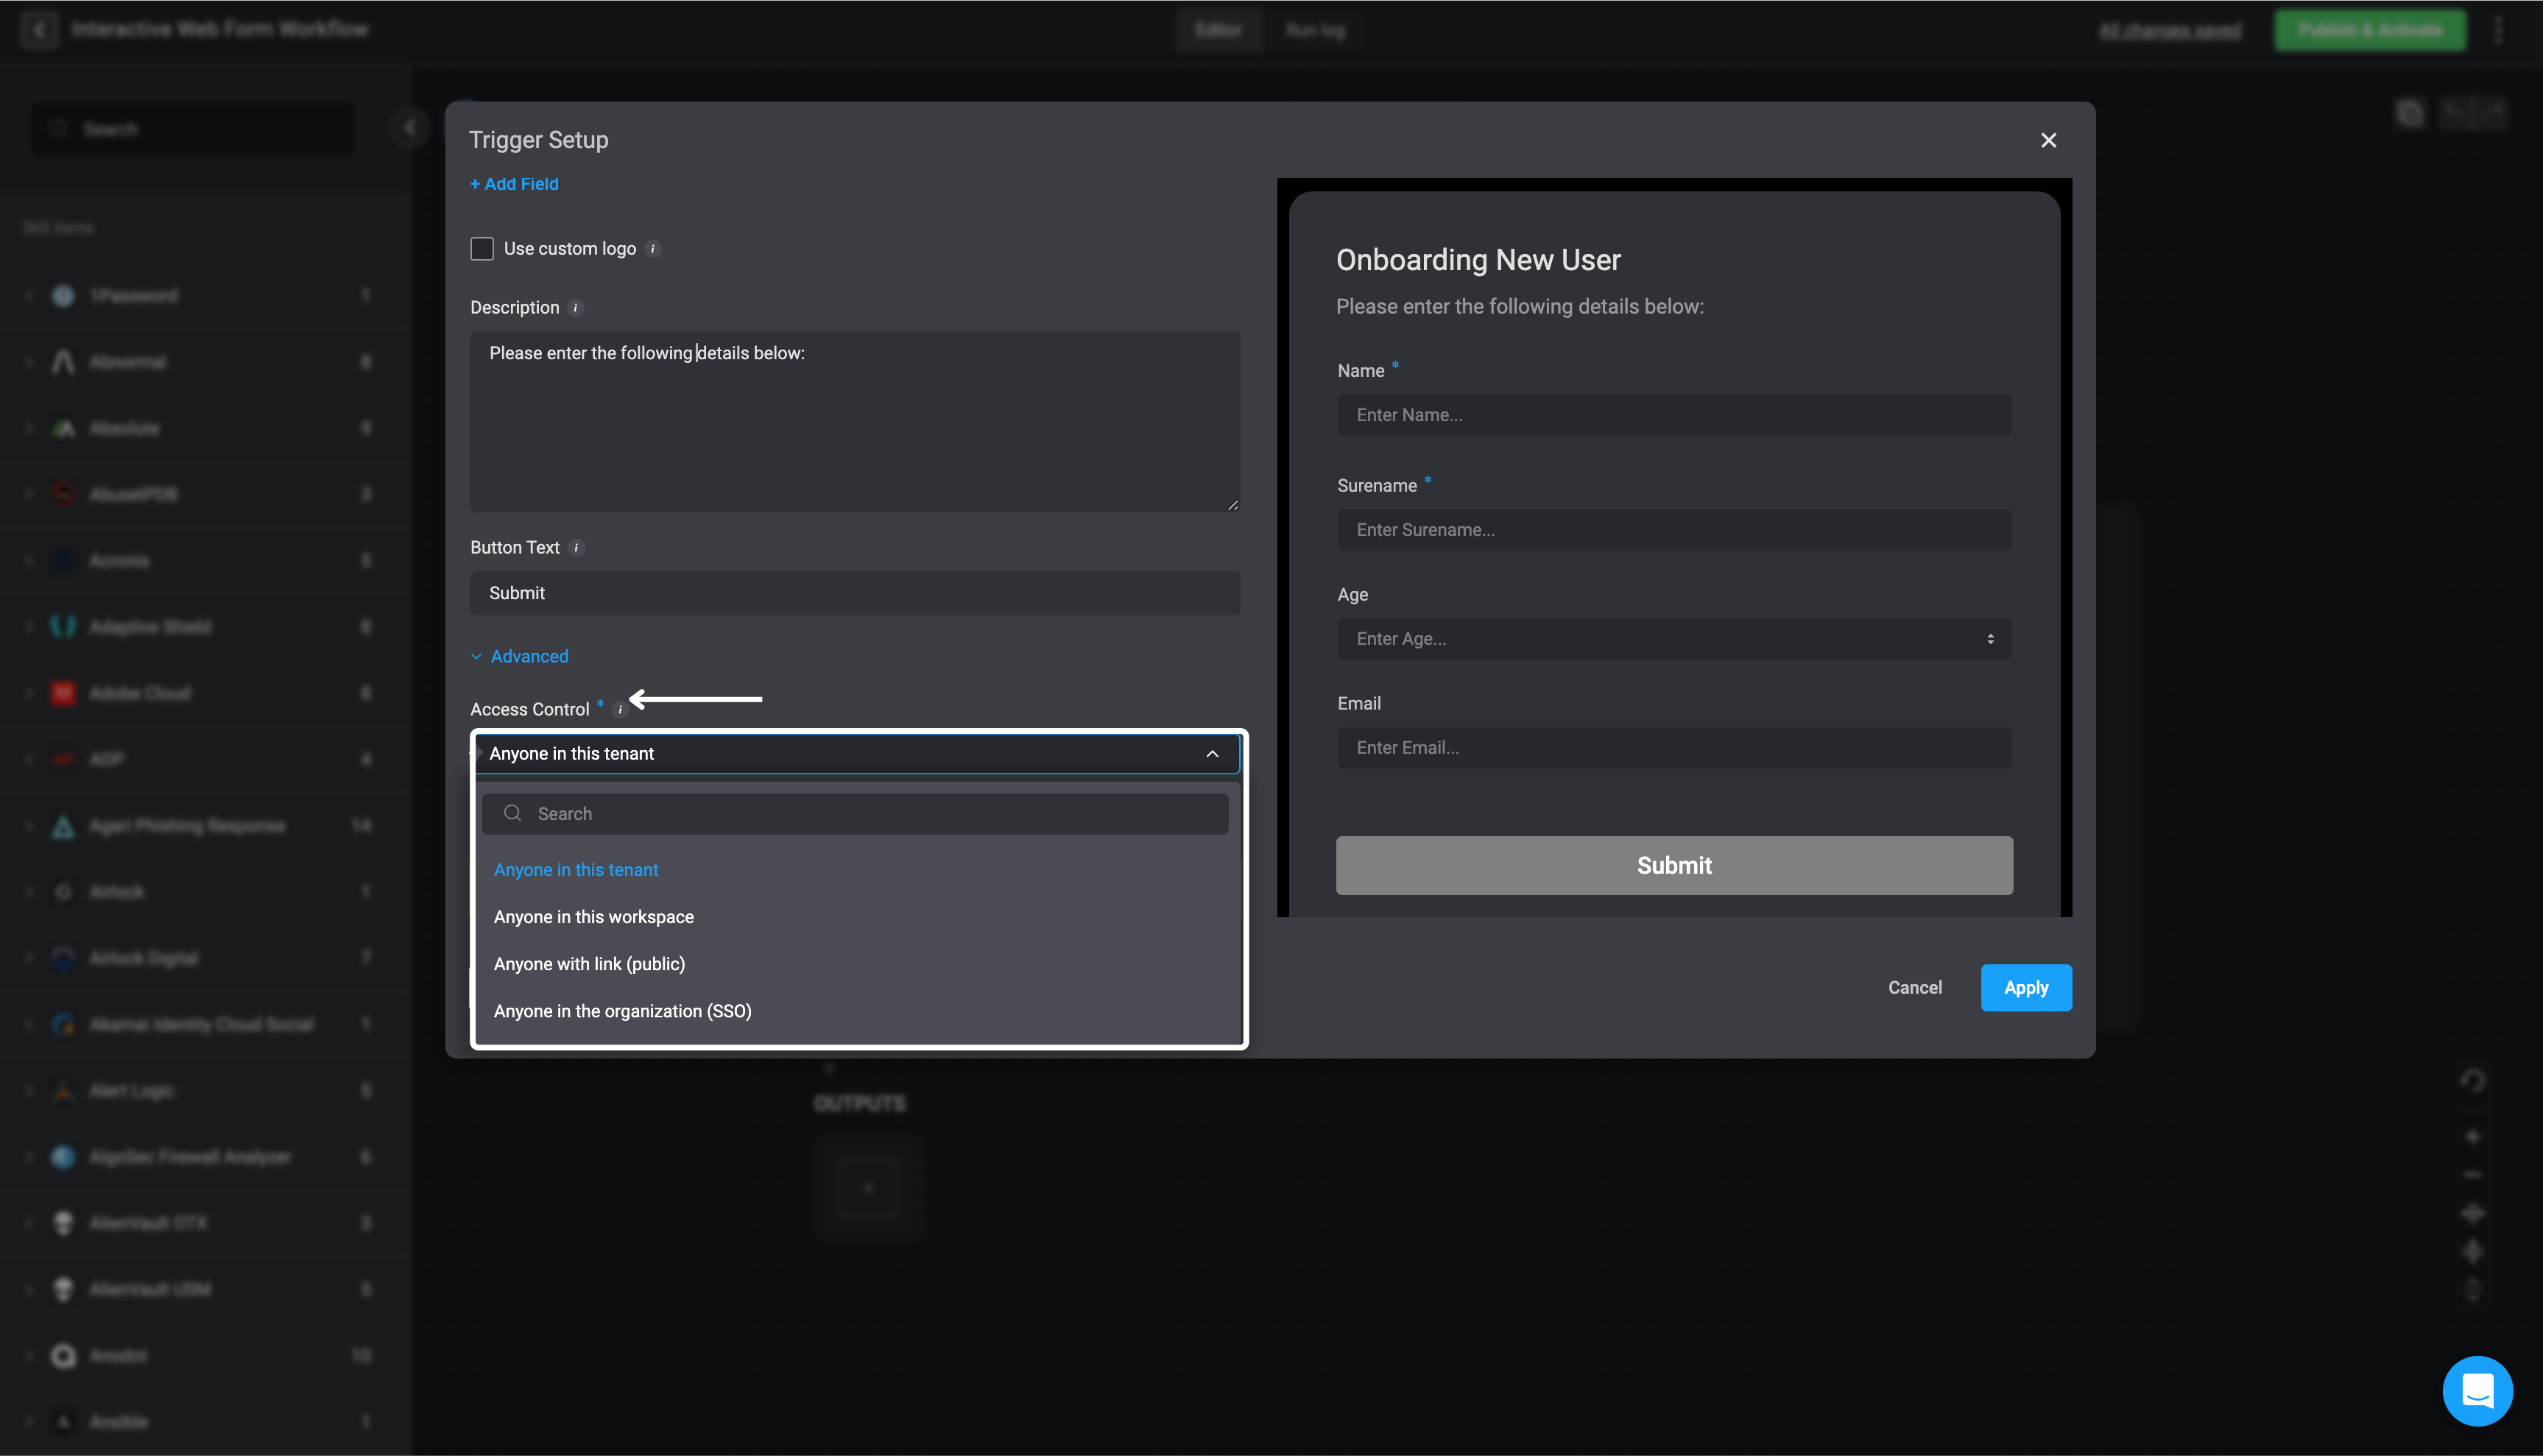
 ***Access Control Hierarchy:***
* **Anyone in this tenant:** Anyone signed into the tenant can access the form. This is the default option.
* **Anyone in this workspace:** Only signed-in members of the specific workspace where the web-form was created, can access the form.
* **Anyone with link (public):** Anyone with the form URL link can access and interact with it.
* **Anyone in the organization (SSO):** Blink users can access and interact with the form only via their organization’s SSO.
***Access Control Hierarchy:***
* **Anyone in this tenant:** Anyone signed into the tenant can access the form. This is the default option.
* **Anyone in this workspace:** Only signed-in members of the specific workspace where the web-form was created, can access the form.
* **Anyone with link (public):** Anyone with the form URL link can access and interact with it.
* **Anyone in the organization (SSO):** Blink users can access and interact with the form only via their organization’s SSO.
 Continue building your workflow. No further web form related step is mandatory.
***
## Configure an Interactive Web Form Trigger
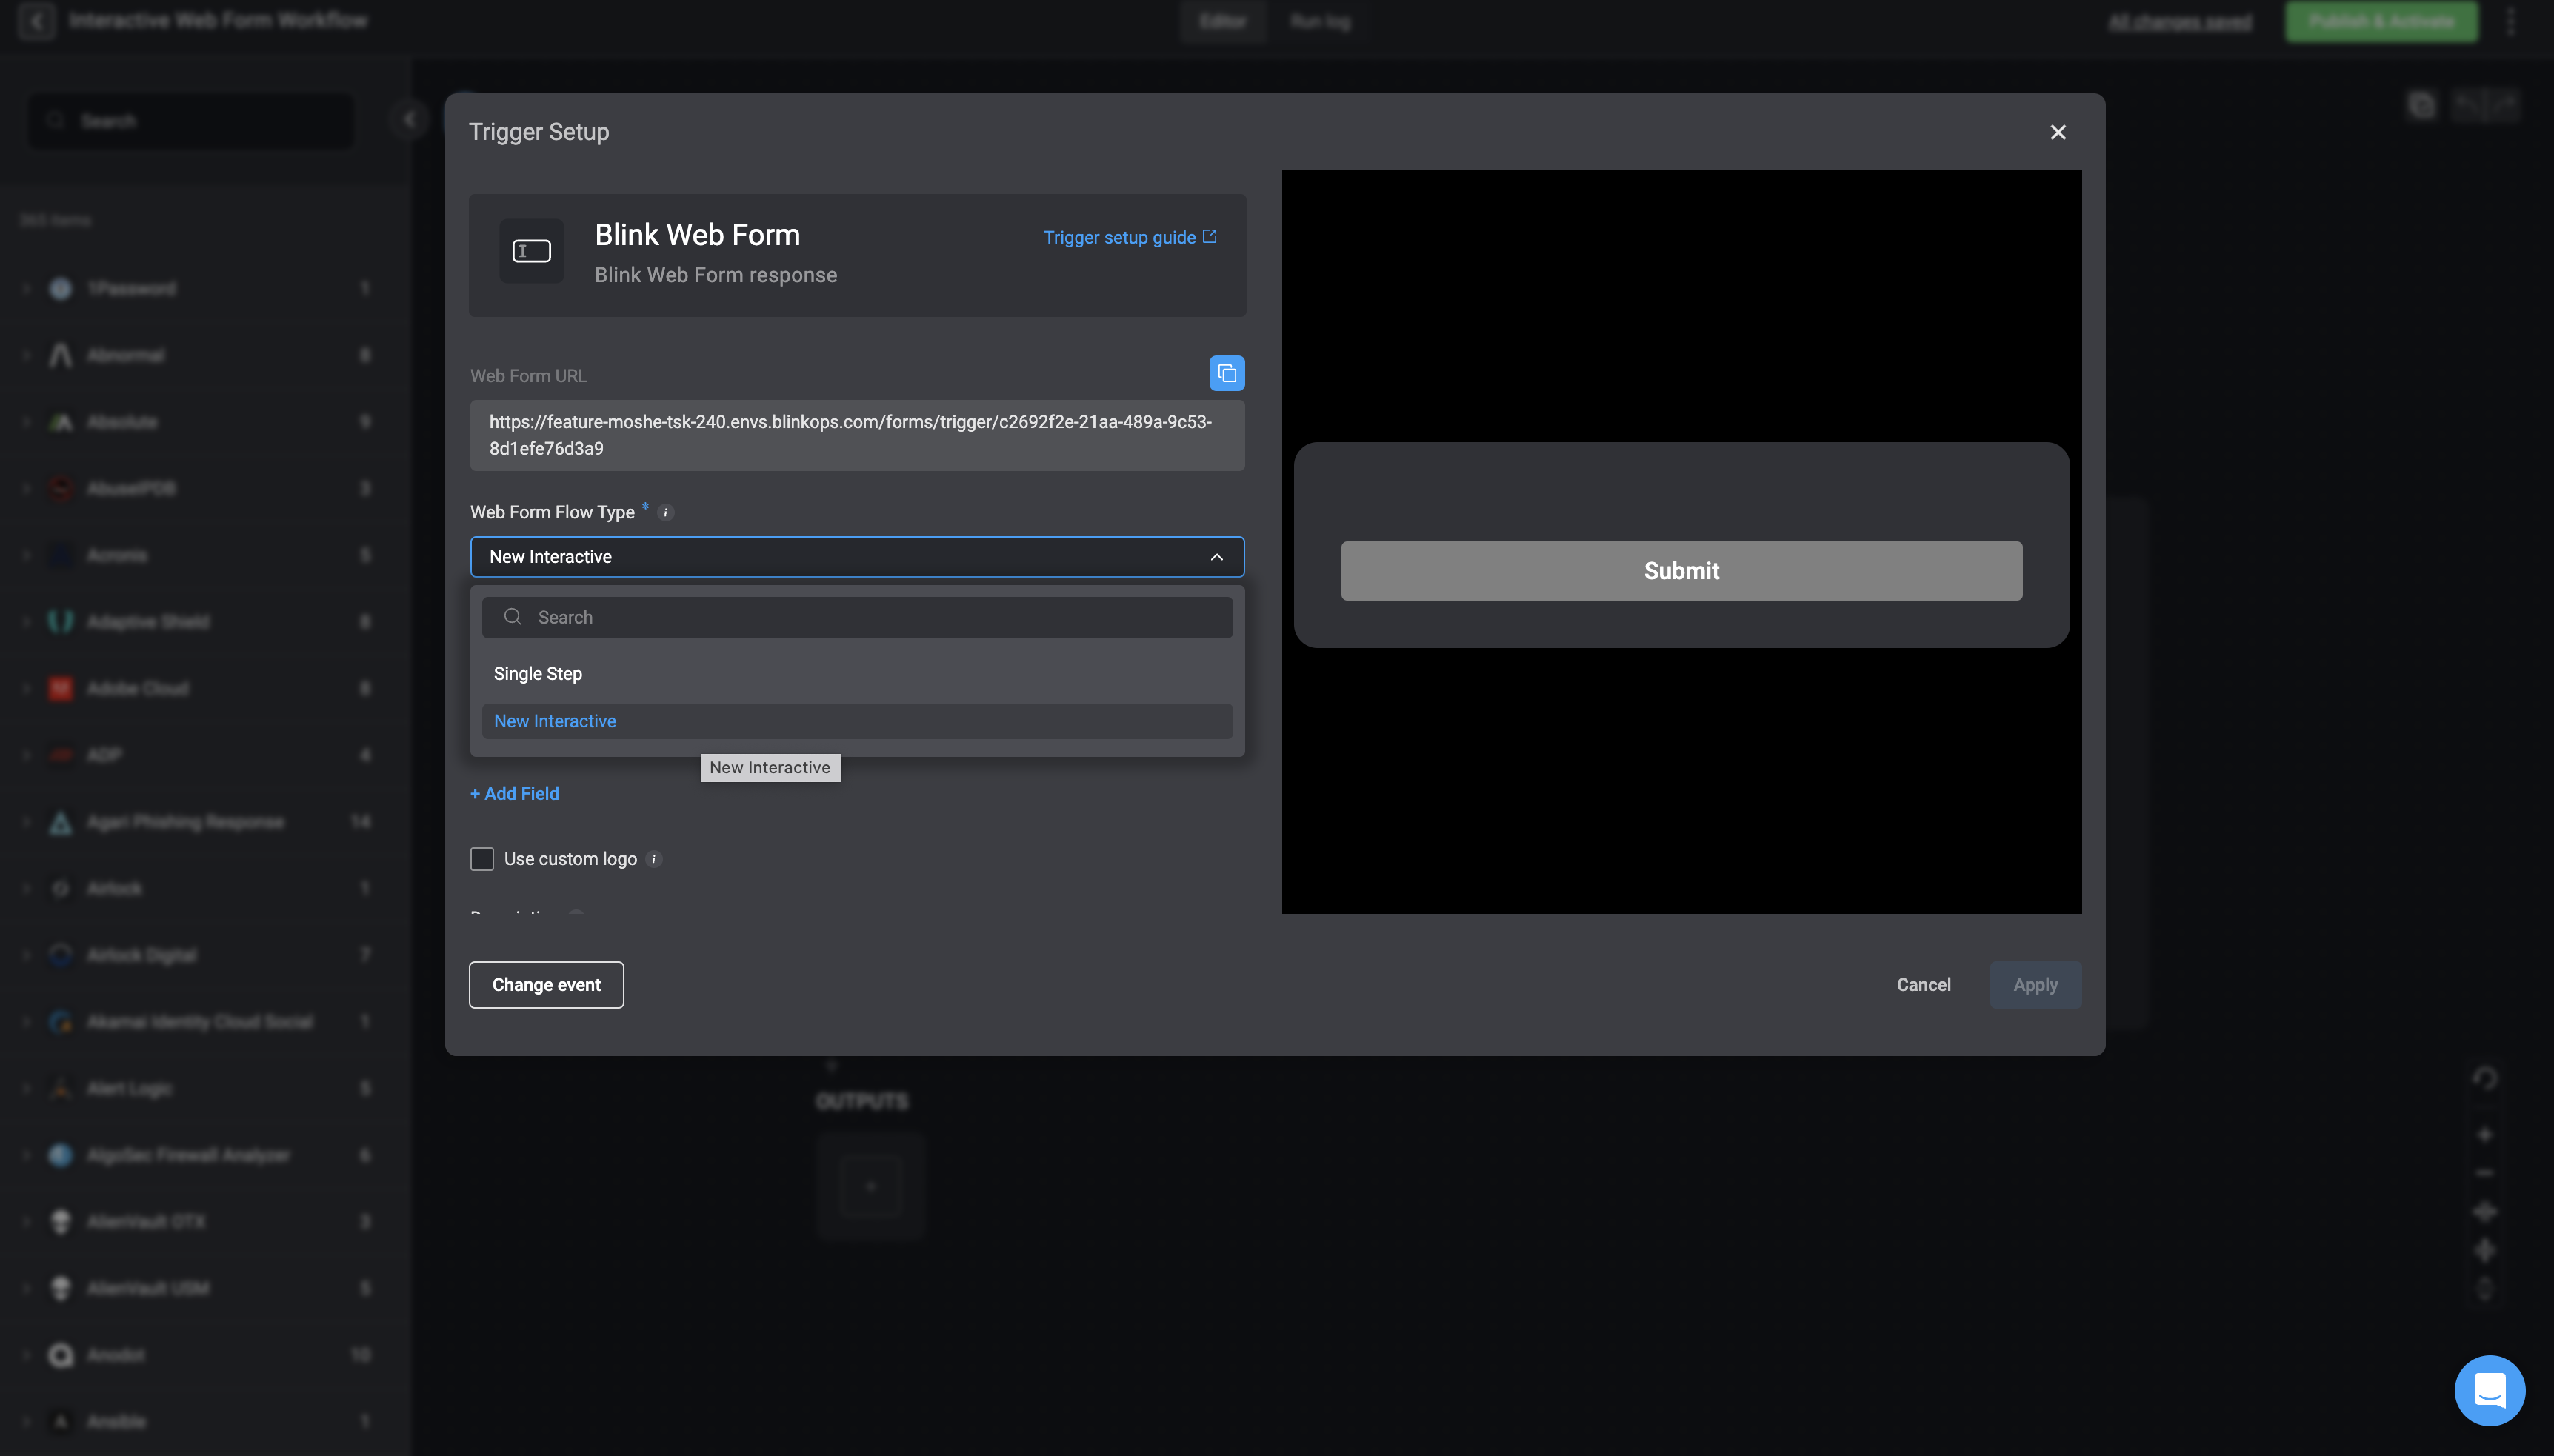
Follow steps 1-7 as outlined in the [Configure a Single Step Web Form Trigger](#configure-a-single-step-web-form-trigger) guide from the previous section. However, in step two, ensure that the *Web Form Flow Type* is set to 'New interactive'.
Continue building your workflow. No further web form related step is mandatory.
***
## Configure an Interactive Web Form Trigger
Follow steps 1-7 as outlined in the [Configure a Single Step Web Form Trigger](#configure-a-single-step-web-form-trigger) guide from the previous section. However, in step two, ensure that the *Web Form Flow Type* is set to 'New interactive'.
 As part of the Workflow steps, configure **at least one more** interactive web form:
1. Add the ‘New Web Form’ action to the step
As part of the Workflow steps, configure **at least one more** interactive web form:
1. Add the ‘New Web Form’ action to the step
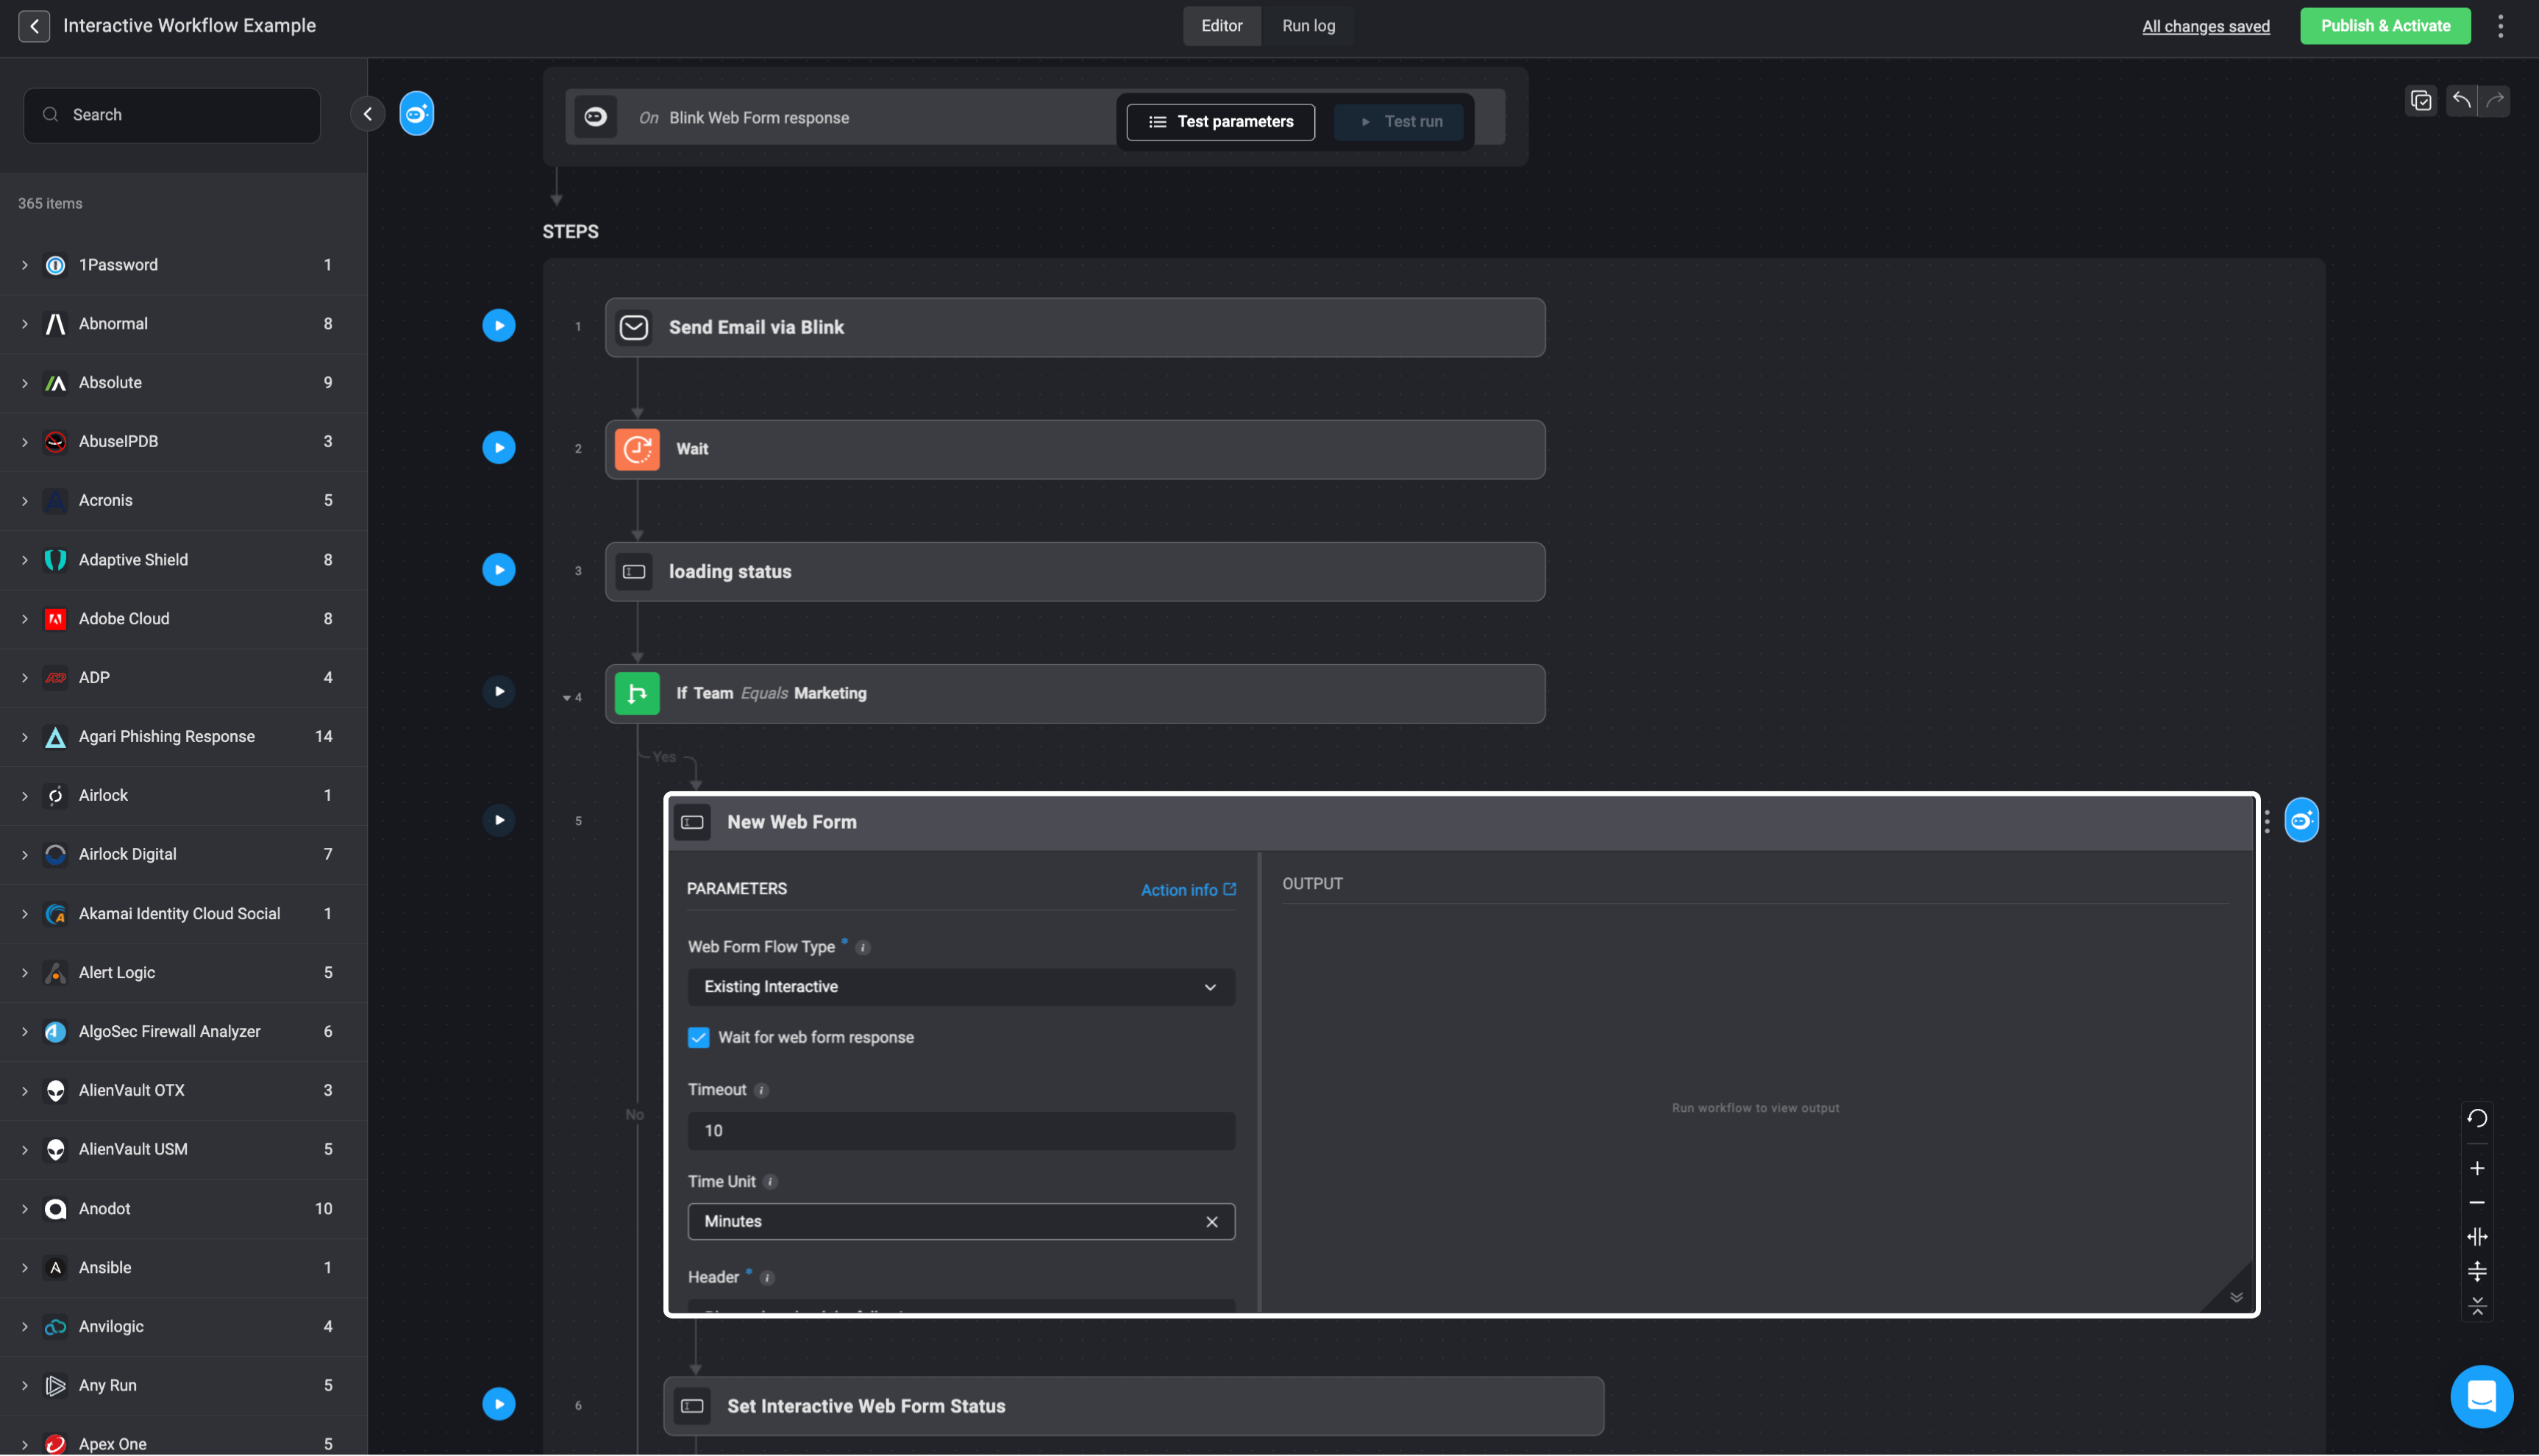 2. Set *Web Form Flow Type* as ‘Existing Interactive’
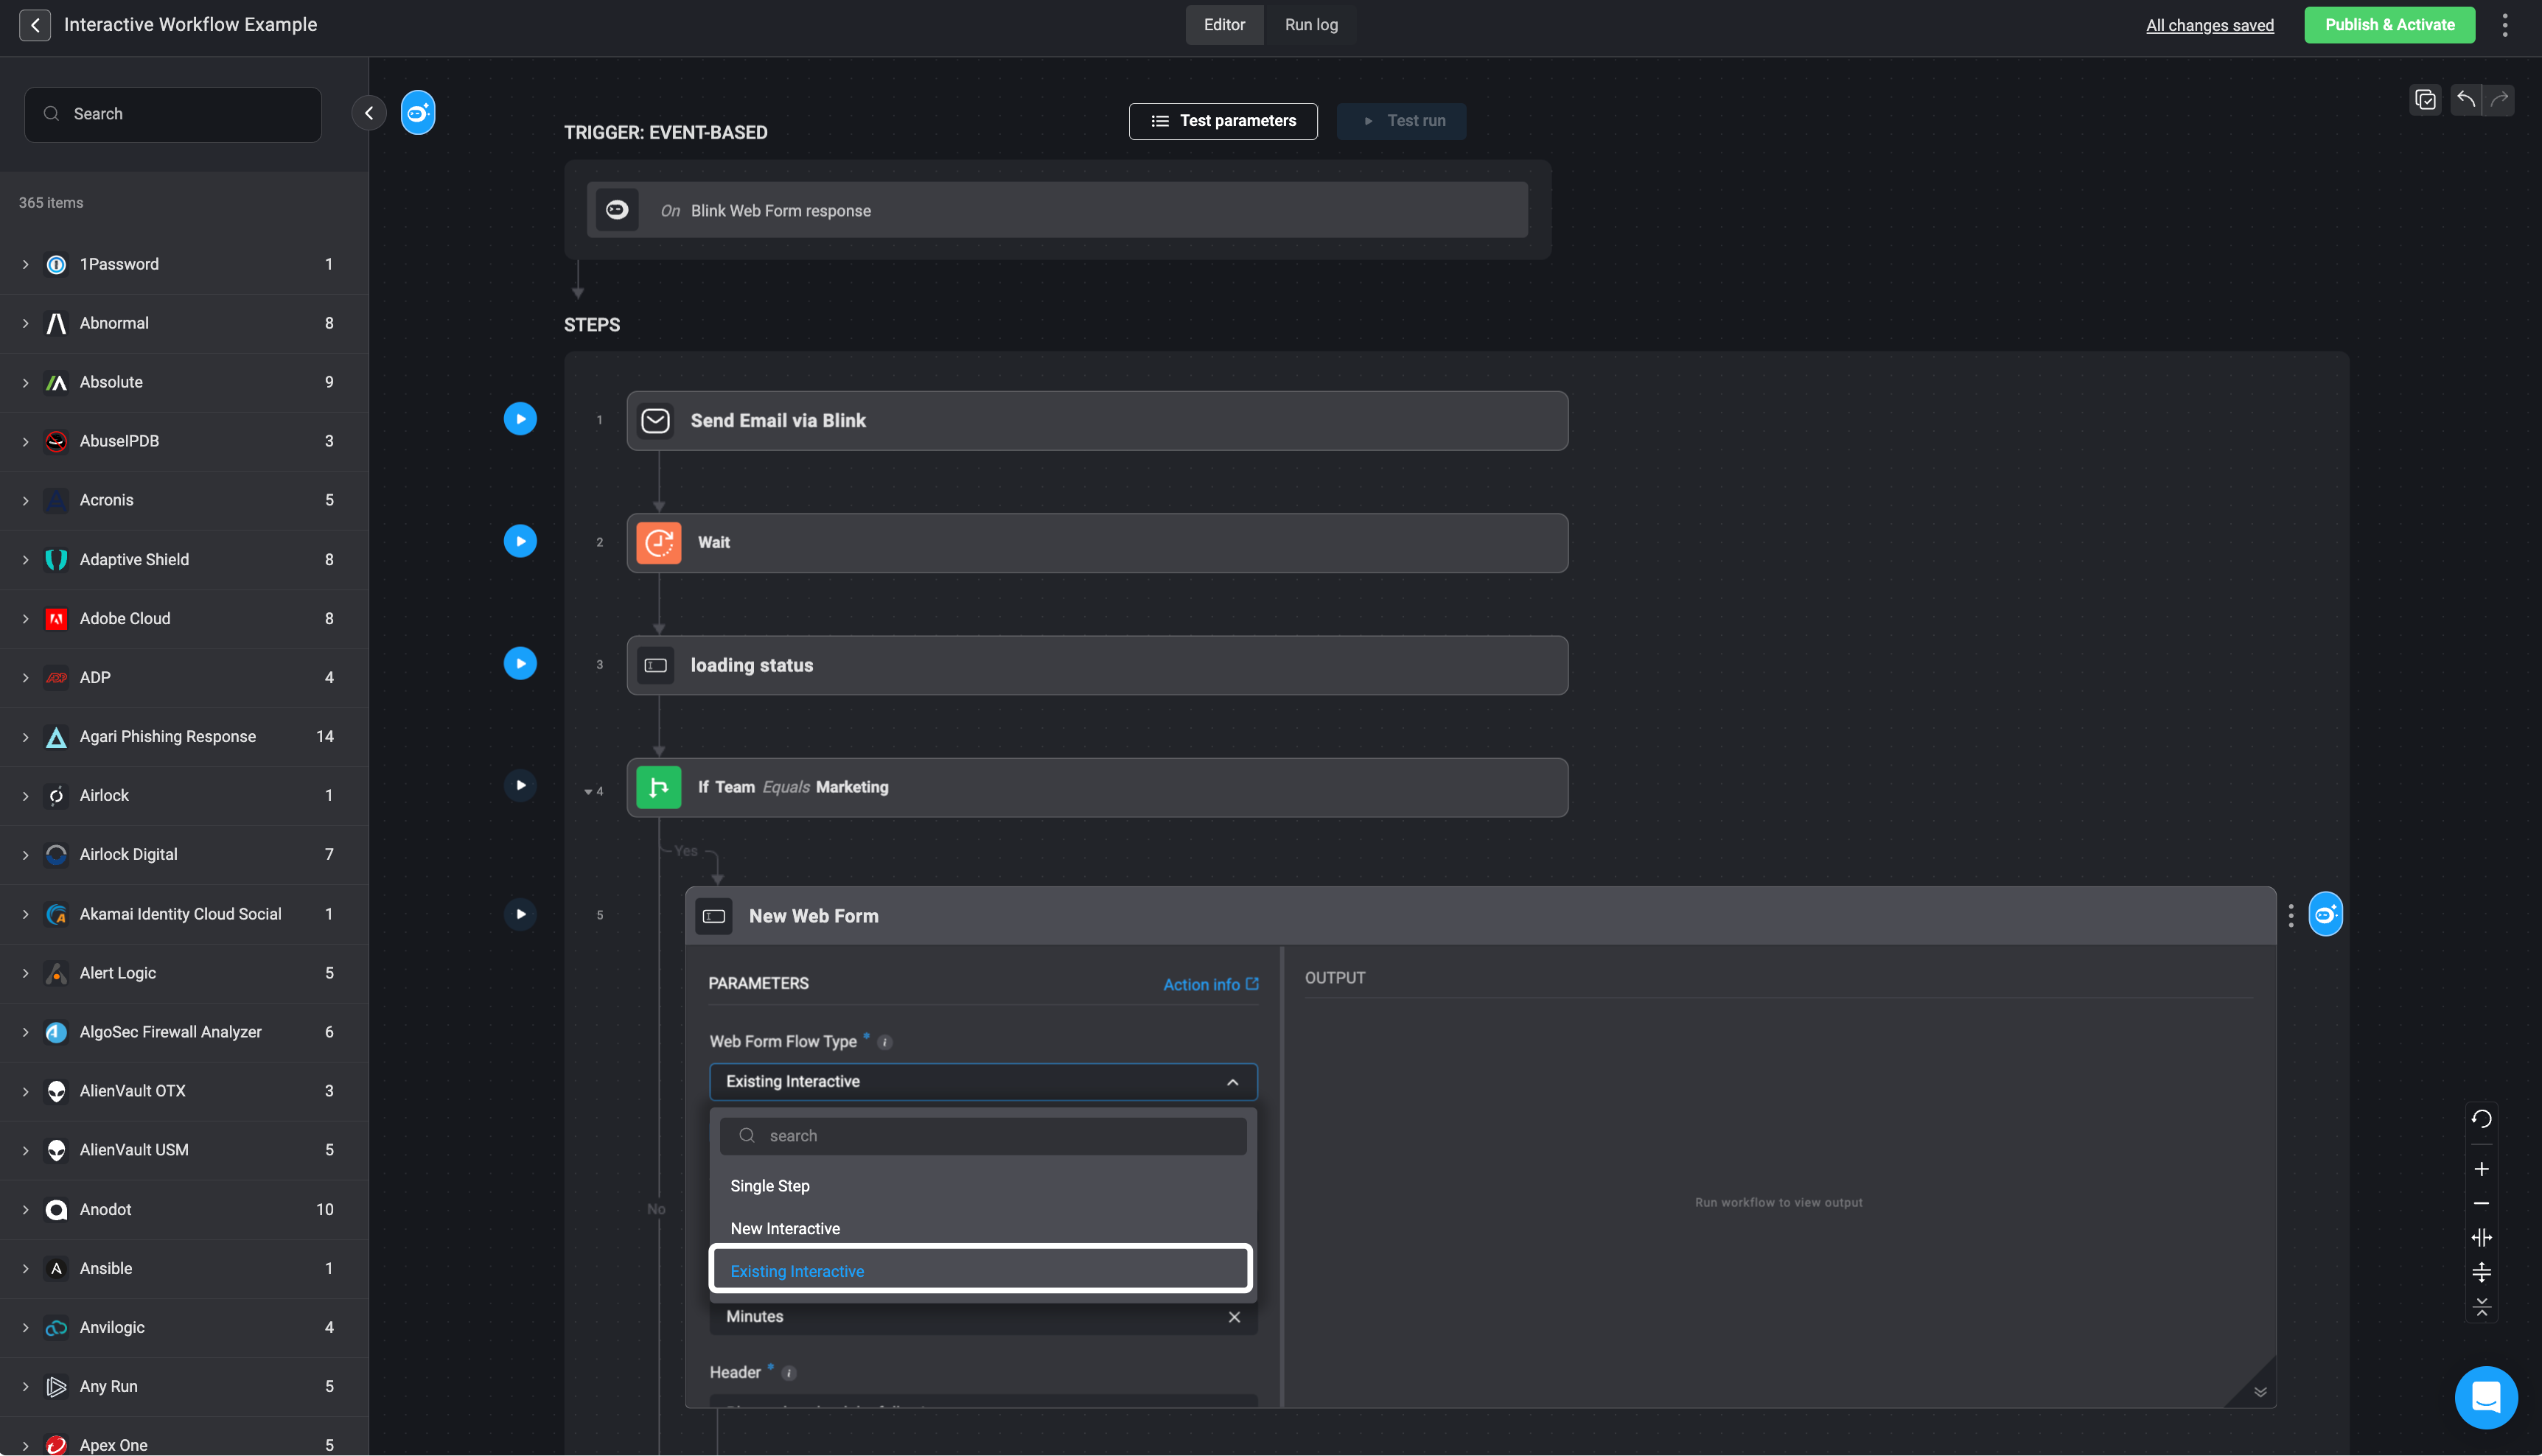 3. To force the step wait for the web form response, select the ‘Wait for web form response’ checkbox. Alternatively, you can add a subsequent [wait](/docs/workflows/building-workflows/actions/basic-actions/flow-control-actions#wait) action to a step, to wait for the web form response.
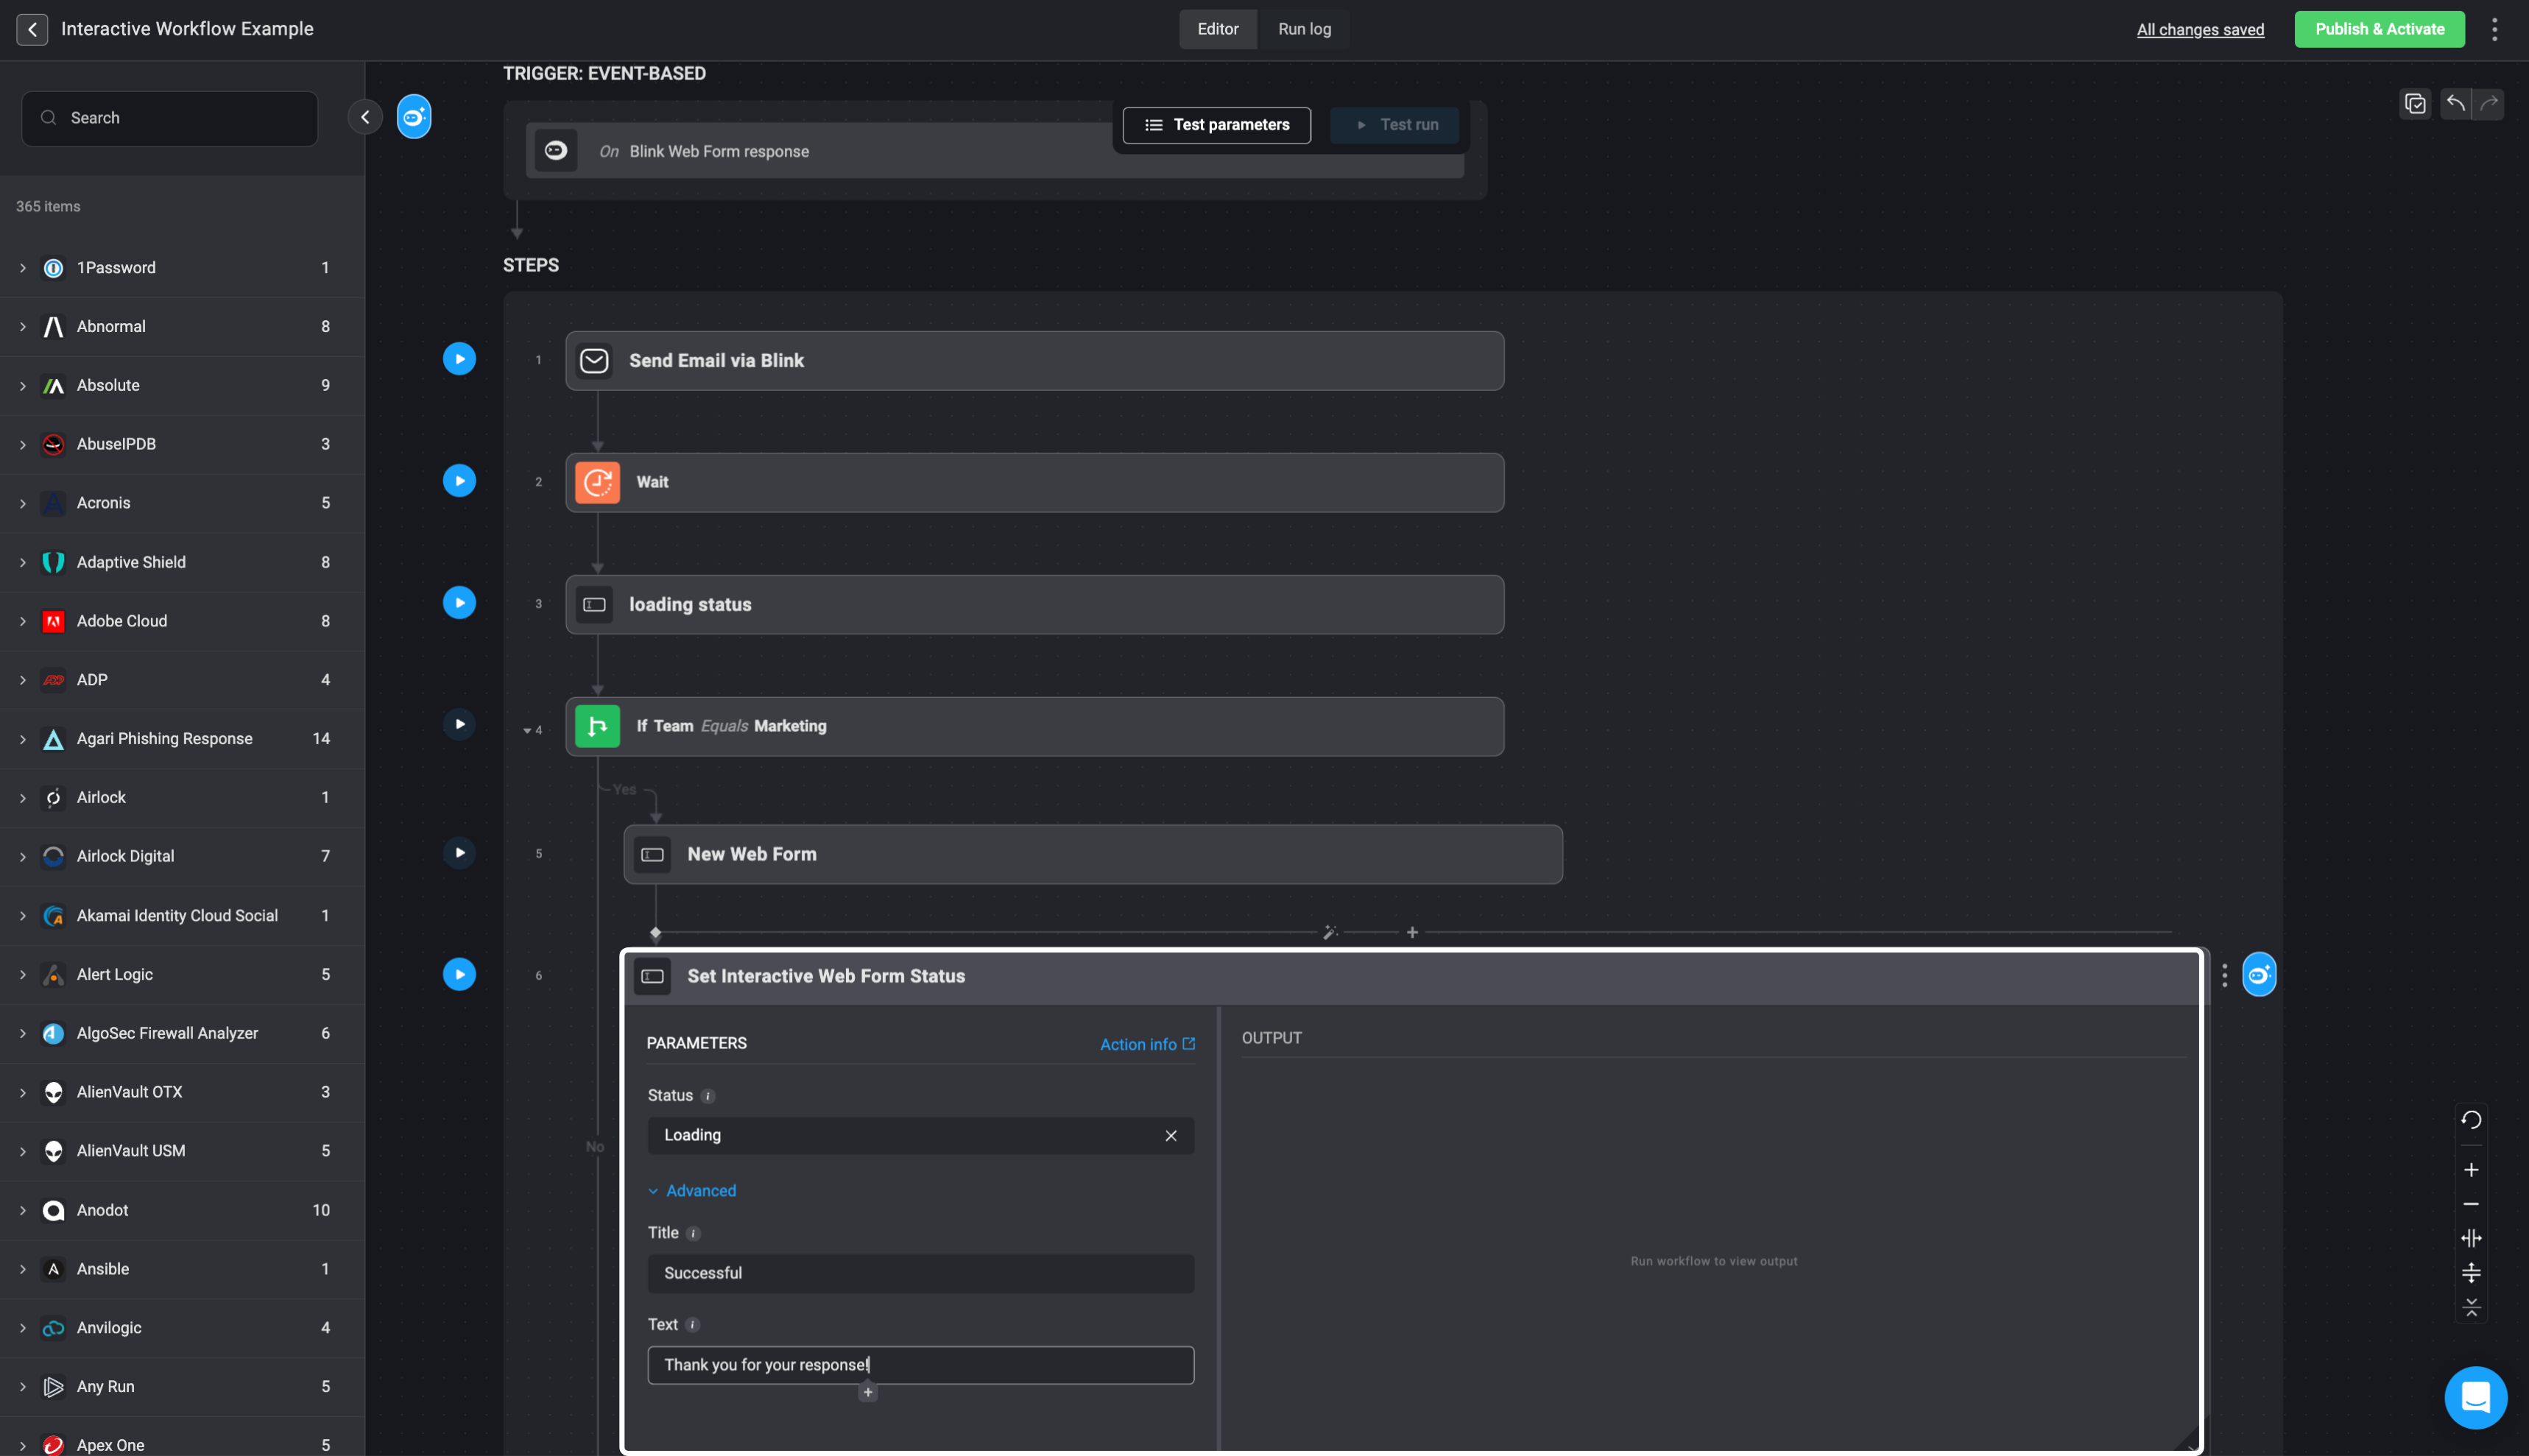
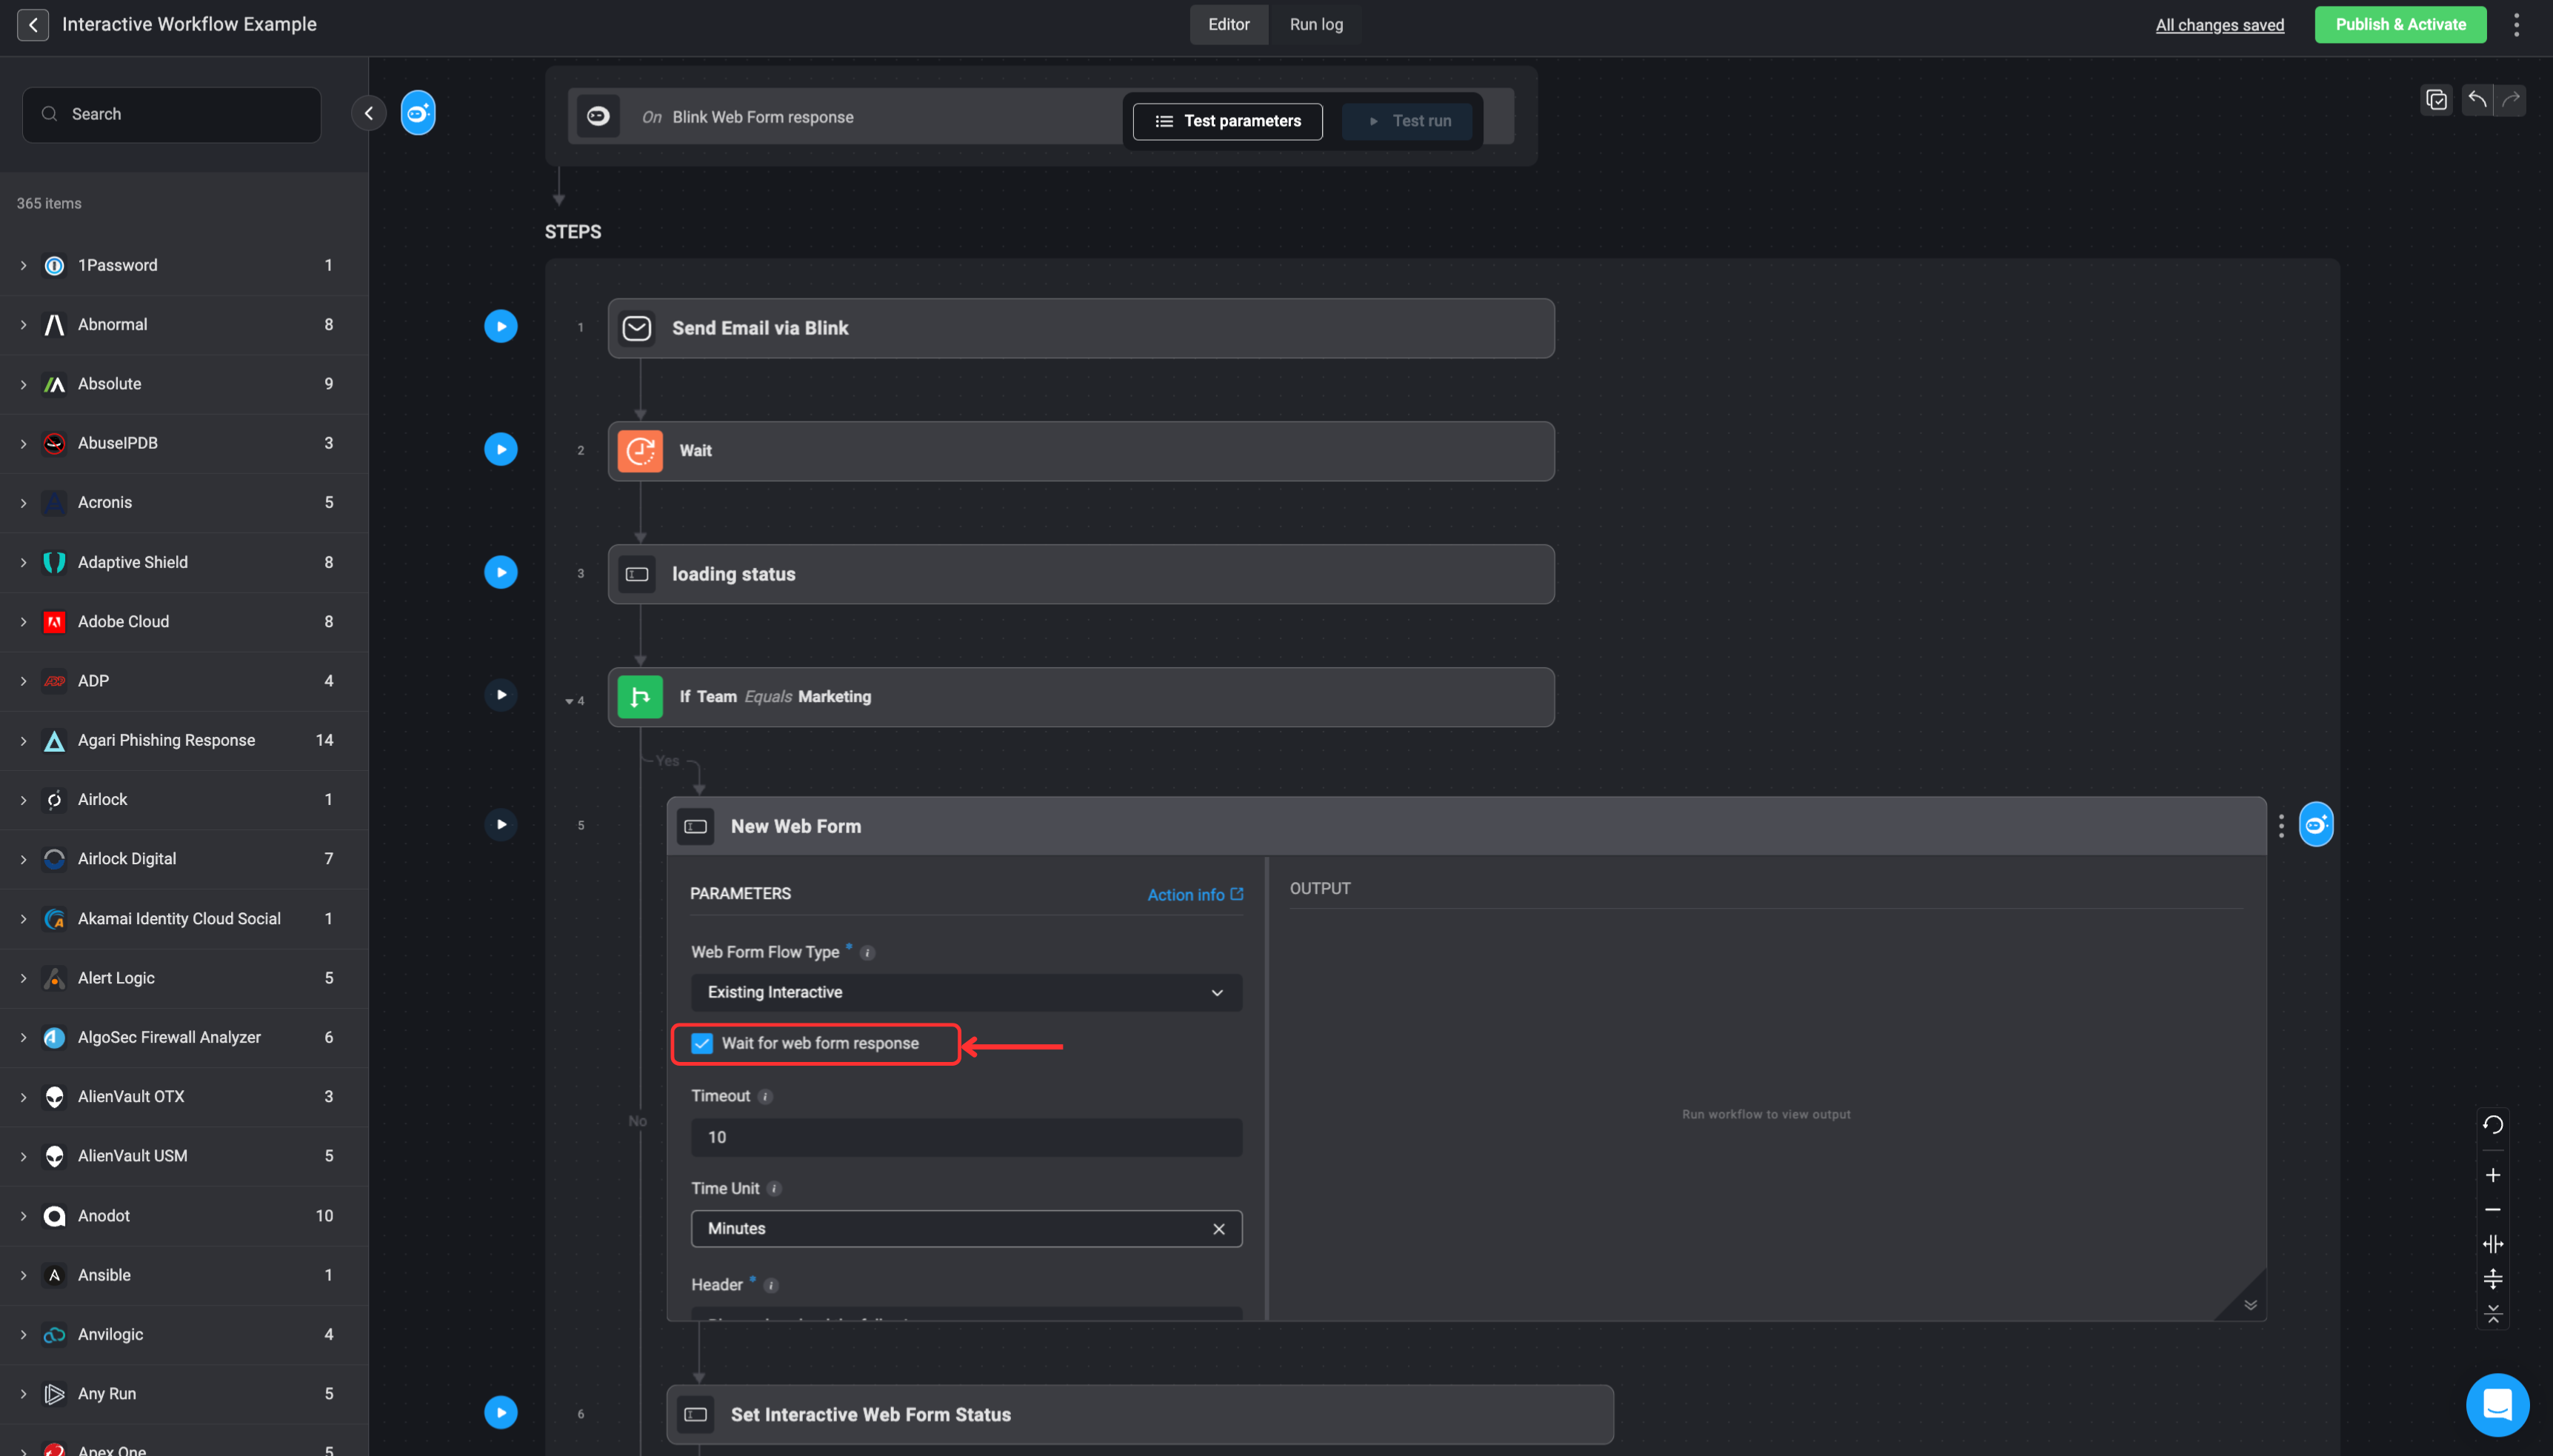 Once a web form is submitted, a default ‘processing’ status is displayed to indicate that the input is being handled. If the workflow includes additional forms, the next form in the sequence will be shown. Upon submission of the final form, a default success or failure message is displayed based on the outcome of the workflow's response processing.
You can customize the status response. Visit the ["Set Interactive Web Form Status" Section](#set-interactive-web-form-status) to learn how.
Once a web form is submitted, a default ‘processing’ status is displayed to indicate that the input is being handled. If the workflow includes additional forms, the next form in the sequence will be shown. Upon submission of the final form, a default success or failure message is displayed based on the outcome of the workflow's response processing.
You can customize the status response. Visit the ["Set Interactive Web Form Status" Section](#set-interactive-web-form-status) to learn how.
 ***
## Testing Web Form Trigger
In the following use case example, we are testing a Web Form Trigger with a single step web form flow type.
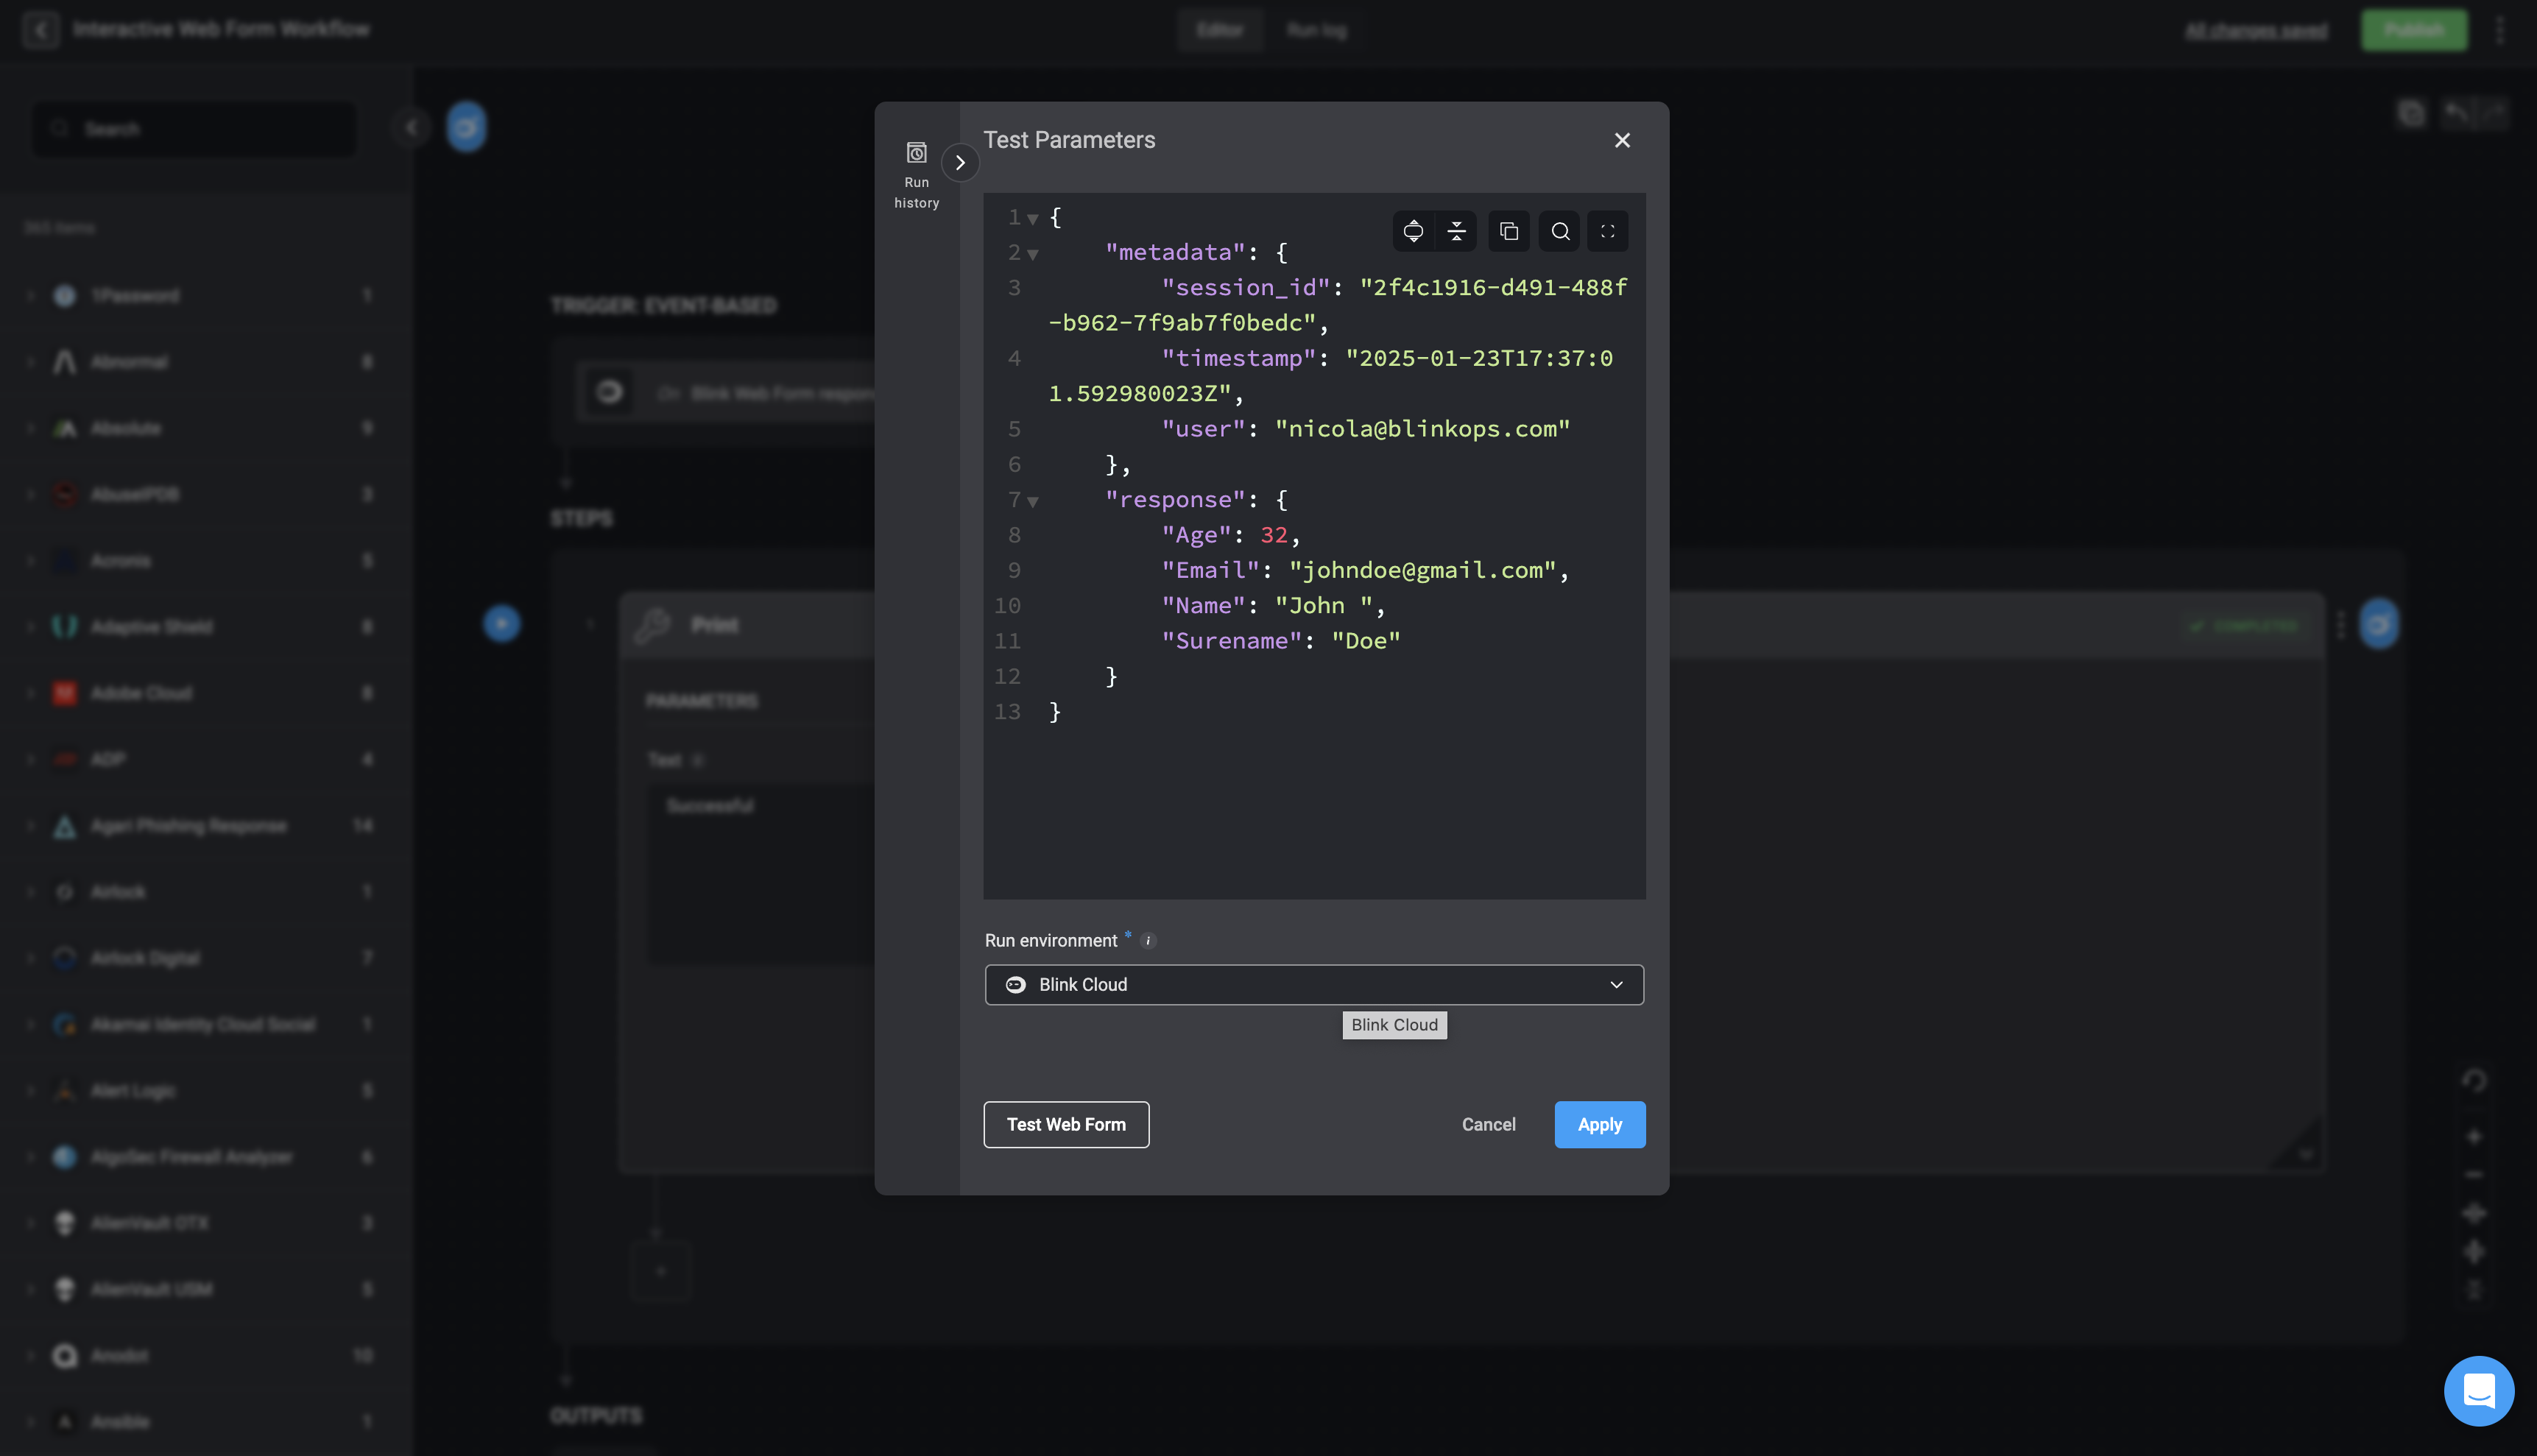
Click the "Test Parameters" button.
***
## Testing Web Form Trigger
In the following use case example, we are testing a Web Form Trigger with a single step web form flow type.
Click the "Test Parameters" button.
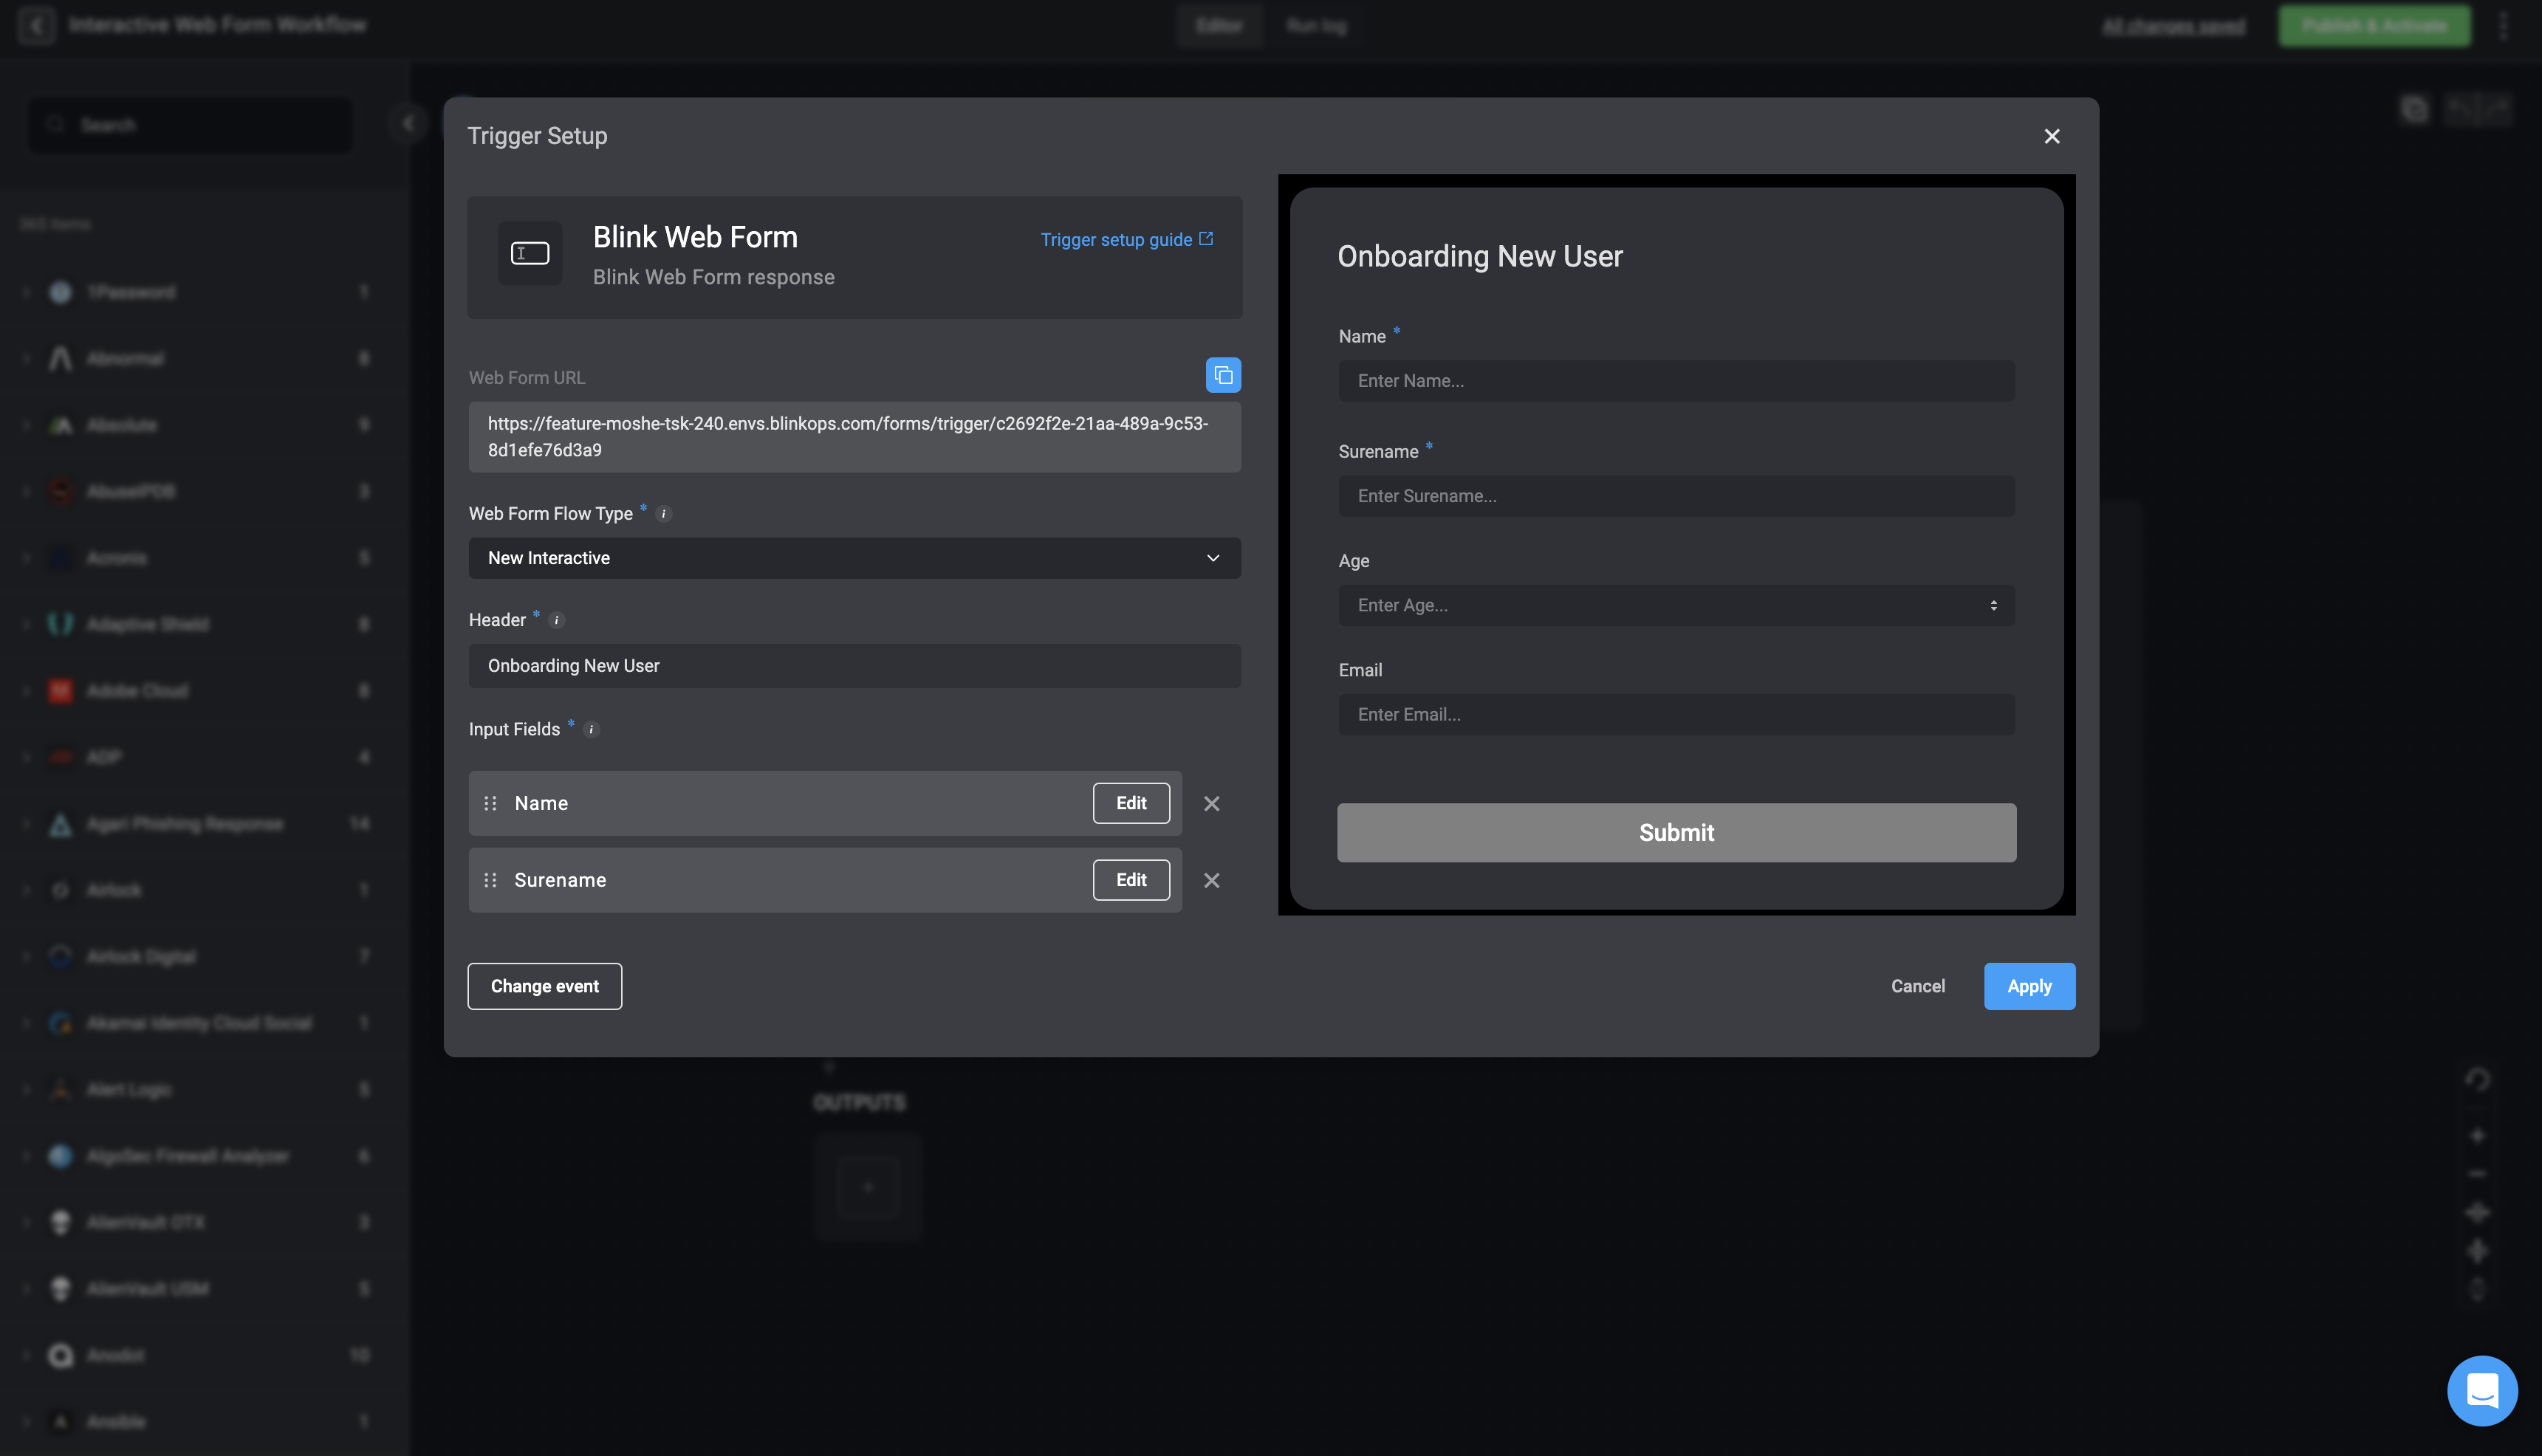 Click the "Test Web Form" button in the bottom-left corner.
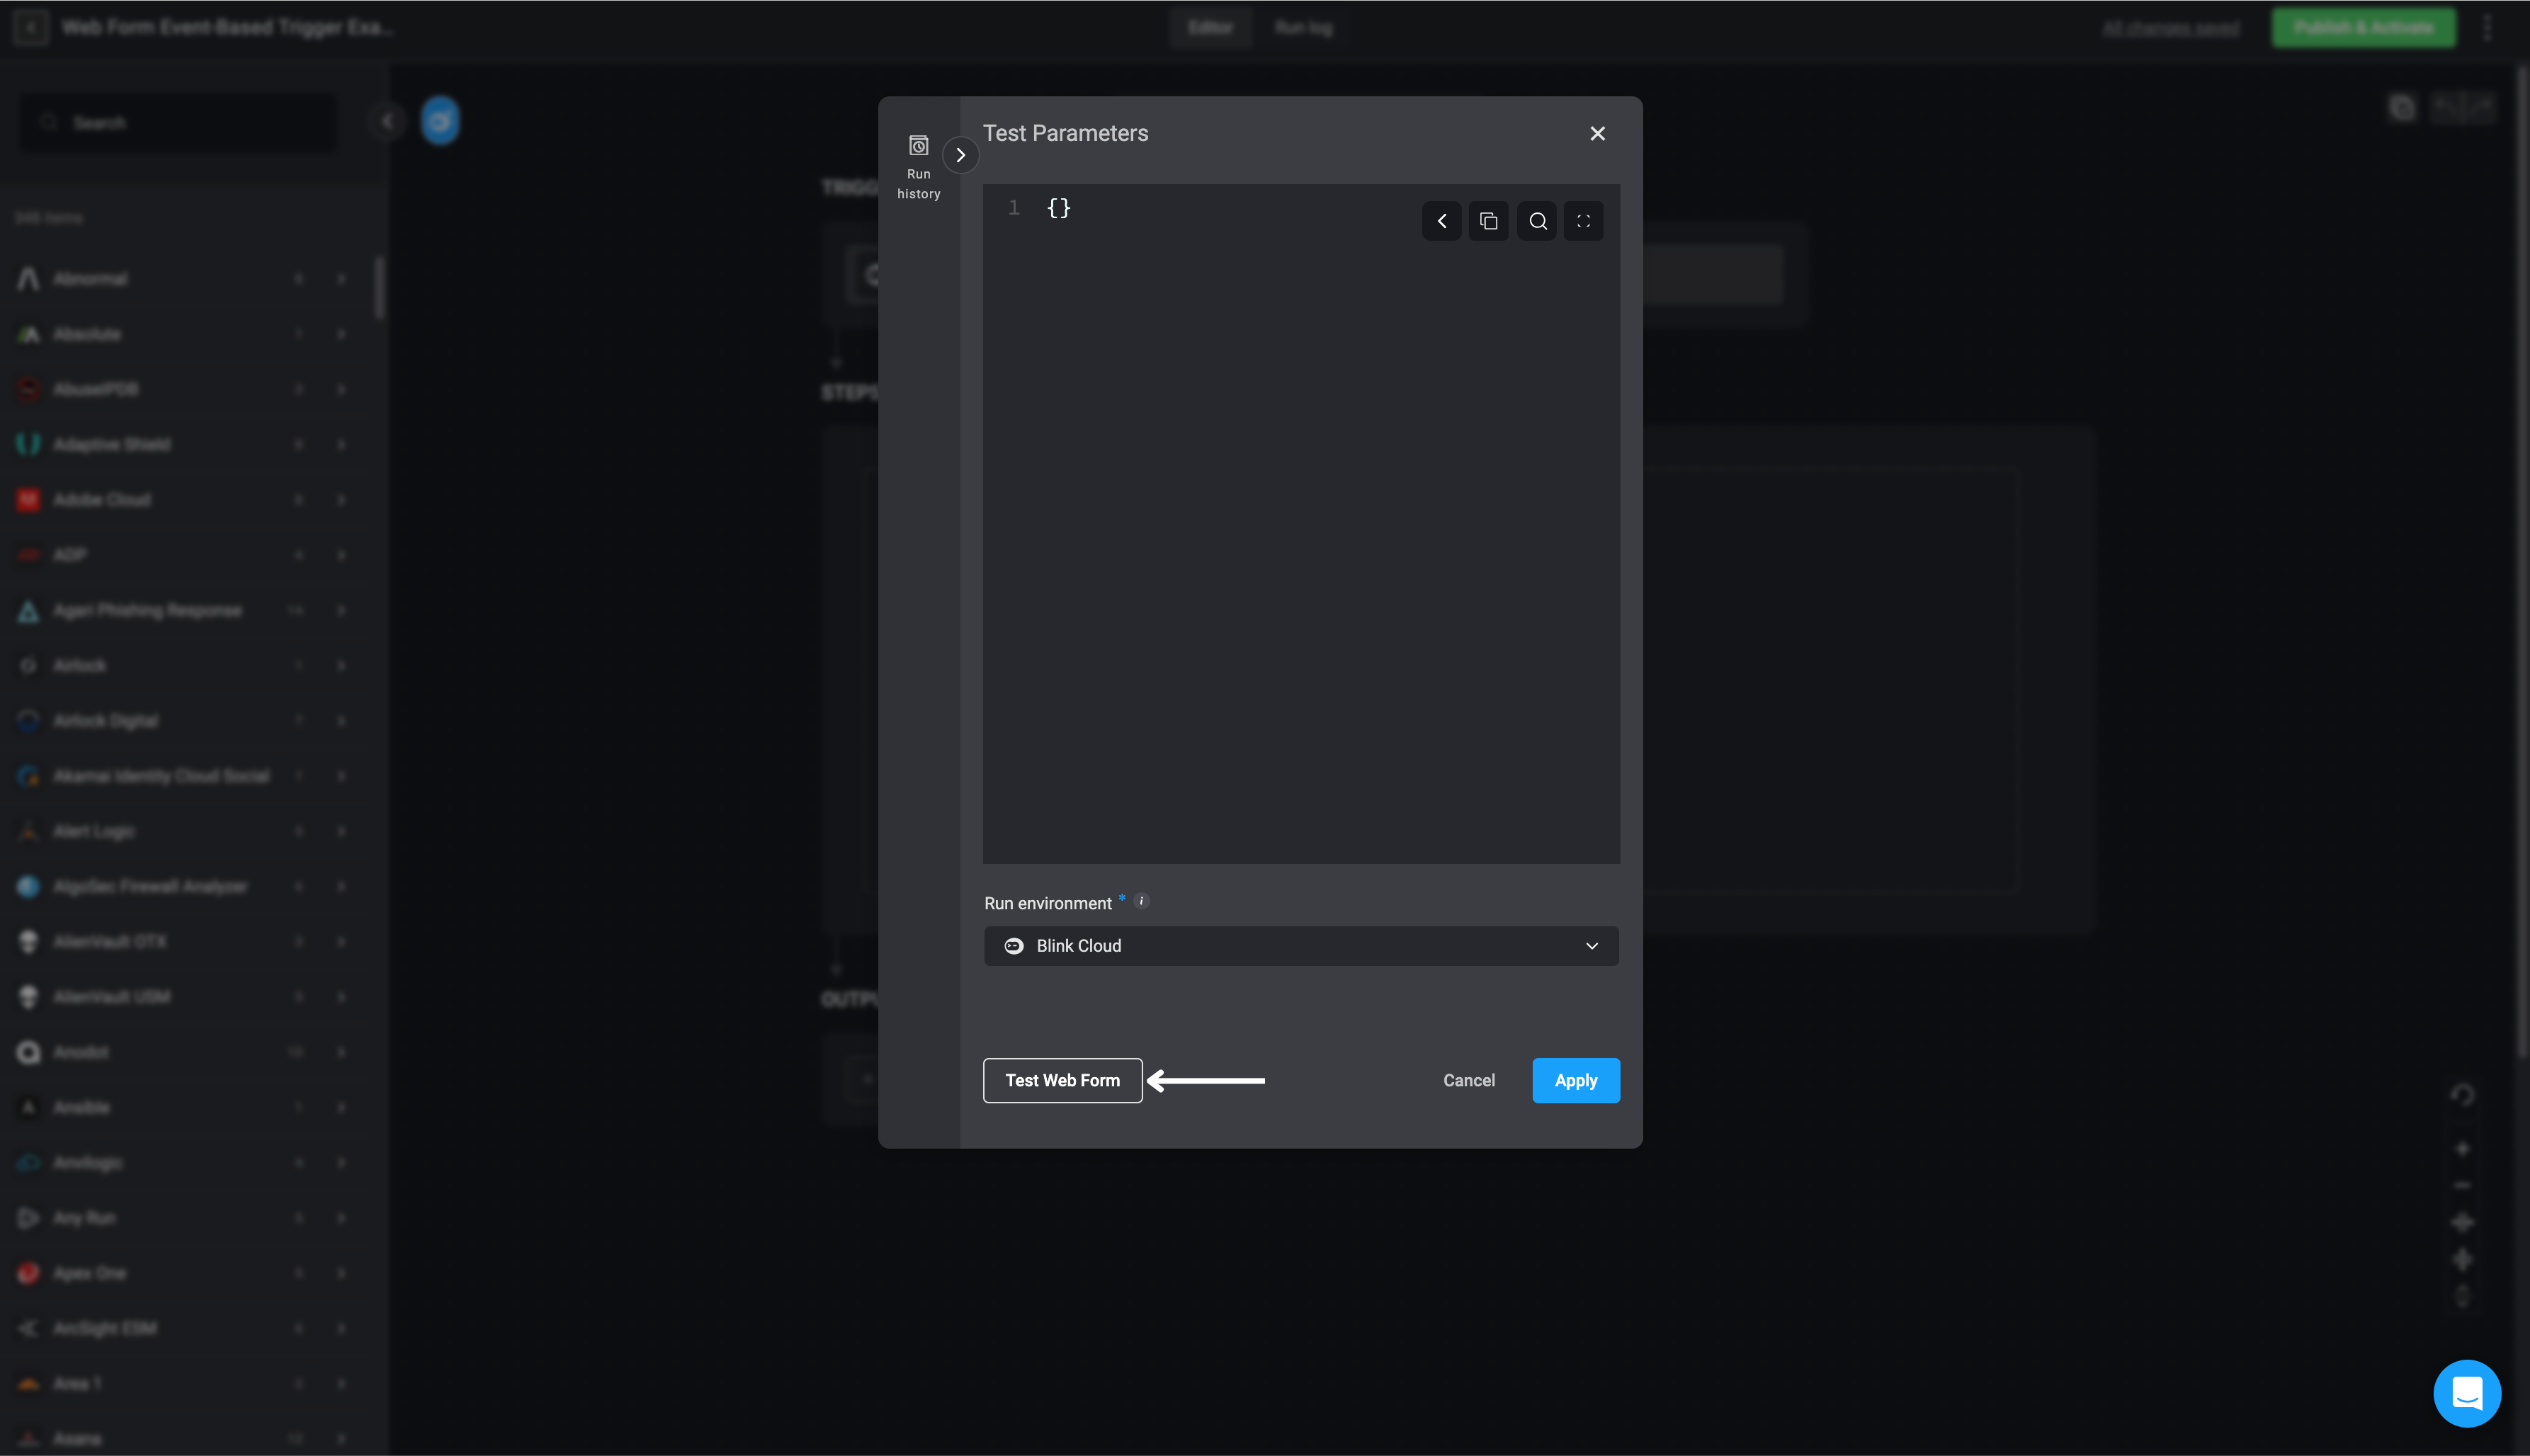 A new browser tab will open, displaying the Web Form you just created. Fill out the form and click Submit.
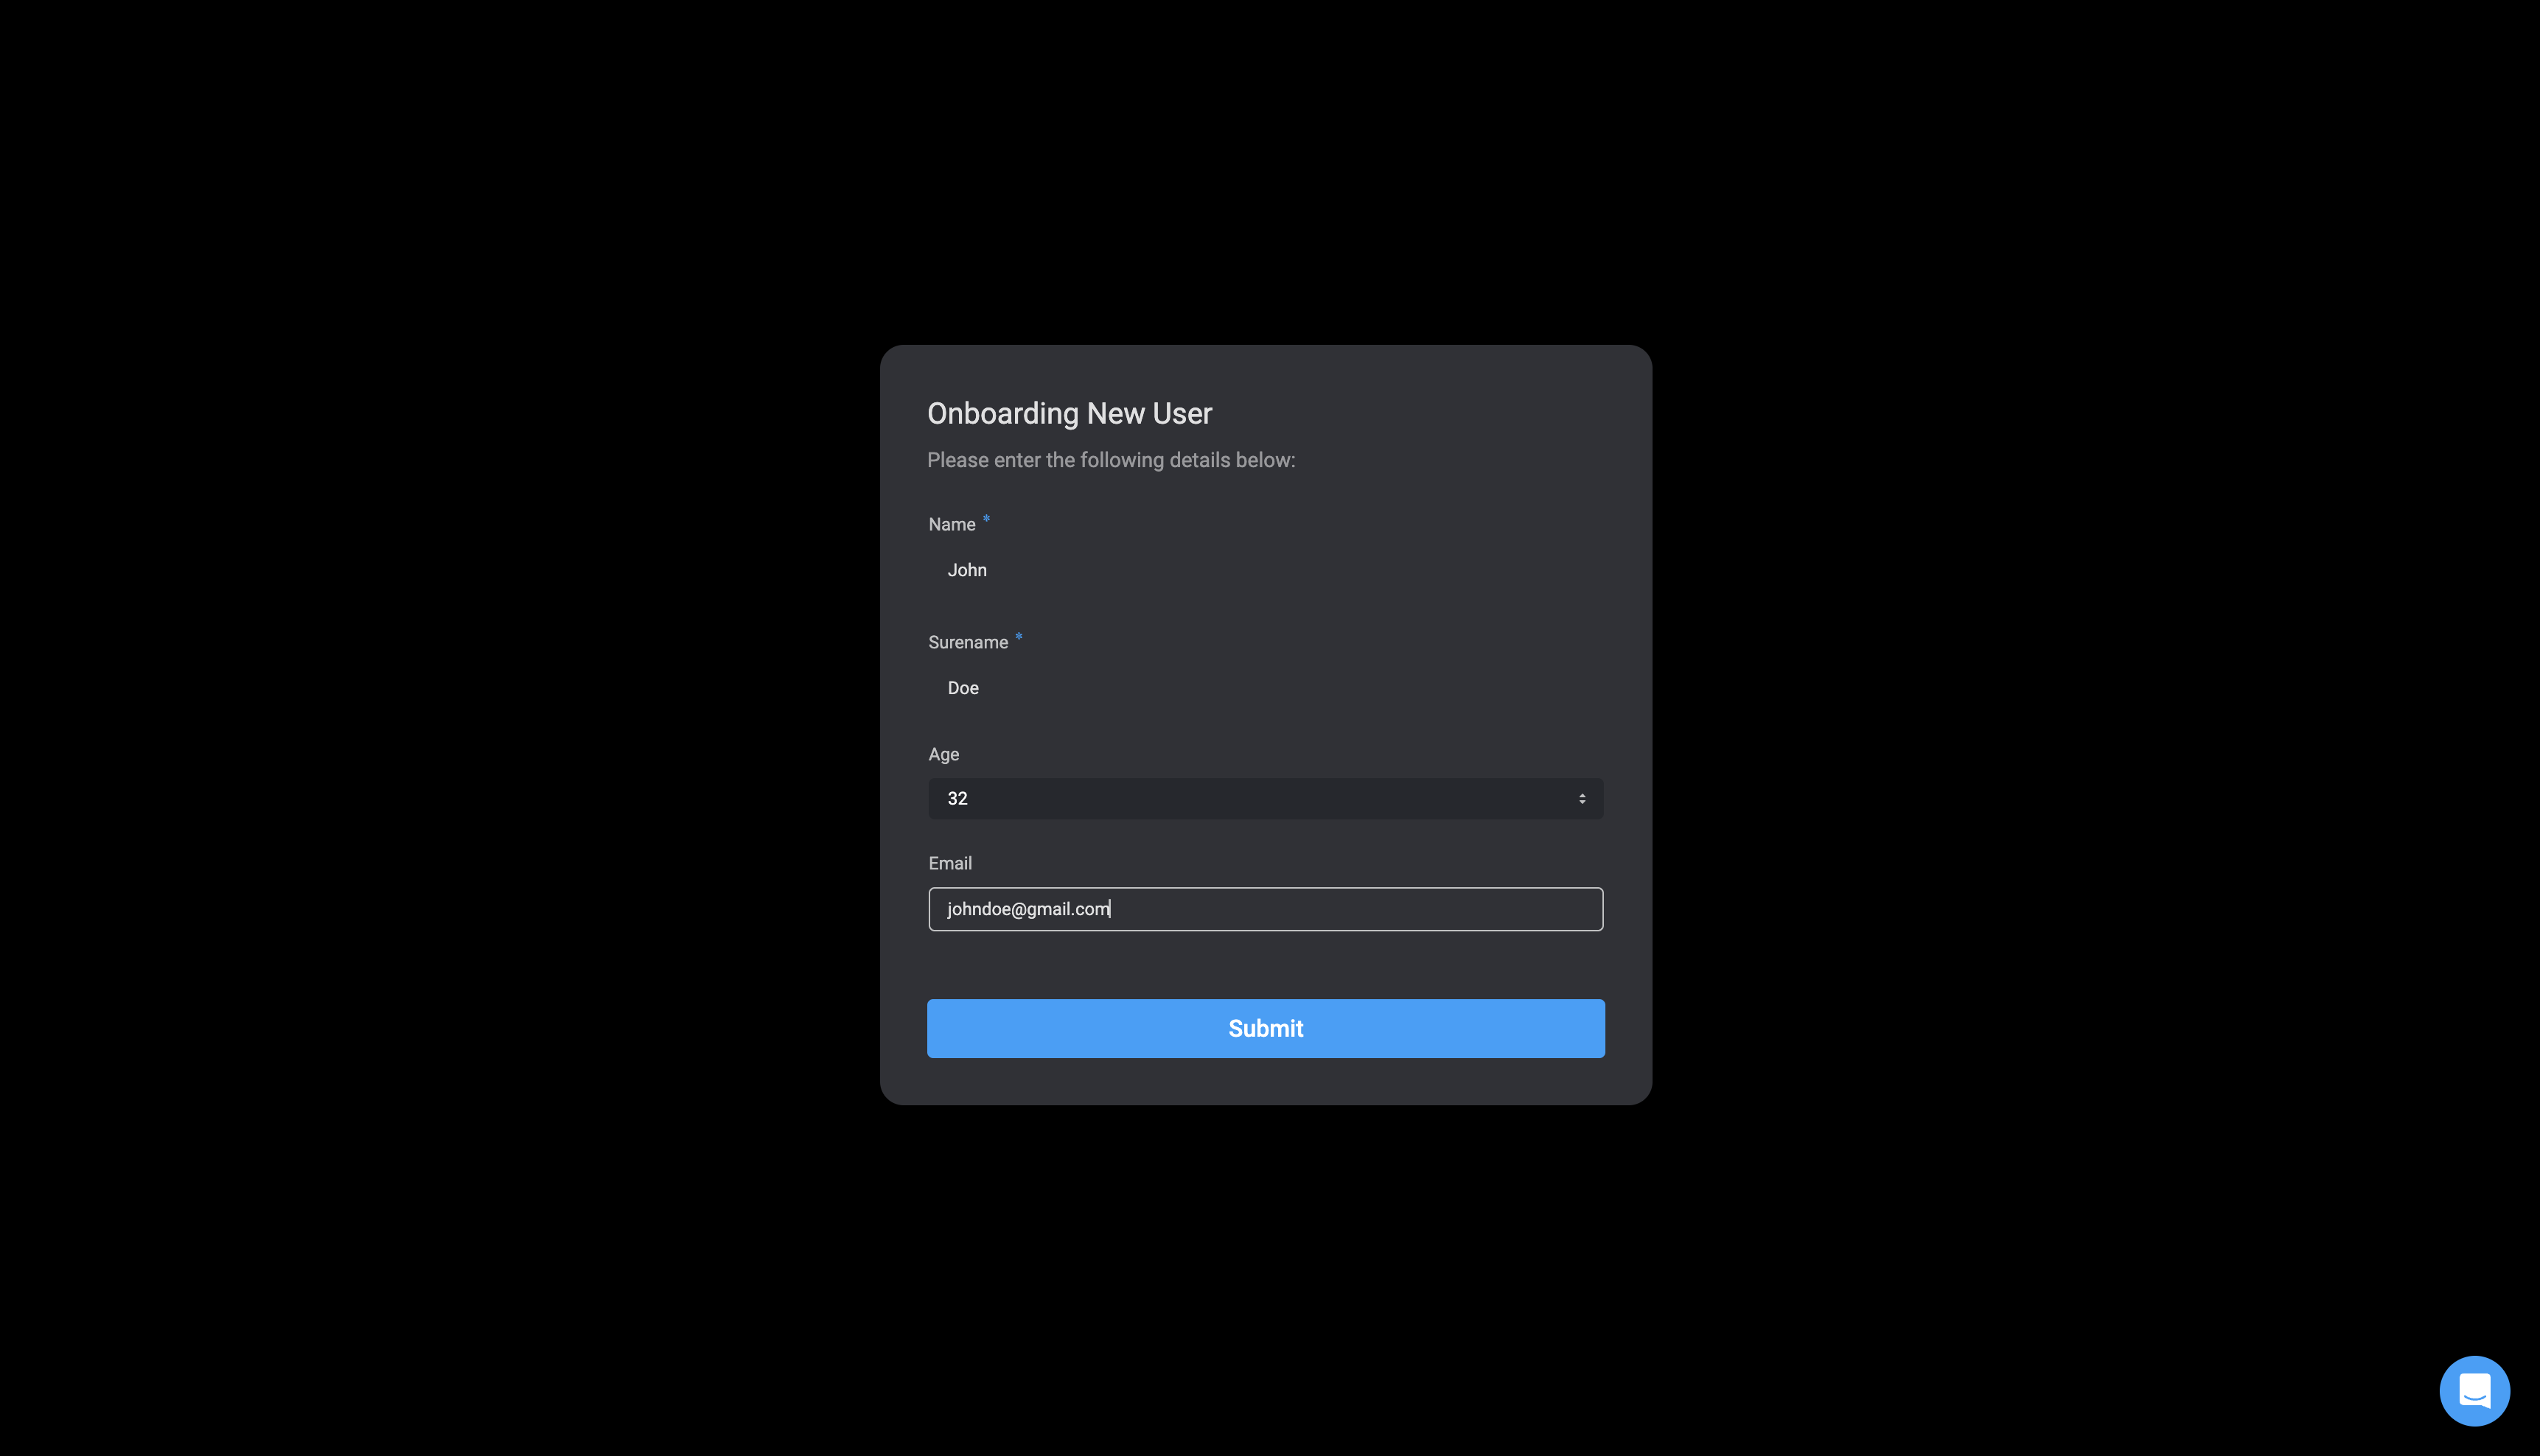 Return to the Test Parameters popup, where you can review the information you entered in the form.