> ## Documentation Index
> Fetch the complete documentation index at: https://docs.blinkops.com/llms.txt
> Use this file to discover all available pages before exploring further.
# Viewing Tables
> Blink Tables allows for basic and advanced view changes, to allow filtering, sorting, ordering and browsing the table records.
## Supported Viewing Capabilities Include:
1. [Sorting](#sorting-table-records)
2. [Filtering (including advanced filtering)](#filtering-table-records)
3. [Changing fields order](#changing-fields-order)
4. [Hiding/Exposing fields](#hiding-and-exposing-fields)
5. [Pagination](#table-pagination)
6. [Copying a cell's value](#copying-a-cells-value)
7. [Changing the table field's width](#changing-the-table-fields-width)
8. [Table Views](#table-views)
***
## Sorting Table Records
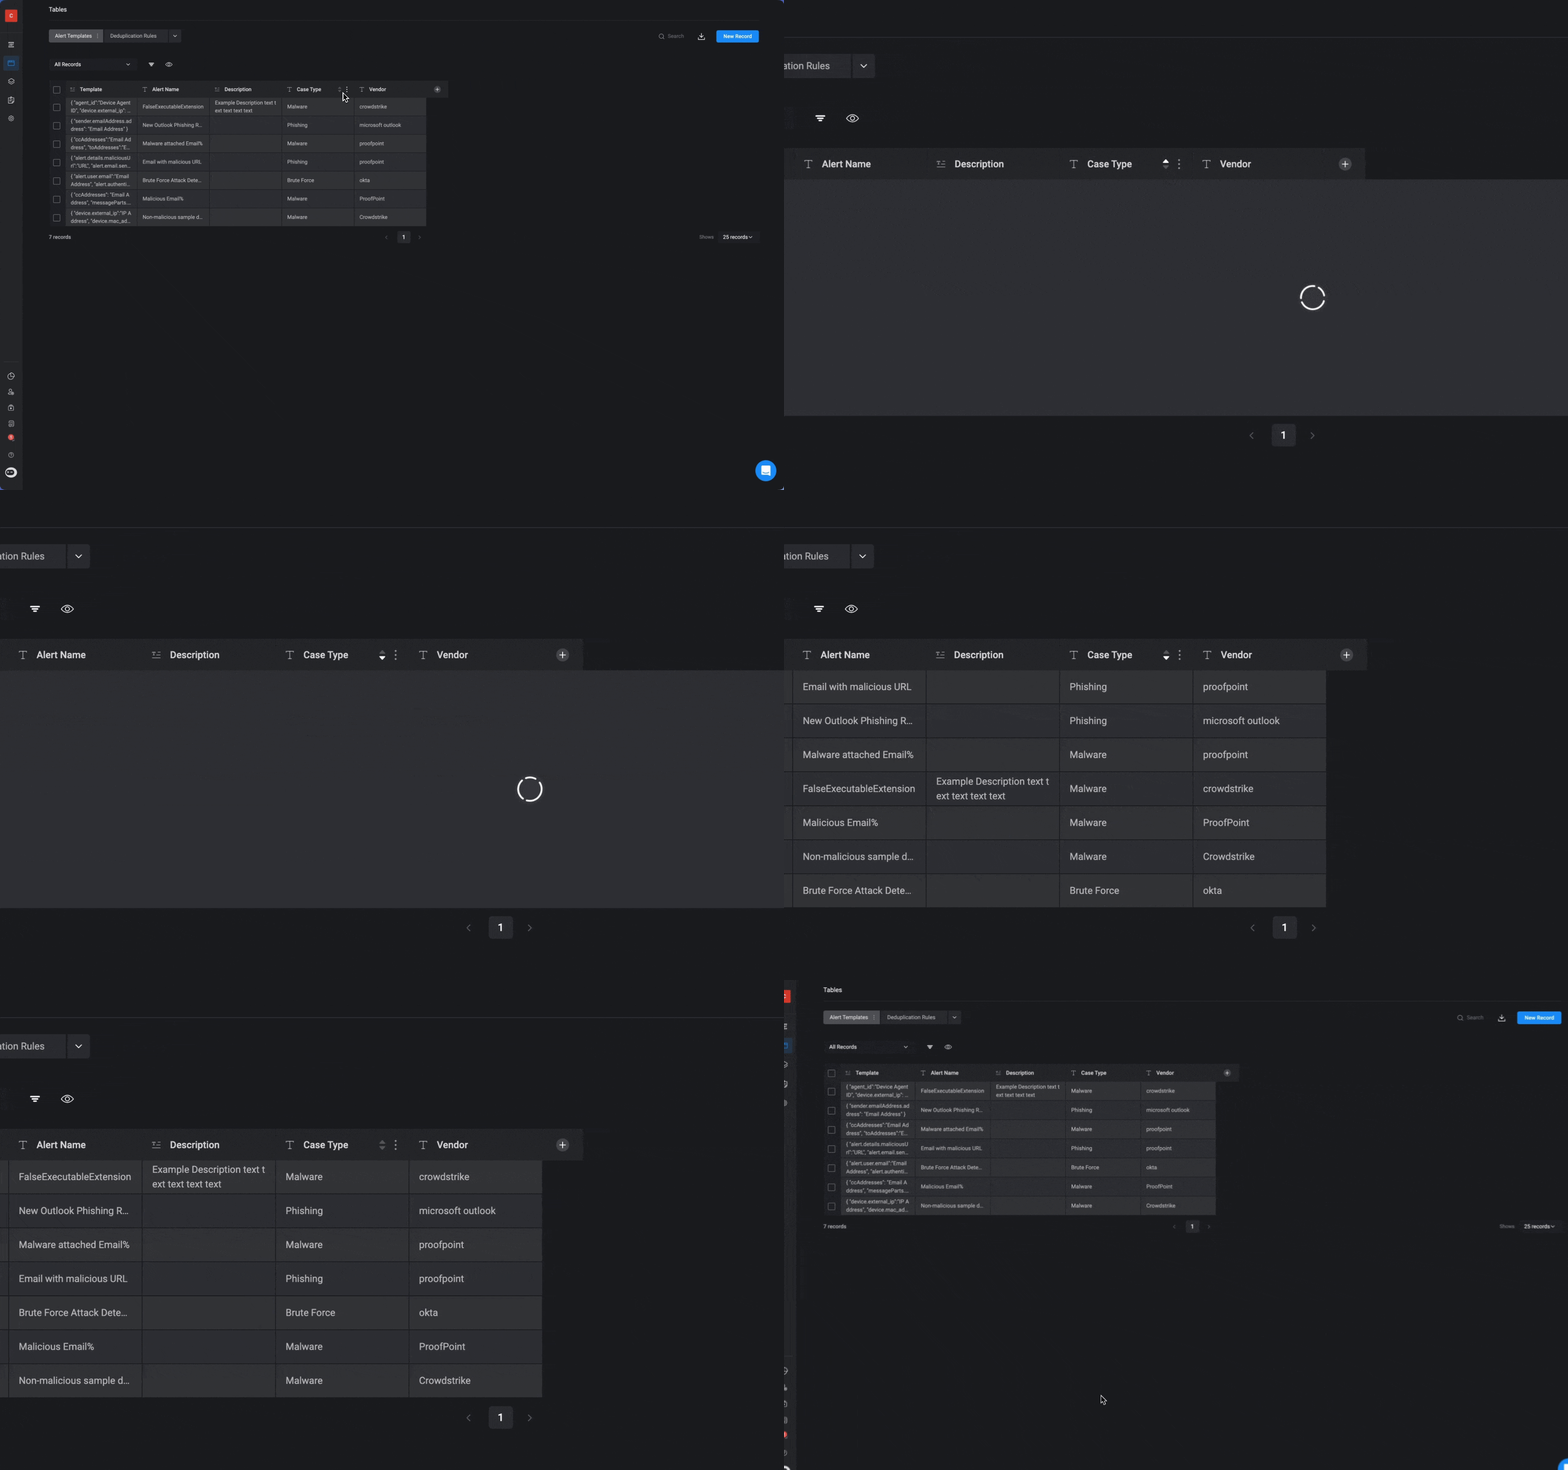
When you hover over a field header, the up and down arrow icons indicate the sorting option.
The default sorting of the table is done according to the record creation time.
* The first click will trigger a sort in descending order.
* The second click will trigger a sort in the ascending order.
* The third click will return the sorting to be as it was before the first click.
 ***
## Filtering Table Records
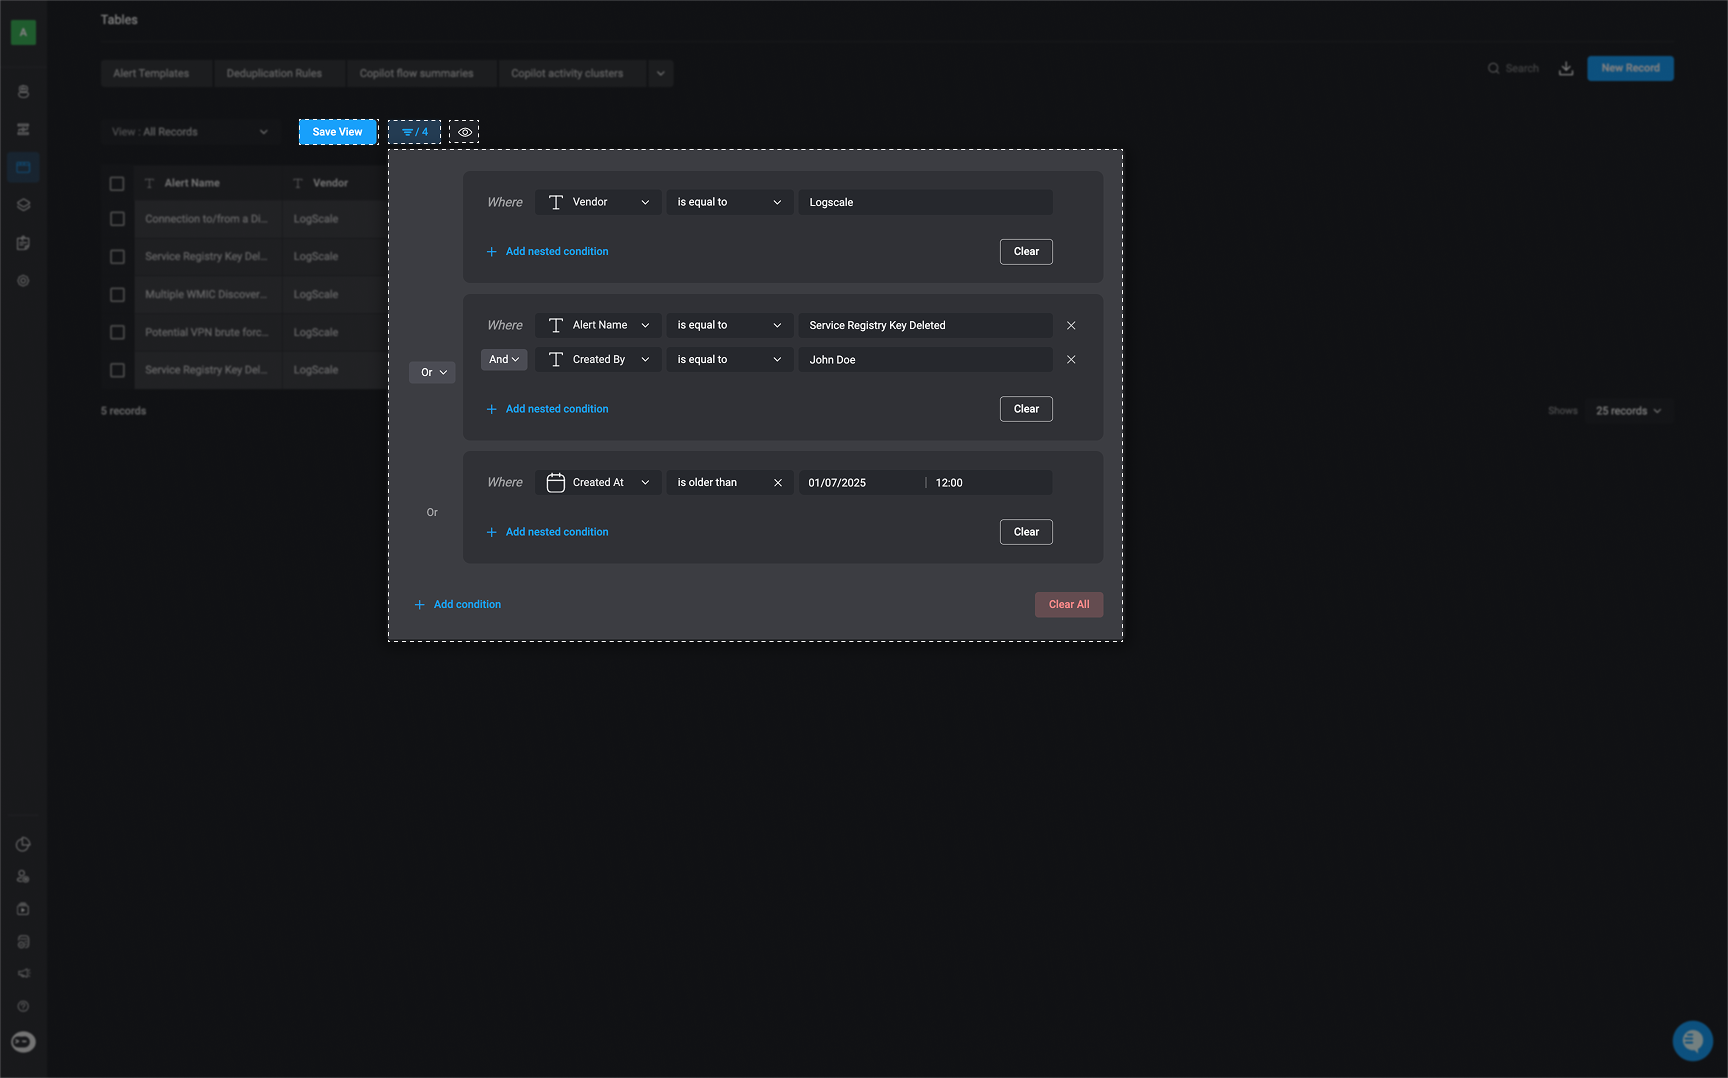
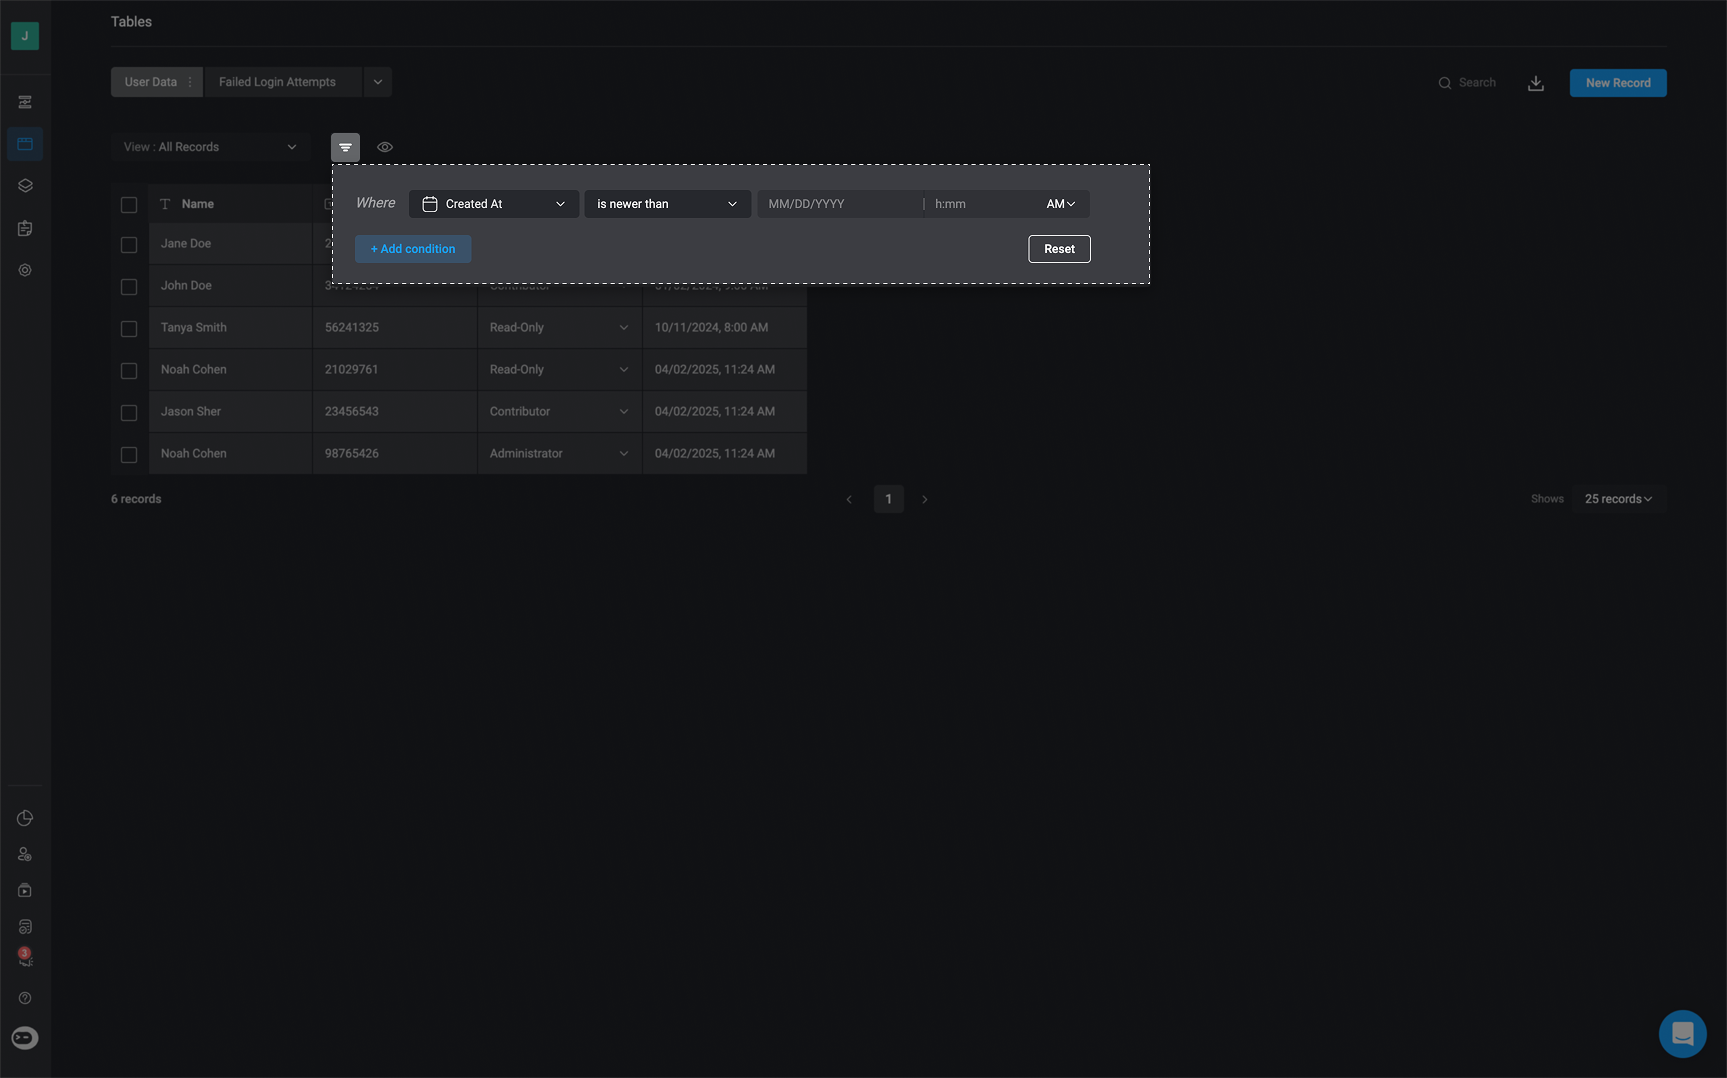
The Table Filter applies conditions to individual fields, allowing you to refine your data based on specific criteria. It consists of three key components:
The table filter is applied to each field individually and works as follows:
Choose the Field Name from the dropdown menu. This determines which column in the table will be filtered.
Operators define how the filter applies to the selected field. Available operators vary based on the field type:
1. **Text** - (`Is equal to`, `Is not equal to`, `Contains`, `Does not contain`, `Starts with`, `Ends with`, `Is empty`, `Is not empty`).
2. **Number** - (`Is equal to`, `Is not equal to`, `Is less than`, `Is less than or equals to`, `Is greater than`, `Is greater than or equals to`, `Is empty`, `Is not empty`, `Is between`)
3. **Multi-select** (`Contains`, `Does not contain`, `Is empty`, `Is not empty`)
4. **Single-select** (`Is equal to`, `Is not equal to`, `Contains`, `Does not contain`, `Starts with`, `Ends with`, `Is empty`, `Is not empty`)
5. **Date** / **Date + Time** (`Is between`, `Is before`, `Is after`, `Past`)
6. **Checkbox** - (`True`, `False`)
7. **User** - (`Contains`, `Does not contain`)
1. **Text** - Free text box
2. **Number** - Free text to insert a number. When the operator is “Between”, you will see fields to specify the “from” and “to” of your range.
3. **Multi-select** - Allows you to select multiple options of the values in the records
4. **Single-select** - Allows you to select one option from the values in the records
5. **Date:** Select a date-based filter using preset options such as Yesterday, Today, Last 7 days, Last 30 days, or Last year. You can also set a custom date range for more precise filtering.
6. **Date & Time** - Functions like the Date filter but also includes a time selector for filtering records based on specific timestamps.
You can also create [nested conditions](/docs/blink-platform/condition-builder/condition-builder#the-advanced-condition-builder-and-nested-conditions) which is groups of conditions within other conditions. [nested conditions](/docs/blink-platform/condition-builder/condition-builder#the-advanced-condition-builder-and-nested-conditions). [Nested Conditions](/docs/blink-platform/condition-builder/condition-builder#nested-conditions) lets you define more complex logic by applying specific operators (`AND` / `OR`) to a subset of conditions independently from the main set.
You can further customize your table view by:
*
***
## Filtering Table Records
The Table Filter applies conditions to individual fields, allowing you to refine your data based on specific criteria. It consists of three key components:
The table filter is applied to each field individually and works as follows:
Choose the Field Name from the dropdown menu. This determines which column in the table will be filtered.
Operators define how the filter applies to the selected field. Available operators vary based on the field type:
1. **Text** - (`Is equal to`, `Is not equal to`, `Contains`, `Does not contain`, `Starts with`, `Ends with`, `Is empty`, `Is not empty`).
2. **Number** - (`Is equal to`, `Is not equal to`, `Is less than`, `Is less than or equals to`, `Is greater than`, `Is greater than or equals to`, `Is empty`, `Is not empty`, `Is between`)
3. **Multi-select** (`Contains`, `Does not contain`, `Is empty`, `Is not empty`)
4. **Single-select** (`Is equal to`, `Is not equal to`, `Contains`, `Does not contain`, `Starts with`, `Ends with`, `Is empty`, `Is not empty`)
5. **Date** / **Date + Time** (`Is between`, `Is before`, `Is after`, `Past`)
6. **Checkbox** - (`True`, `False`)
7. **User** - (`Contains`, `Does not contain`)
1. **Text** - Free text box
2. **Number** - Free text to insert a number. When the operator is “Between”, you will see fields to specify the “from” and “to” of your range.
3. **Multi-select** - Allows you to select multiple options of the values in the records
4. **Single-select** - Allows you to select one option from the values in the records
5. **Date:** Select a date-based filter using preset options such as Yesterday, Today, Last 7 days, Last 30 days, or Last year. You can also set a custom date range for more precise filtering.
6. **Date & Time** - Functions like the Date filter but also includes a time selector for filtering records based on specific timestamps.
You can also create [nested conditions](/docs/blink-platform/condition-builder/condition-builder#the-advanced-condition-builder-and-nested-conditions) which is groups of conditions within other conditions. [nested conditions](/docs/blink-platform/condition-builder/condition-builder#the-advanced-condition-builder-and-nested-conditions). [Nested Conditions](/docs/blink-platform/condition-builder/condition-builder#nested-conditions) lets you define more complex logic by applying specific operators (`AND` / `OR`) to a subset of conditions independently from the main set.
You can further customize your table view by:
* Clicking the icon to choose which columns are visible.
* Dragging columns to [rearrange their order](#changing-fields-order).
* [Sorting columns](#sorting-table-records) by hovering over a column header and using the **up or down arrows**.
Once your view is set up the way you like, click **"Save View"** to apply your changes.
 ***
## Changing Fields Order
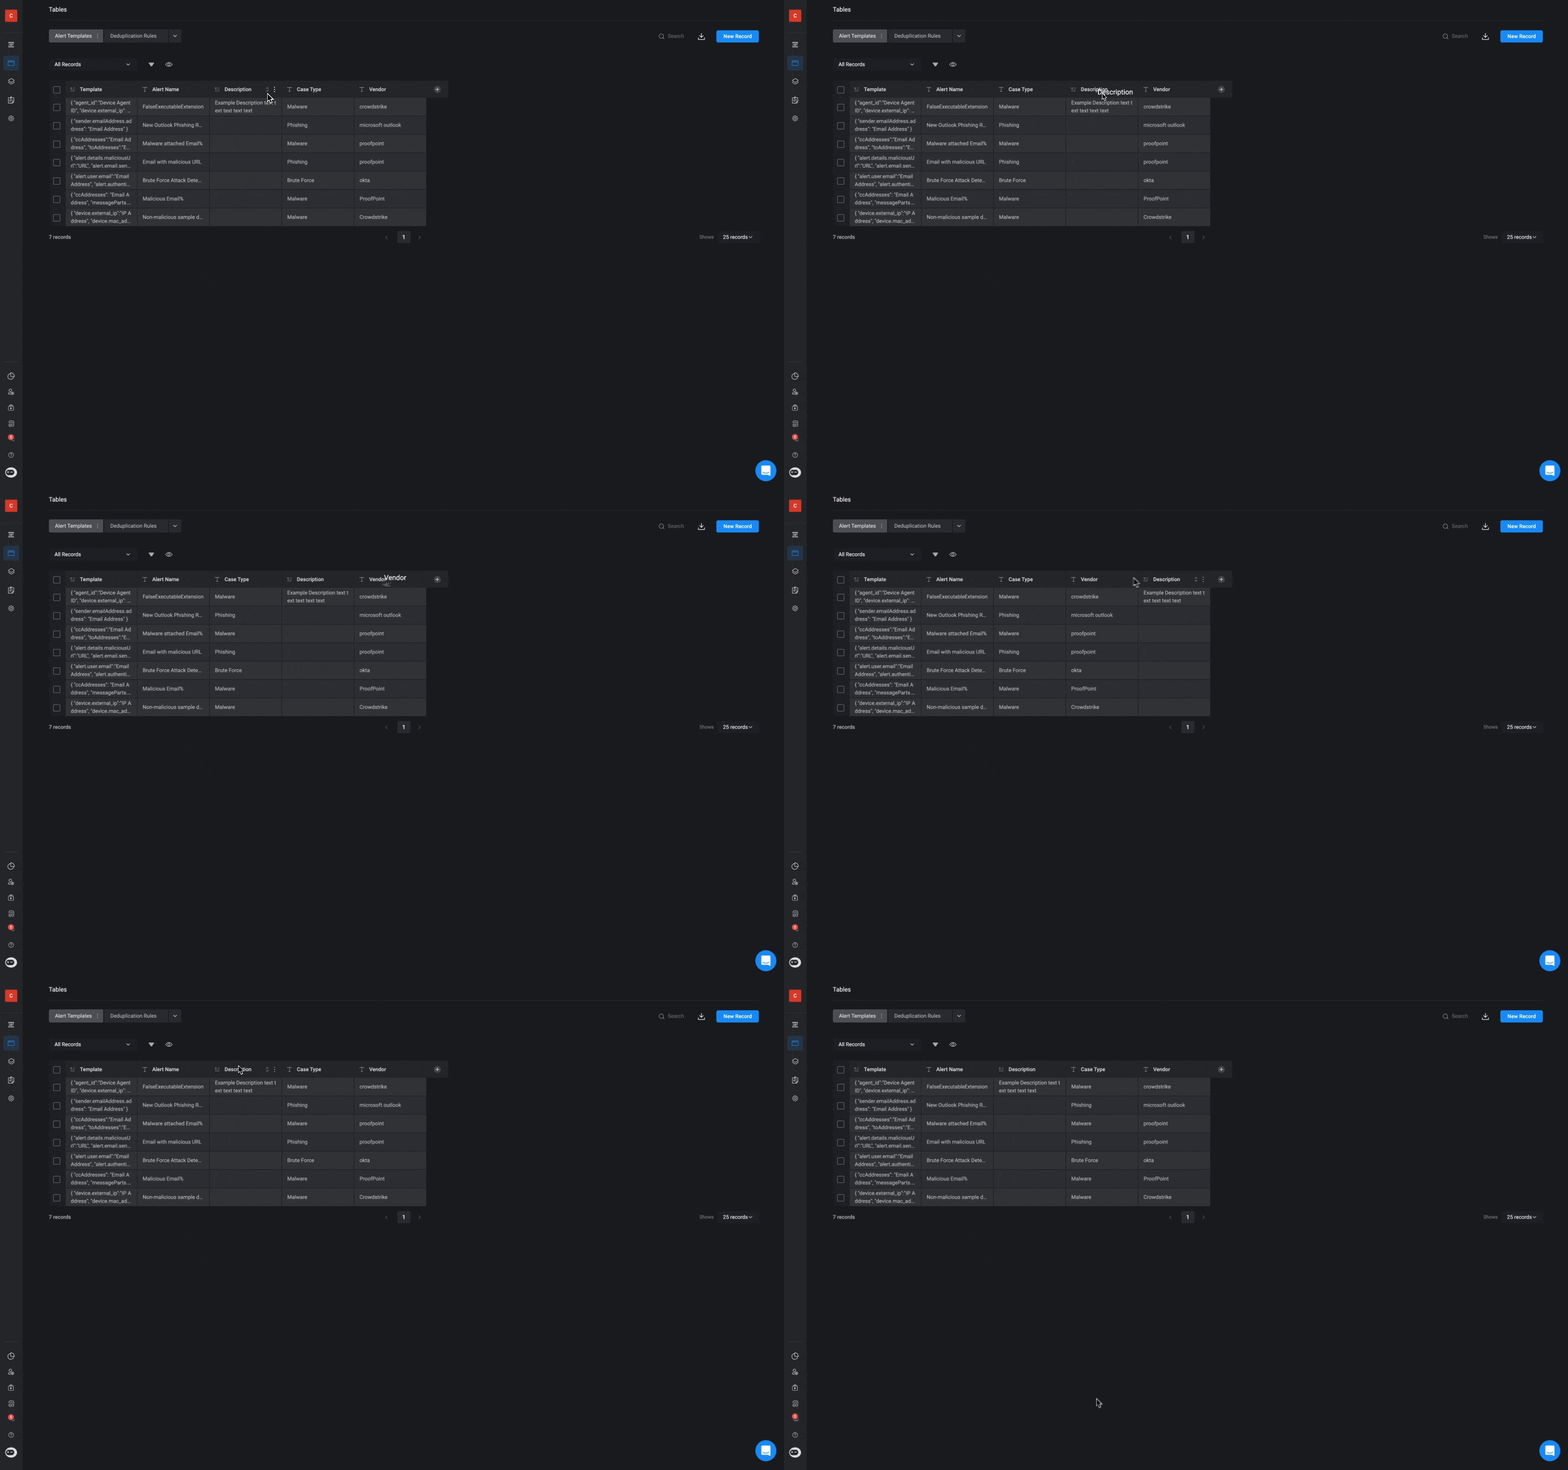
You can reorder your table fields by dragging a selected field and dropping it into the new place.
***
## Changing Fields Order
You can reorder your table fields by dragging a selected field and dropping it into the new place.
 ***
## Hiding and Exposing Fields
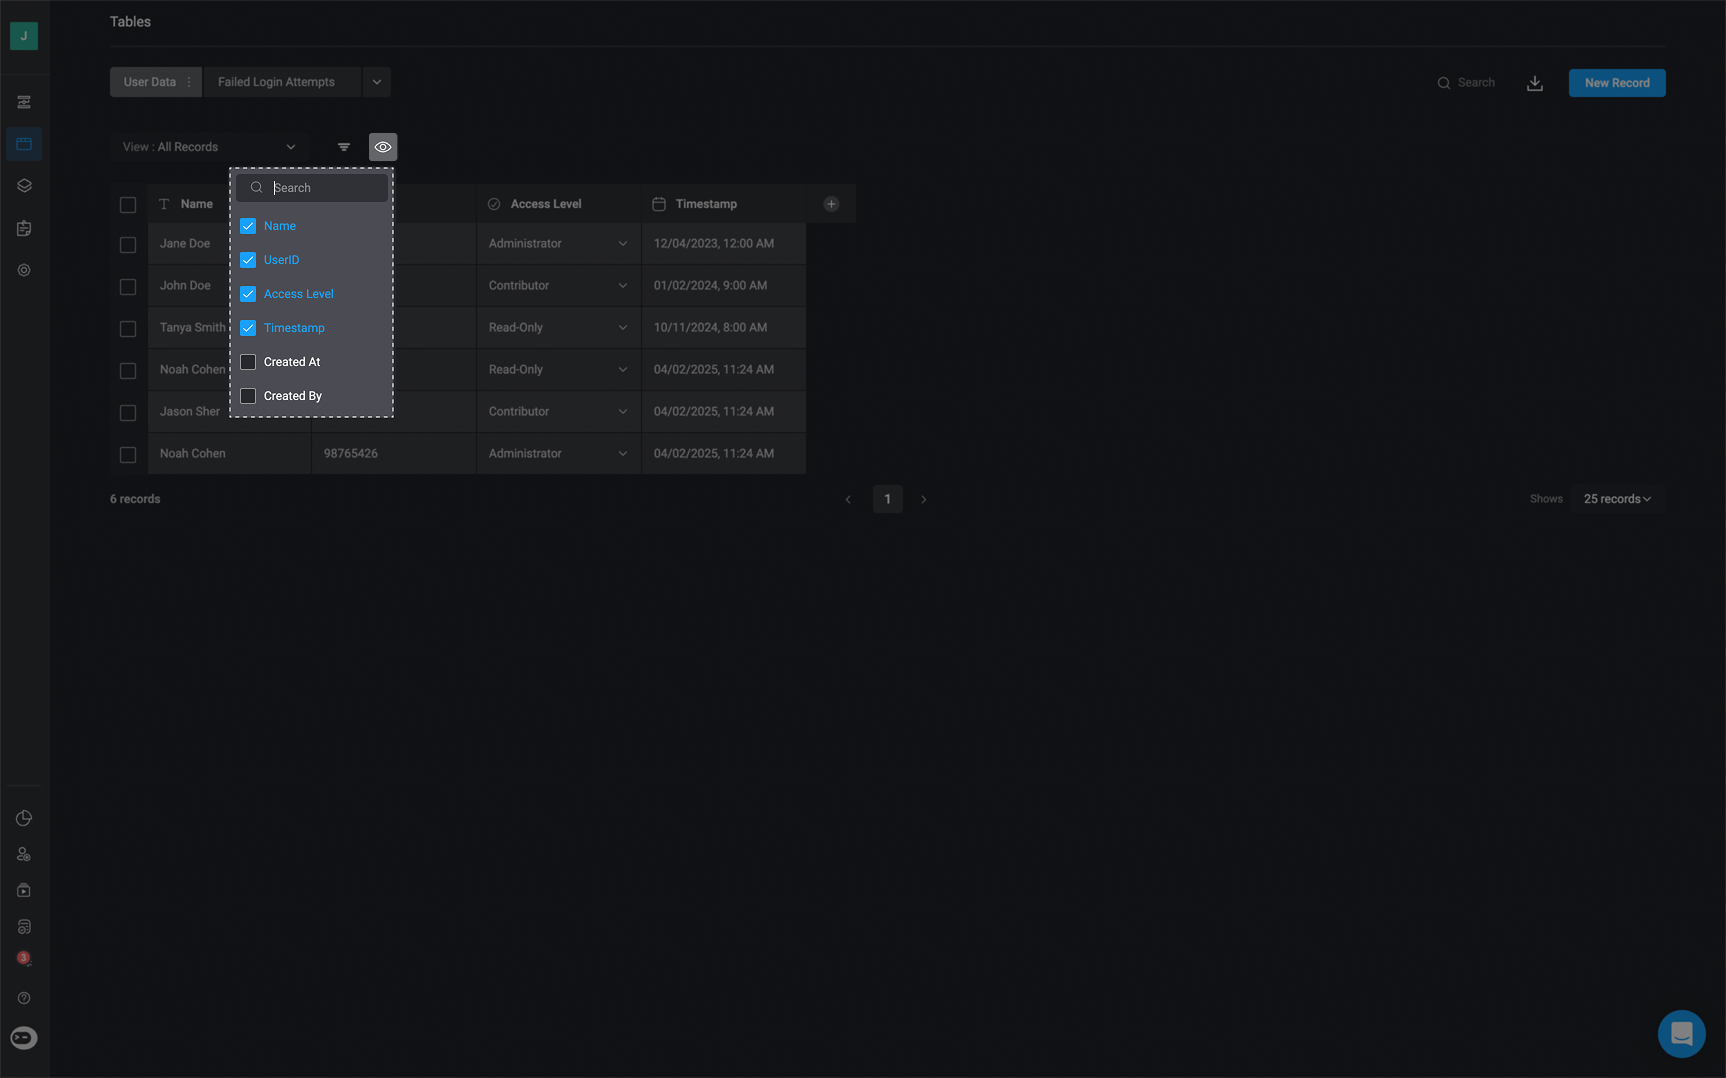
You can decide which fields to display in the table and which fields to hide.
The following table fields are **System Fields** and will not be presented by default: `Created At`, `Created By`, `ID`, `Updated At` and `Updated By`
***
## Hiding and Exposing Fields
You can decide which fields to display in the table and which fields to hide.
The following table fields are **System Fields** and will not be presented by default: `Created At`, `Created By`, `ID`, `Updated At` and `Updated By`
Click on the icon to open a modal with the fields. Any fields that are selected will be presented:
 ***
## Table Pagination
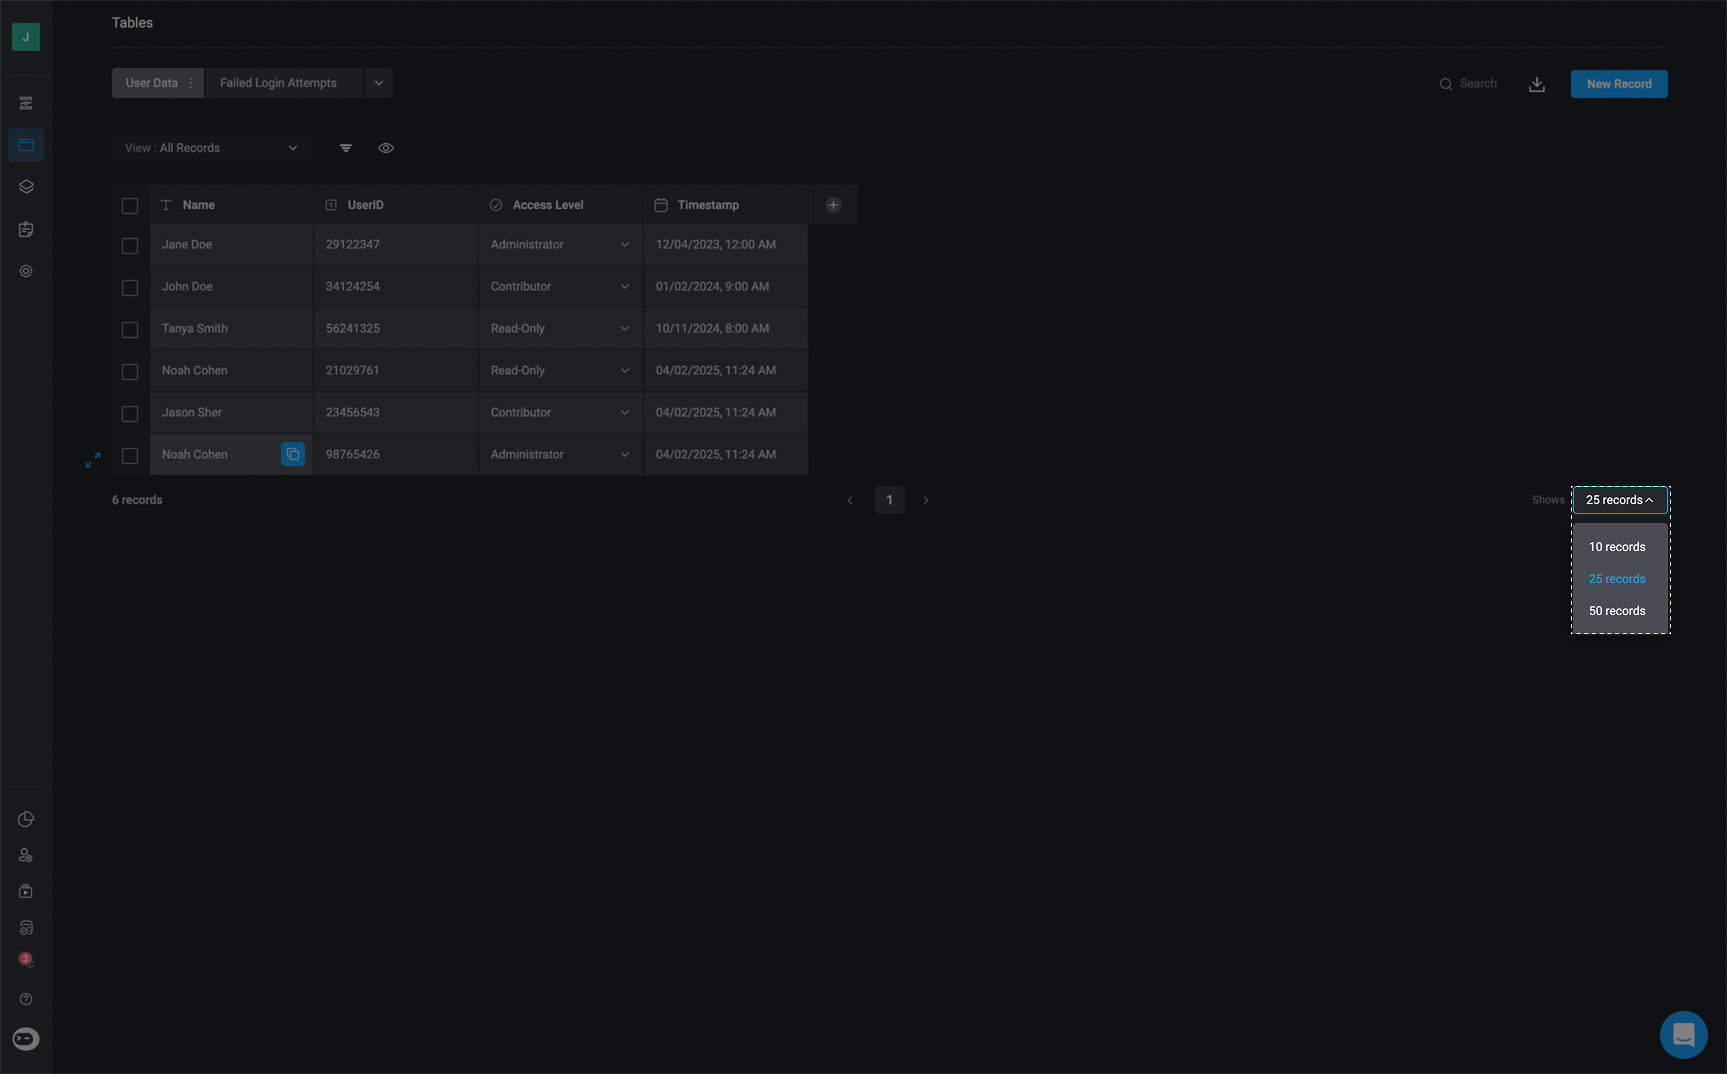
Table pagination helps manage large datasets by controlling record display and enabling easy navigation. Below are details on setting record limits and moving between pages.
The Table pagination settings are at the bottom of the Table, offering the following options: 10, 20, 50, 100 records. The default number of records is 10 and it can be modified by selecting another number from the drop down.
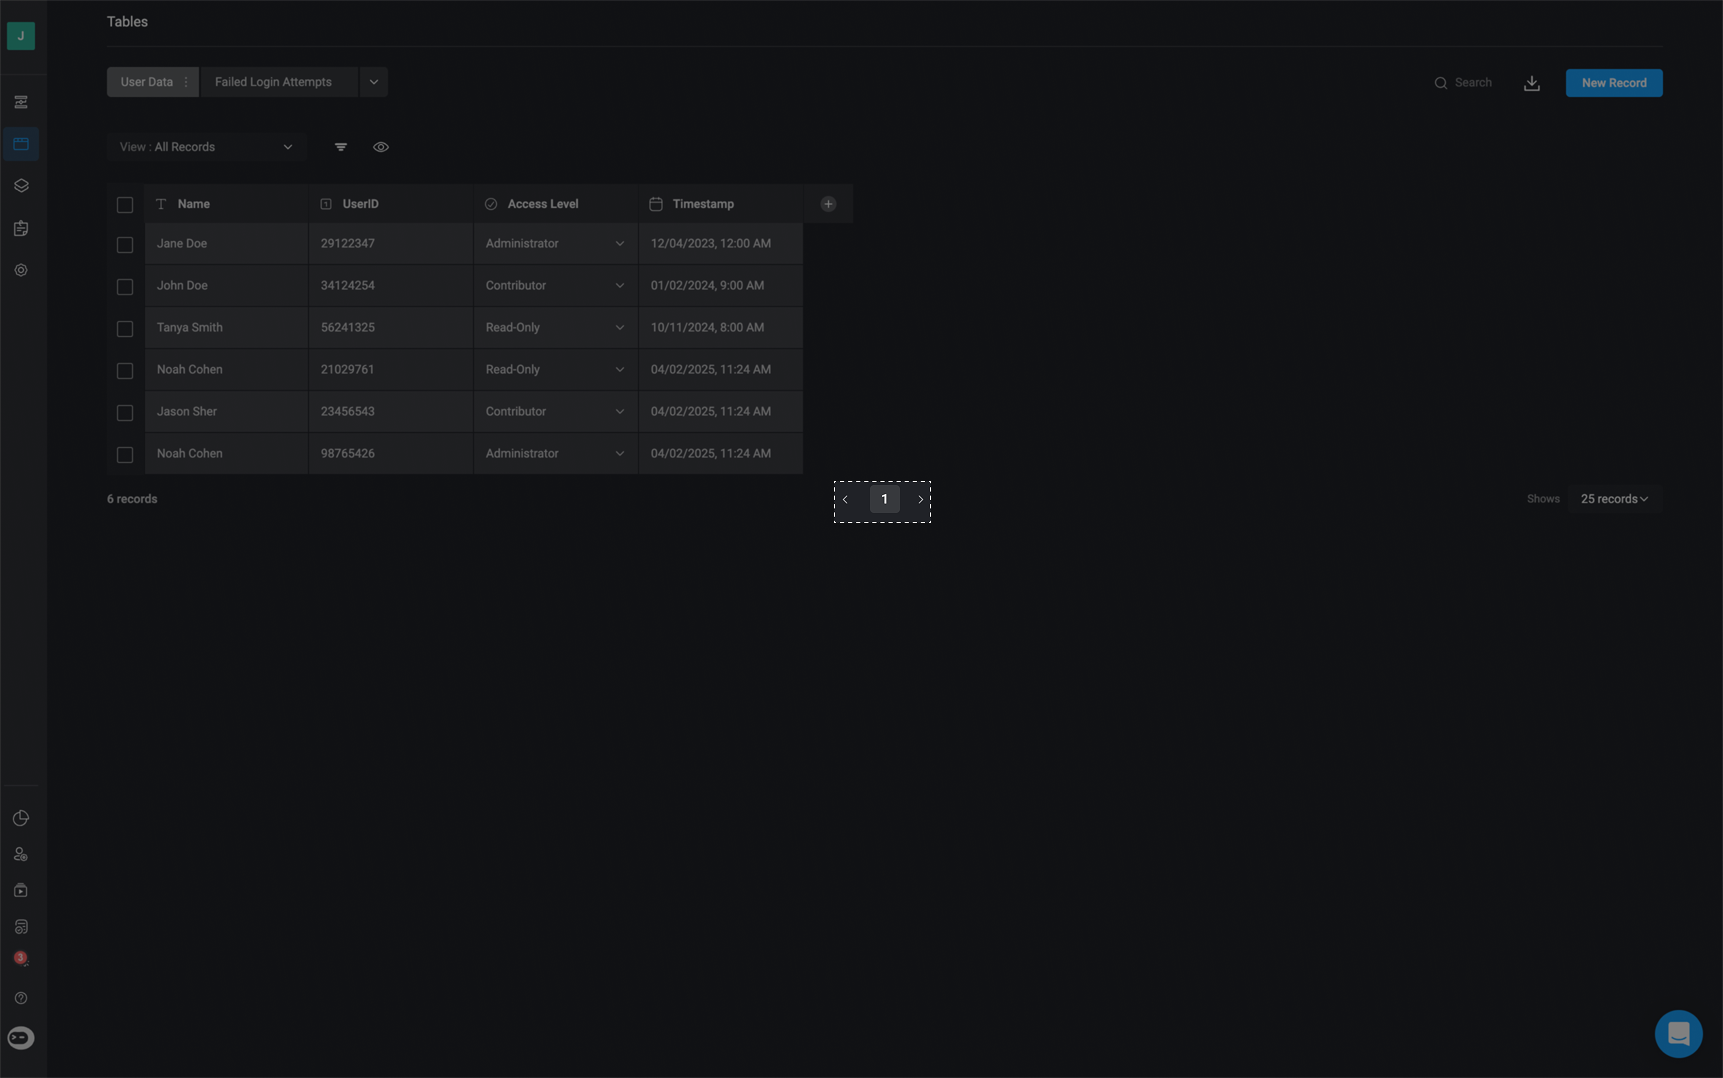
When the number of records exceeds the value of the selected records, it creates a new page.
***
## Table Pagination
Table pagination helps manage large datasets by controlling record display and enabling easy navigation. Below are details on setting record limits and moving between pages.
The Table pagination settings are at the bottom of the Table, offering the following options: 10, 20, 50, 100 records. The default number of records is 10 and it can be modified by selecting another number from the drop down.
When the number of records exceeds the value of the selected records, it creates a new page.
 The navigation between the Table’s pages can be done via the arrow at the bottom of the table.
 ***
## Copying A Cell's Value
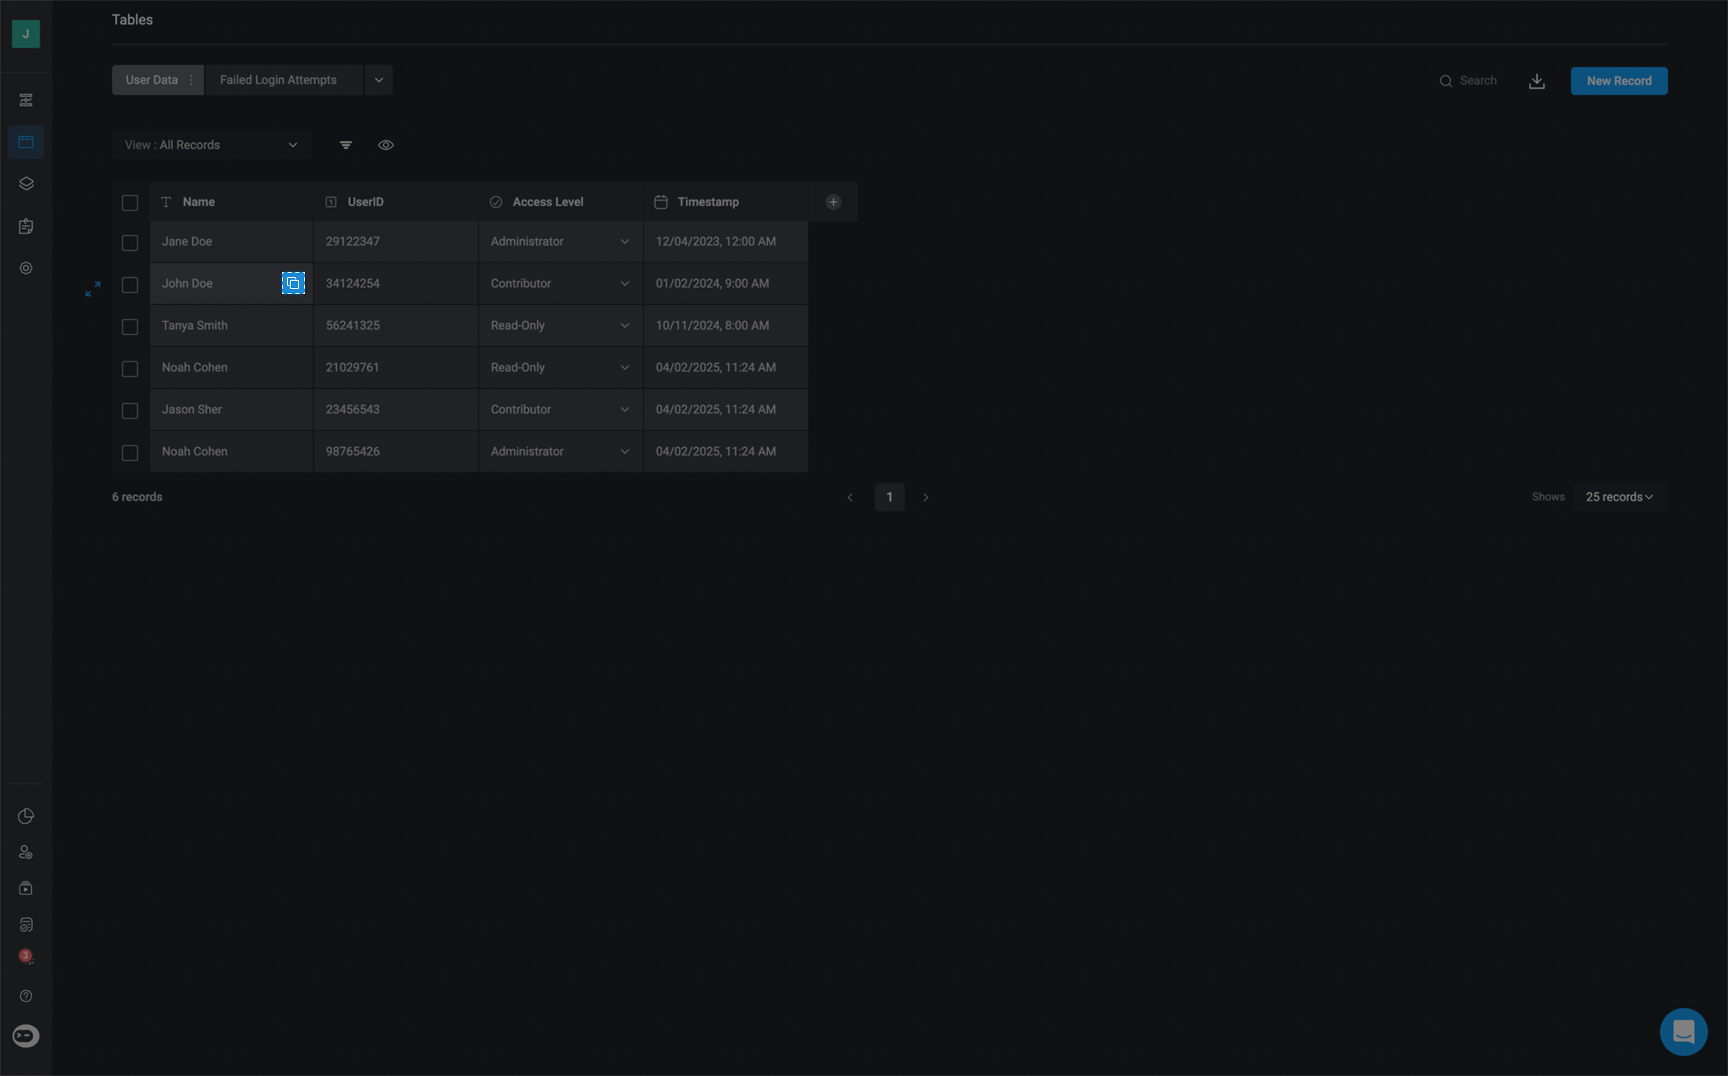
When clicking on a single cell, a “Copy” icon will be presented. Click the copy icon to copy the cell value.
***
## Copying A Cell's Value
When clicking on a single cell, a “Copy” icon will be presented. Click the copy icon to copy the cell value.
 ***
## Changing the Table Field's Width
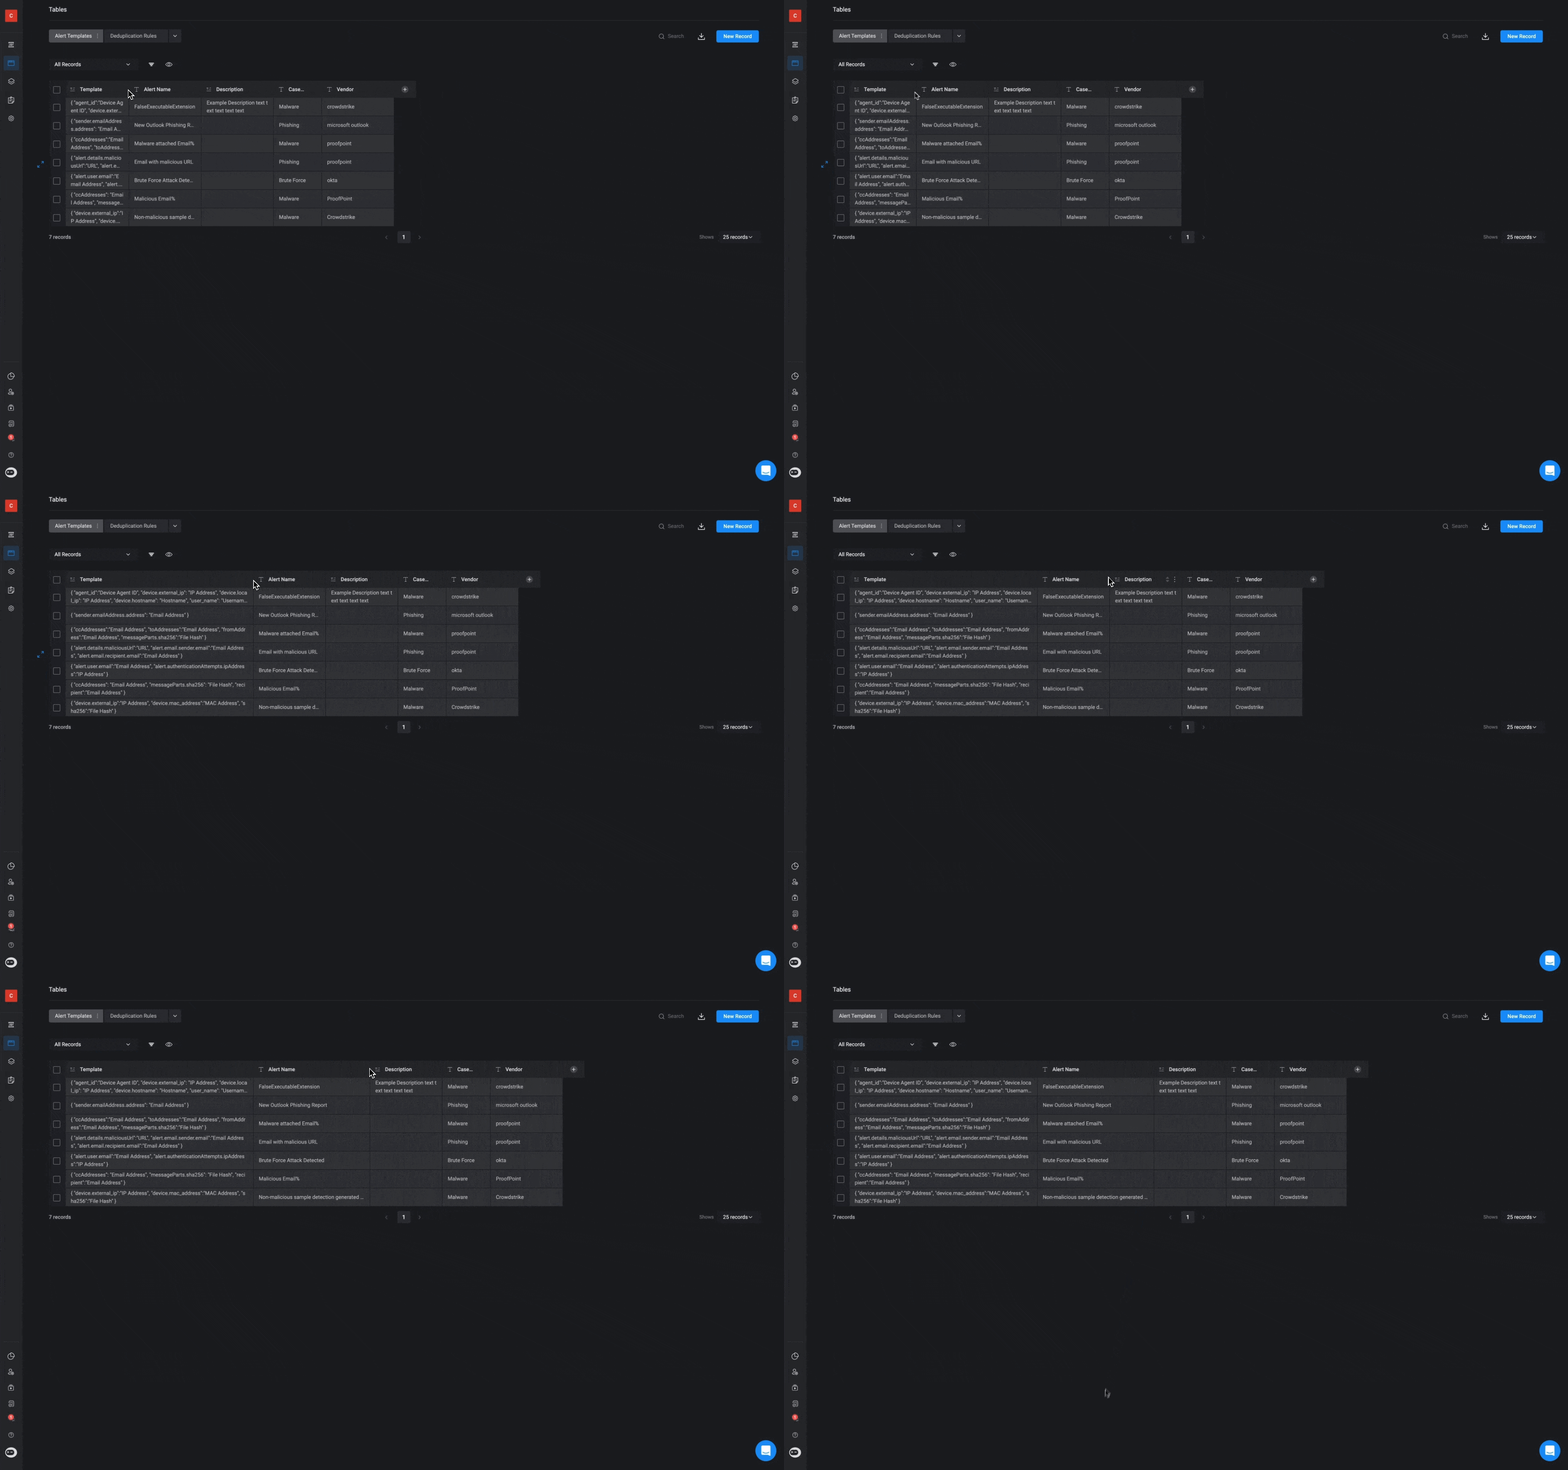
You can change the width of a specific field by clicking on its border and dragging it to the specific width you want
***
## Changing the Table Field's Width
You can change the width of a specific field by clicking on its border and dragging it to the specific width you want
 ***
## Table Views
'Table Views' refers to a saved configuration that combines specific filtering and sorting of your table data. These views can be set as either public (accessible to all users) or private (restricted to the user who created it).
In the dropdown menu in the top-left corner, you will find out of the box options for reviewing your Table Views.
***
## Table Views
'Table Views' refers to a saved configuration that combines specific filtering and sorting of your table data. These views can be set as either public (accessible to all users) or private (restricted to the user who created it).
In the dropdown menu in the top-left corner, you will find out of the box options for reviewing your Table Views.
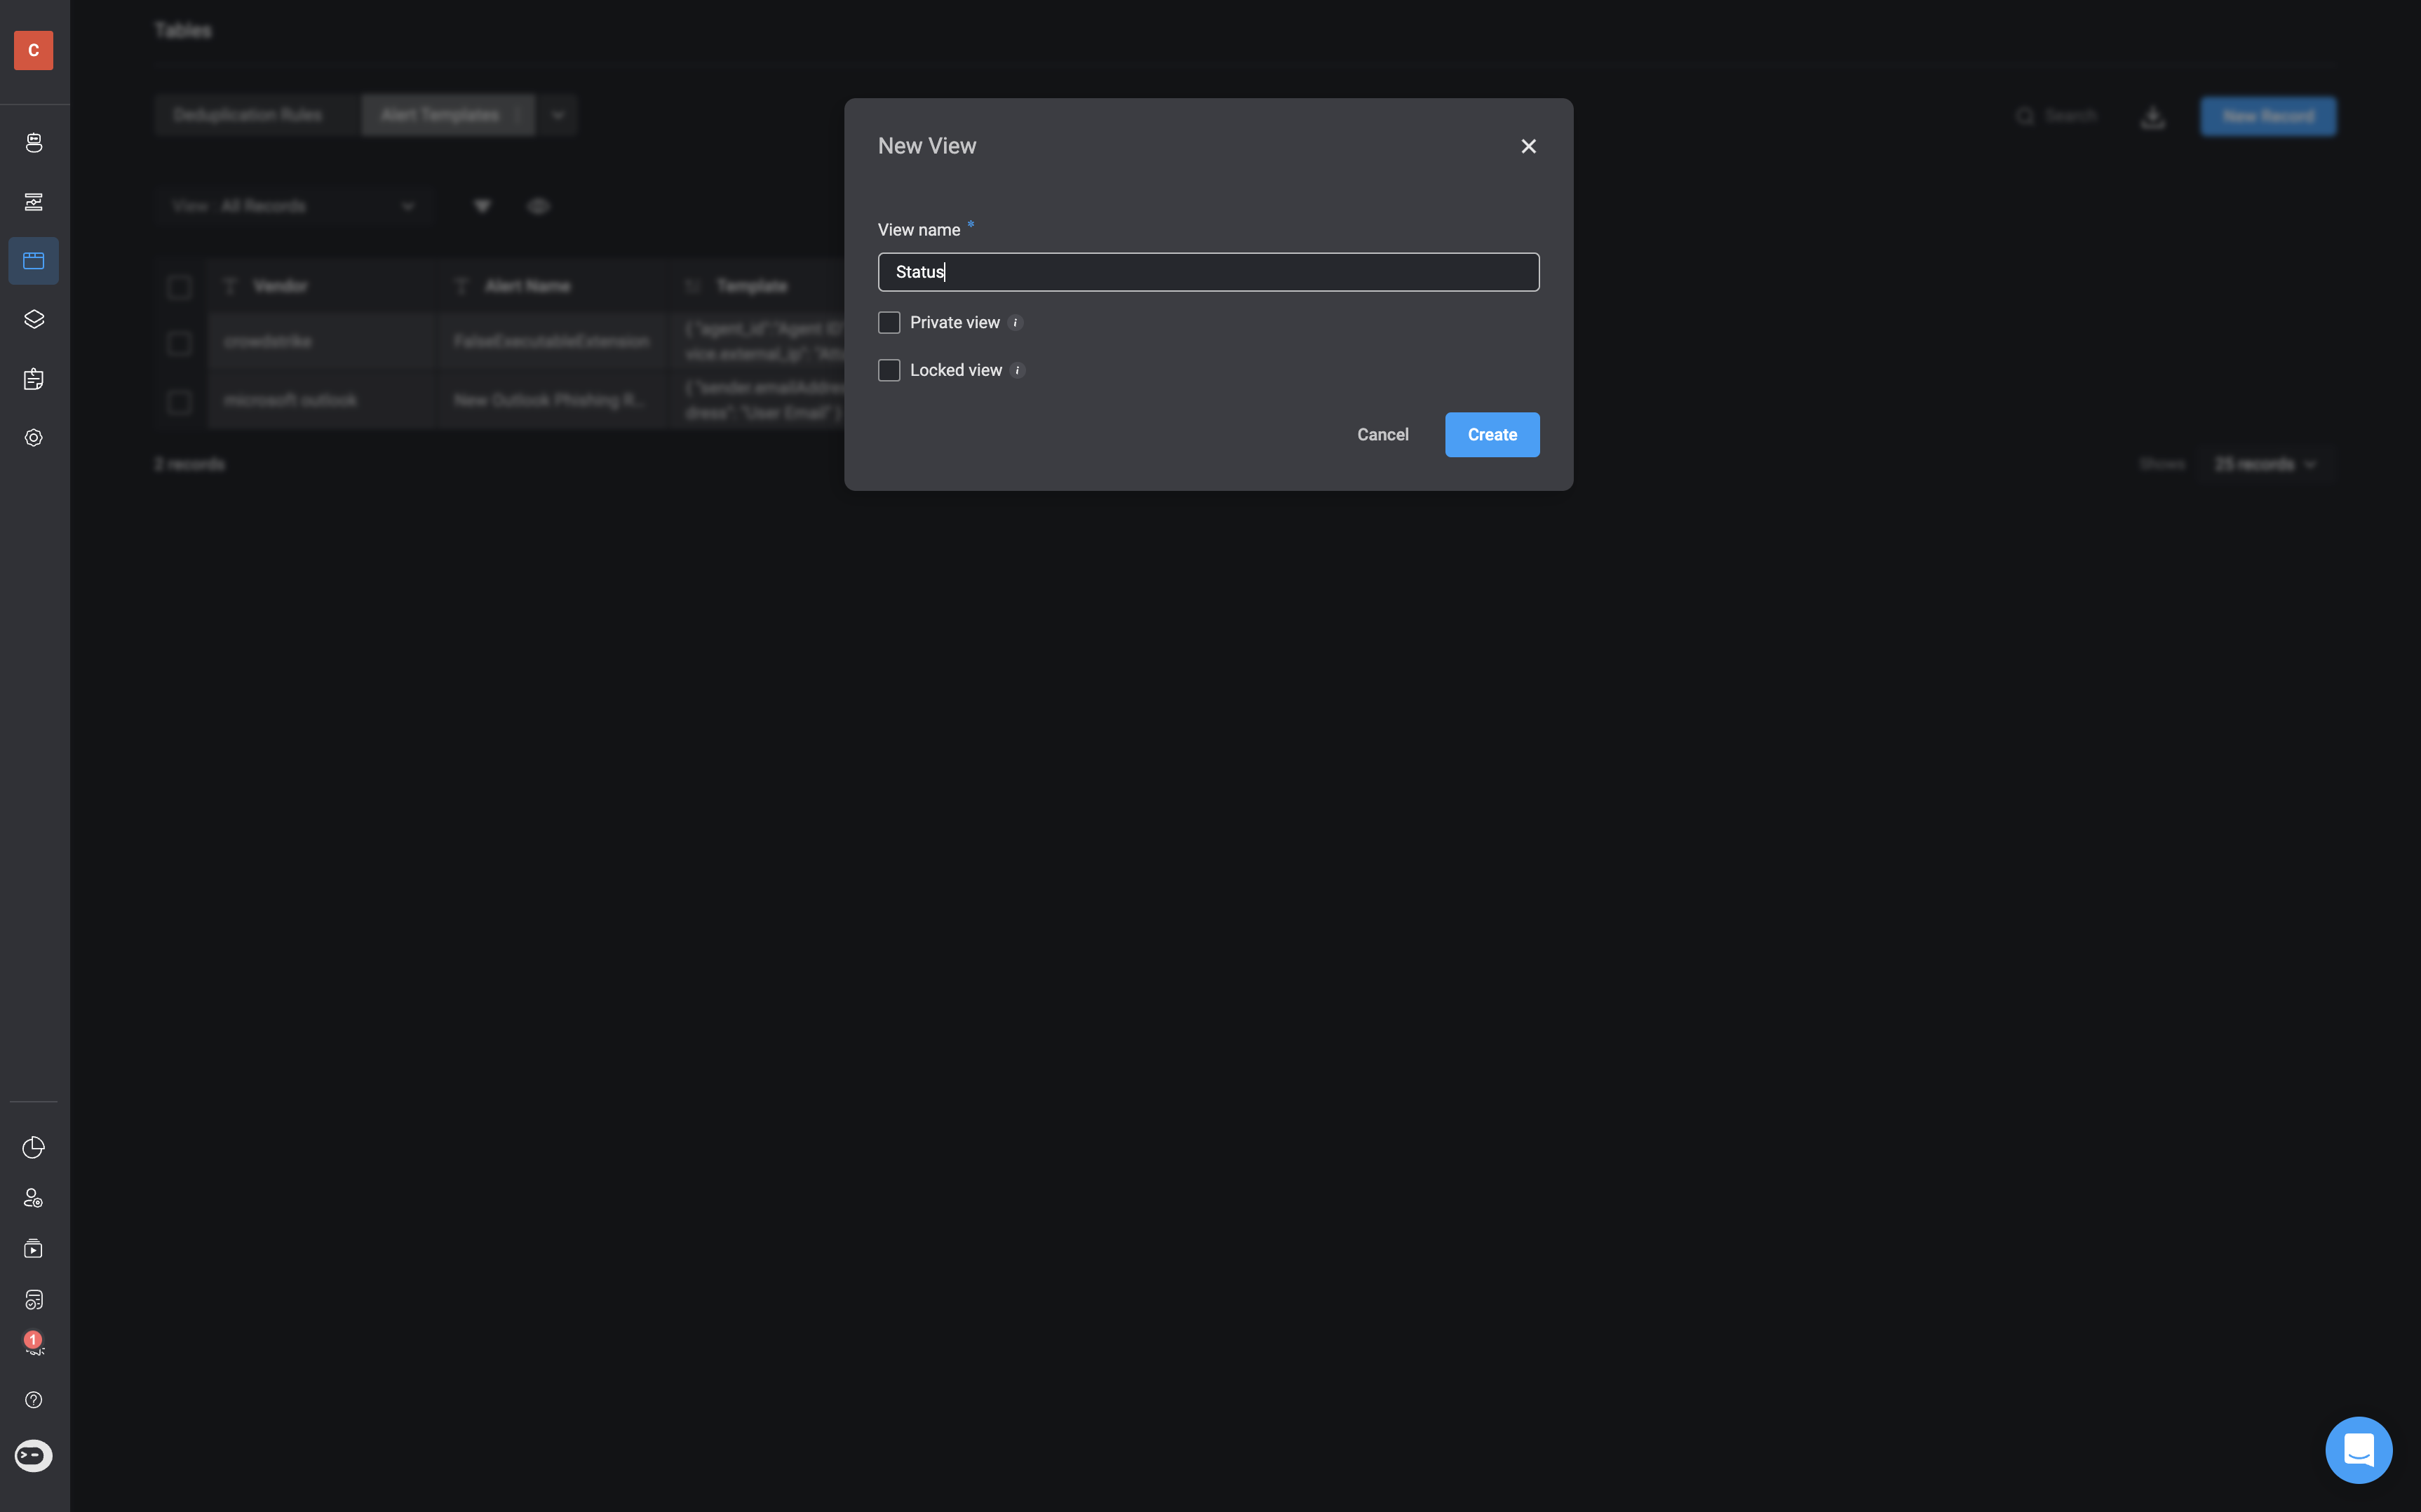
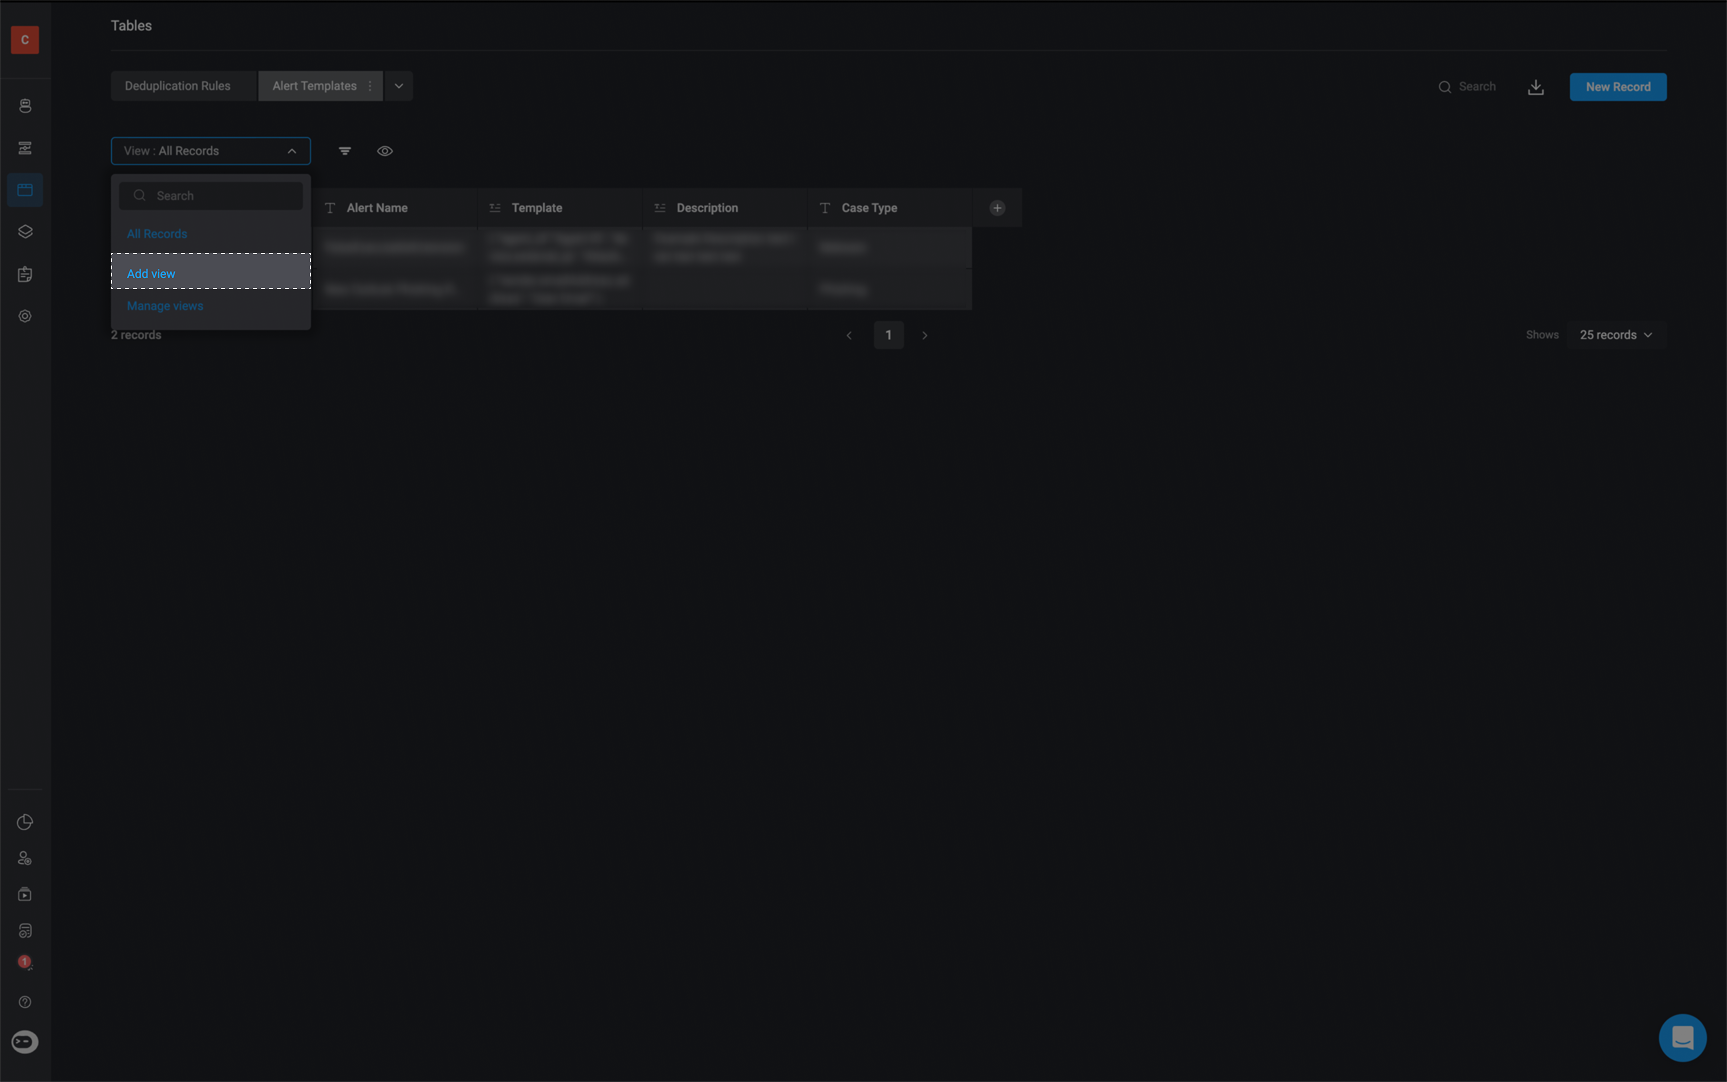 To create a custom table view, click 'Add View' and enter a name for your new view.
* **Private View**: When selected, the view is only visible to the creator and hidden from other users. If left unchecked, the view is public and can be accessed and modified by all users.
* **Locked view**: When checked, the view will be visible to all users, but only admins will be able to make changes to it.
To make changes to a view when **Locked View** is enabled, a user must have the `tables:edit` permission.
To create a custom table view, click 'Add View' and enter a name for your new view.
* **Private View**: When selected, the view is only visible to the creator and hidden from other users. If left unchecked, the view is public and can be accessed and modified by all users.
* **Locked view**: When checked, the view will be visible to all users, but only admins will be able to make changes to it.
To make changes to a view when **Locked View** is enabled, a user must have the `tables:edit` permission.
Next, click the icon to create a **conditional statement** that filters the data displayed in your custom table view.
You can also create [nested conditions](/docs/blink-platform/condition-builder/condition-builder#the-advanced-condition-builder-and-nested-conditions) which is groups of conditions within other conditions. [nested conditions](/docs/blink-platform/condition-builder/condition-builder#the-advanced-condition-builder-and-nested-conditions). [Nested Conditions](/docs/blink-platform/condition-builder/condition-builder#nested-conditions) lets you define more complex logic by applying specific operators (`AND` / `OR`) to a subset of conditions independently from the main set.
* Clicking the icon to choose which columns are visible.
* Dragging columns to [rearrange their order](#changing-fields-order).
* [Sorting columns](#sorting-table-records) by hovering over a column header and using the **up or down arrows**.
Once your view is set up the way you like, click **"Save View"** to apply your changes.
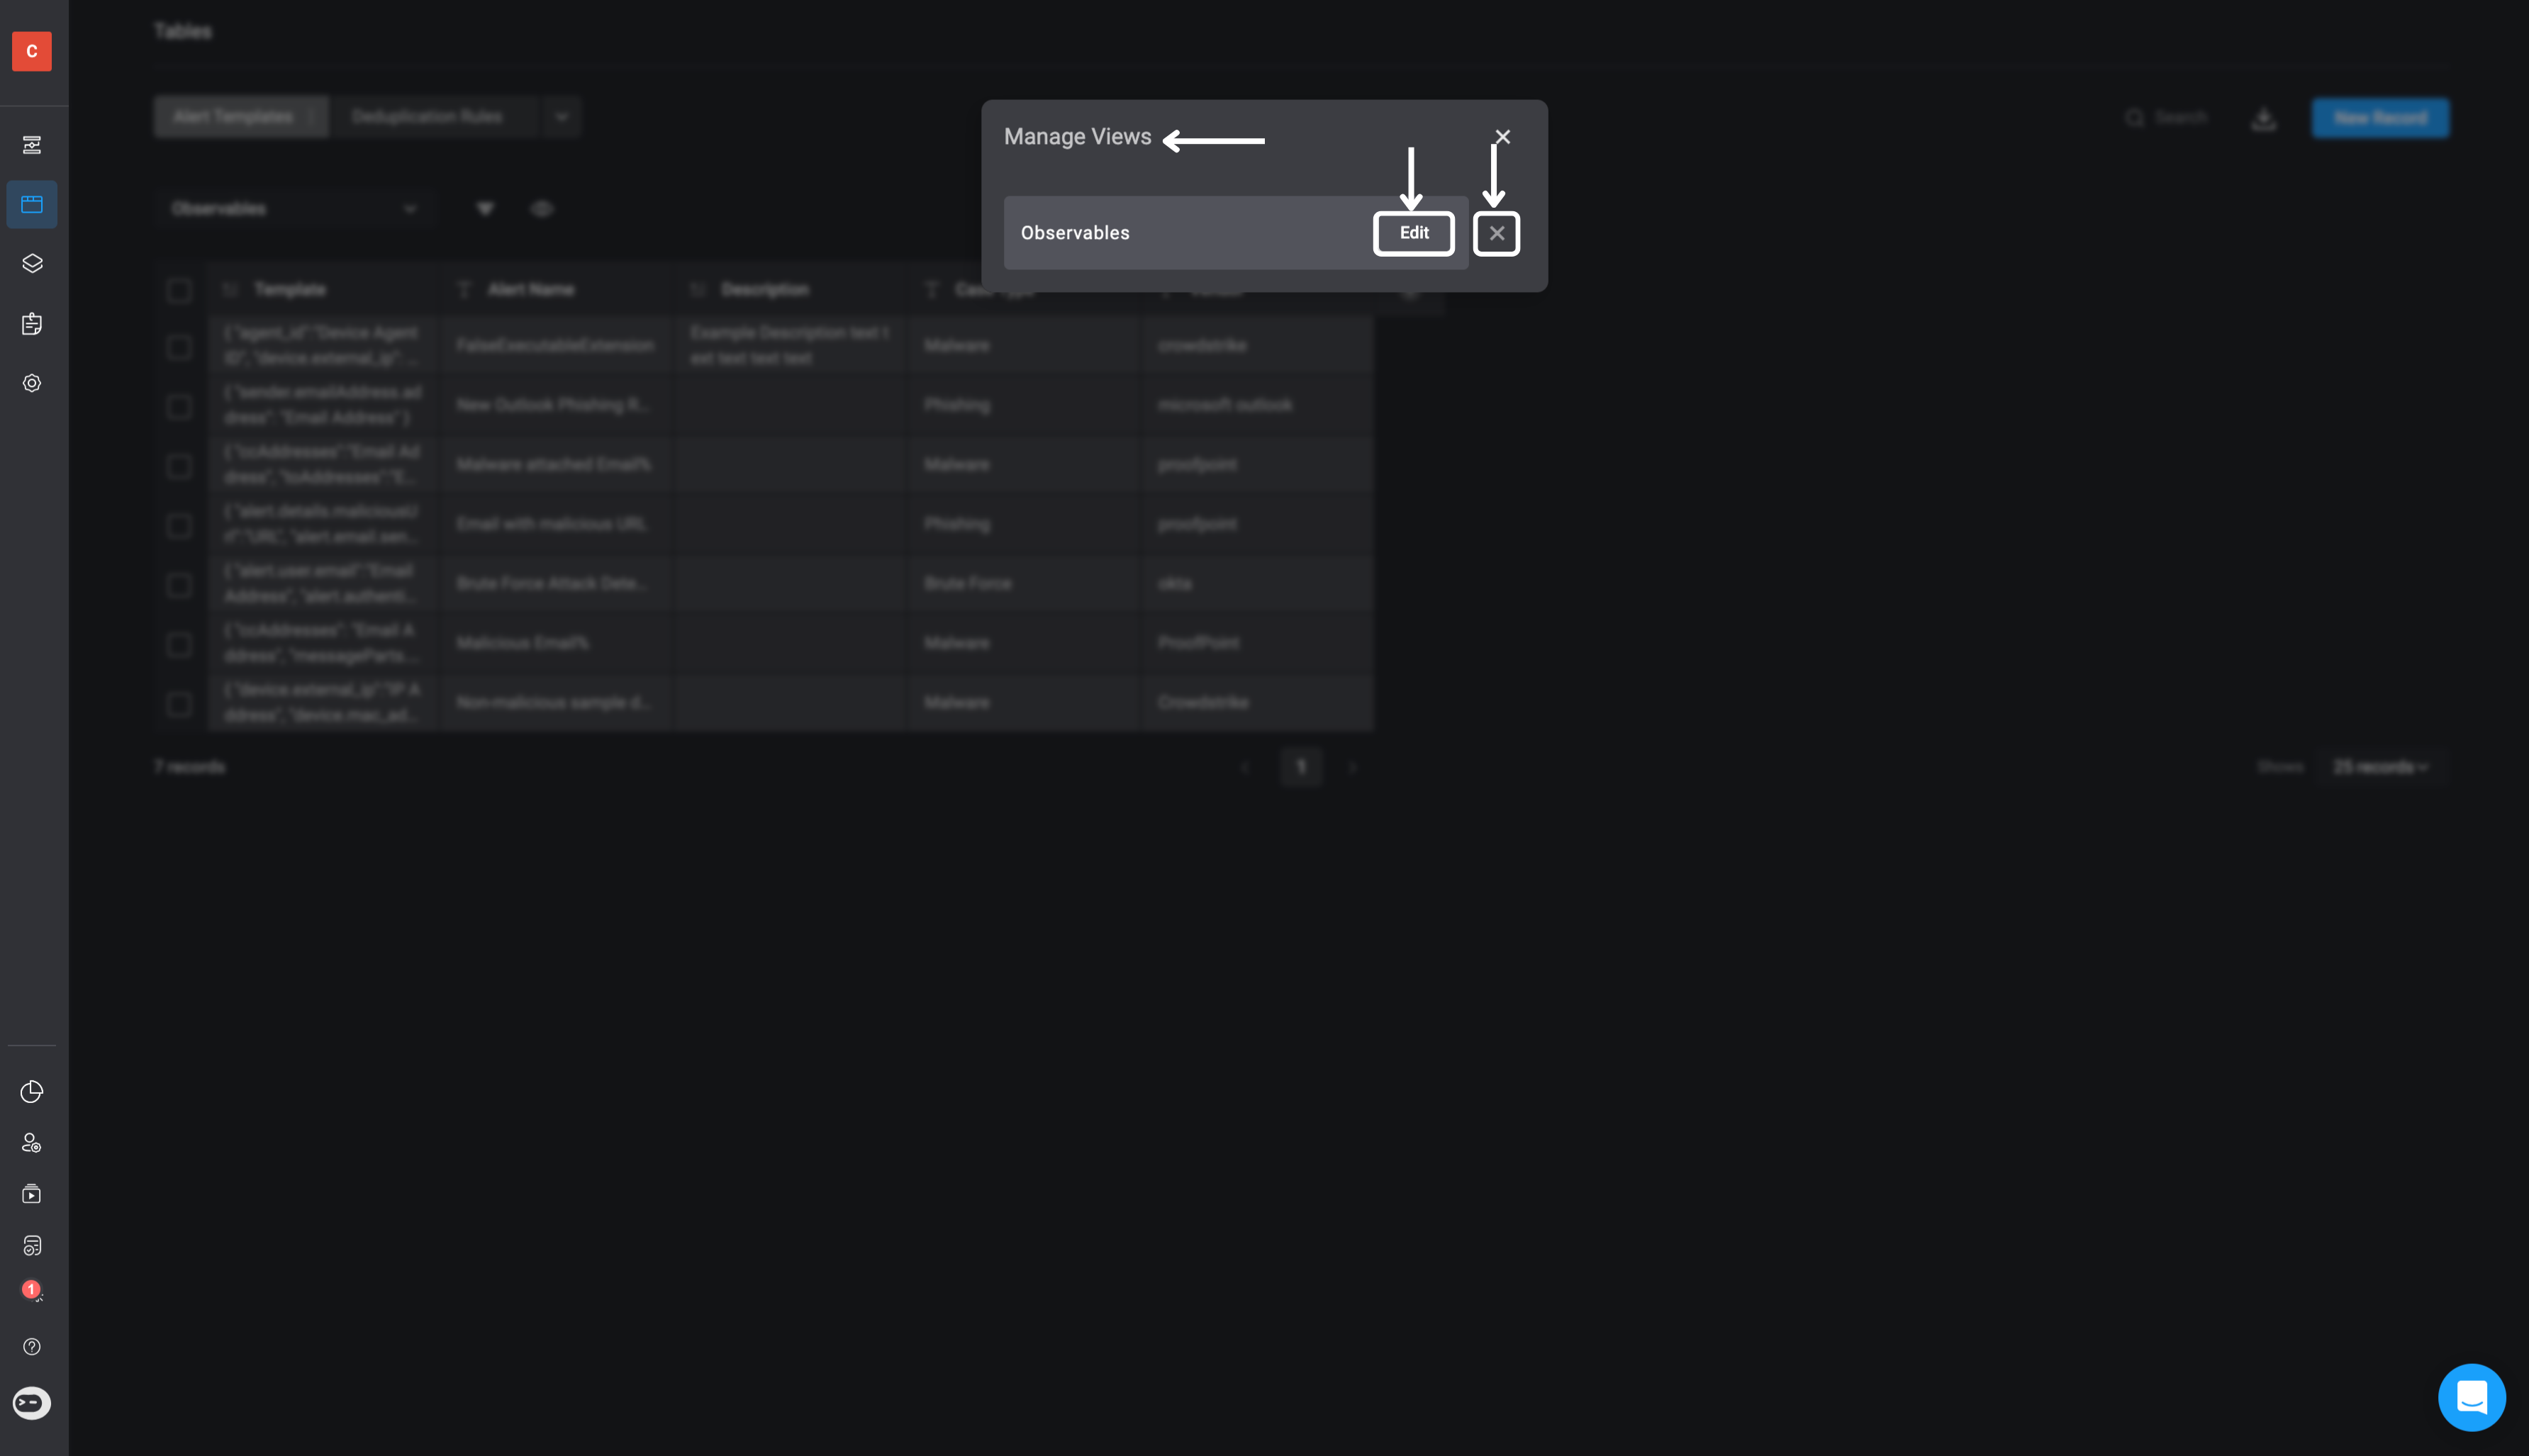
You can also edit the 'Table View' you created by clicking on the dropdown menu and selecting the "Manage View" option. To make any changes, click the "Manage View" button. If you want to delete the view you created, click the "X" button.
 ***
## Related Articles
Learn more about best practices for table and field naming conventions
Learn more about creating and using table actions in Workflows
Learn more about basic table operations
Learn More About Table Limitations
***
## Related Articles
Learn more about best practices for table and field naming conventions
Learn more about creating and using table actions in Workflows
Learn more about basic table operations
Learn More About Table Limitations