> ## Documentation Index
> Fetch the complete documentation index at: https://docs.blinkops.com/llms.txt
> Use this file to discover all available pages before exploring further.
# Configuring a SAML application on Cloudflare
> Instructions on how to configure a SAML SSO application with Cloudflare.
## 1. Get SaaS Application URLs
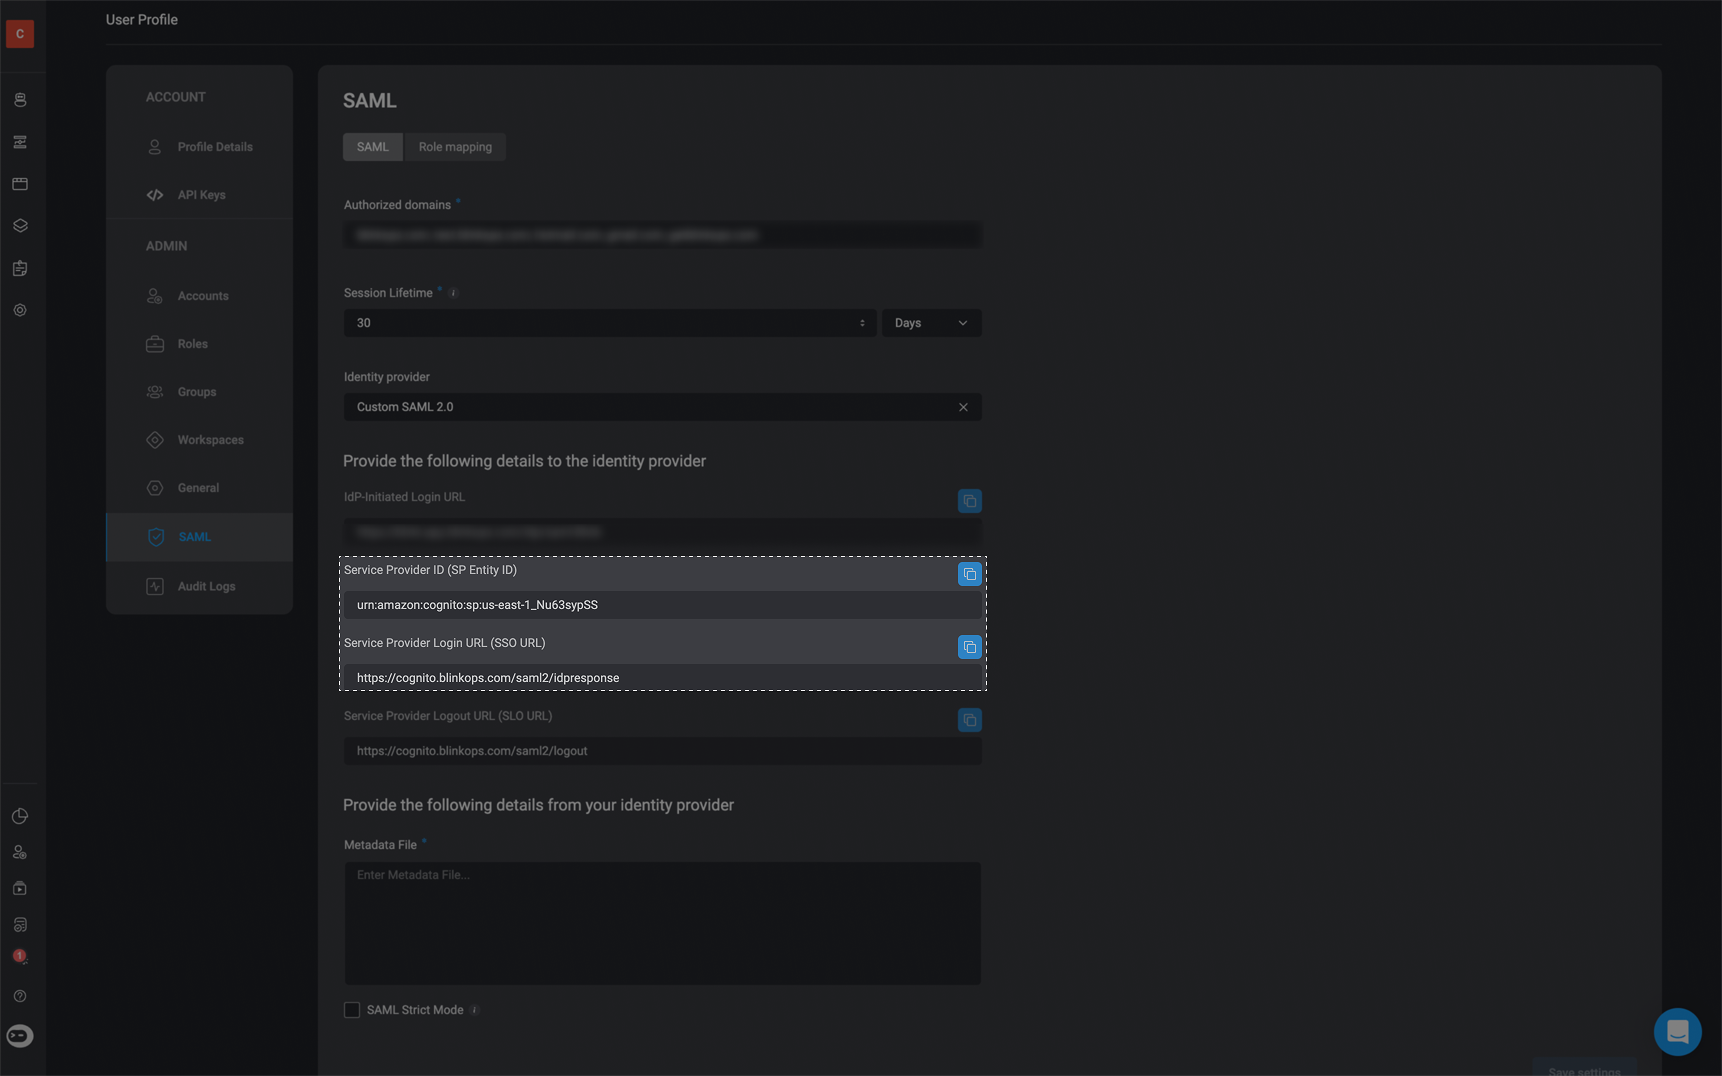
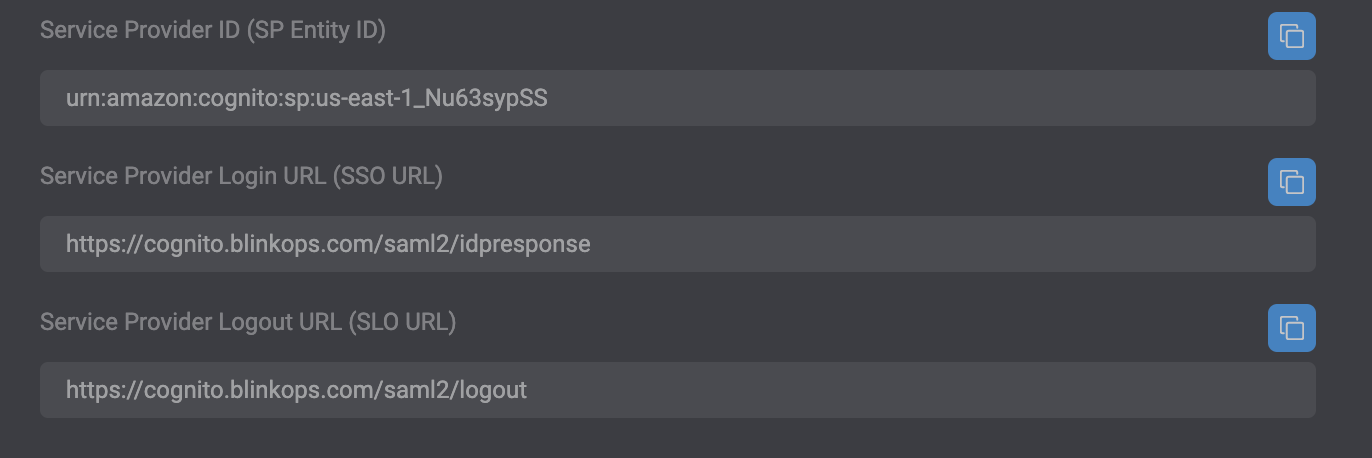
* **Entity ID**: A unique URL issued for your SaaS application.
* **Assertion Consumer Service URL:** The service provider’s endpoint for receiving and parsing SAML assertions.
 **NOTE**
Please note that the **Identifier (Entity ID)** value, along with the **Assertion Consumer Service URL**, can be located within the SAML tab under the Account Management Settings section within the Blink Platform. Please note the value of the **Assertion Consumer Service URL (ACS URL)** can be either the **Service Provider Login URL (SSO URL)** or **IdP-Initiated Login URL**.
**The Entity ID** : `urn:amazon:cognito:sp:eu-west-1_NEemCMO1L`
**Assertion Consumer Service URL:** [https://cognito.blinkops.com/saml2/idpresponse](https://cognito.blinkops.com/saml2/idpresponse).
**NOTE**
Please note that the **Identifier (Entity ID)** value, along with the **Assertion Consumer Service URL**, can be located within the SAML tab under the Account Management Settings section within the Blink Platform. Please note the value of the **Assertion Consumer Service URL (ACS URL)** can be either the **Service Provider Login URL (SSO URL)** or **IdP-Initiated Login URL**.
**The Entity ID** : `urn:amazon:cognito:sp:eu-west-1_NEemCMO1L`
**Assertion Consumer Service URL:** [https://cognito.blinkops.com/saml2/idpresponse](https://cognito.blinkops.com/saml2/idpresponse).
 ***
## 2. Add your Application to Access
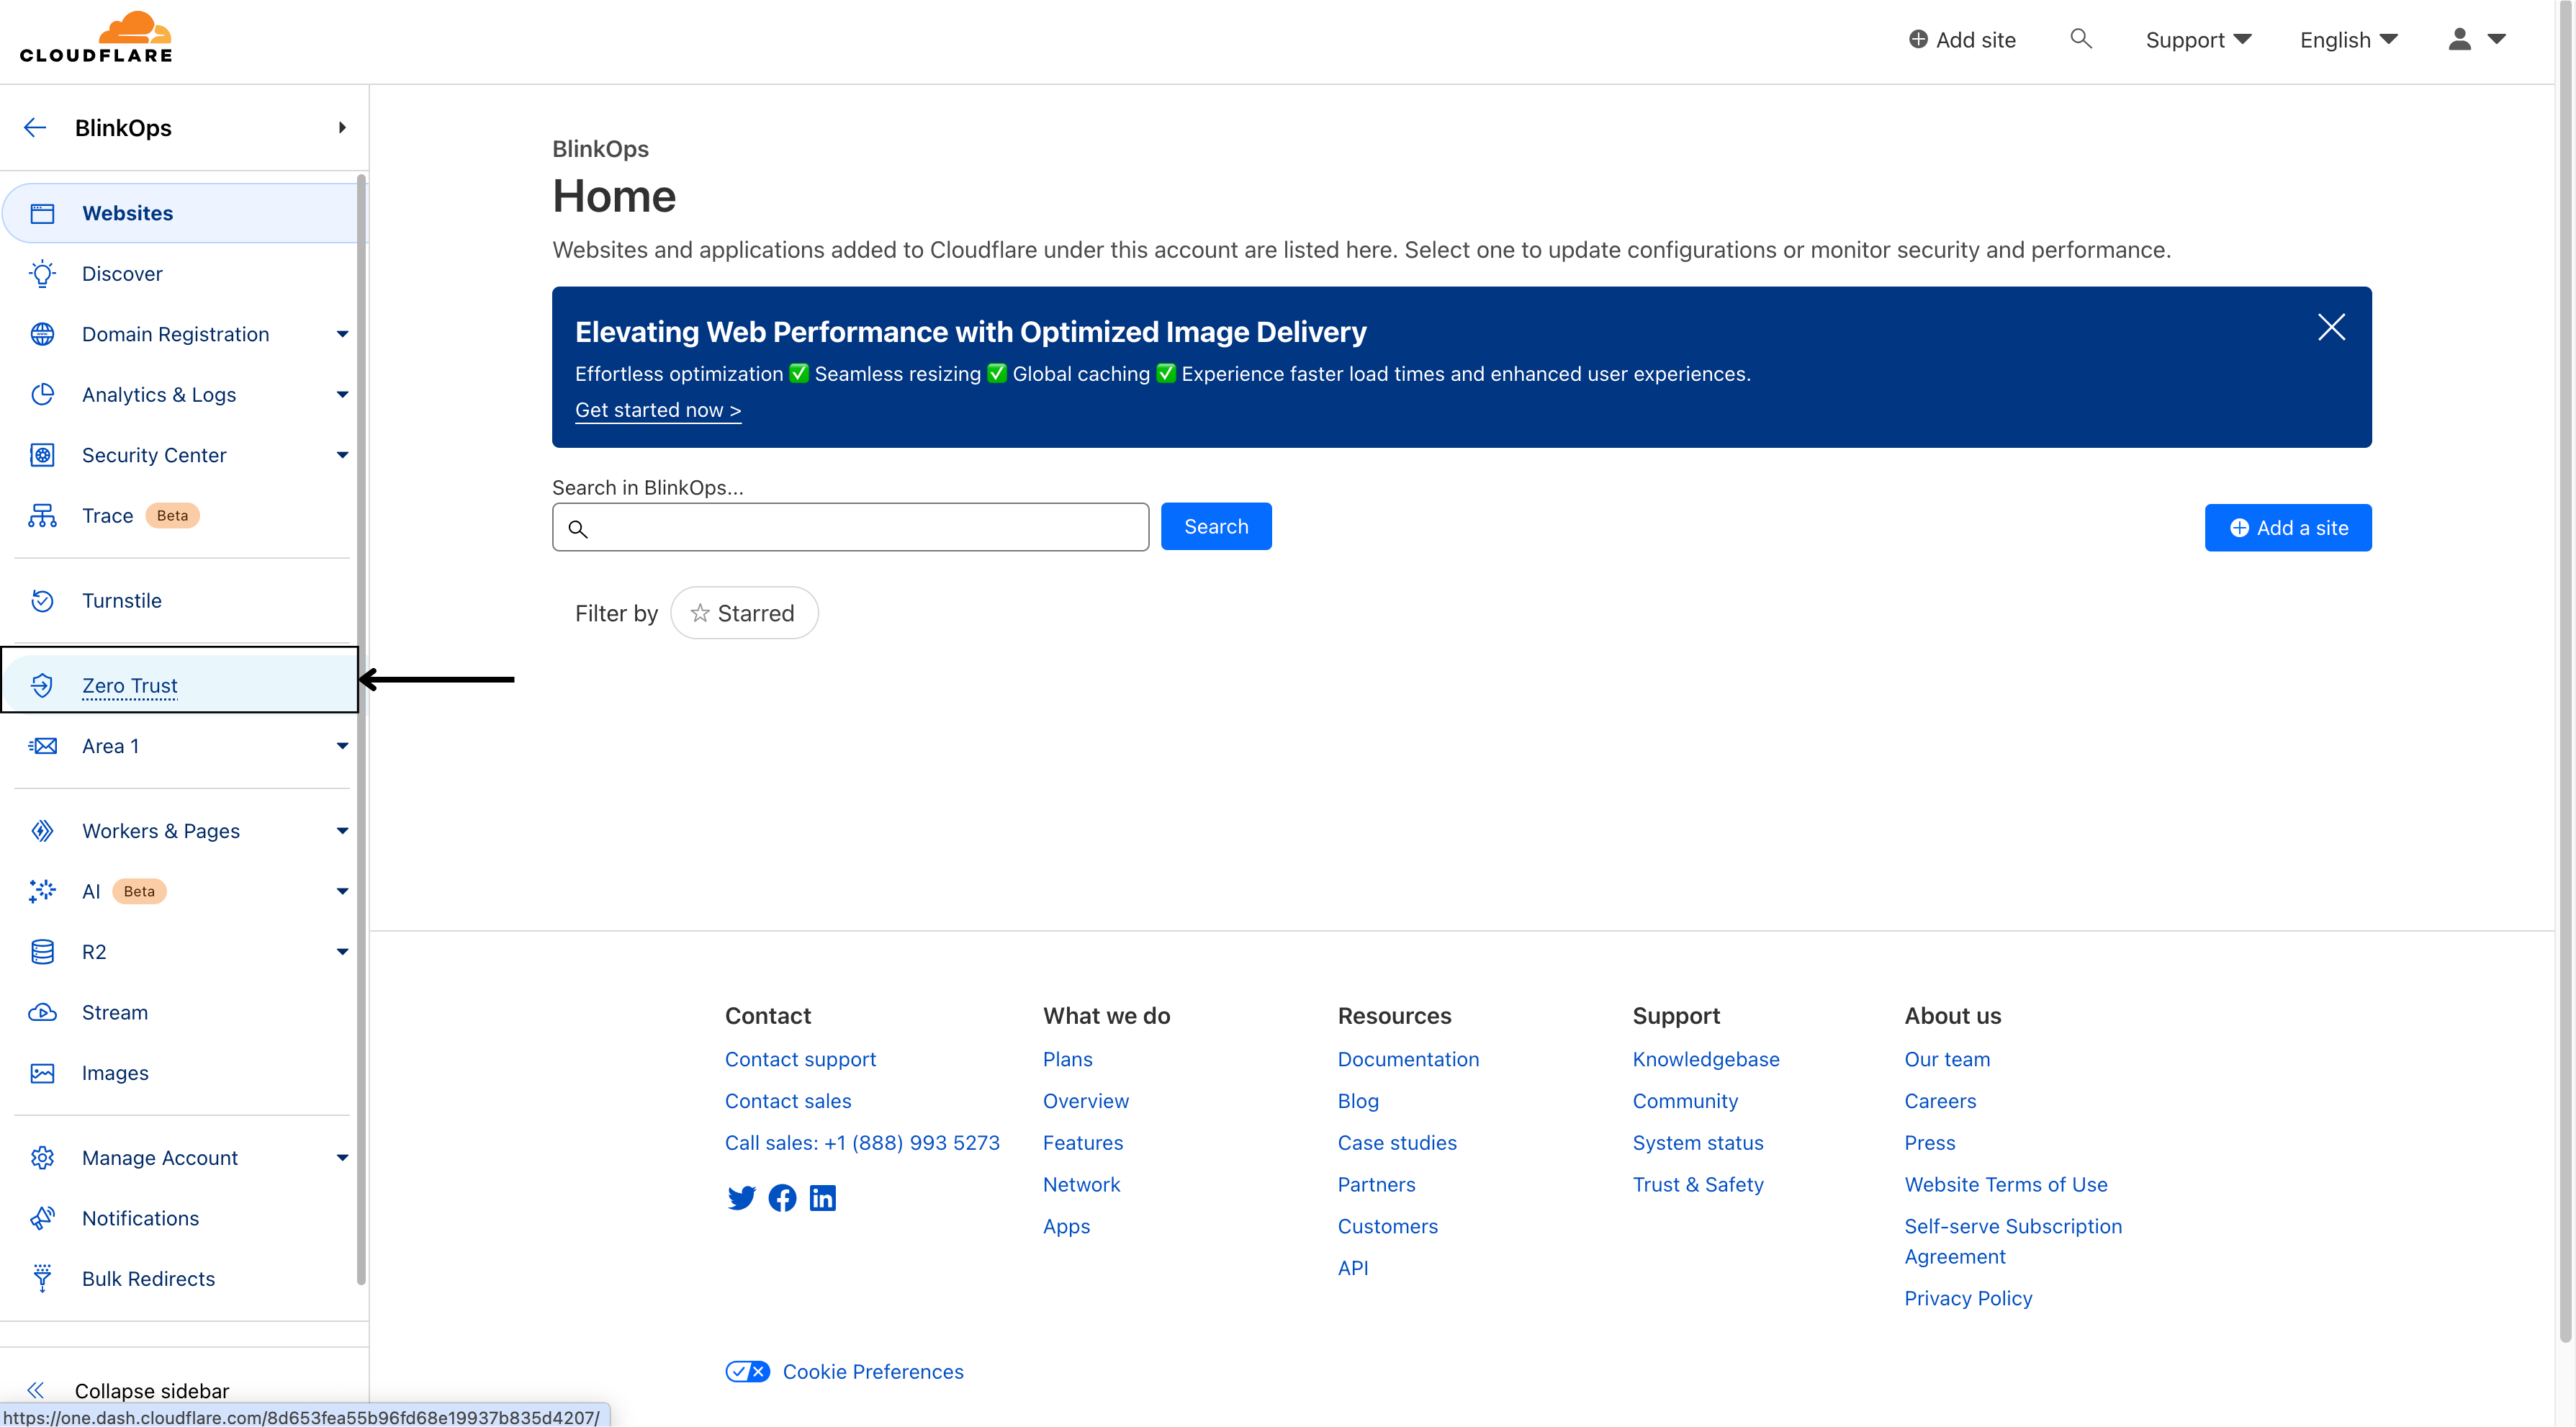
Navigate to the **Zero Trust** option in the sidebar.
***
## 2. Add your Application to Access
Navigate to the **Zero Trust** option in the sidebar.
 Navigate to **application**.
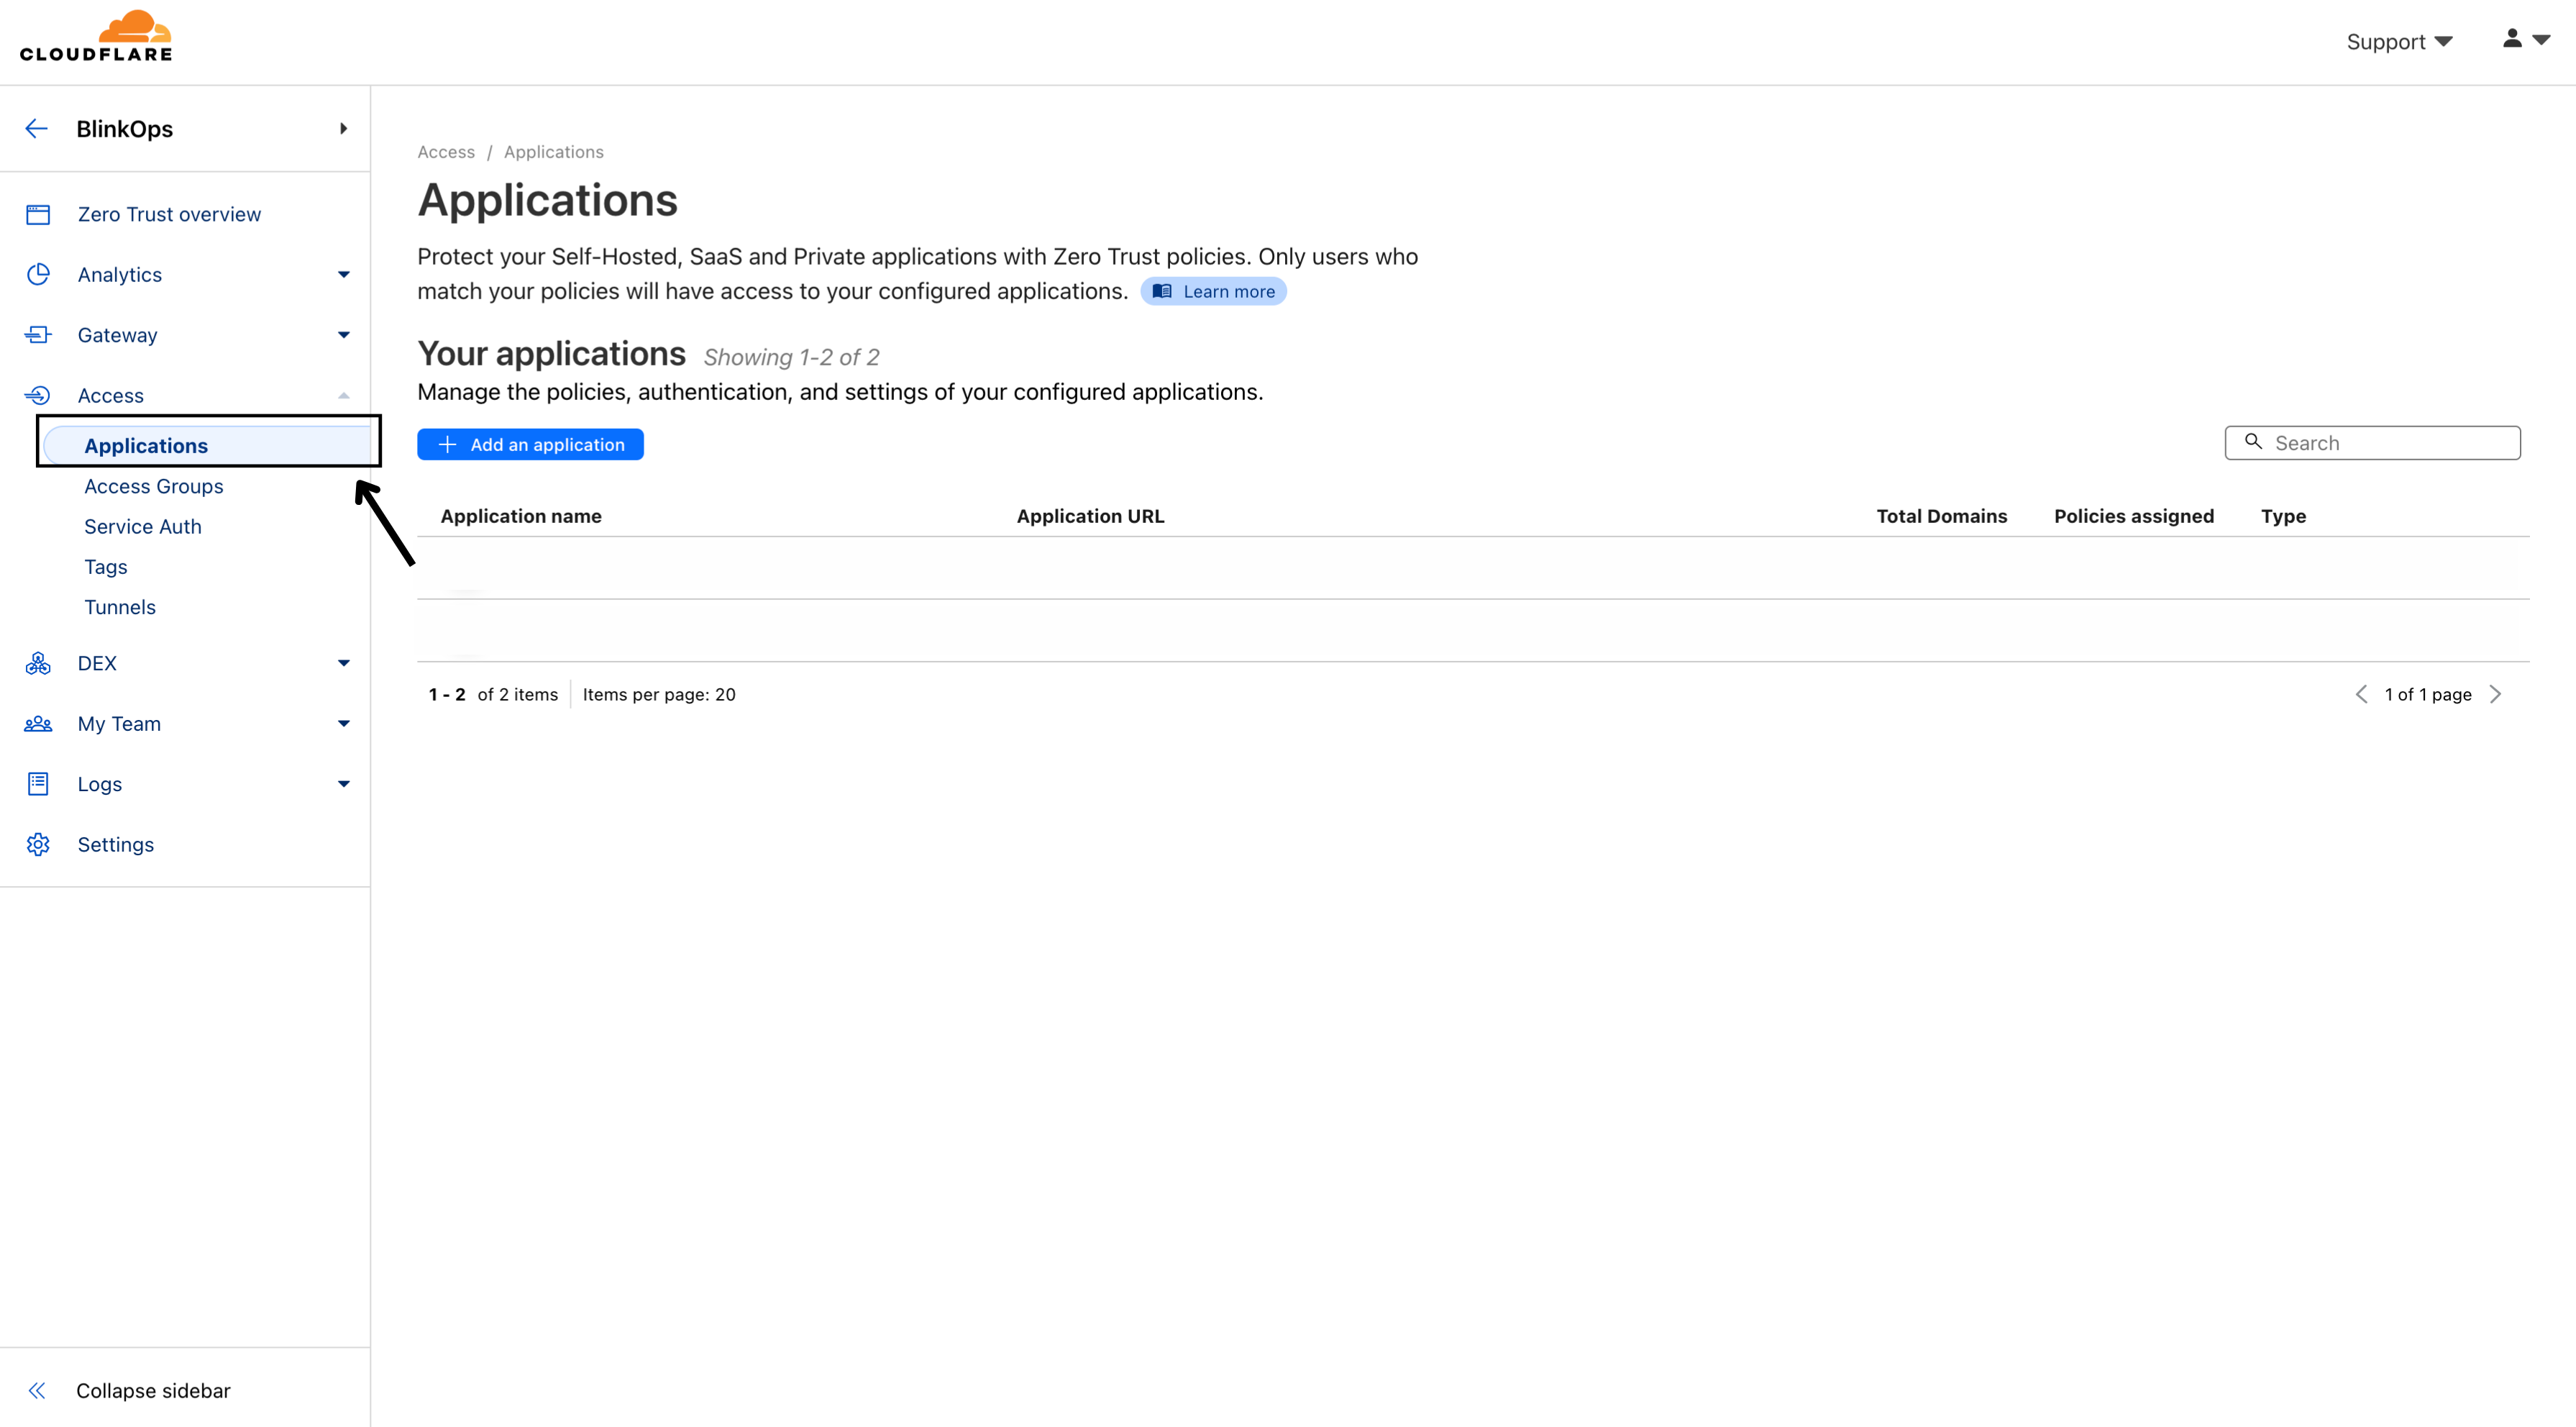 Select **Add an application**.
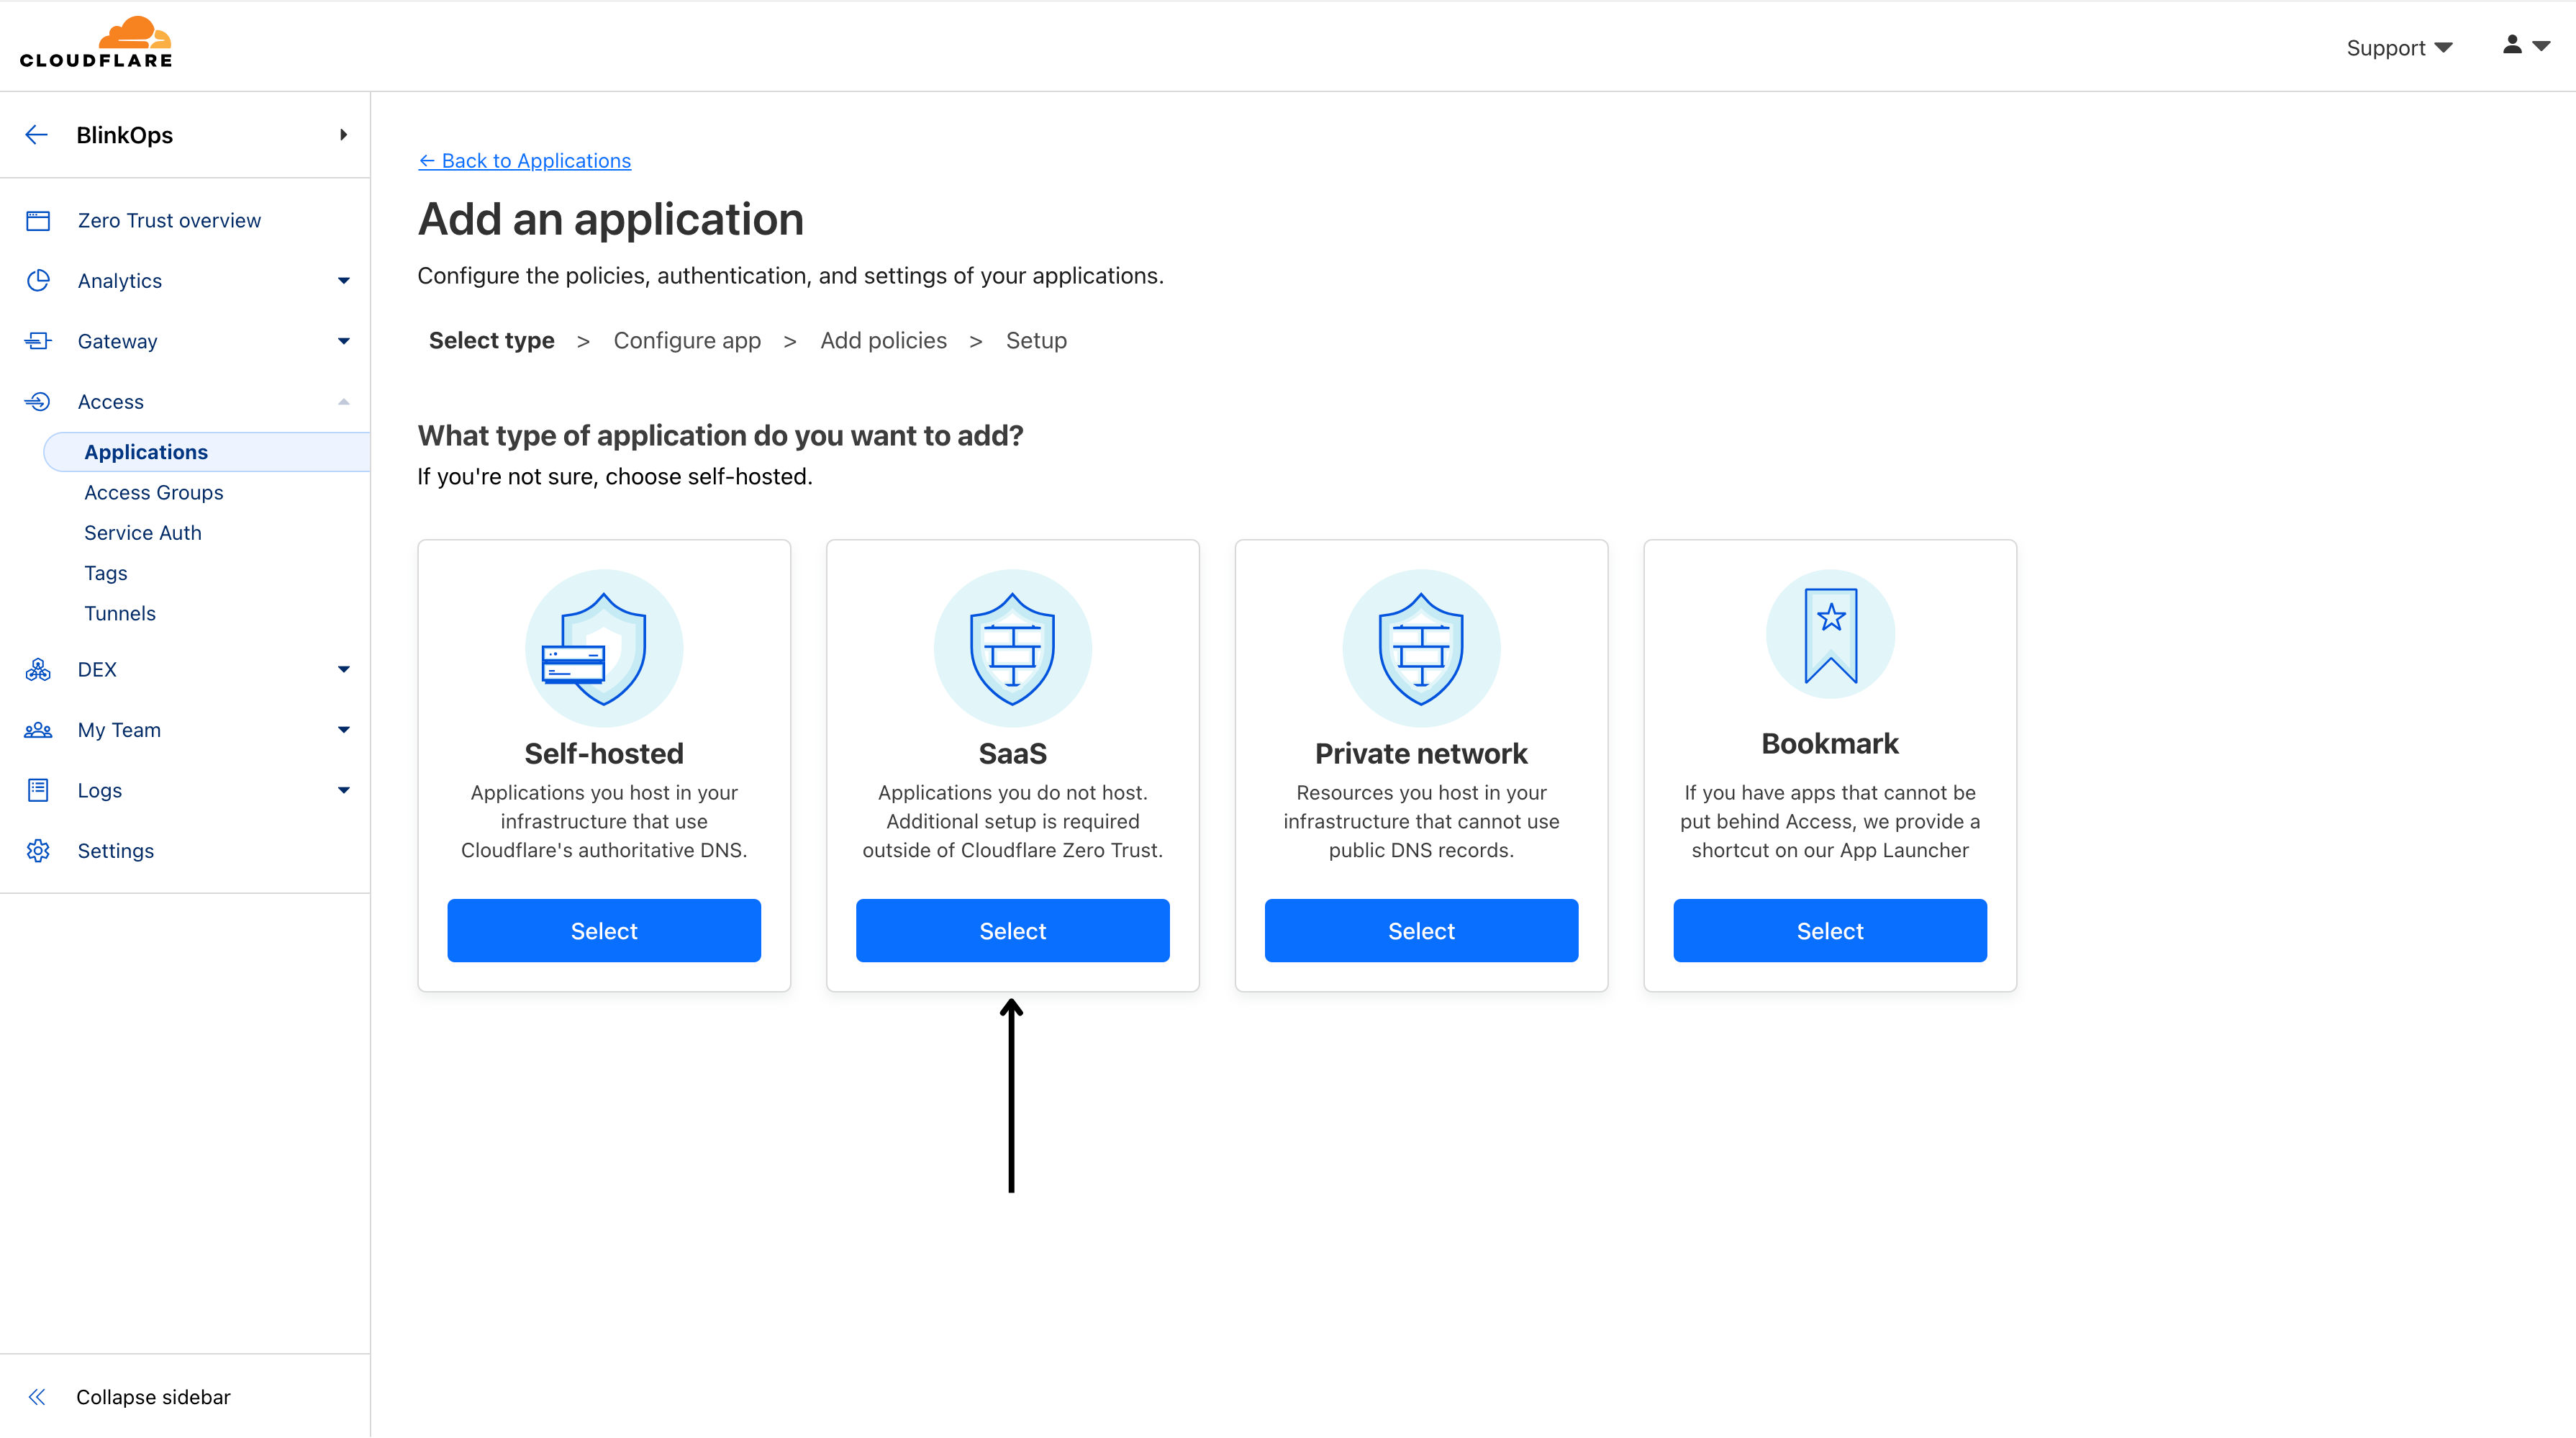
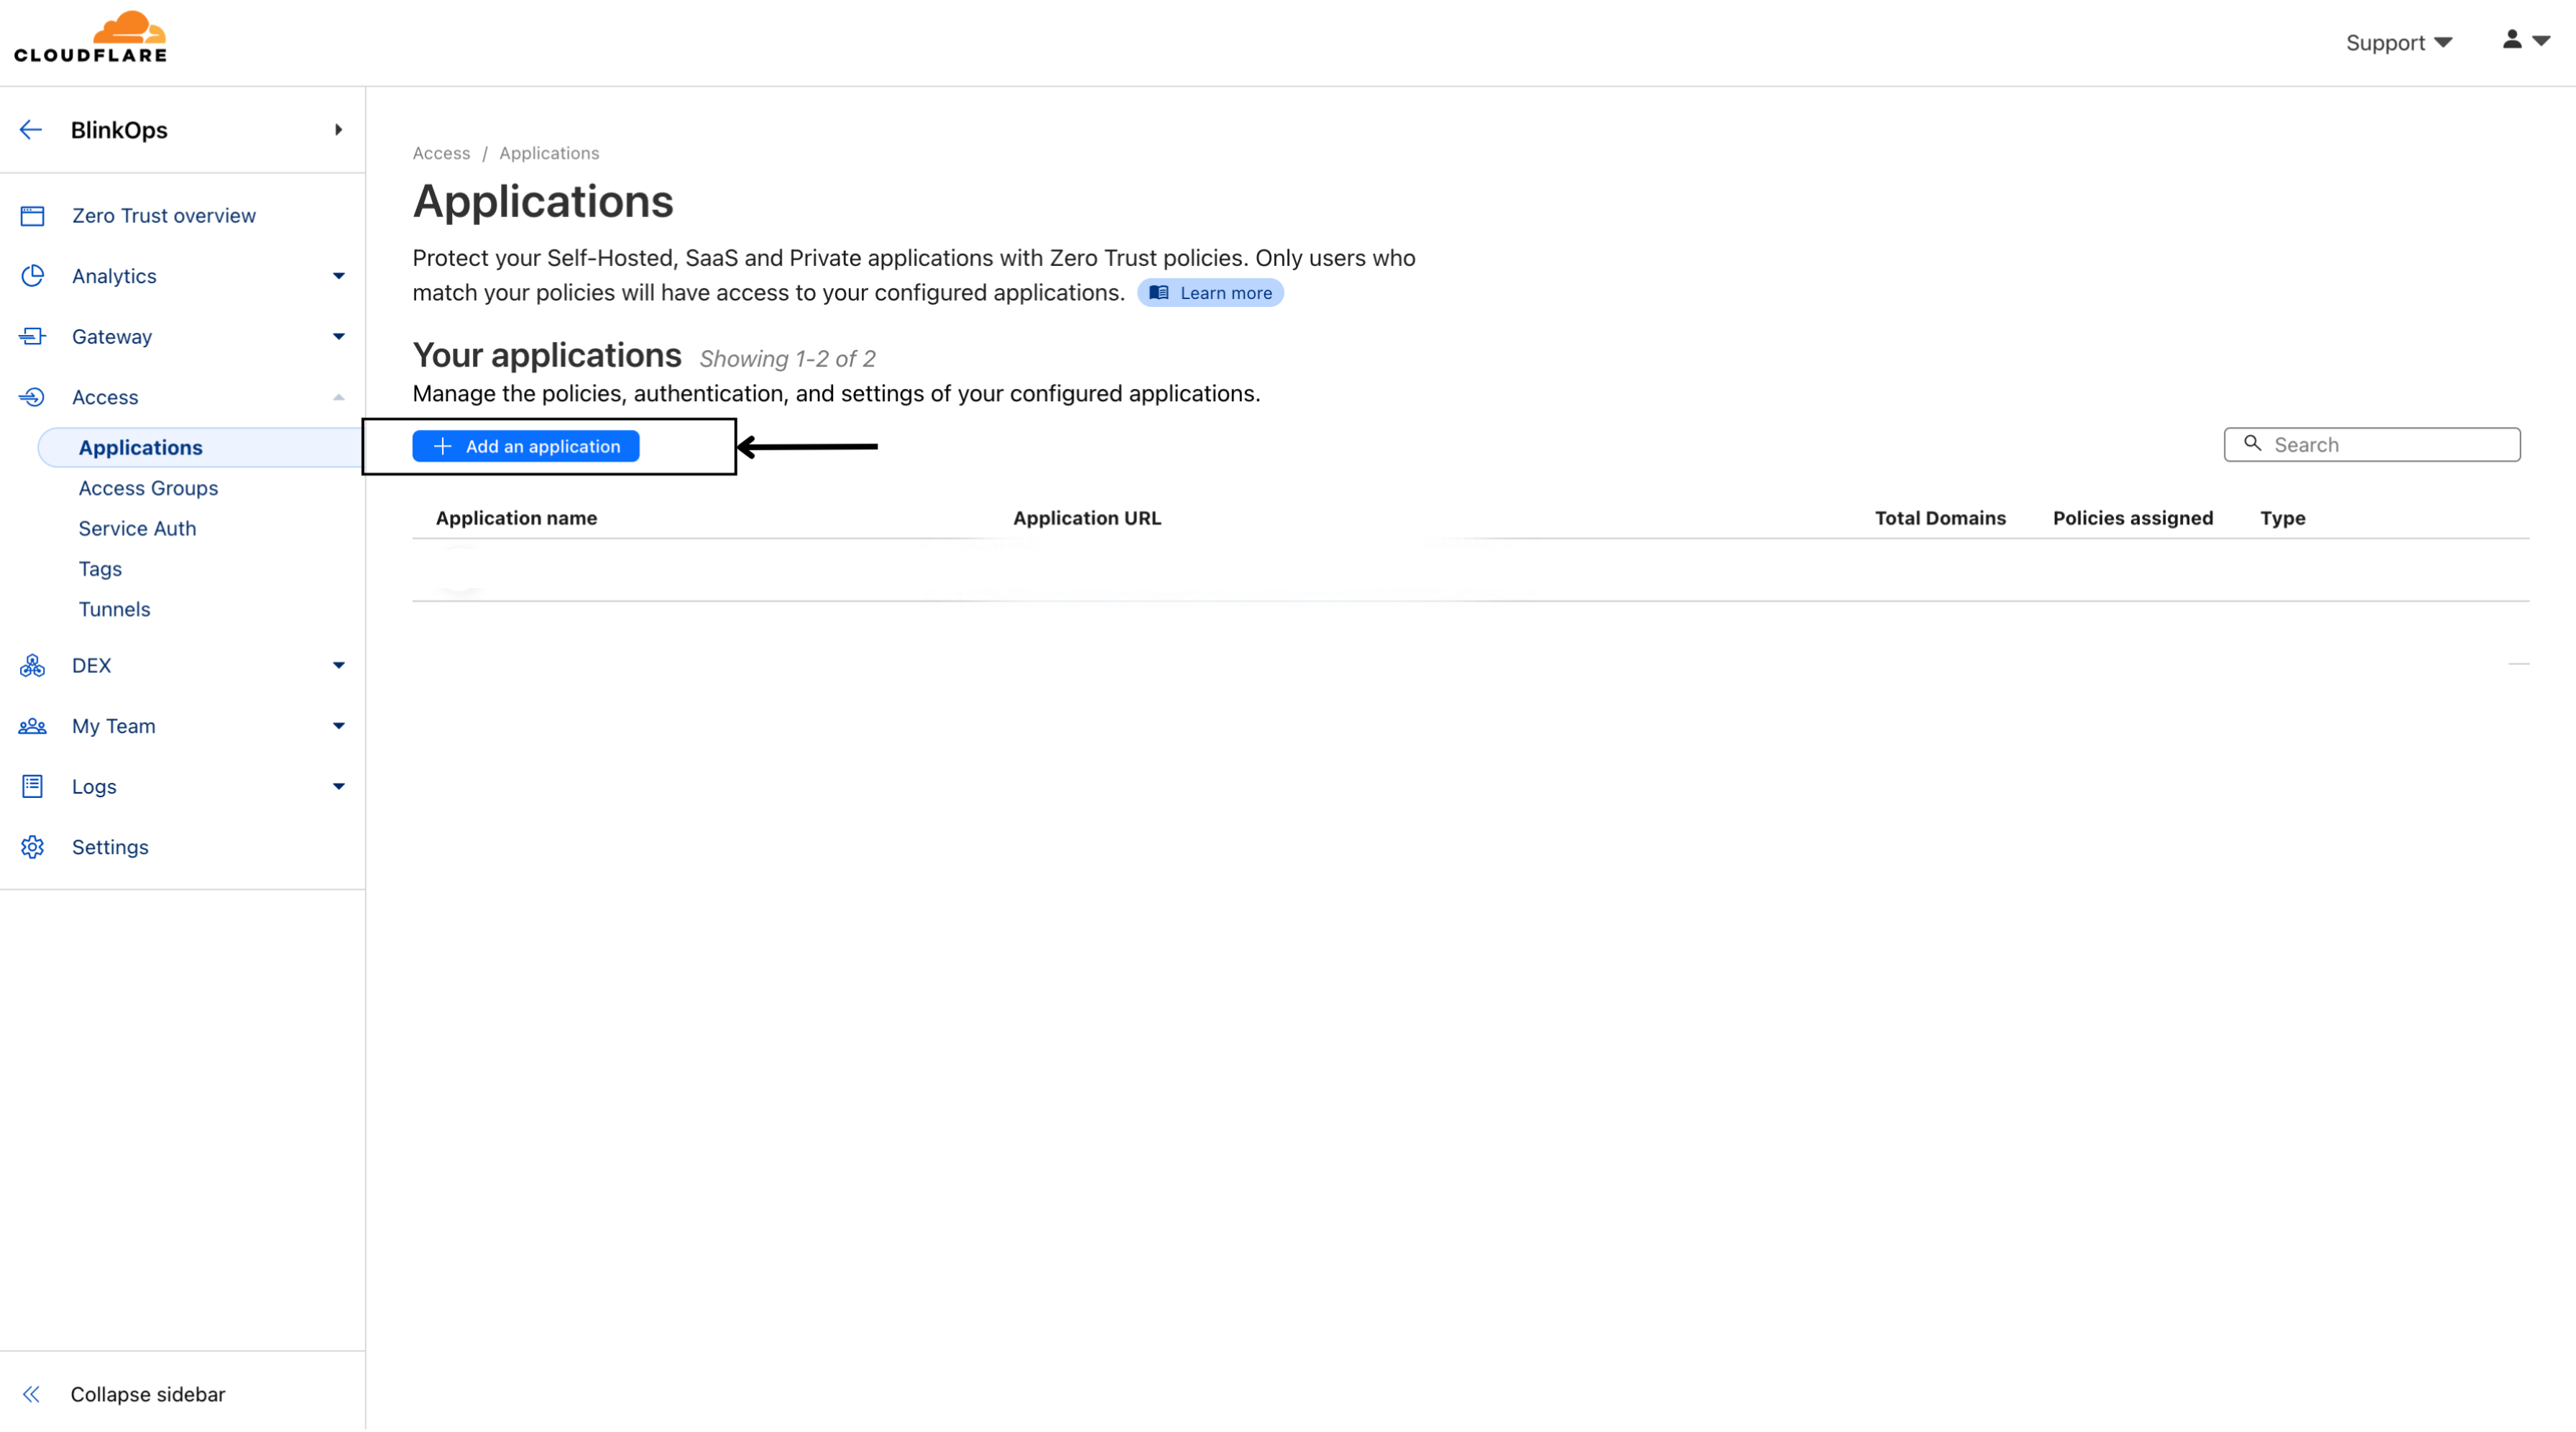 Select SaaS.
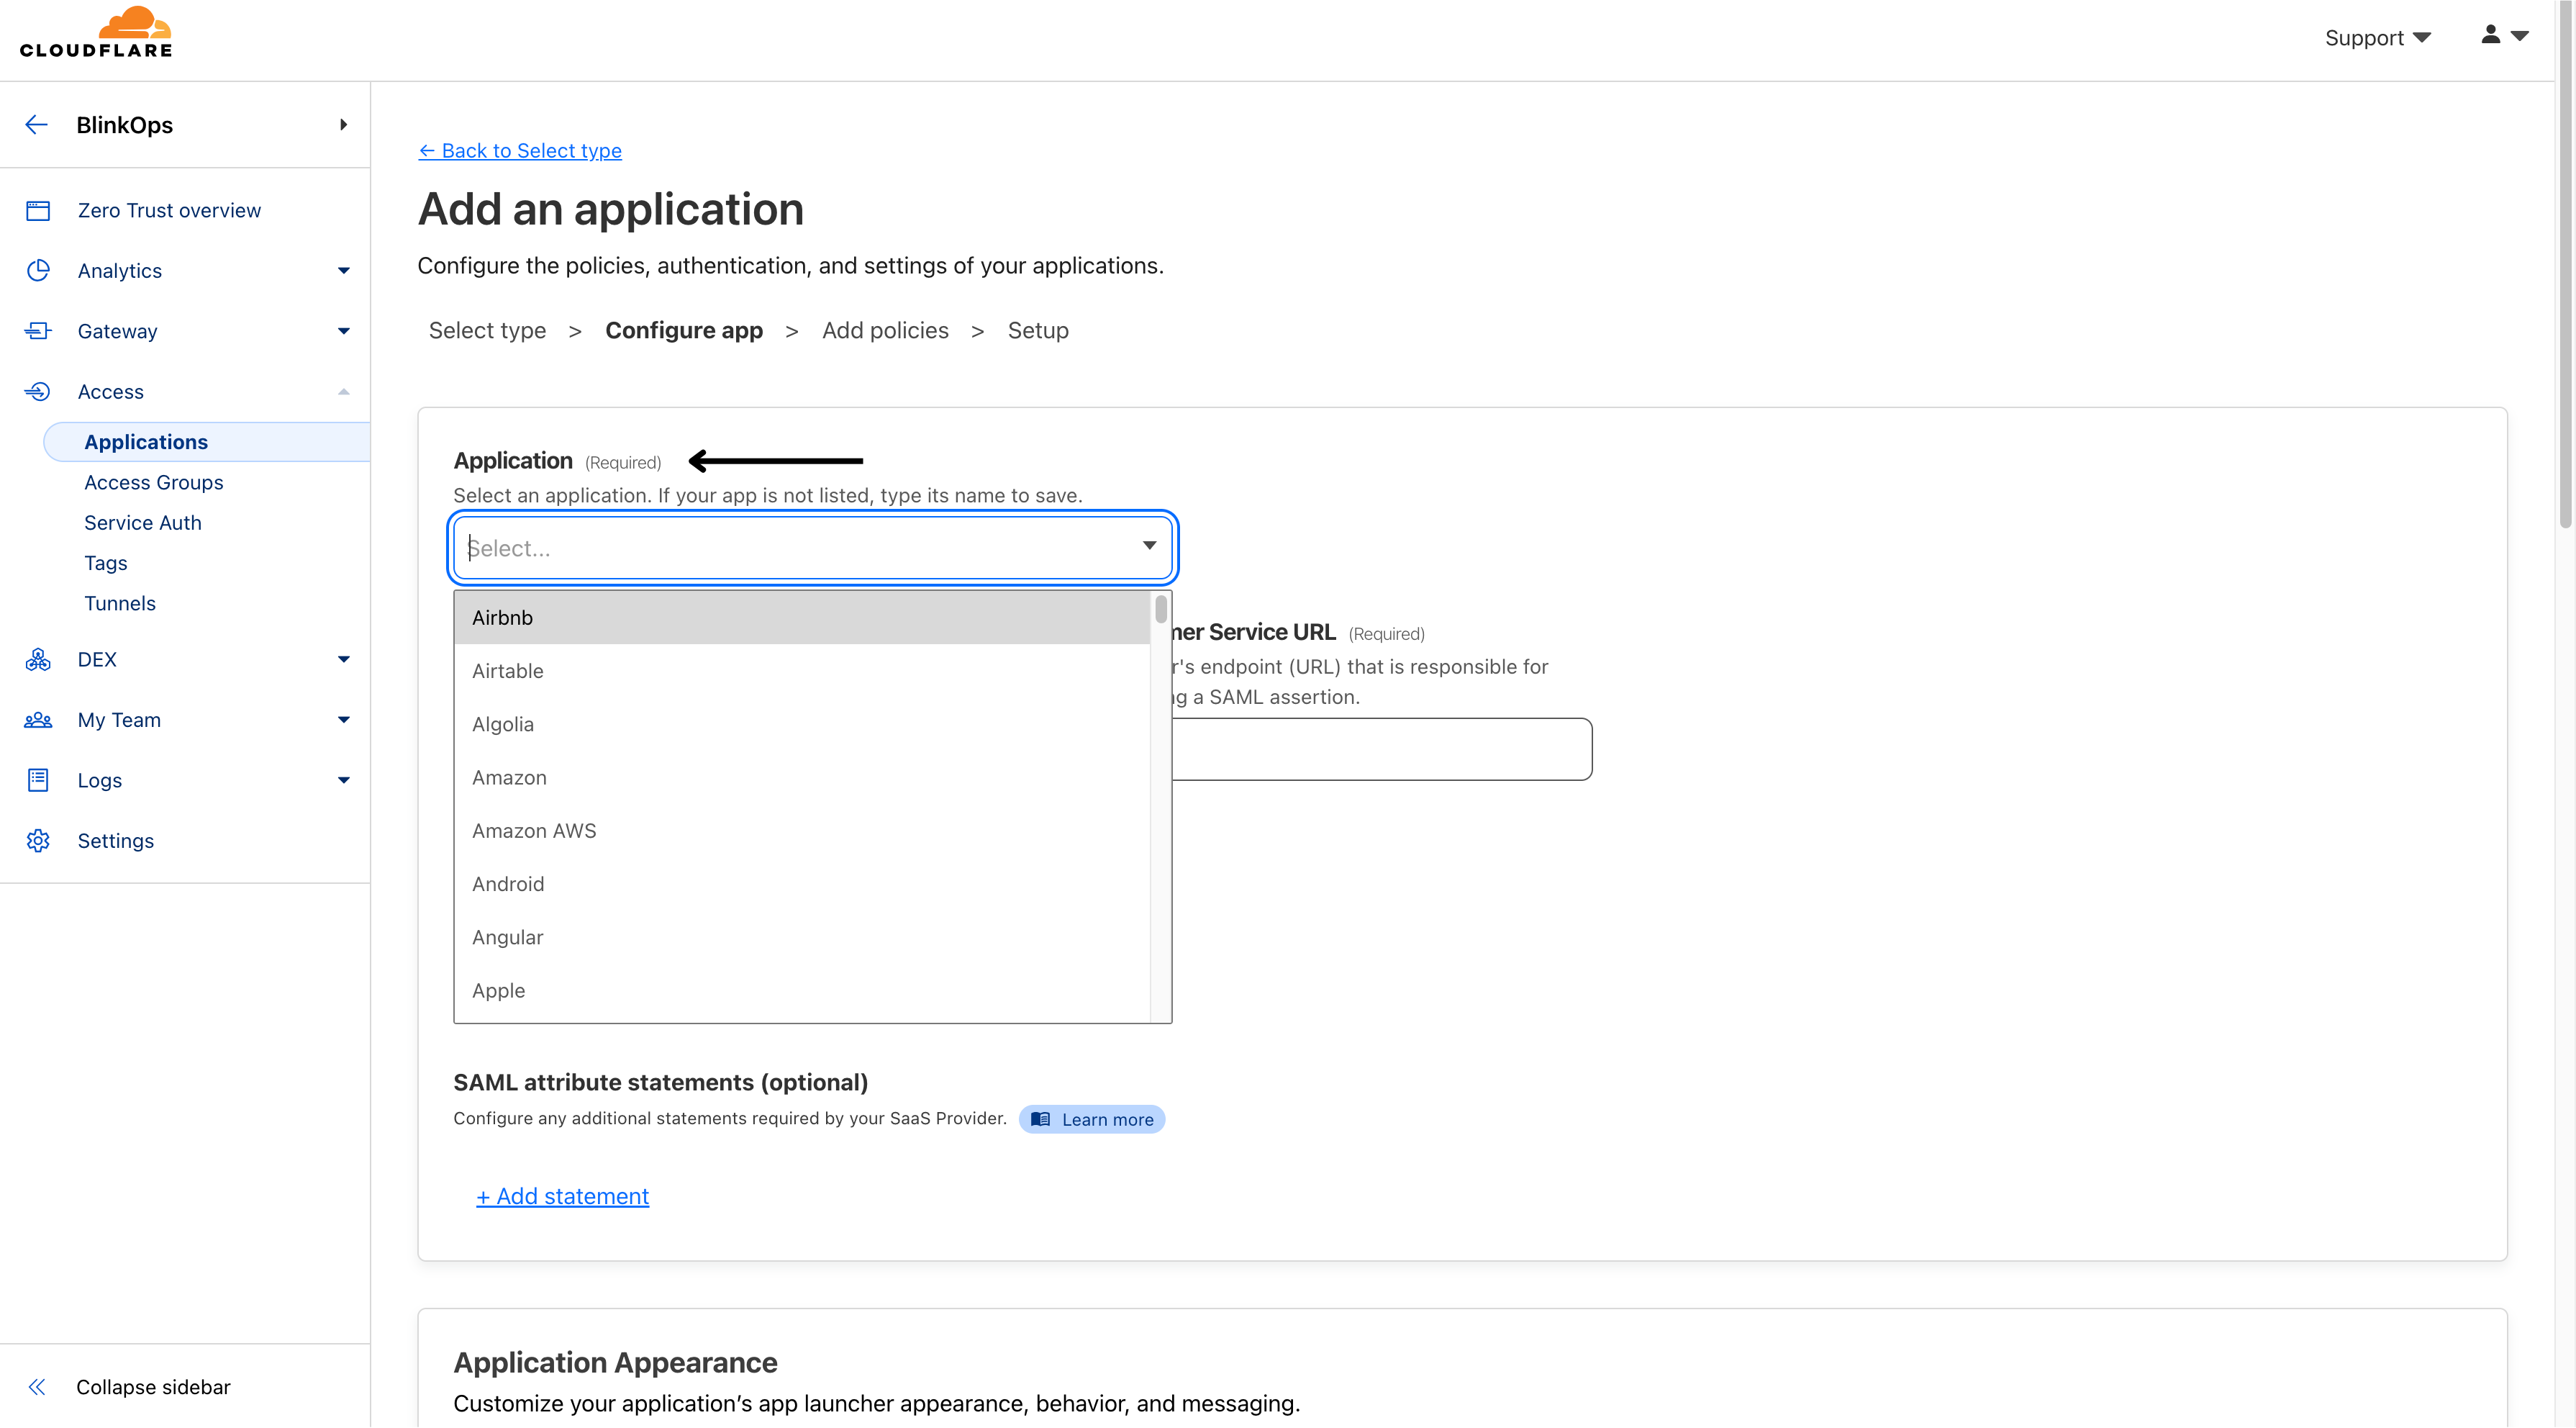
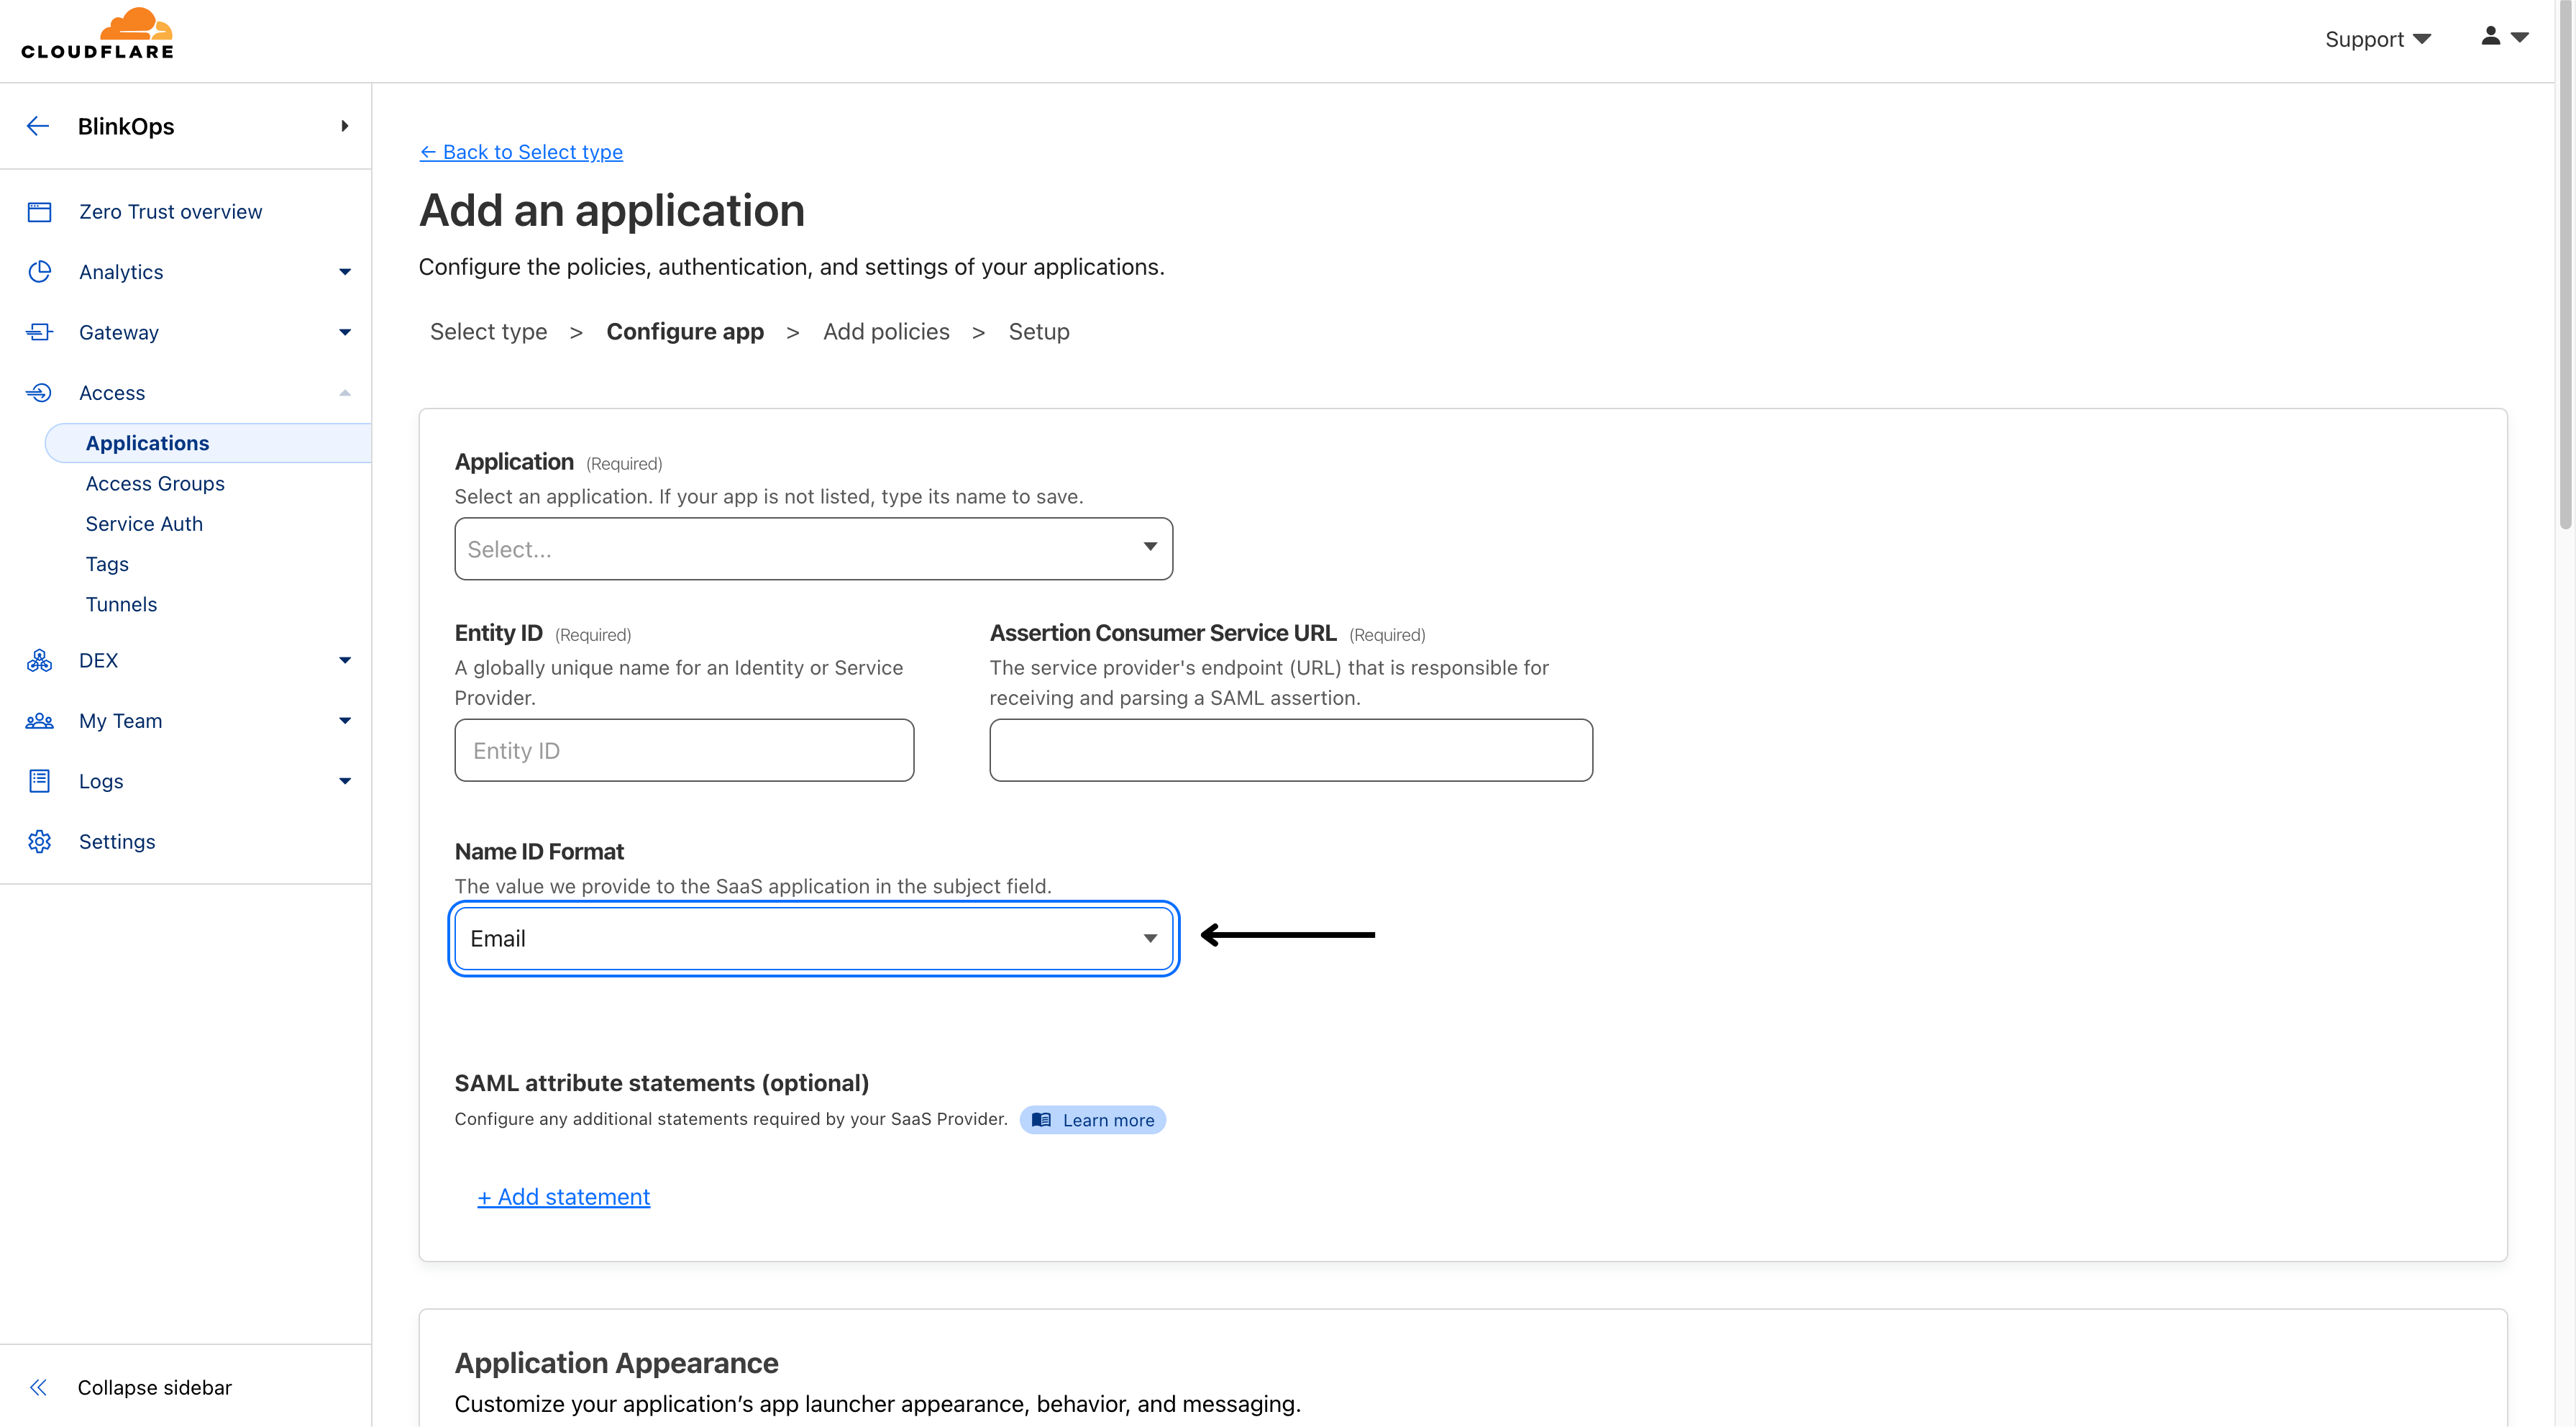
 Enter a unique name in the Application field, like `BlinkOps`, and hit **Enter** since the `BlinkOps` application might not be included.
 Enter the **Entity ID** and **Assertion Consumer Service URL** obtained from your SaaS application account.
**INFO**
**The Entity ID** : `urn:amazon:cognito:sp:eu-west-1_NEemCMO1L`
**Assertion Consumer Service URL**: [https://cognito.blinkops.com/saml2/idpresponse](https://cognito.blinkops.com/saml2/idpresponse).
Enter the **Entity ID** and **Assertion Consumer Service URL** obtained from your SaaS application account.
**INFO**
**The Entity ID** : `urn:amazon:cognito:sp:eu-west-1_NEemCMO1L`
**Assertion Consumer Service URL**: [https://cognito.blinkops.com/saml2/idpresponse](https://cognito.blinkops.com/saml2/idpresponse).
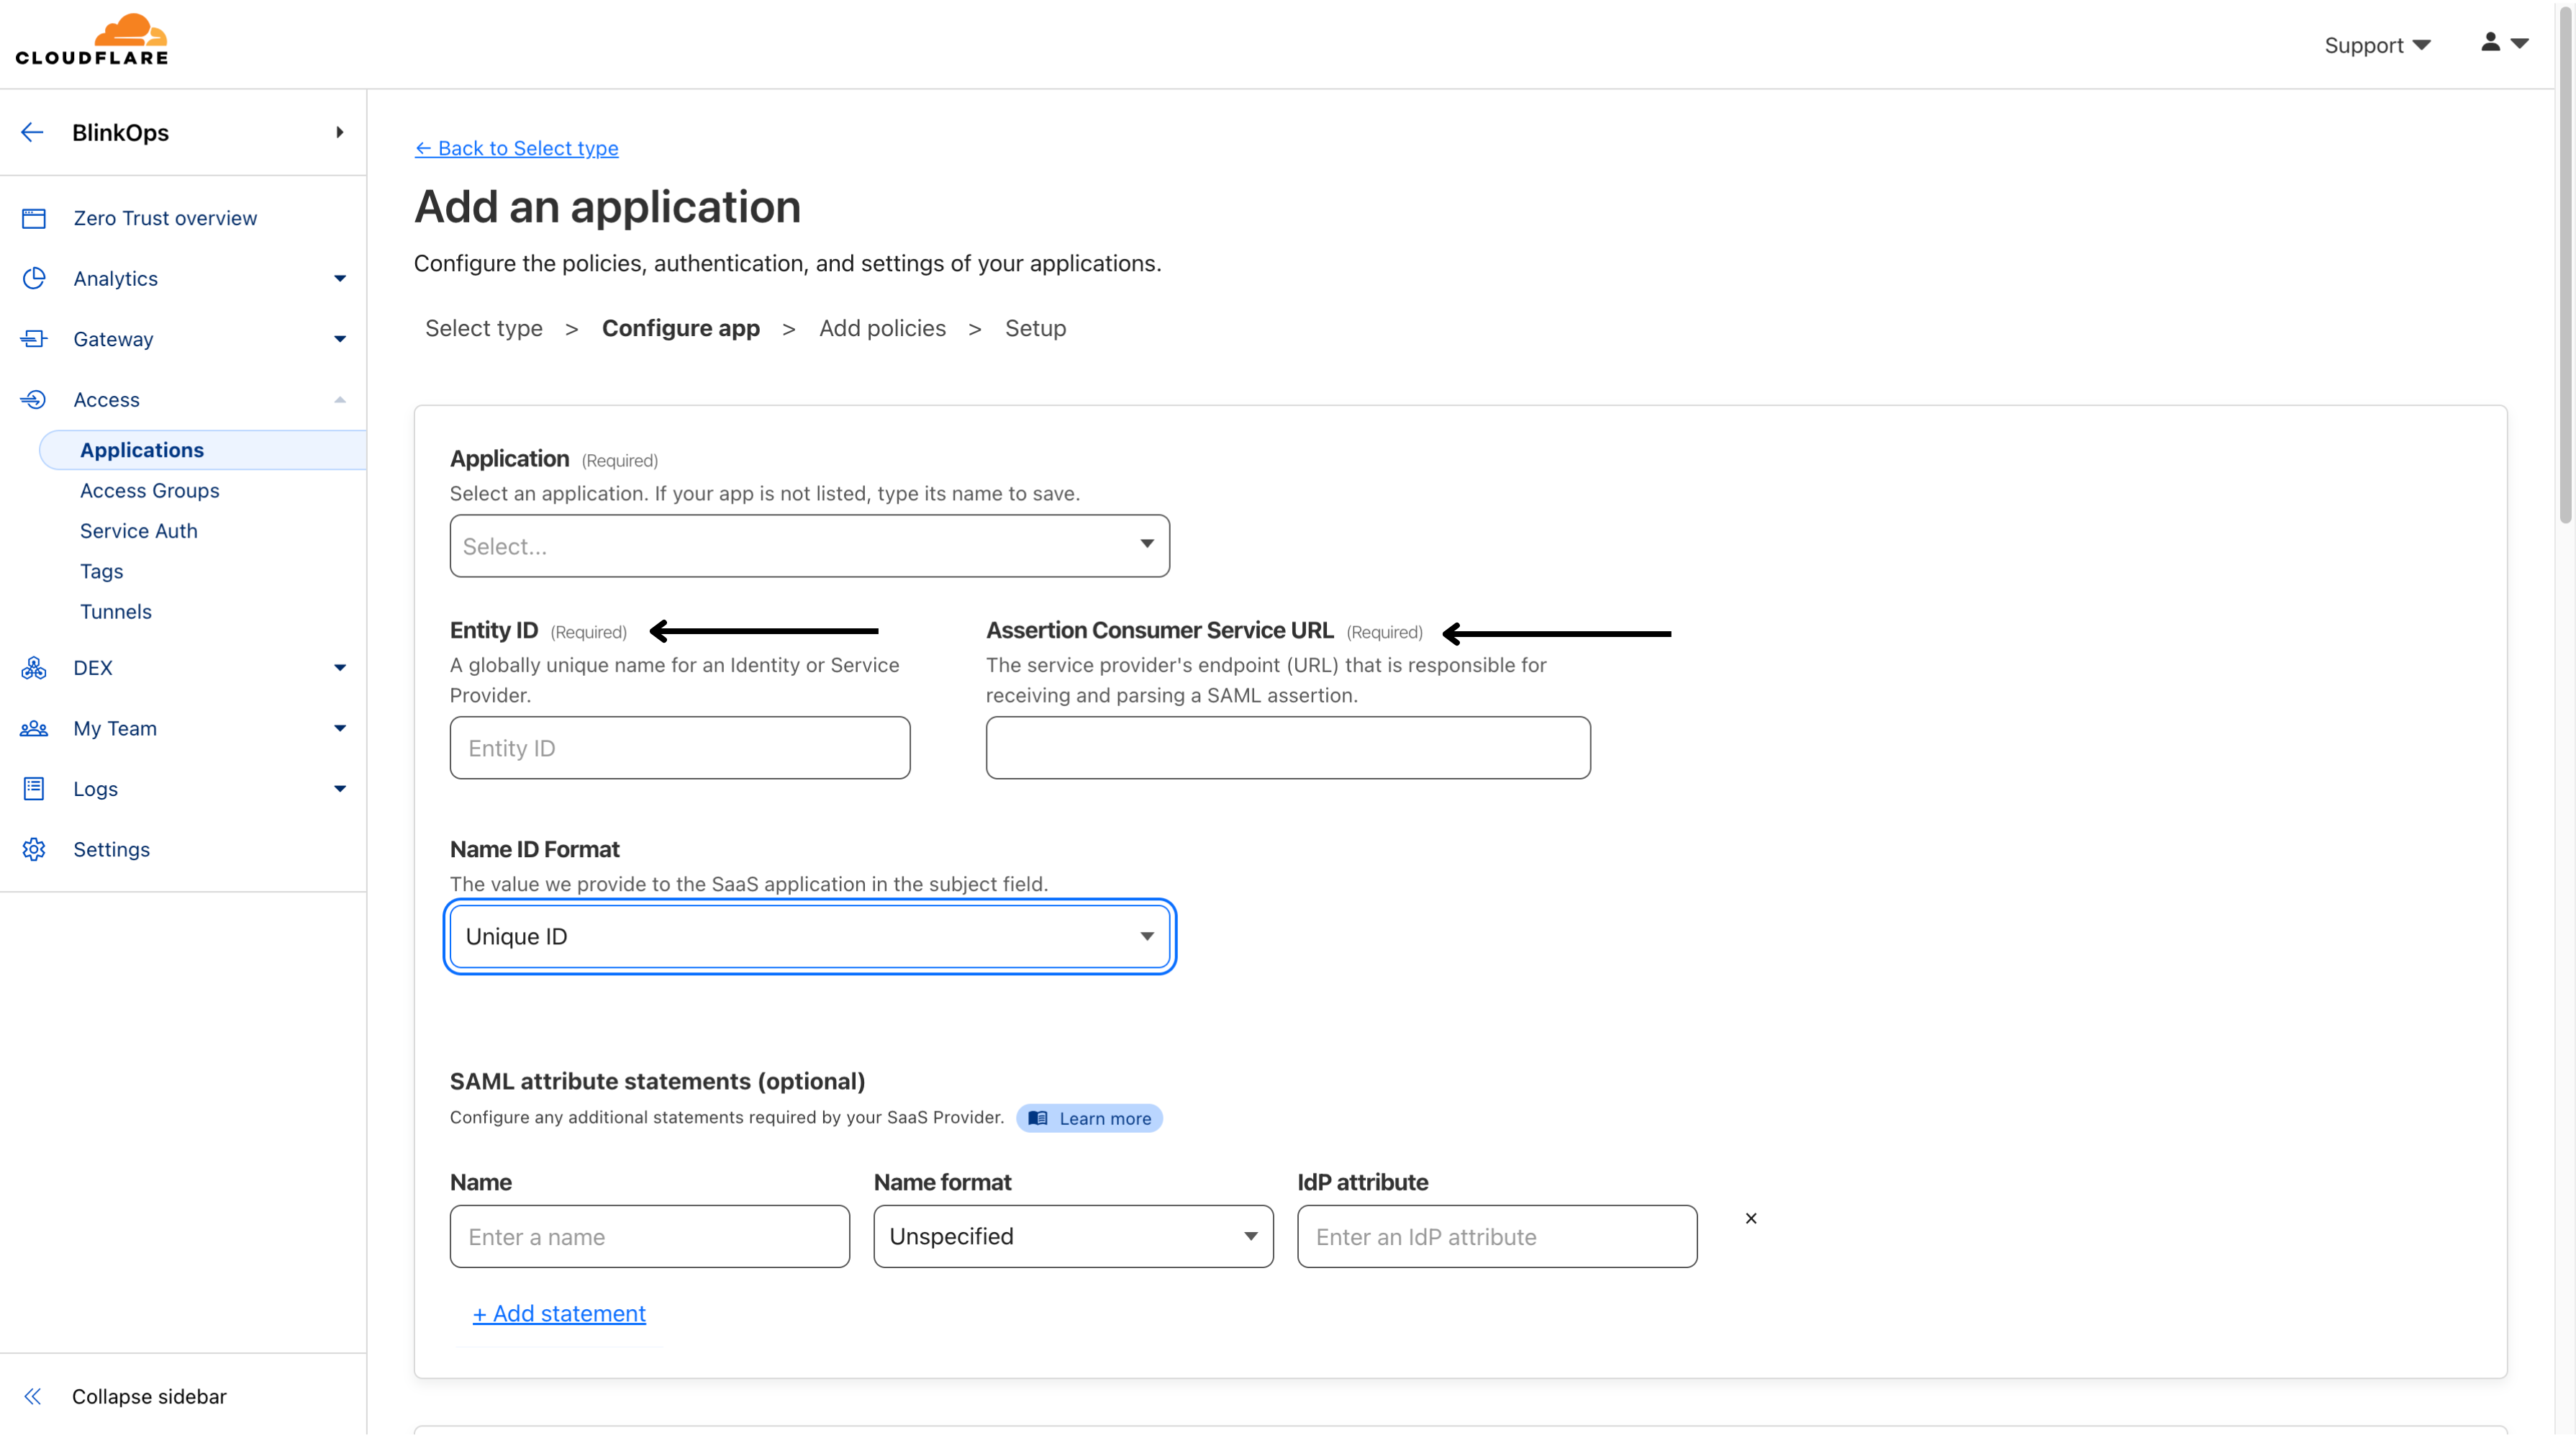 Select the **Name ID** Format expected by your SaaS application (usually Email).
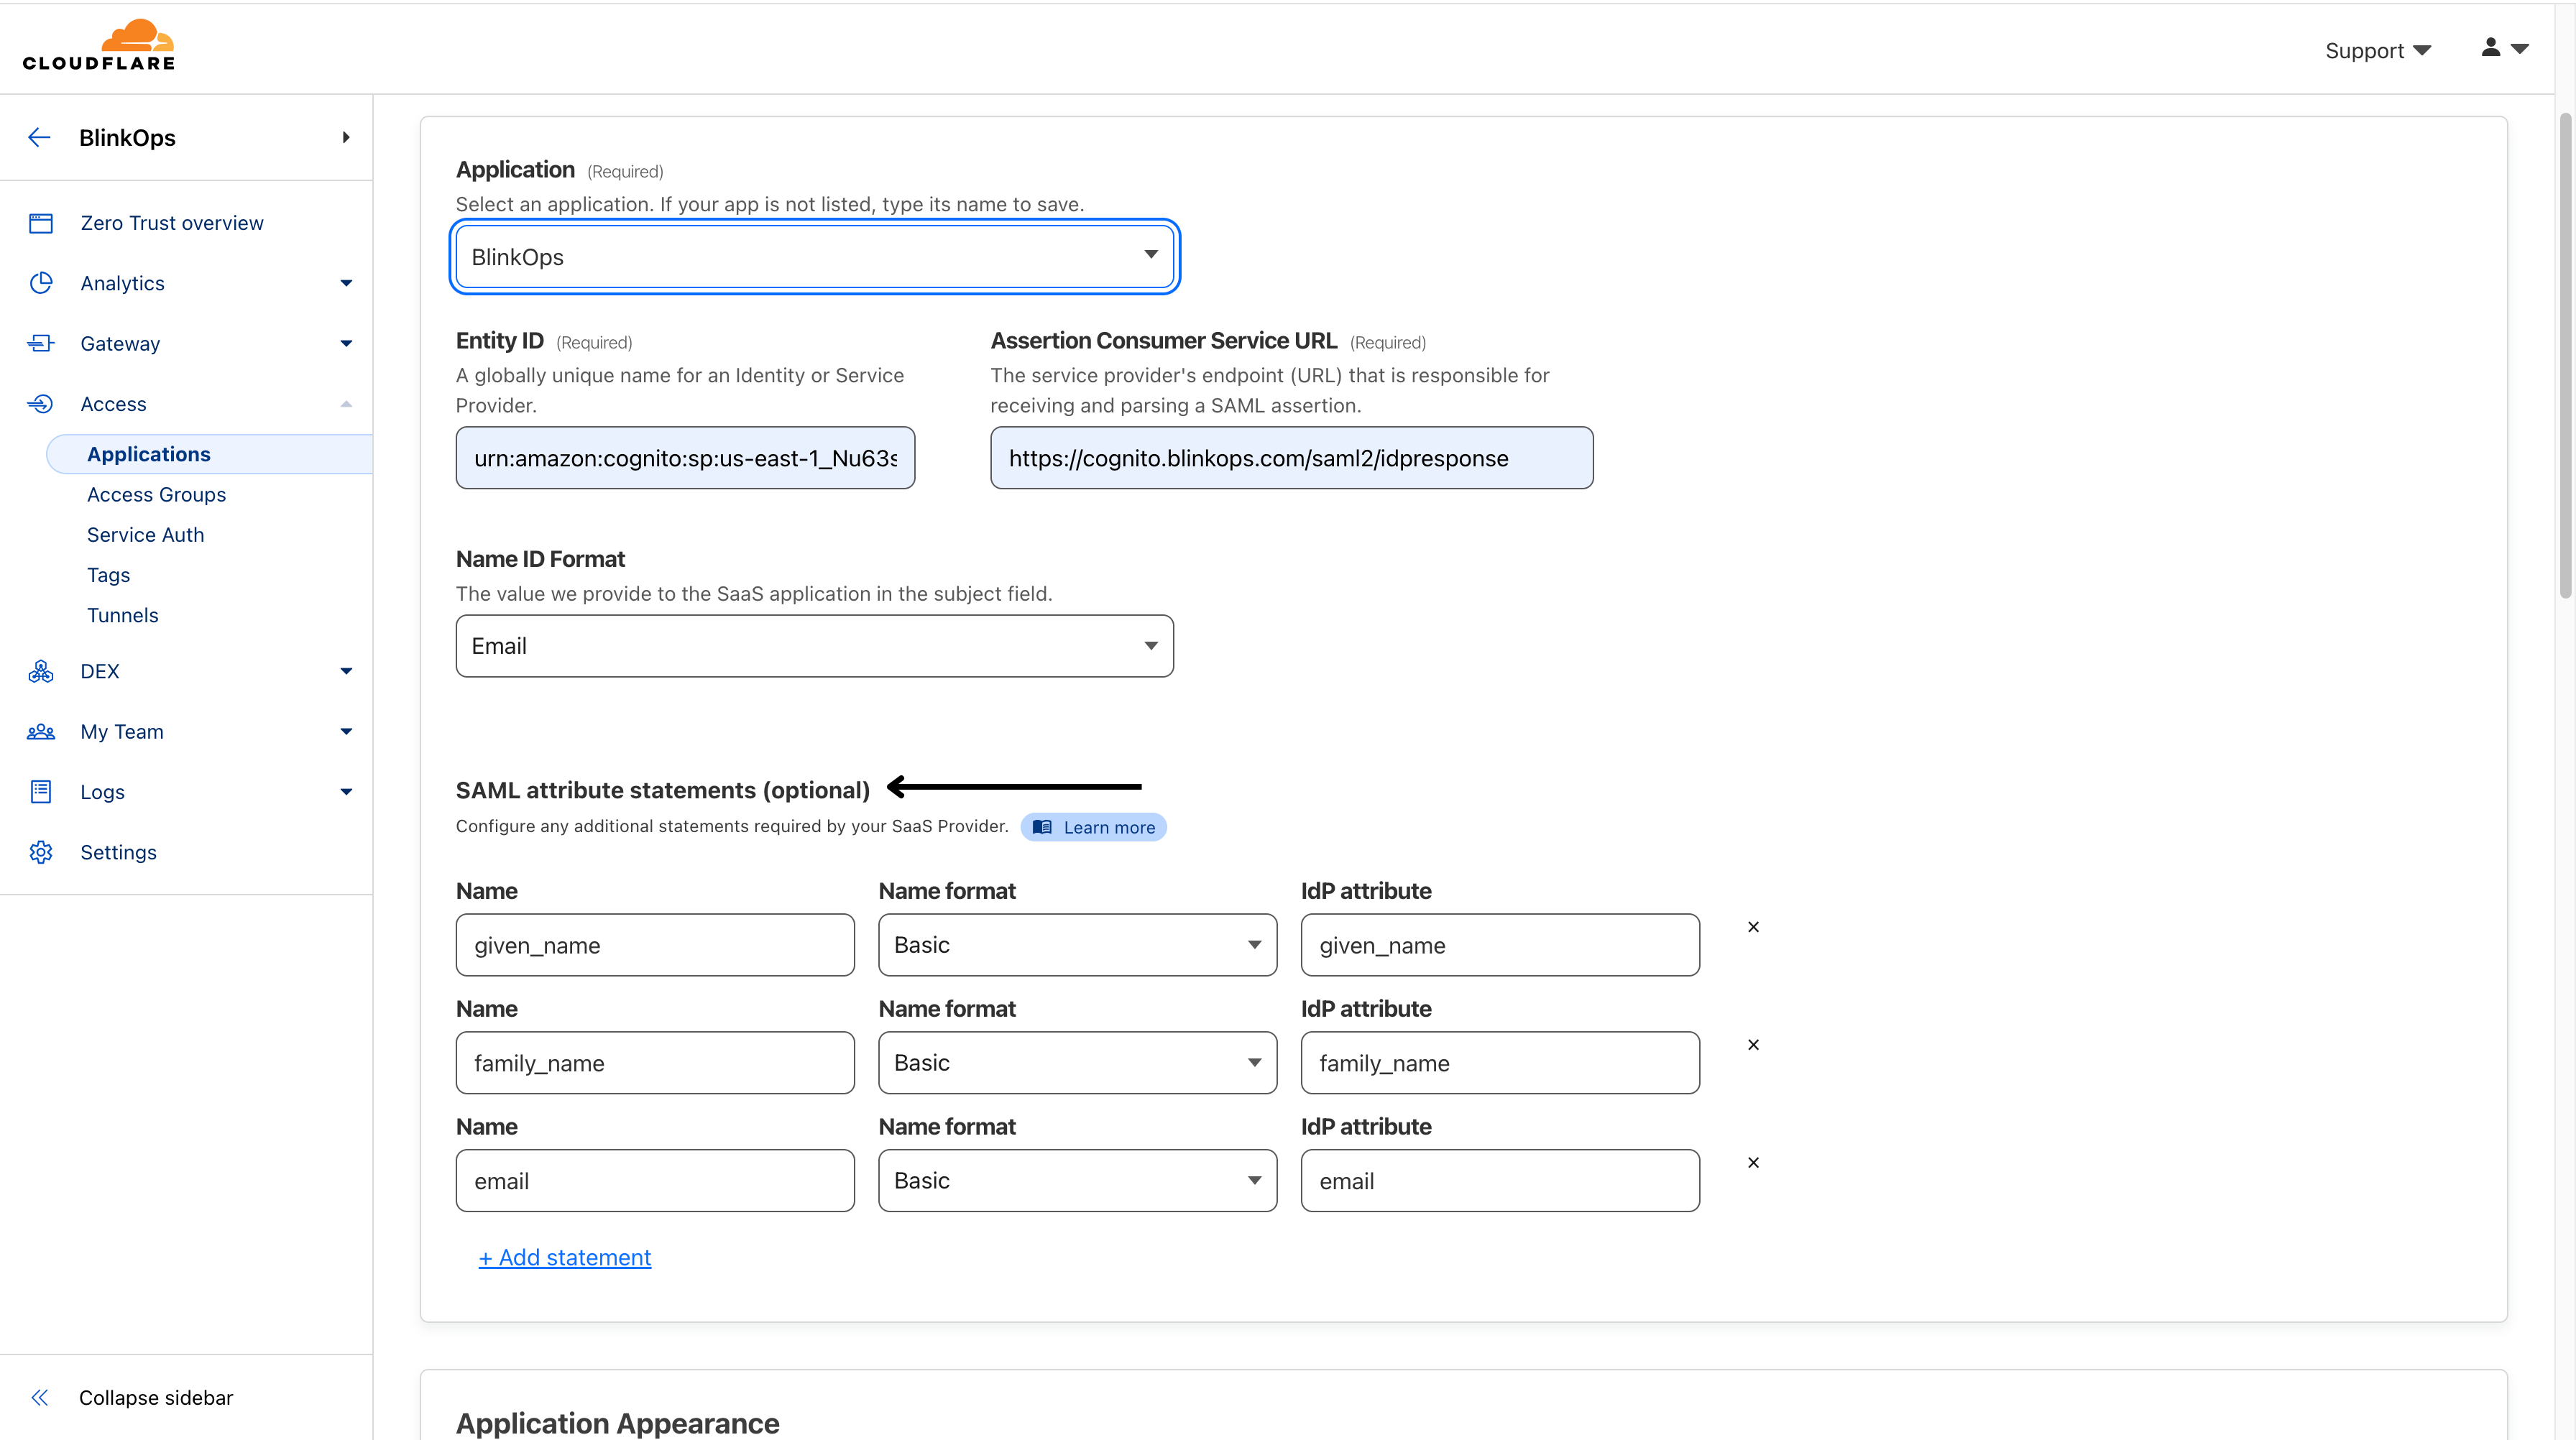
 Scroll down to the **SAML attribute statements** section and add the following **key-value pairs**, and then click Next.
 **INFO**
**IdP groups**\
If you are using Okta, AzureAD, Google Workspace, or GitHub as your IdP, Access will automatically send a SAML attribute titled groups with all of the user’s associated groups as attribute values.
Configure **App Launcher settings** for the application — **this is an optional step.**
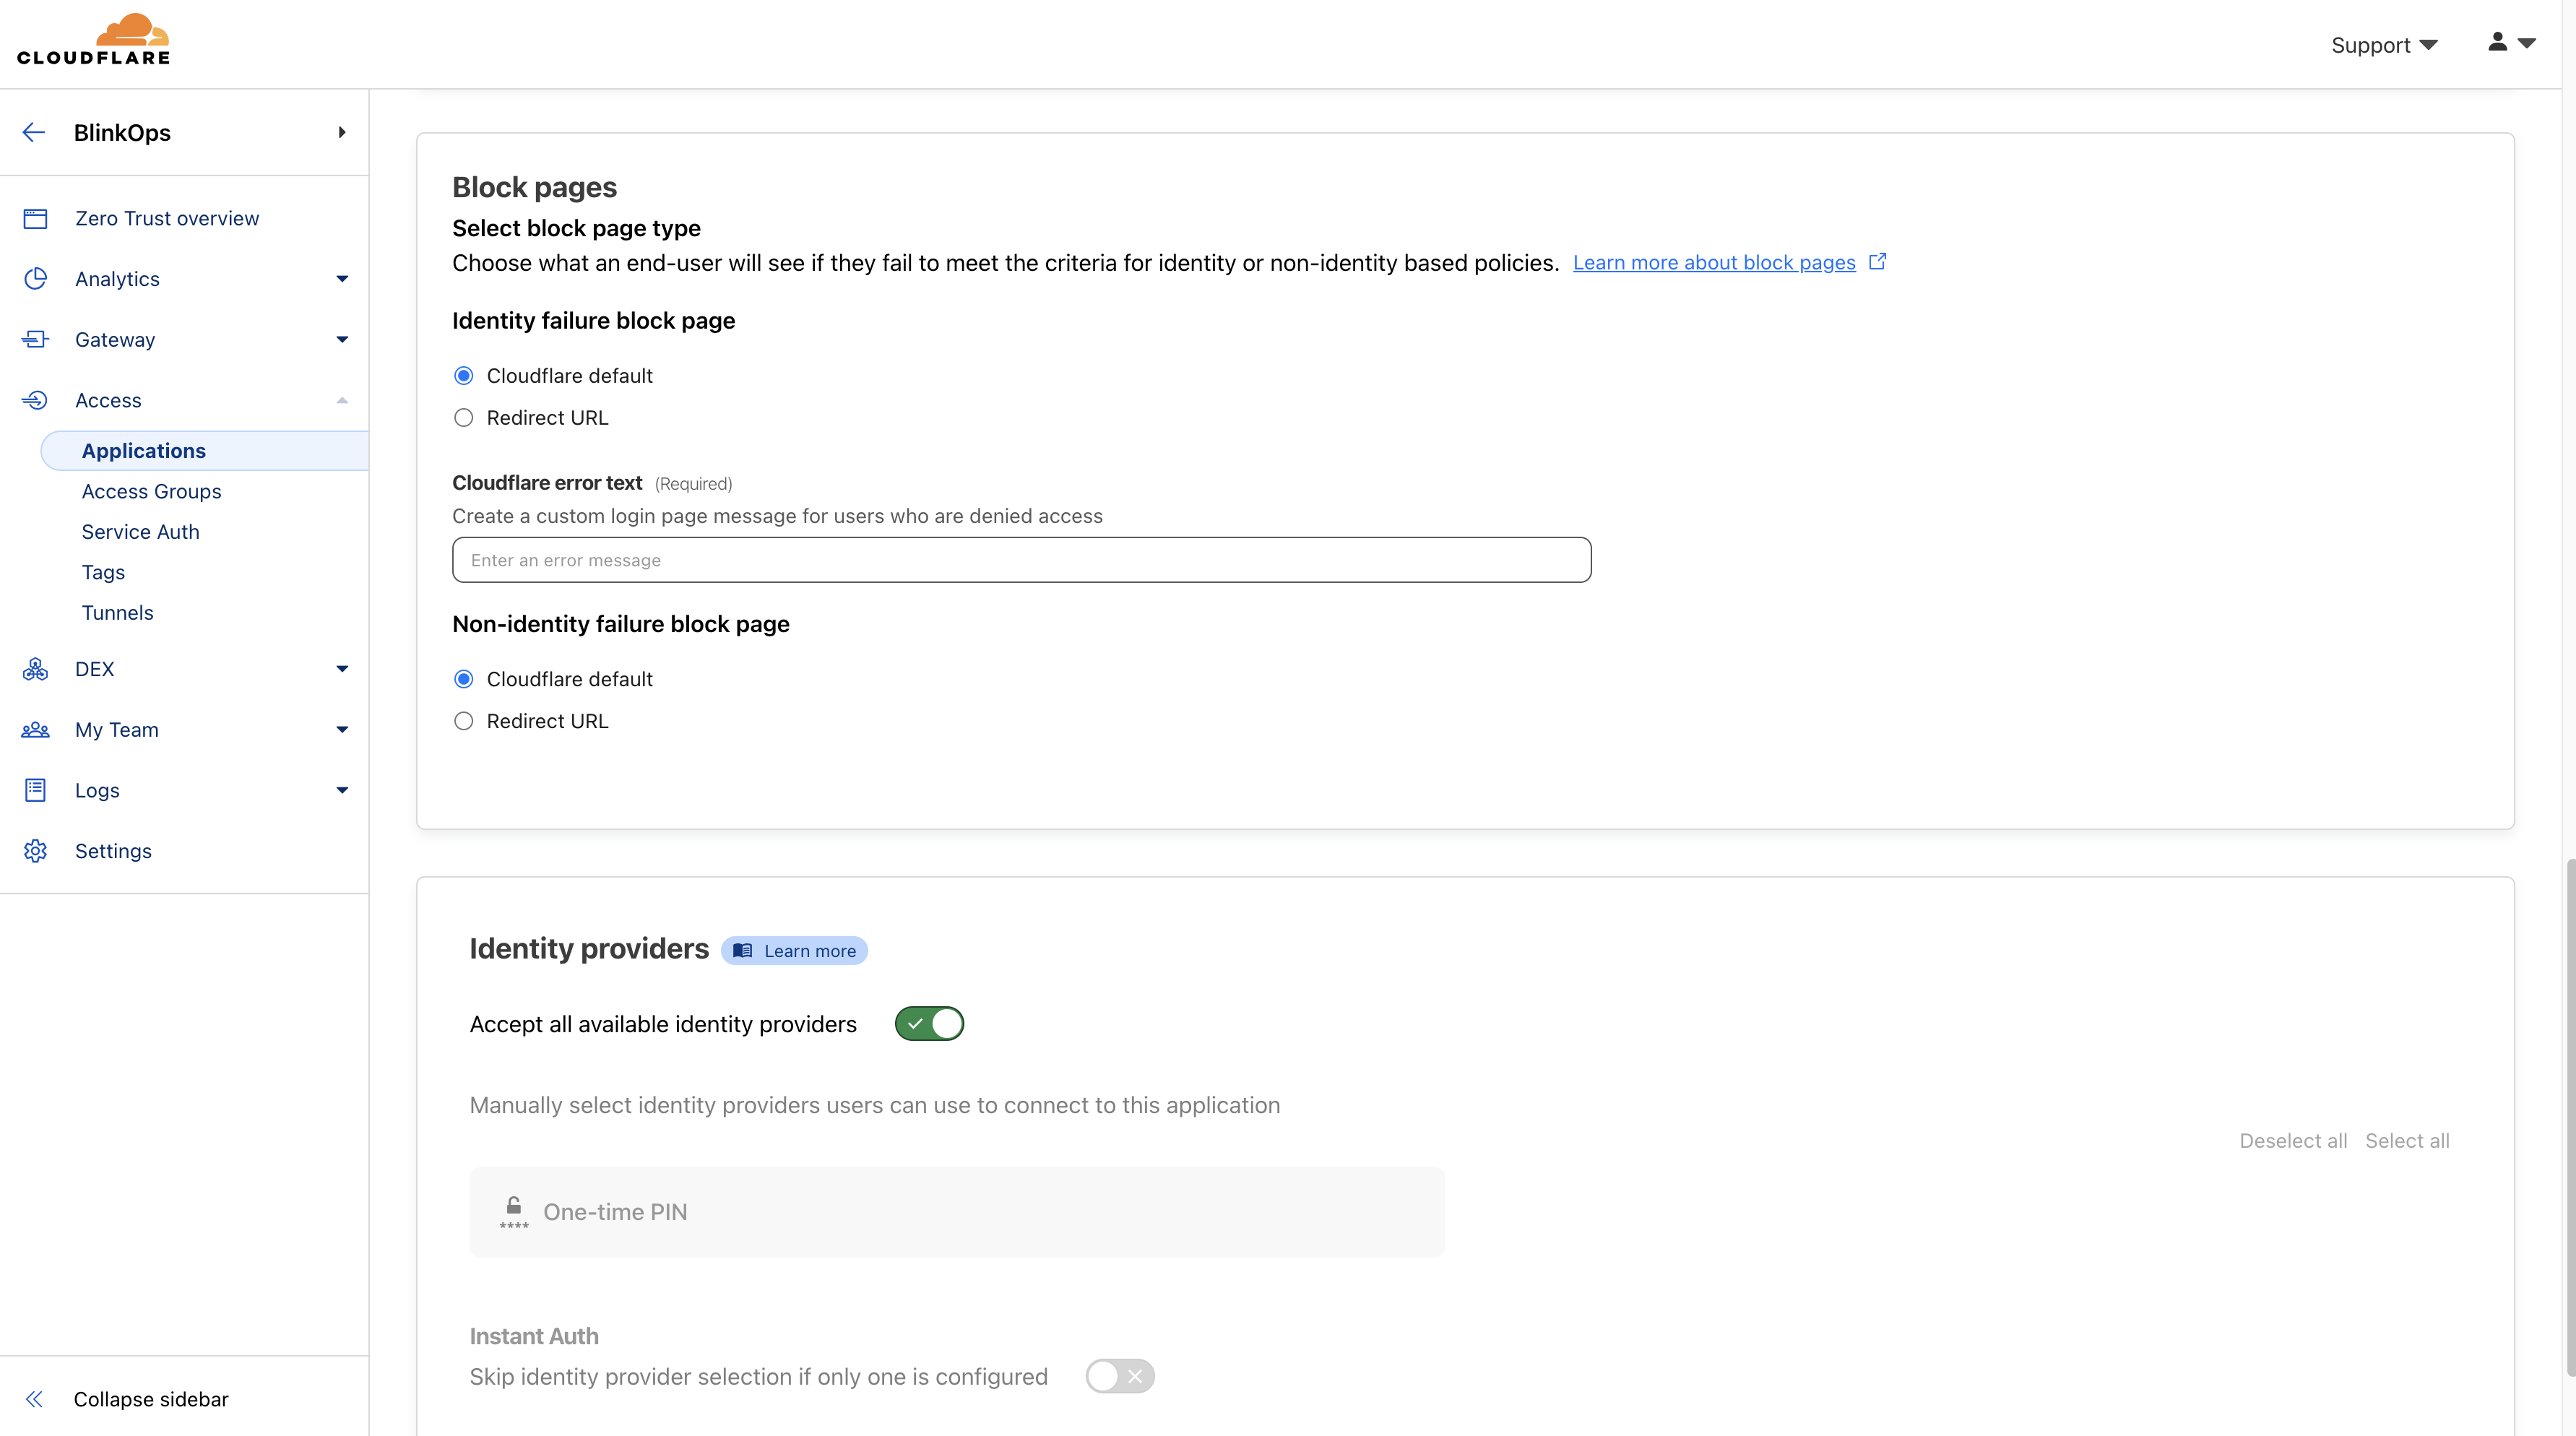
Under **Block pages**, choose what end users will see when they are denied access to the application:
* **Cloudflare default**: Reload the login page and display a block message below the Cloudflare Access logo. The default message is "That account does not have access", or you can enter a custom message.
* **Redirect URL**: Redirect to the specified website.
* **Custom page template**: Display a custom block page hosted in Zero Trust.
**INFO**
**IdP groups**\
If you are using Okta, AzureAD, Google Workspace, or GitHub as your IdP, Access will automatically send a SAML attribute titled groups with all of the user’s associated groups as attribute values.
Configure **App Launcher settings** for the application — **this is an optional step.**
Under **Block pages**, choose what end users will see when they are denied access to the application:
* **Cloudflare default**: Reload the login page and display a block message below the Cloudflare Access logo. The default message is "That account does not have access", or you can enter a custom message.
* **Redirect URL**: Redirect to the specified website.
* **Custom page template**: Display a custom block page hosted in Zero Trust.
 Next, configure how users will authenticate:
* Select the Identity providers you want to enable for your application.
* (Optional) Turn on Instant Auth if you selected only one IdP and want users to skip the identity provider selection step.
* (Optional) Under WARP authentication identity, allow users to authenticate to the application using their WARP session identity.
Next, configure how users will authenticate:
* Select the Identity providers you want to enable for your application.
* (Optional) Turn on Instant Auth if you selected only one IdP and want users to skip the identity provider selection step.
* (Optional) Under WARP authentication identity, allow users to authenticate to the application using their WARP session identity.
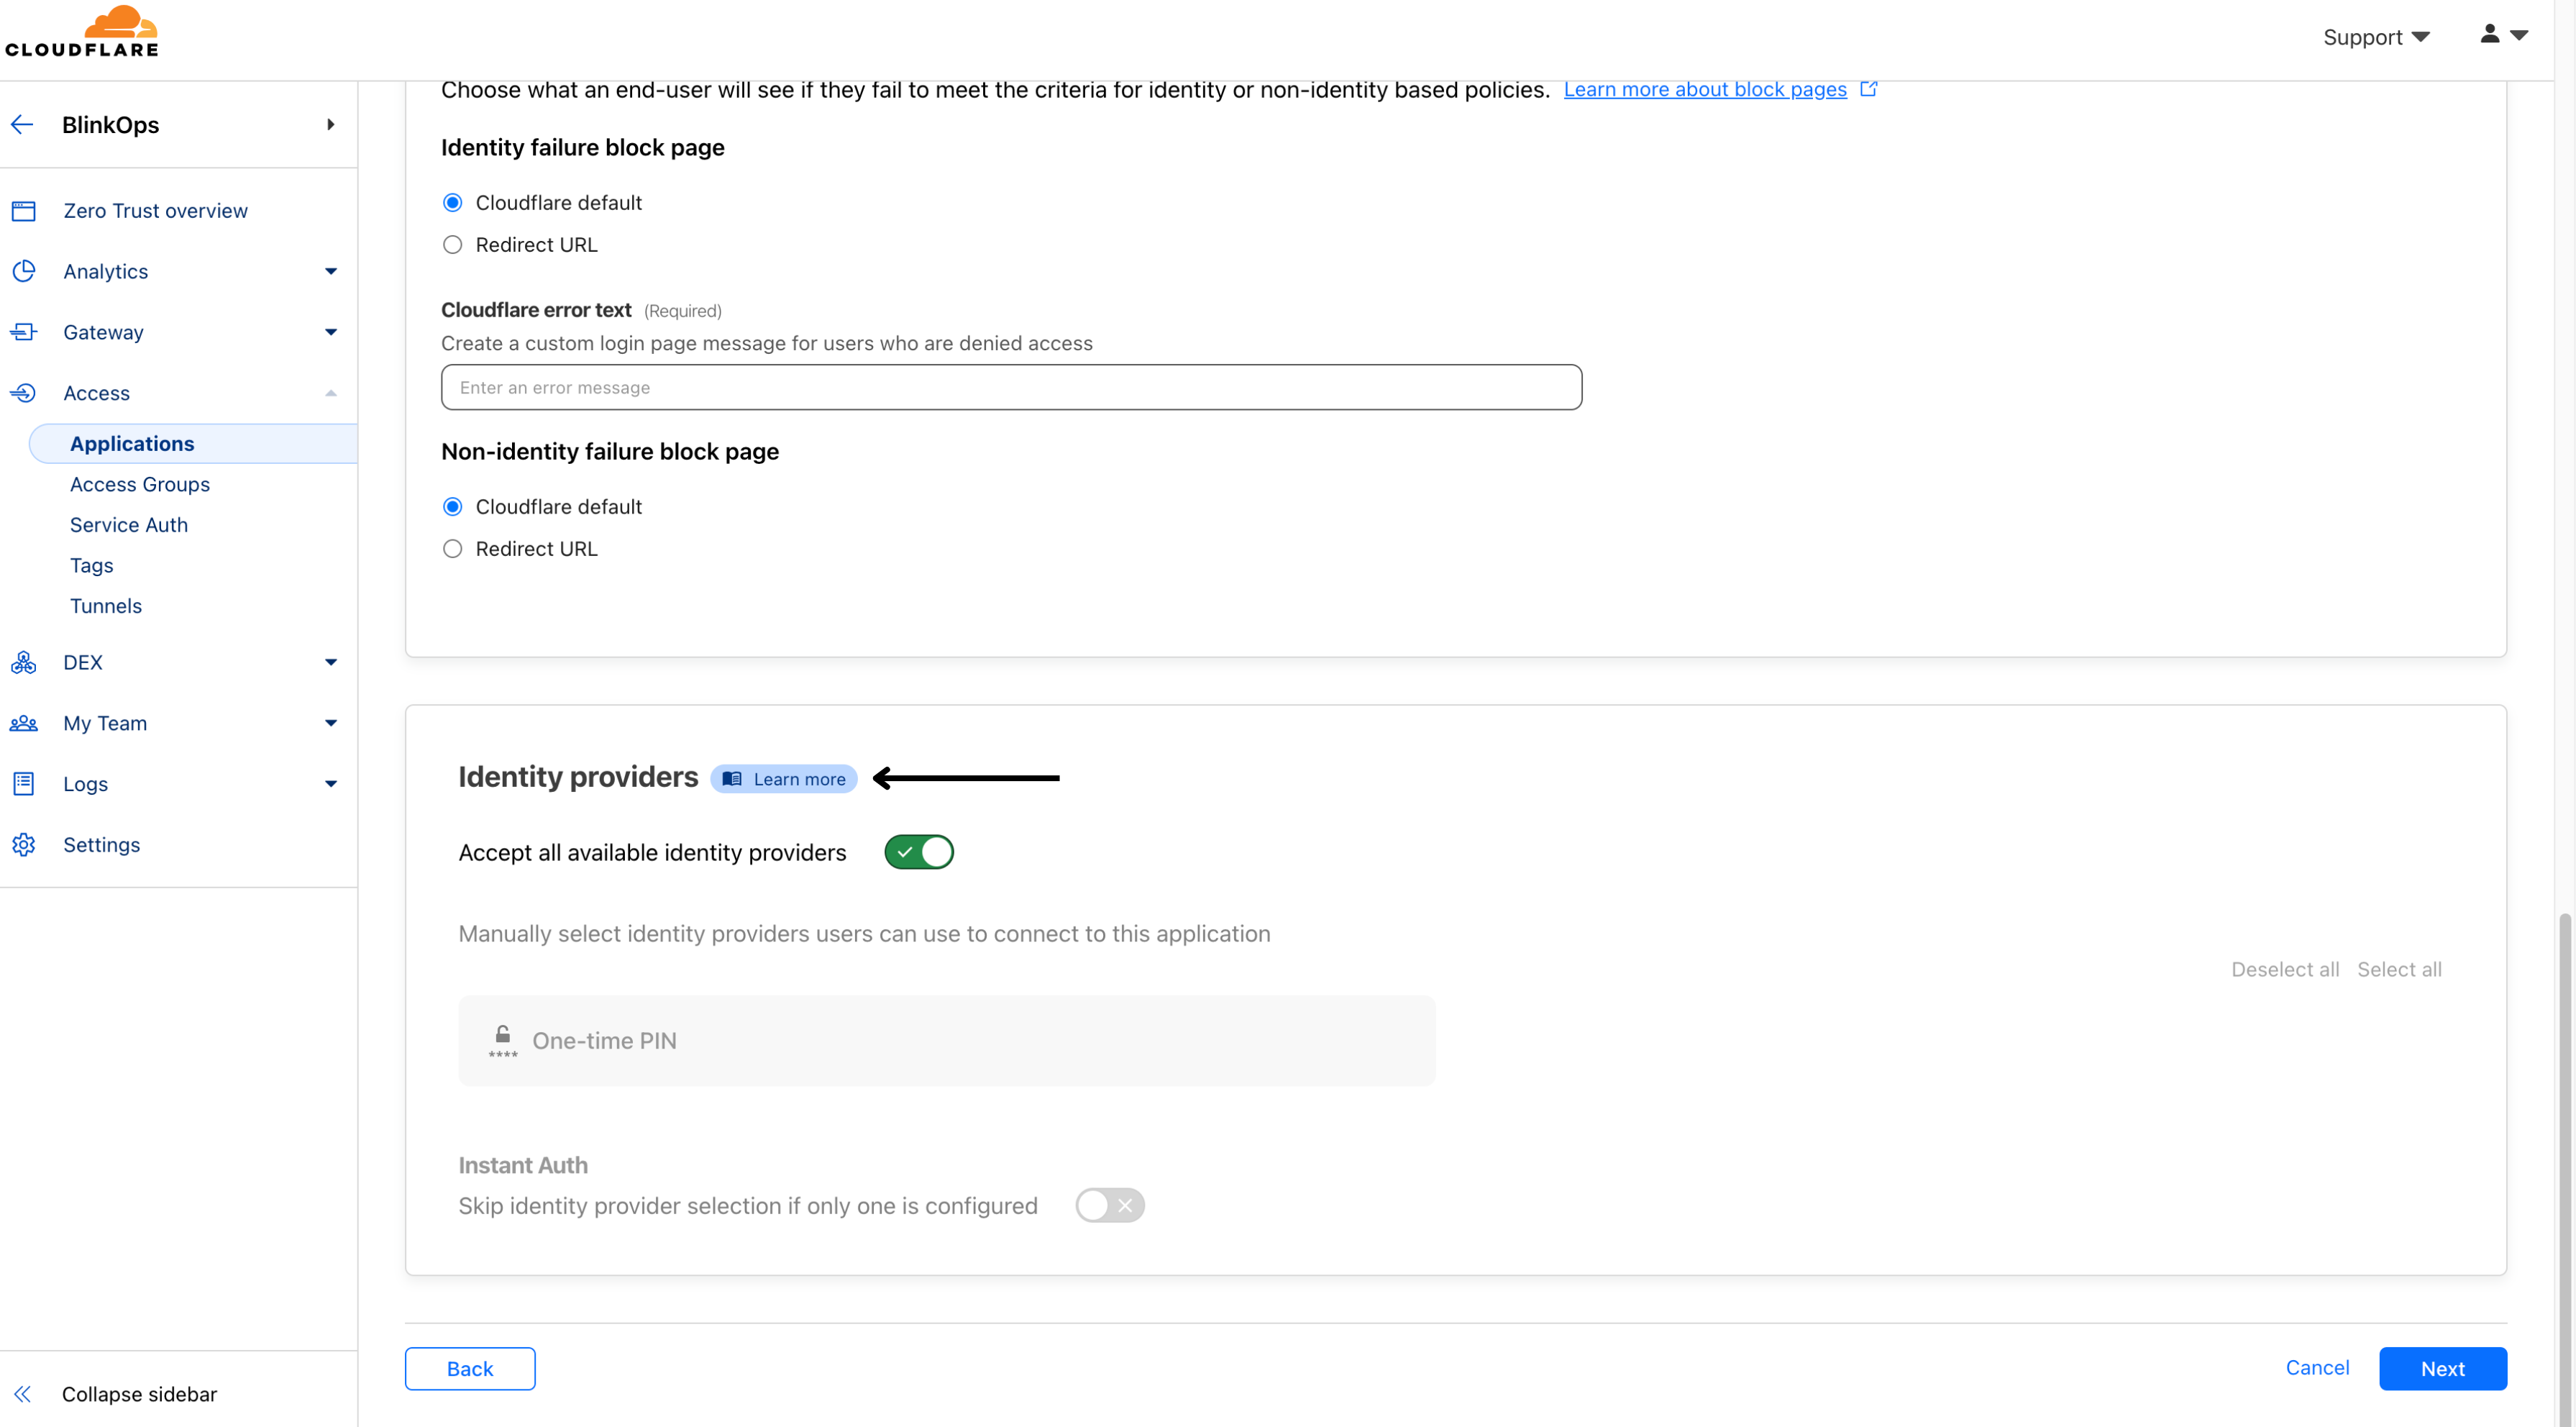 Select Next.
***
## Add an Access Policy
To control who can access your application, create an **Access policy**.
Select Next.
***
## Add an Access Policy
To control who can access your application, create an **Access policy**.
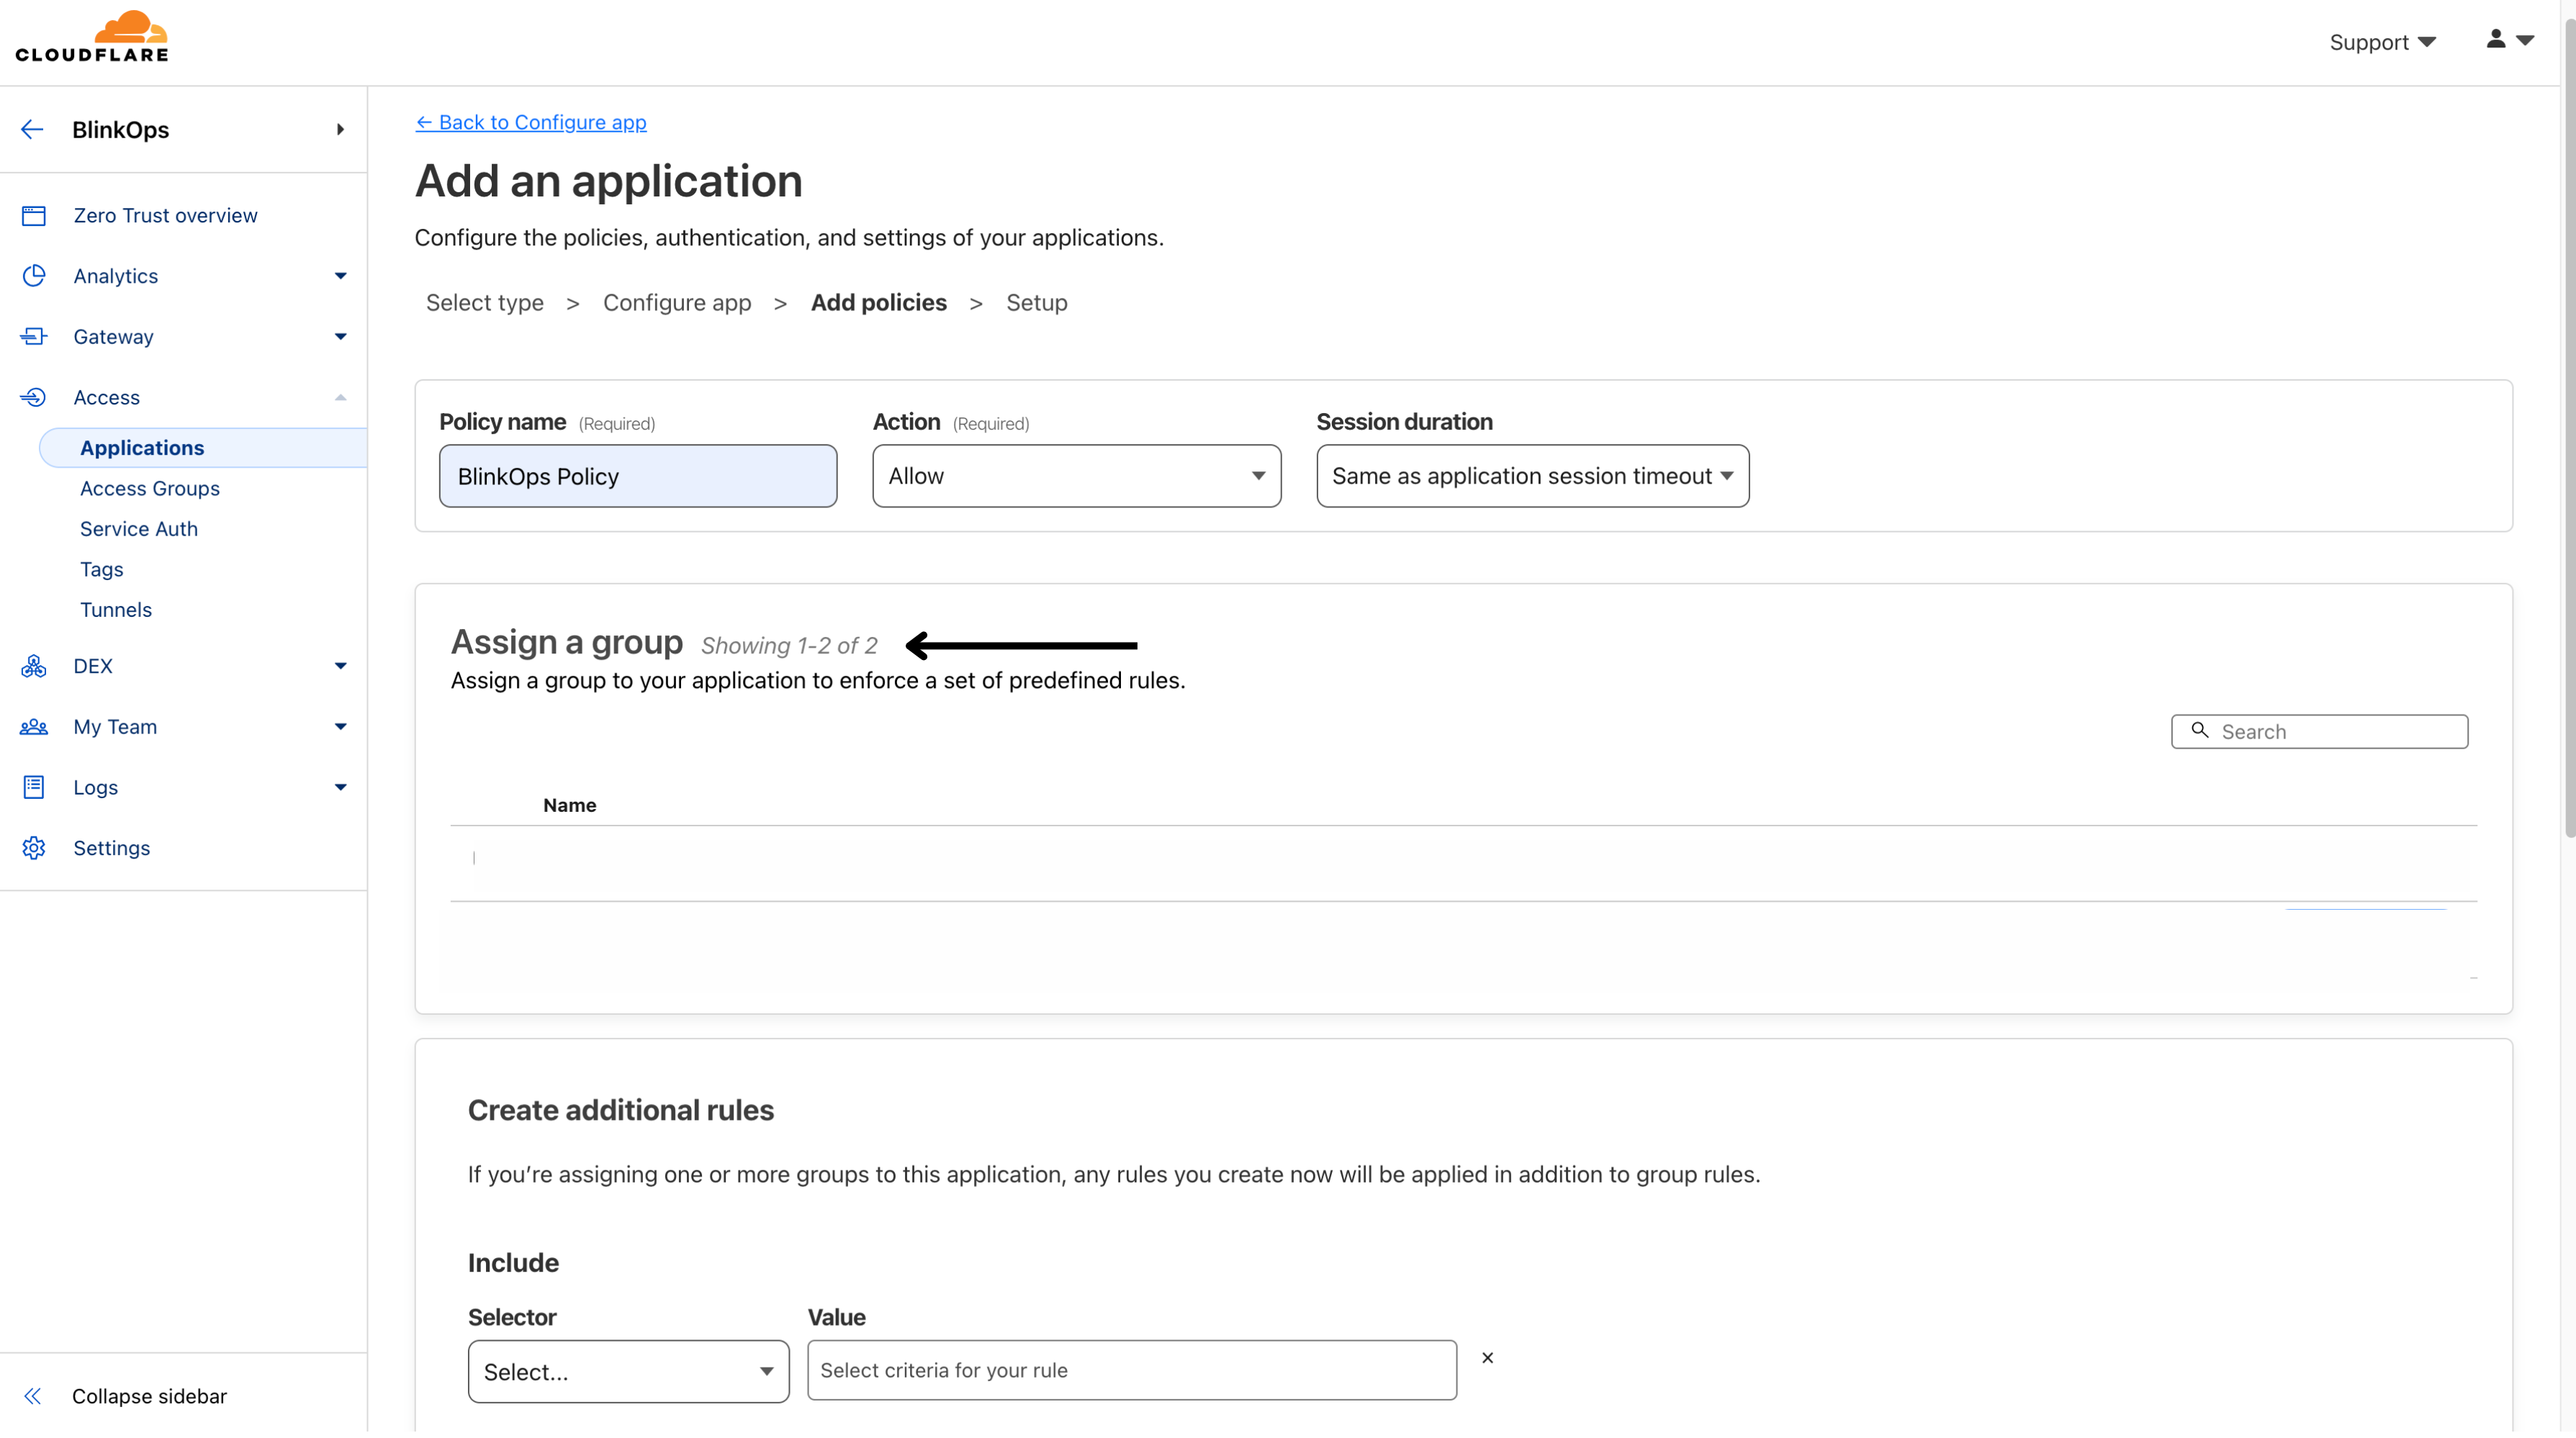
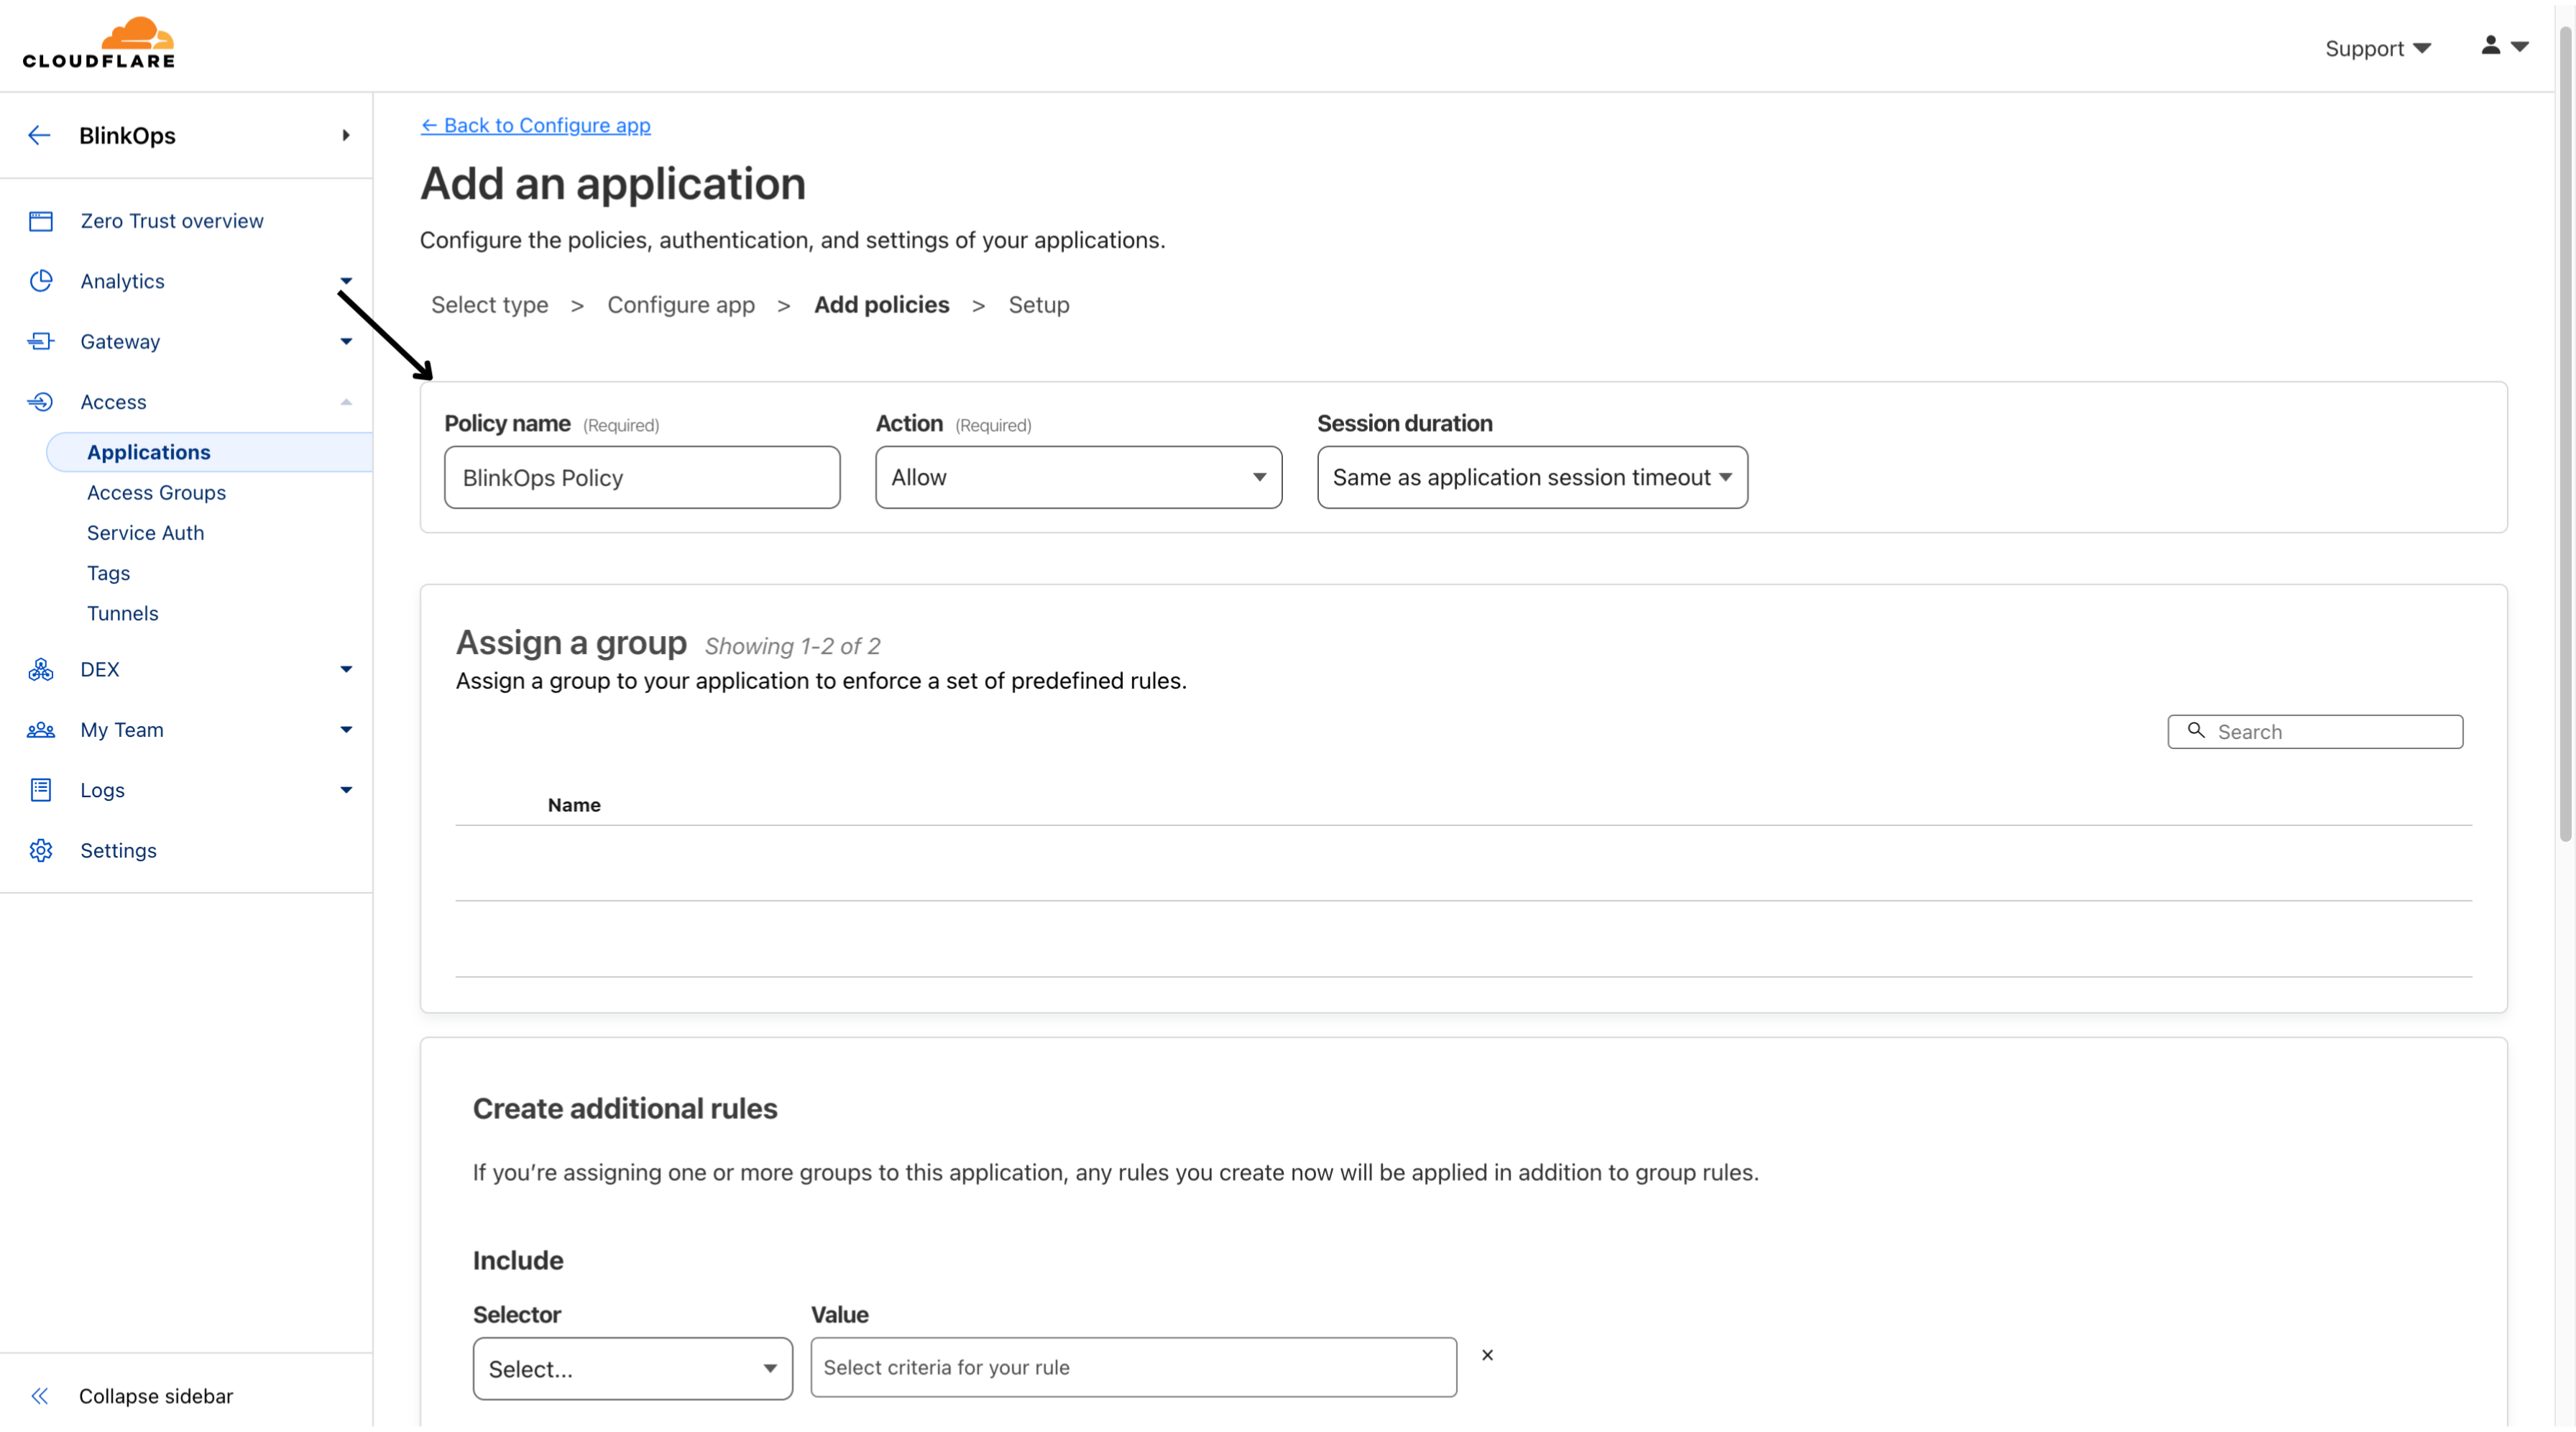 Then navigate to the **Assign a group** section and fill out the following fields.
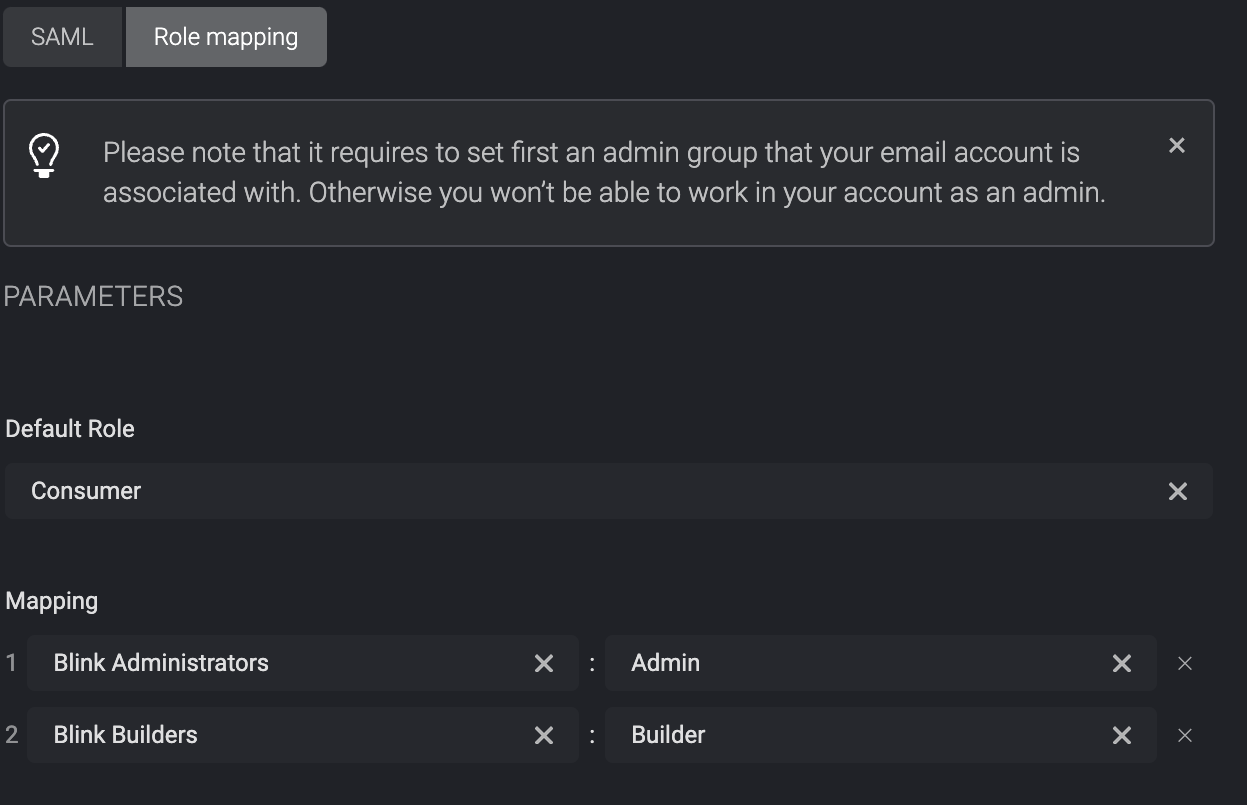
 Then head to the **SAML** tab under the **Account Management Settings** section within the Blink Platform and click the **Role Mapping** section and select the applicable values.
**Note:** Please note that within the **mapping** section, it's necessary to designate at least one **mapping role** as an **admin** with administrative privileges. Otherwise, you will not have the ability to operate within your account as an **administrator**.
Then head to the **SAML** tab under the **Account Management Settings** section within the Blink Platform and click the **Role Mapping** section and select the applicable values.
**Note:** Please note that within the **mapping** section, it's necessary to designate at least one **mapping role** as an **admin** with administrative privileges. Otherwise, you will not have the ability to operate within your account as an **administrator**.
 ***
## 4. Configure SSO in your SaaS application
Finally, you will need to configure your SaaS application to require users to log in through Cloudflare Access.
Configure the following fields with your SAML SSO-compliant application:
* SSO endpoint
* Access Entity ID or Issuer
* Public key
***
## 4. Configure SSO in your SaaS application
Finally, you will need to configure your SaaS application to require users to log in through Cloudflare Access.
Configure the following fields with your SAML SSO-compliant application:
* SSO endpoint
* Access Entity ID or Issuer
* Public key
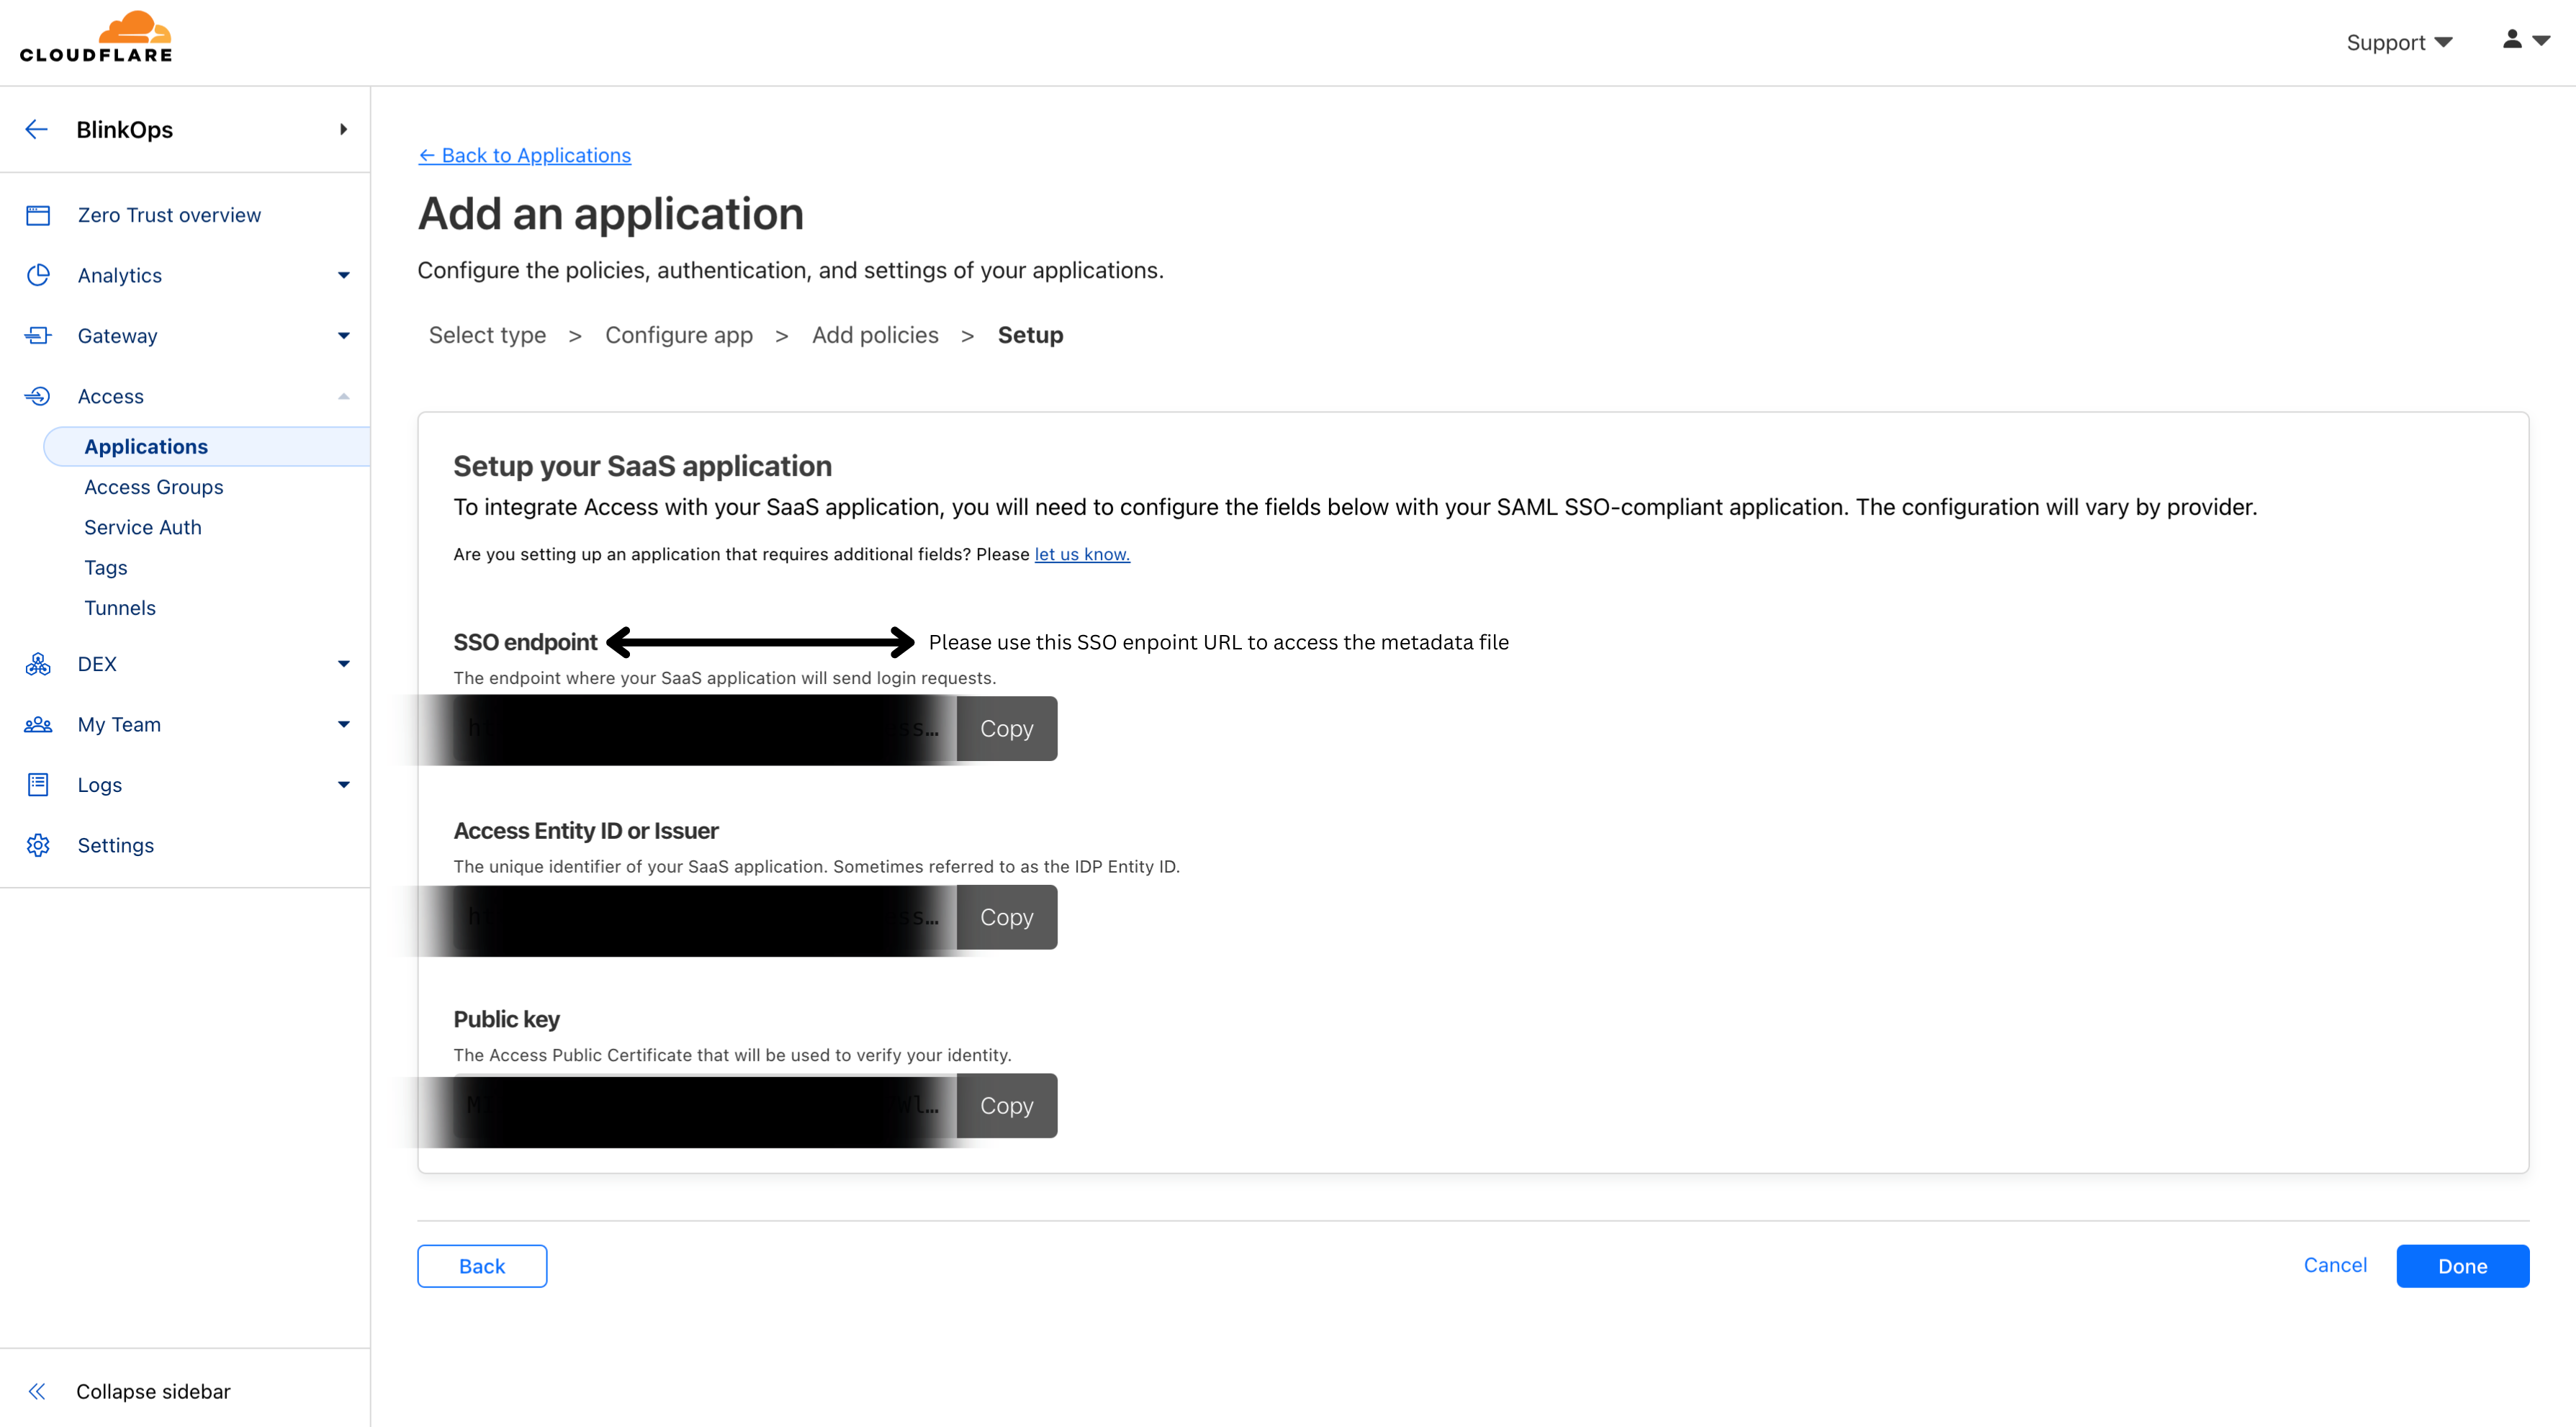 **NOTE**\
The metadata is available at the URL: `/saml-metadata`
Proceed by copying the contents of that file found at the URL: `/saml-metadata`. Then navigate to the **Metadata File section** found within the **SAML tab** in your **Account Management Settings**
Paste the **contents of that file** into the designated text field labeled Metadata File.
**NOTE**\
The metadata is available at the URL: `/saml-metadata`
Proceed by copying the contents of that file found at the URL: `/saml-metadata`. Then navigate to the **Metadata File section** found within the **SAML tab** in your **Account Management Settings**
Paste the **contents of that file** into the designated text field labeled Metadata File.
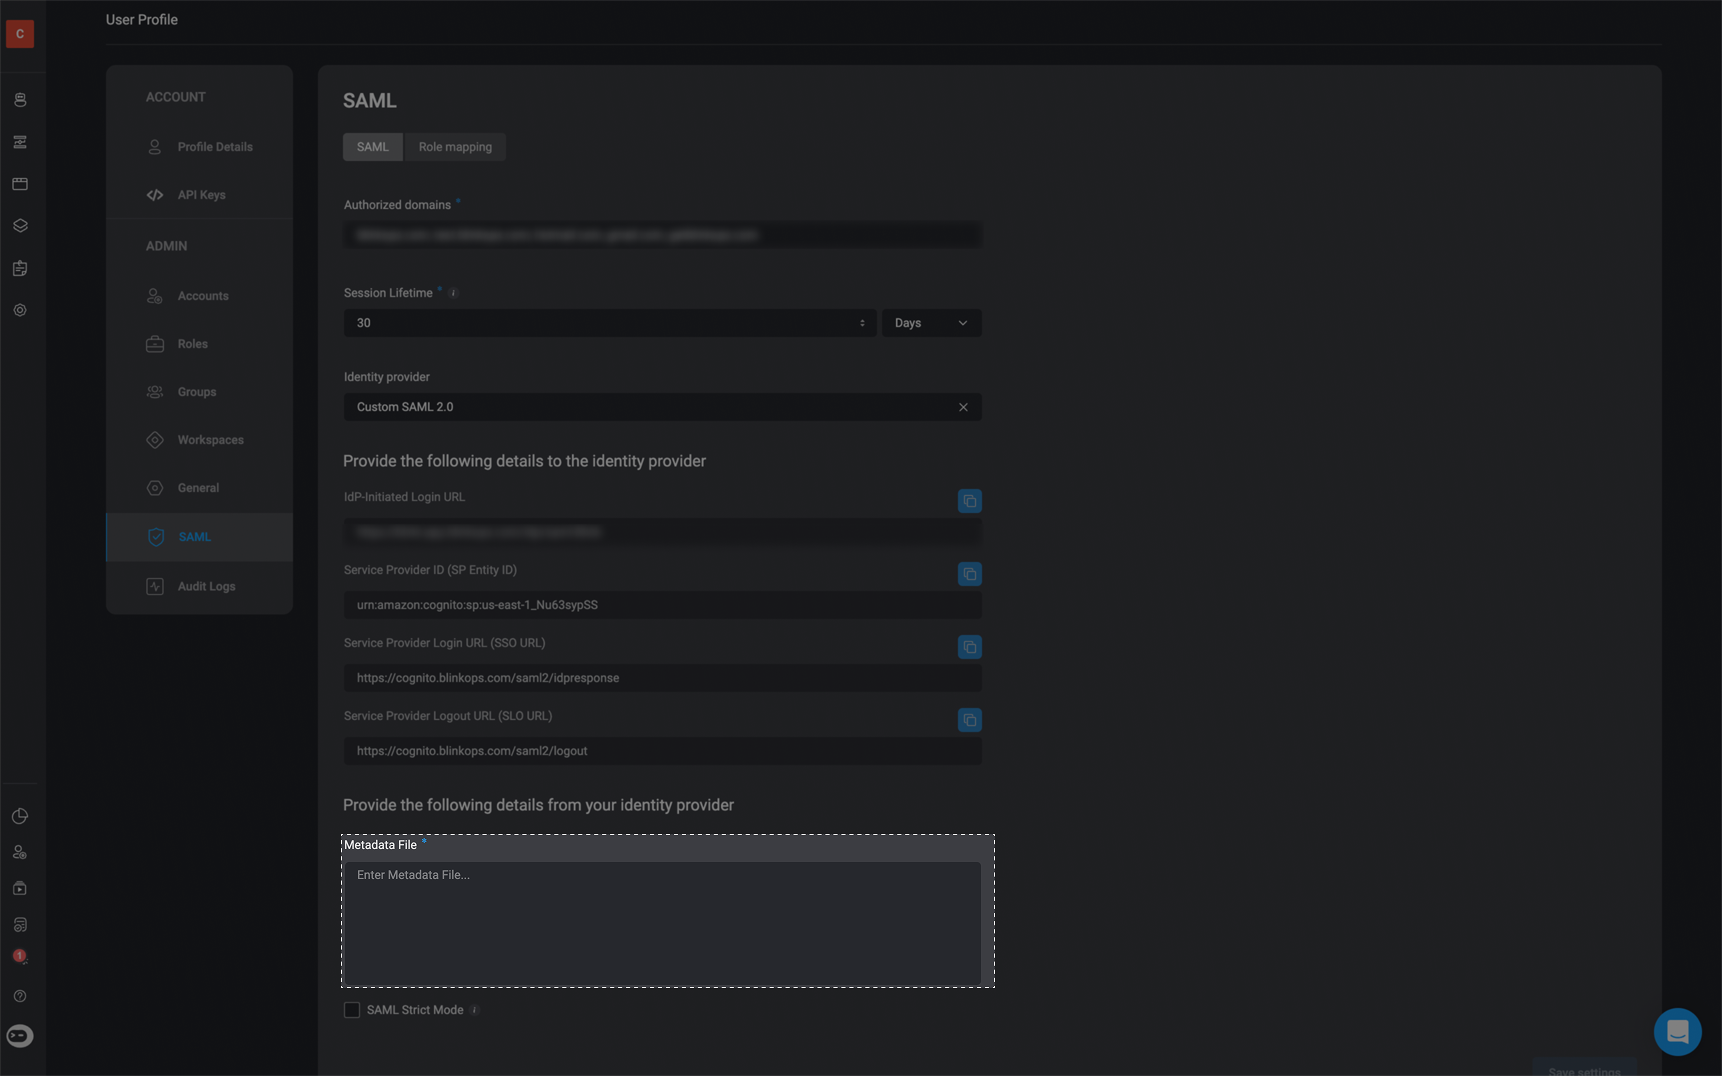 Then click **Save Settings** in the bottom-right corner. Your application will appear on the Applications page.
***
Then click **Save Settings** in the bottom-right corner. Your application will appear on the Applications page.
***