> ## Documentation Index
> Fetch the complete documentation index at: https://docs.blinkops.com/llms.txt
> Use this file to discover all available pages before exploring further.
# About Accounts
> How to manage your Blink account settings, including profile, preferences, and organization details.
Each company using Blink has its own separate account, fully isolated from all other companies. Within an account, groups can be created to organize users, such as teams or departments.
The Blink platform supports two types of accounts: [user account](#users) and [service accounts](#service-account), each serving different purposes.
## User Account Vs Service Account
A [user account](#users) is an identity created for an individual to access and interact with systems, applications, and services, typically requiring authentication via a username and password, and often equipped with permissions aligned with the individual's role. On the other hand, a [service account](#service-account) is designed for use by applications, services, or automated processes rather than human users. Service accounts are authenticated using credentials such as keys or tokens and are granted specific permissions to perform predefined tasks, allowing for secure and automated access to resources without human intervention. While user accounts are managed based on the individual's lifecycle, service accounts are managed according to the application's needs.
## Users
Each company using Blink operates within its own separate account, fully isolated from all other accounts. Only Admin users have the authority to invite new users and manage user access, including adding or removing users from groups.
Before a user can access the Blink platform, they must be added to the account. Admins can invite a user, assign them to specific groups and workspaces, and define their role in advance. Once the invited user accepts the invitation, all their workspaces, group memberships, and roles are already configured, allowing them to start using the platform immediately without additional setup.
**Please note**: Deleting a user does not remove any associated resources, such as workspaces, workflows, or connections.
 ### Inviting a New User
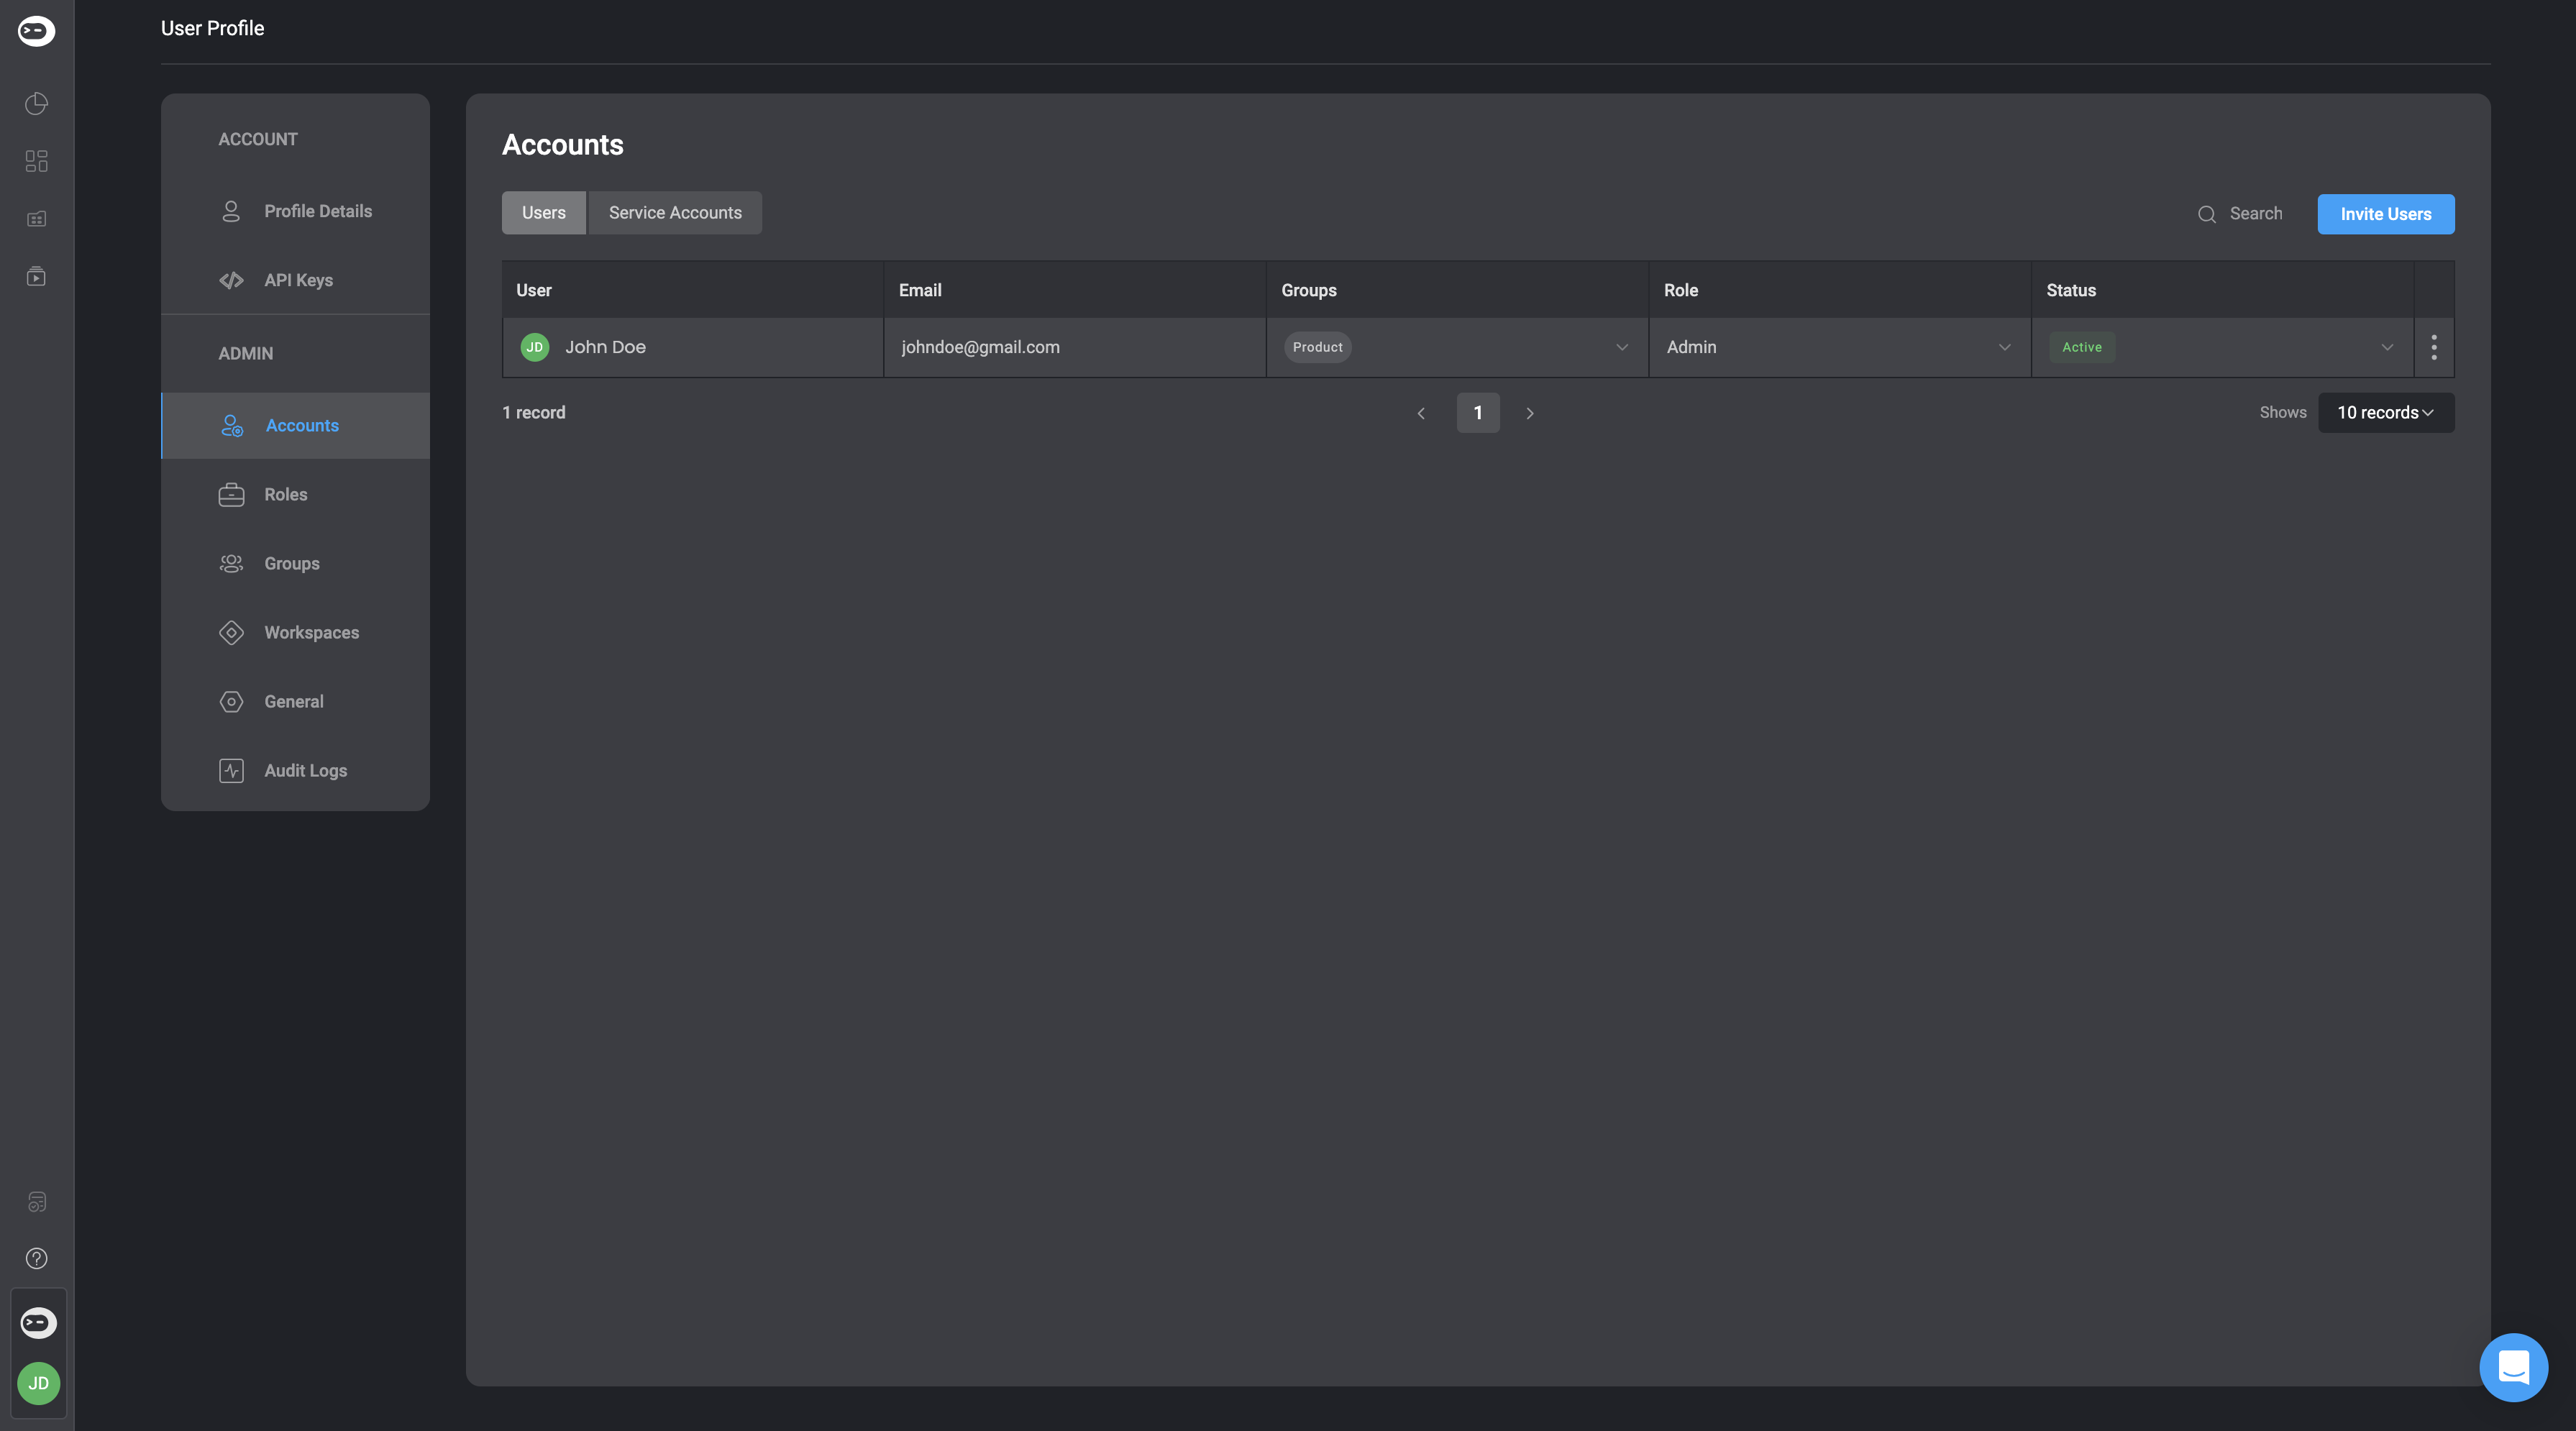
Click on "Account" option. You will be navigated to the Accounts Page in your **Account Settings**.
### Inviting a New User
Click on "Account" option. You will be navigated to the Accounts Page in your **Account Settings**.
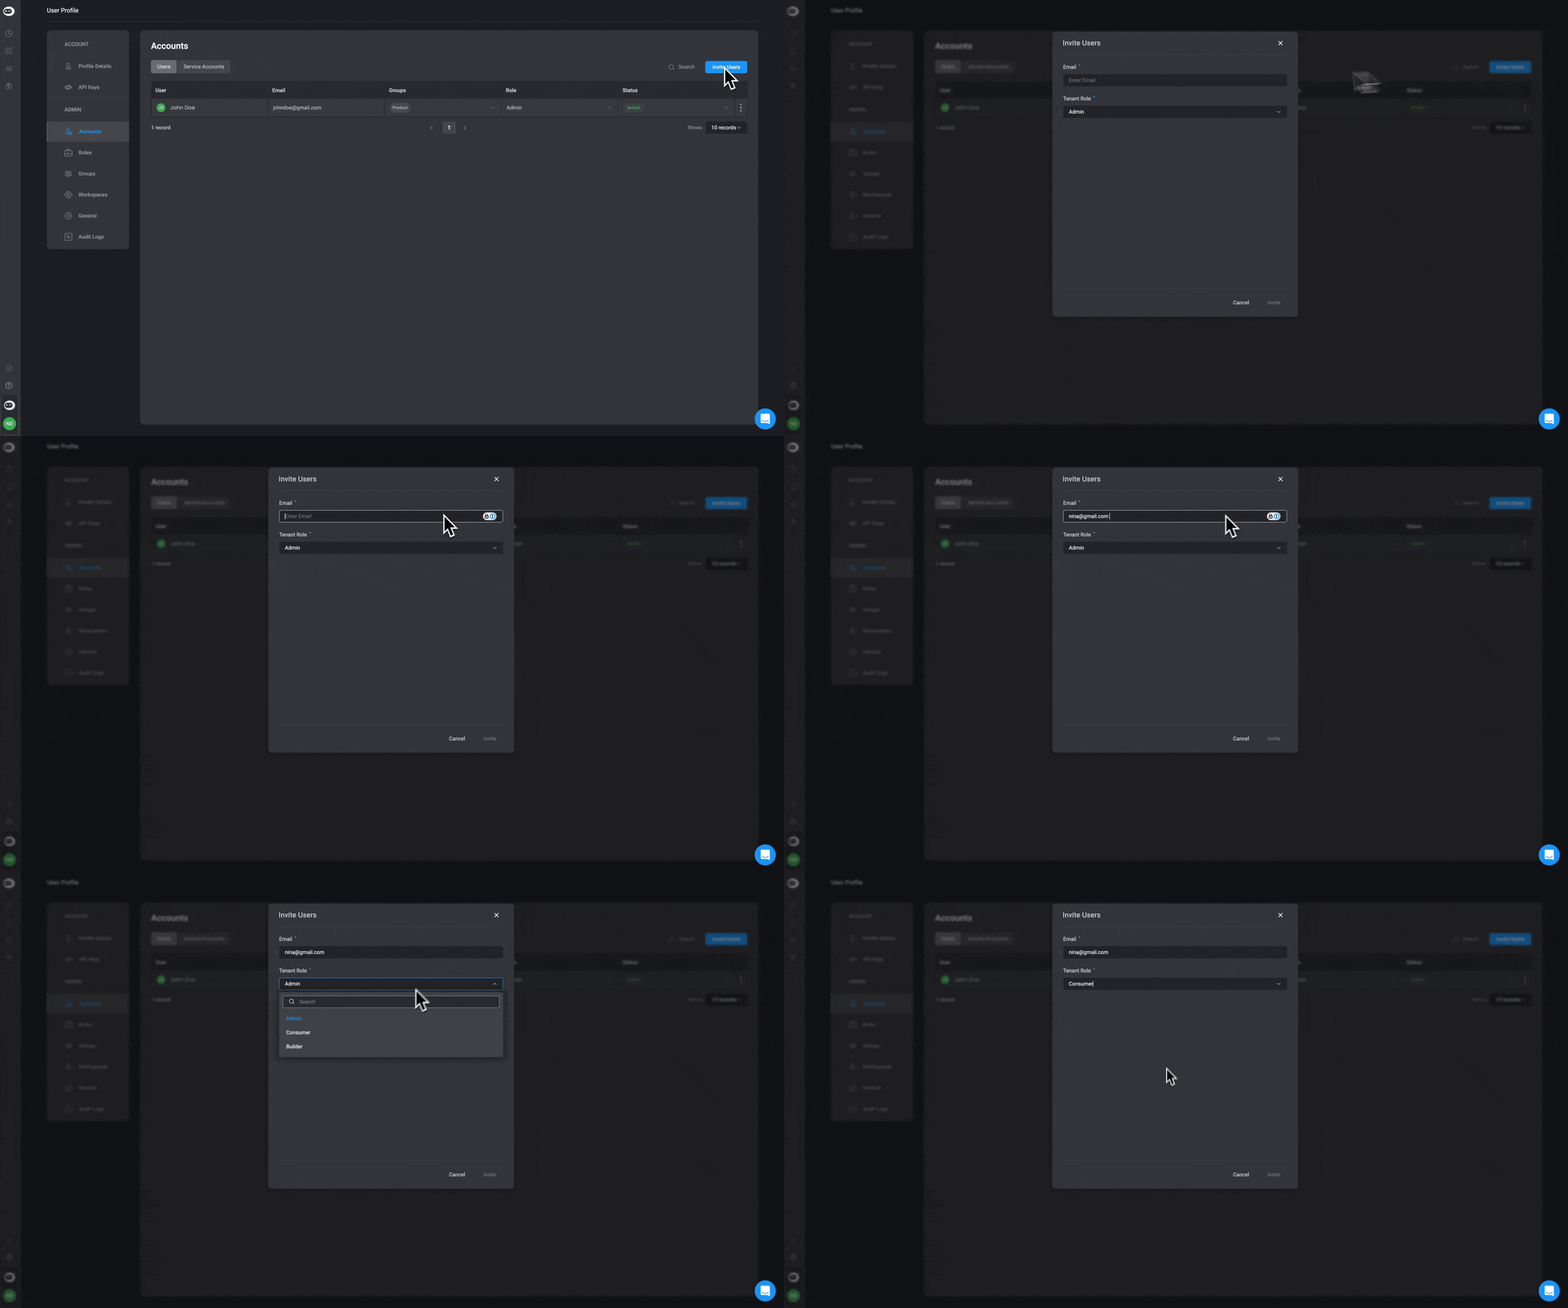 In the **Users** tab of the 'Accounts' page, click the "Invite User" button in the top-right corner. Provide the email address of the new user you would like to invite
The user will receive an email invite and once accepted, appear in the member list of the account.
There are three types of built-in [Tenant Roles](/docs/blink-platform/account-management/roles#tenant-role-scope) to assign the invited user:
* [Admin](/docs/blink-platform/account-management/roles#admin): As an Admin, you have full access to all workspaces as well as control over all settings across the Blink Platform.
* [Consumer](/docs/blink-platform/account-management/roles#consumer): As a Consumer, you have full access to the self-service portal as well as read and write permissions in the user's Workspaces.
* [Builder](/docs/blink-platform/account-management/roles#builder): As a Builder, you have complete access to read, write, and execute permissions within the user's Workspaces.
* [Tenant Guest](/docs/blink-platform/account-management/roles#4-tenant-guest) As a Tenant Guest, you only have access to view a workspace.
You can also assign a user a custom role within the tenant scope.
### Checking the Status of a Member of your Account
A member can have one of the following statuses:
In the **Users** tab of the 'Accounts' page, click the "Invite User" button in the top-right corner. Provide the email address of the new user you would like to invite
The user will receive an email invite and once accepted, appear in the member list of the account.
There are three types of built-in [Tenant Roles](/docs/blink-platform/account-management/roles#tenant-role-scope) to assign the invited user:
* [Admin](/docs/blink-platform/account-management/roles#admin): As an Admin, you have full access to all workspaces as well as control over all settings across the Blink Platform.
* [Consumer](/docs/blink-platform/account-management/roles#consumer): As a Consumer, you have full access to the self-service portal as well as read and write permissions in the user's Workspaces.
* [Builder](/docs/blink-platform/account-management/roles#builder): As a Builder, you have complete access to read, write, and execute permissions within the user's Workspaces.
* [Tenant Guest](/docs/blink-platform/account-management/roles#4-tenant-guest) As a Tenant Guest, you only have access to view a workspace.
You can also assign a user a custom role within the tenant scope.
### Checking the Status of a Member of your Account
A member can have one of the following statuses:
| User status | Description | Admin actions available |
| ----------- | -------------------------------- | ----------------------------------------------------------------------- |
| Active | The user has signed up to Blink. | Deactivate user, remove user or check which groups the user belongs to. |
| Inactive | The user is blocked from Blink. | Re-activate. |
| Invited | The user is invited to Blink. | Re-send or cancel the invite. |
The following images shows Admin actions for an inactive user.
 The following screenshot shows Admin actions for an invited user.
 The following screenshot shows Admin actions for an active user.
 ## Service Account
A service account is a specialized, non-human account used by locations, services, or automated processes to access resources and perform tasks. It is authenticated through credentials such as API keys or tokens and is granted specific permissions tailored to its intended functions, enabling secure and automated operations without human intervention.
**Note**: Only [Tenant Admin](/docs/blink-platform/account-management/roles#admin) users can create a service account and designate roles.
### How to create a New Service Account
Click on "Account" option. You will be navigated to the Accounts Page in your **Account Settings**.
## Service Account
A service account is a specialized, non-human account used by locations, services, or automated processes to access resources and perform tasks. It is authenticated through credentials such as API keys or tokens and is granted specific permissions tailored to its intended functions, enabling secure and automated operations without human intervention.
**Note**: Only [Tenant Admin](/docs/blink-platform/account-management/roles#admin) users can create a service account and designate roles.
### How to create a New Service Account
Click on "Account" option. You will be navigated to the Accounts Page in your **Account Settings**.
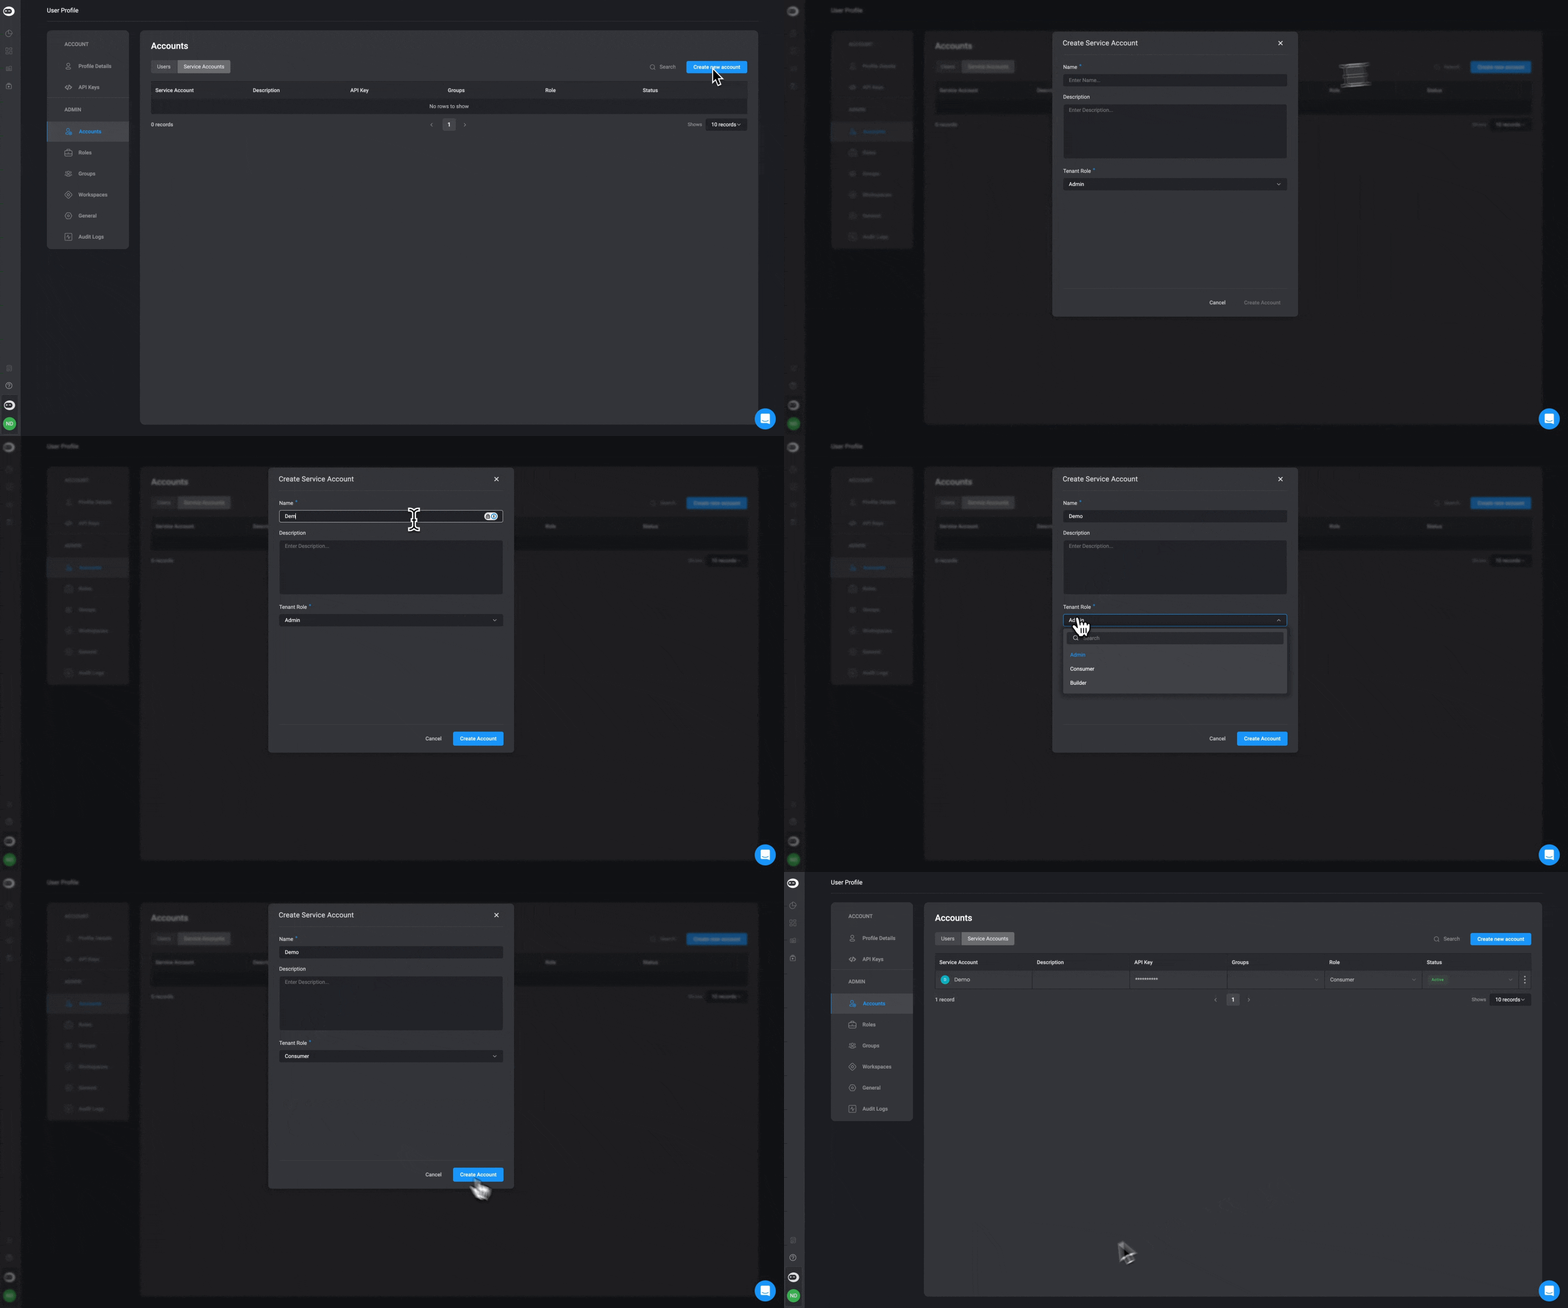
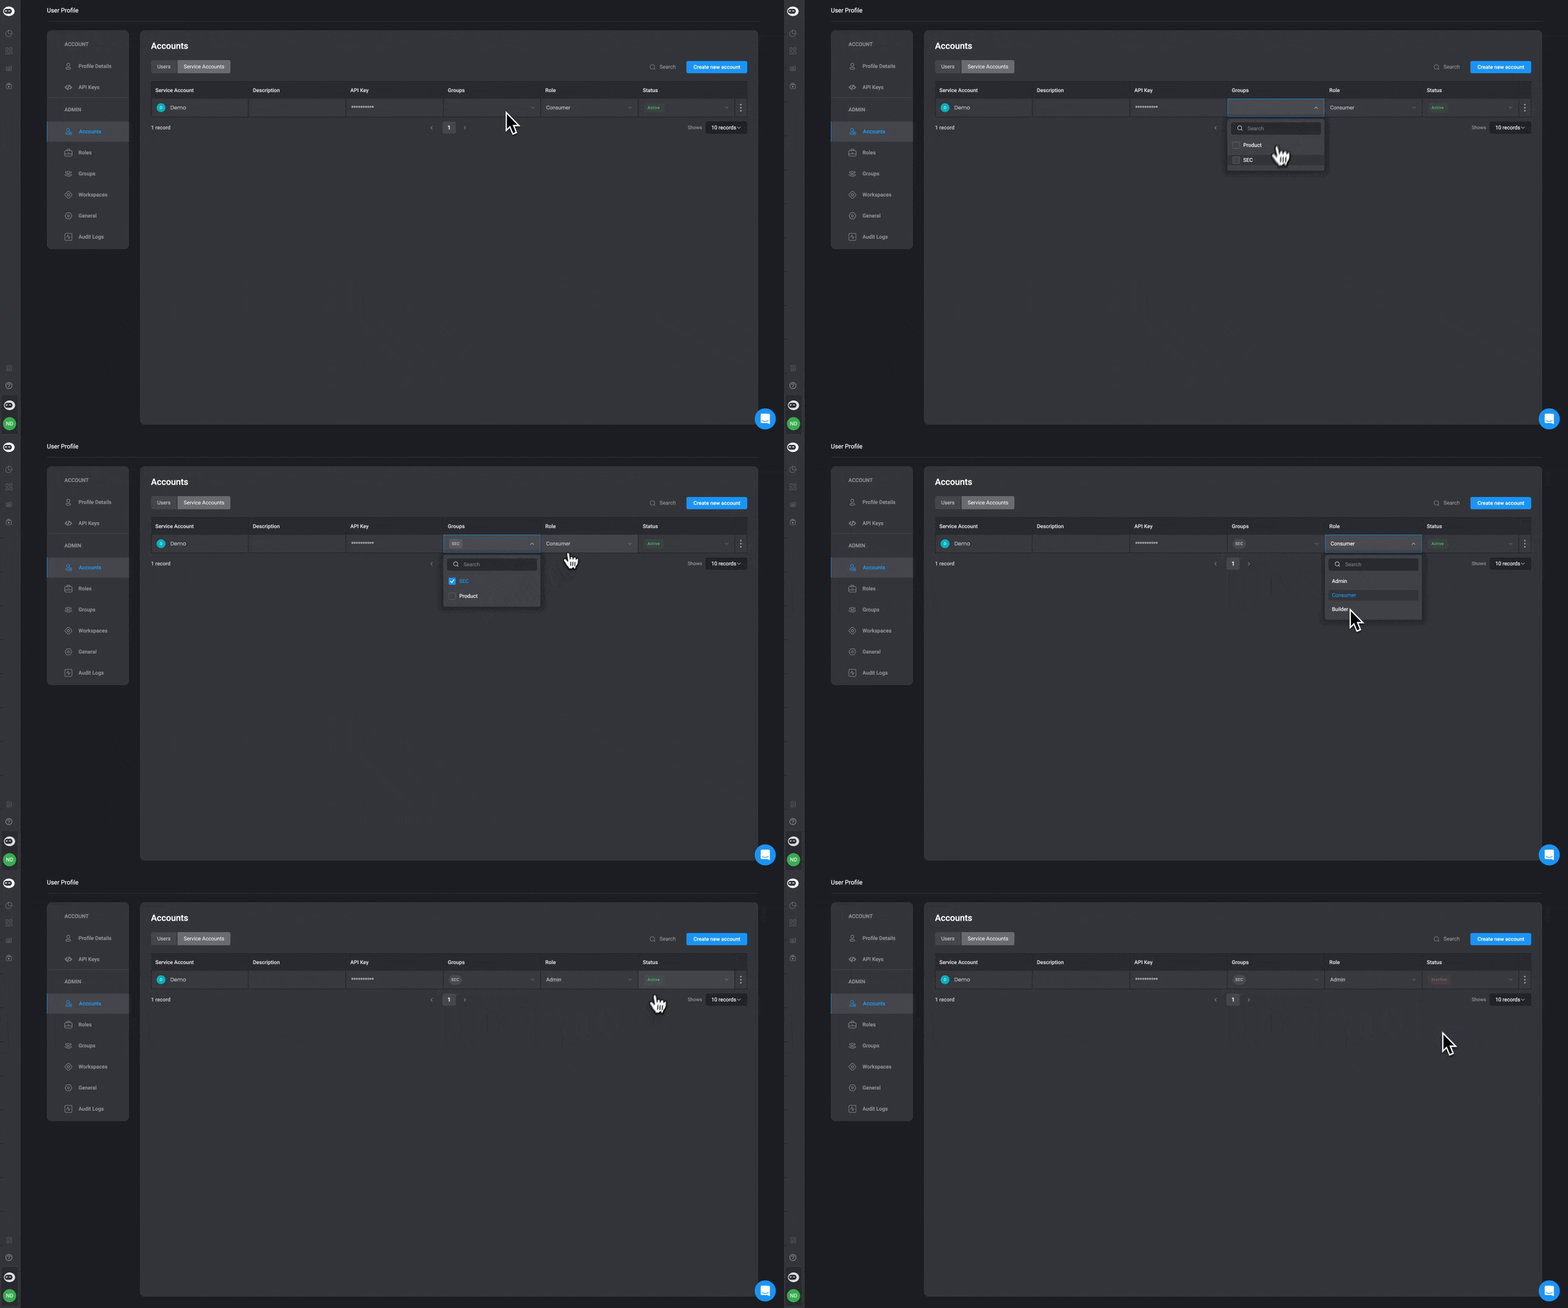 Navigate to the "Service Account" Tab. In the "Service Account" tab of the Accounts page, click the "Create new account" button in the top-right corner.
Provide a Name for your Service Account, optionally add a description and choose a role:
* [Admin](/docs/blink-platform/account-management/roles#admin): As an Admin, the account has full access to all workspaces as well as control over all settings across the Blink Platform.
* [Builder](/docs/blink-platform/account-management/roles#builder): As a Builder, the account has complete access to read, write, and execute permissions within the user's Workspaces.
If the service account is assigned [Tenant- Builder Role](/docs/blink-platform/account-management/roles#builder), the [Tenant- Admin](/docs/blink-platform/account-management/roles#admin) will have to invite the Service Account to each Workspace they want it to operate in.
* [Consumer](/docs/blink-platform/account-management/roles#consumer): As a Consumer, the account has full access to the self-service portal as well as read and write permissions in the user's Workspaces.
Navigate to the "Service Account" Tab. In the "Service Account" tab of the Accounts page, click the "Create new account" button in the top-right corner.
Provide a Name for your Service Account, optionally add a description and choose a role:
* [Admin](/docs/blink-platform/account-management/roles#admin): As an Admin, the account has full access to all workspaces as well as control over all settings across the Blink Platform.
* [Builder](/docs/blink-platform/account-management/roles#builder): As a Builder, the account has complete access to read, write, and execute permissions within the user's Workspaces.
If the service account is assigned [Tenant- Builder Role](/docs/blink-platform/account-management/roles#builder), the [Tenant- Admin](/docs/blink-platform/account-management/roles#admin) will have to invite the Service Account to each Workspace they want it to operate in.
* [Consumer](/docs/blink-platform/account-management/roles#consumer): As a Consumer, the account has full access to the self-service portal as well as read and write permissions in the user's Workspaces.
 ### Editing a Service Account
Click on the Service Account's table field you would like to make changes to. The changes will be applied automatically.
### Deleting a Service Account
### Editing a Service Account
Click on the Service Account's table field you would like to make changes to. The changes will be applied automatically.
### Deleting a Service Account
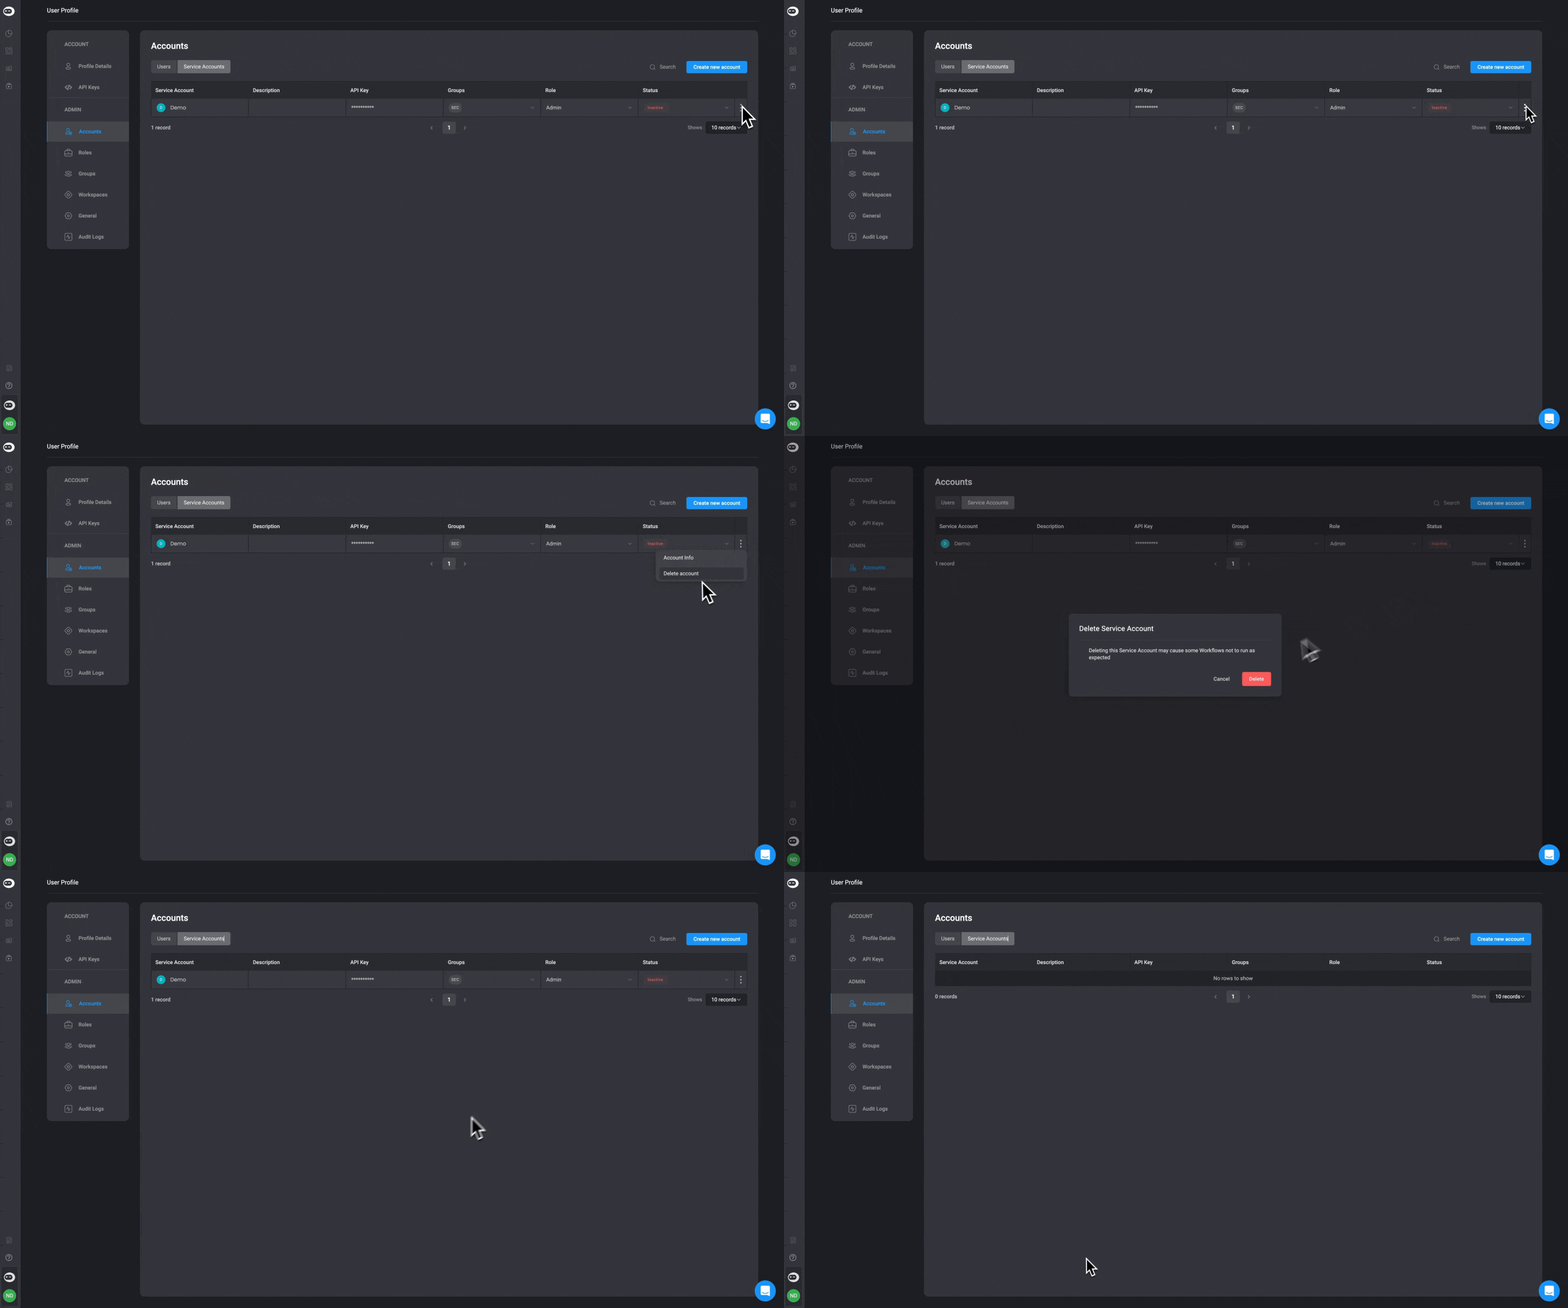
Click on the icon in the last column and click on the delete option and confirm you want to delete the selected service account by clicking the "Delete" button.
 ### Service Account Information
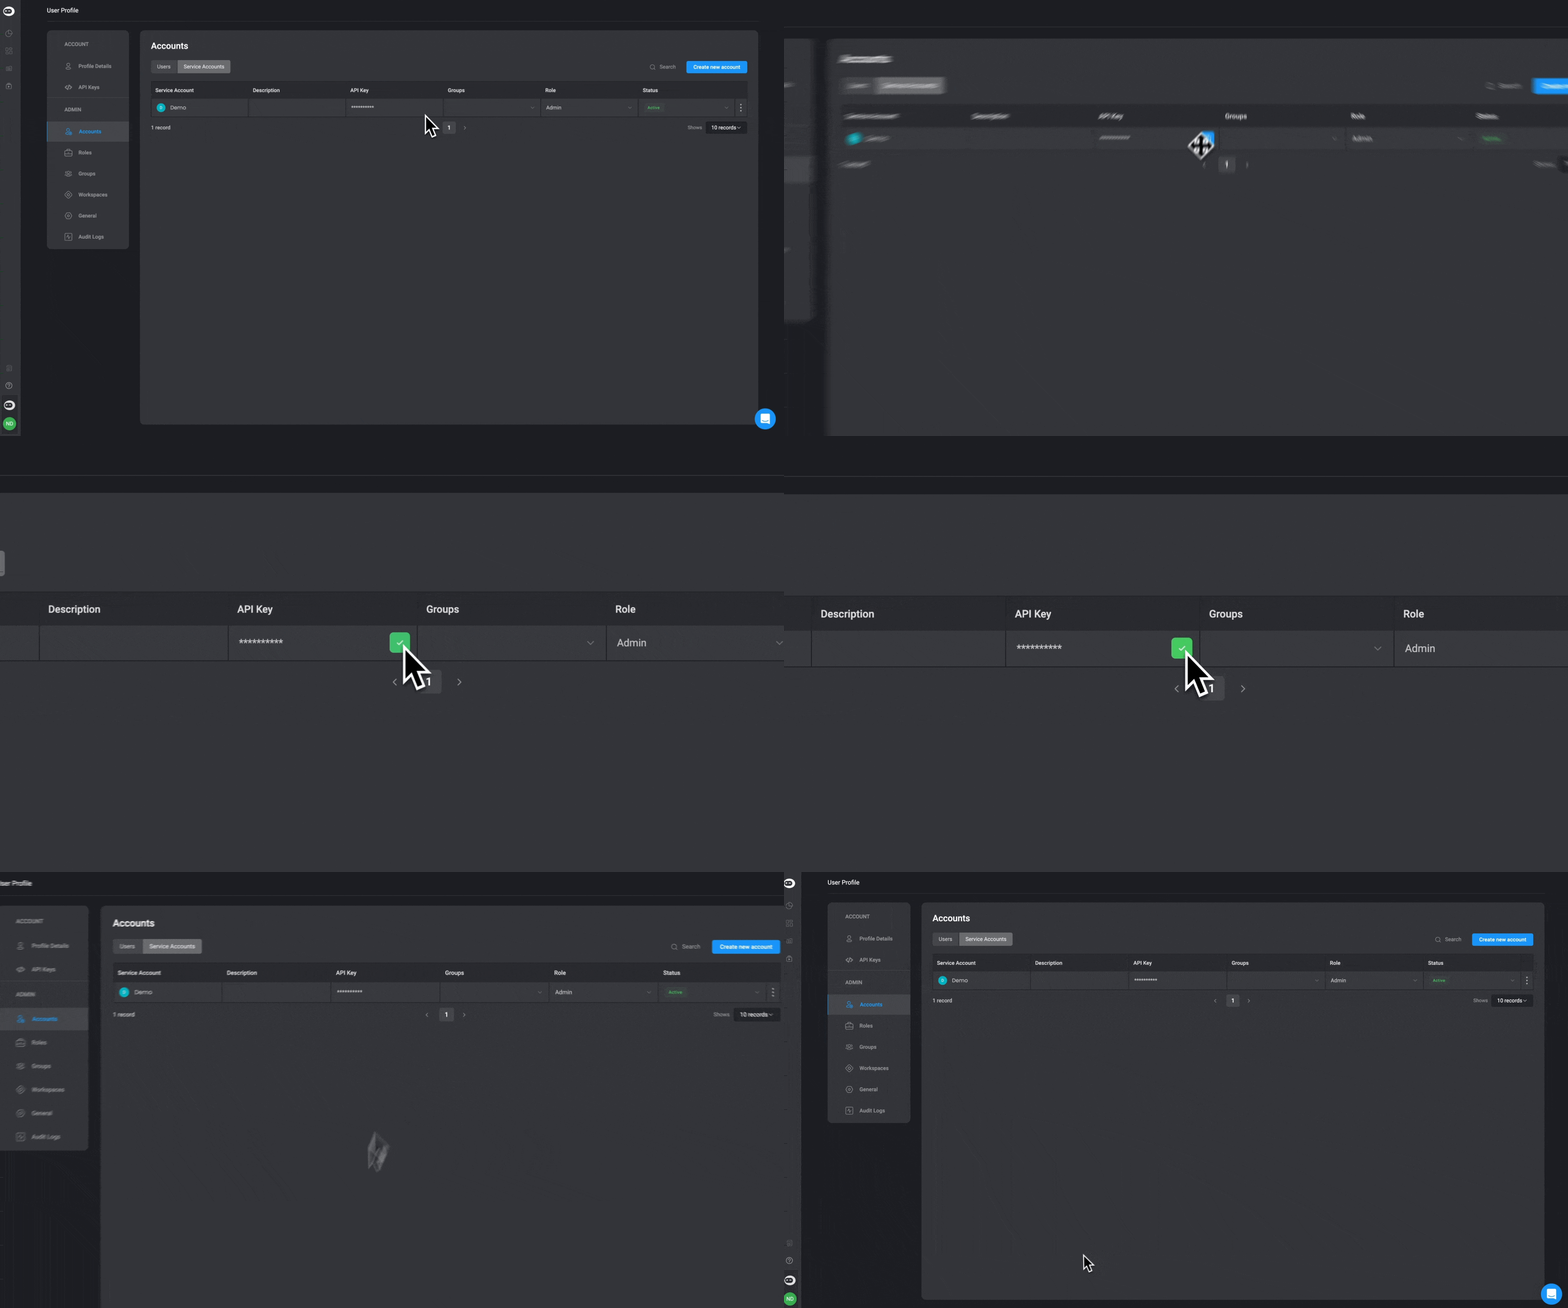
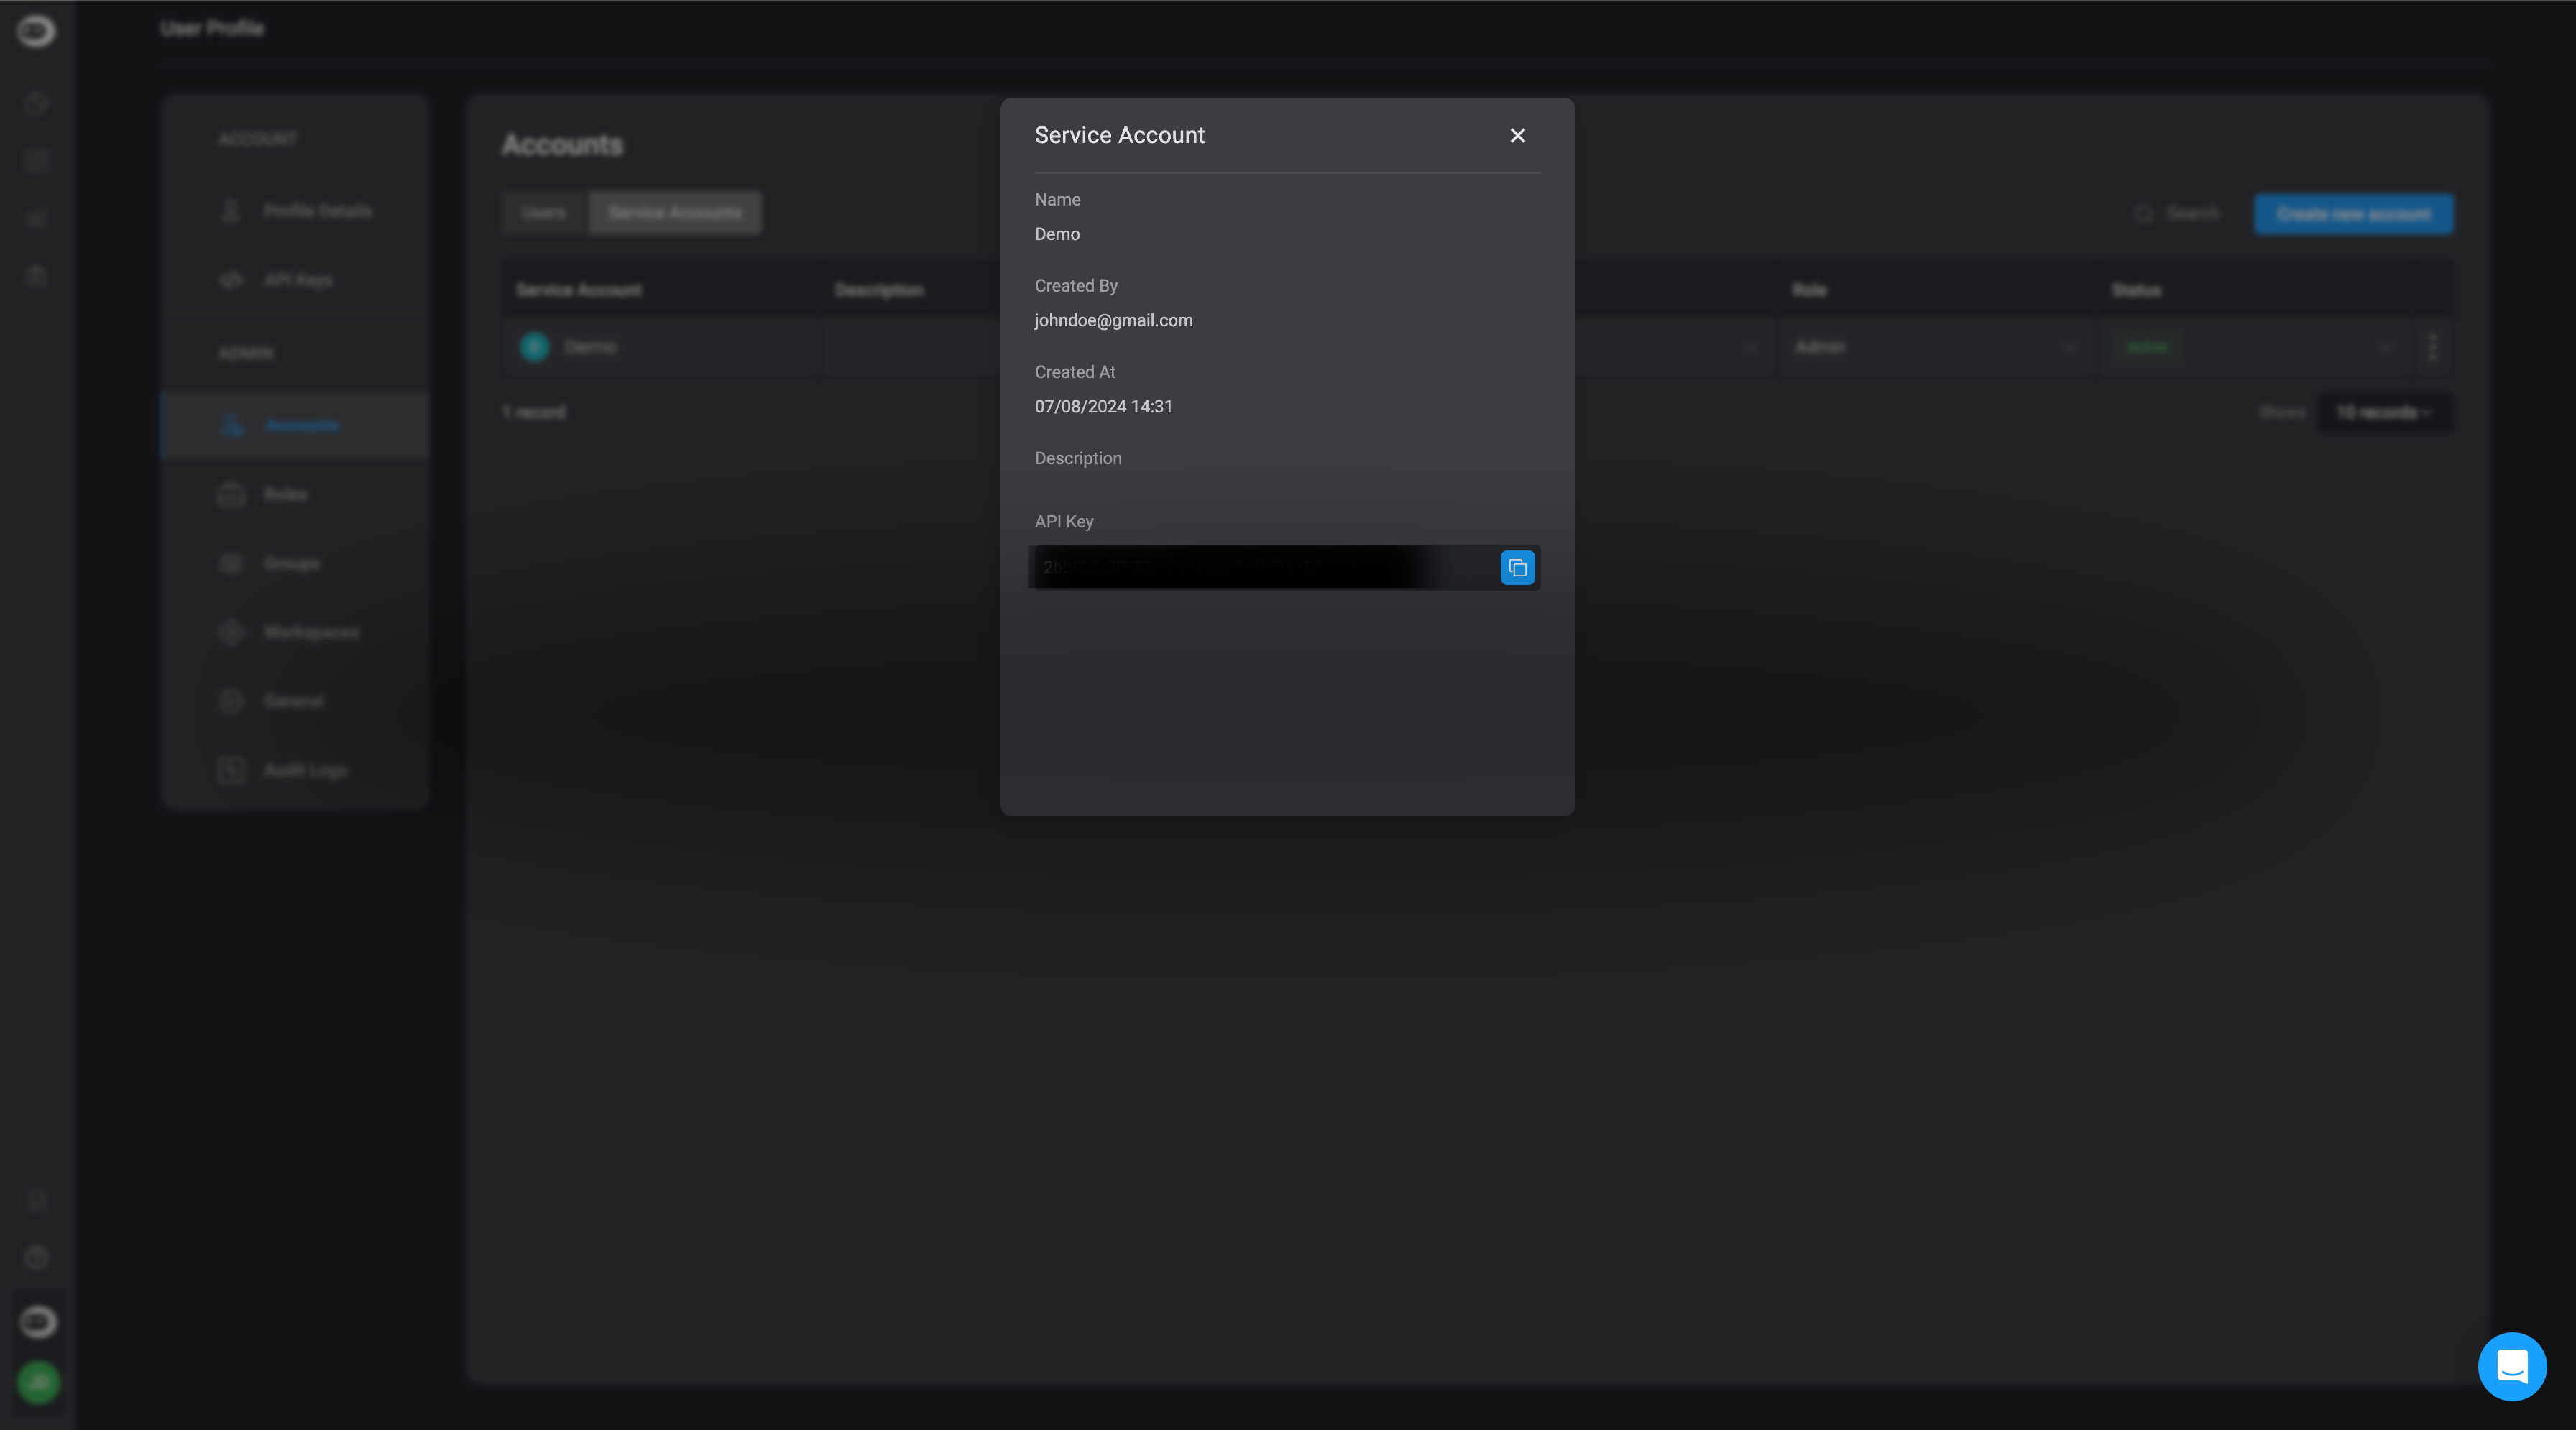
Each service account is created with one API Key. Access the Service Account's API Key by
1.
### Service Account Information
Each service account is created with one API Key. Access the Service Account's API Key by
1. Clicking on the icon in the last column and click on the "Account info" option and to view your service account's information and API key.
 OR
2.
OR
2. Clicking the icon to copy your API Key.